1、博文相关接口:
功能分析:(改:先查后改,删:查)
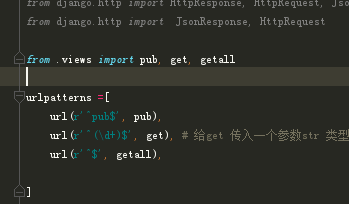
| 功能 | 函数名 | Request方法 | 路径 |
| 发布(增) | pub | POST | /pub |
| 看文章(查) | get | GET | /(d+) |
| 列表(分页) | getall | GET | / |
2、创建博文应用:
$ python manage.py startapp post
注意:一定要把应用post 注册到settings.py 找那个,否则不能迁移
字段类型去这里看:https://www.cnblogs.com/JerryZao/p/10002165.html
模型:(如果中途删了数据库,再迁移,必须把数据库中的django_migrations 里的记录也删除了,才能个创建成功)
 1 from user.models import User
 2 # 两个class上下关系不能调换
 3 class Post(models.Model):
 4     class Meta:
 5         db_table = 'post'
 6     id = models.AutoField(primary_key=True)# 可以自动生成
 7     title = models.CharField(max_length=256, null=False)
 8     postdate = models.DateTimeField(null=False)
 9     # 从post 查作者,从post 查内容
10     author = models.ForeignKey(User) # 指定外键, migrate会生成author_id  字段(外键都会变成_id)
11     #### 不同于sqlalchemy 使用relationship
12     # self.content 可以访问Content实例,其内筒是self.content.content
13
14     def __str__(self):
15         return 'post {} {} {} {}'.format(self.id, self.title, self.author_id, self.content)
16
17 class Content(models.Model):
18     class Meta:
19         db_table = 'content'
20
21     # id 不需要手动写,会自动生成一个id
22     post = models.OneToOneField(Post) # 一对一,这边会有一个外键post_id,引用post.id
23     # post = models.ForeignKey(Post) 上面的也是外键,只不过一对一,要有一起有,没有就没有
24     content =  models.TextField(null=False)
25
26     def __str__(self):
27         return  'Content {}{}{}'.format(self.post.id,self.post 错误的,  self.content[:20])
注意:因为外键因素,导致字段名改变,所以,代码中调用的时候,只能使用改变后的字段名,否则报错
路由:
注册post应用
全局 blog/urls.py
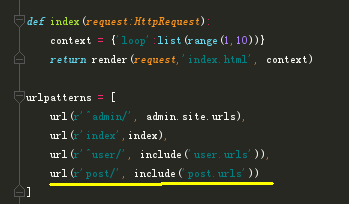
post/urls.py
3、pub接口实现
用户从浏览器端提交Json数据,包含title, content。
提交博文需要认证用户,从请求的header中验证jwt
request:POST --> @authenticate pub ---> return post_id
 1 from  user.views import auth
 2 import simplejson
 3 import datetime
 4 from .models import Post, Content
 5
 6 @auth   #利用user的auth认证
 7 def put(request:HttpRequest):
 8     post = Post()
 9     content = Content()
10     try:
11         payload = simplejson.loads(request.body)
12
13         # post
14         post.title = payload['title']
15         # post.author = User(id=request.user.id)
16         # author = models.ForeignKey(User) #author是一个实例,只需要将实例传给就行, id 内部自己会处理,这里不能使用 request.user.id
17         post.author = request.user # 因为auth中已将将user这个属性注入到request实例中
18         post.postdate = datetime.datetime.now(datetime.timezone(datetime.timedelta(hours=8)))# 加时区
19         post.save()
20
21         # content
22         content.content = payload['content']
23         print(content.content,'====== = = = = ')
24         content.post = post # 跟上面的author是一样的,实例对实例
25         content.save()
26         print(content,'========== content =======')
27
28         return JsonResponse({'post_id':post.id})
29     except Exception as e:
30         print(e)
31         return HttpResponseBadRequest({"a":111111})
4、get接口的实现
根据post_id 查询博文并返回。
不需要认证
如果博文只能作者自己的看,需要认证,我们这里的宫颈癌所有人看,所以不需要认证
request :GET --》 get post by id --> return post + content
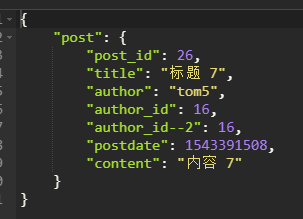
 1 # Django的做法,通过返回直接提供 *args
 2 def get(requset:HttpRequest, id): # post/1  因为不在GET(查询字符串)也不在POST(body中)中
 3     print(id, type(id),'-----------------------') # 1 <class 'str'>
 4     try:
 5         id = int(id)
 6         post = Post.objects.get(pk=id)
 7         print( post,'---  --- --- --- --')
 8         if post:
 9             return JsonResponse({
10                 'post':{
11                     "post_id":post.id,
12                     "title":post.title,
13                     "author":post.author.name,
14                     "author_id":post.author_id,
15                     "author_id--2":post.author.id,
16                     "postdate":post.postdate.timestamp(),
17                     "content":post.content.content 一一对应关系,内部会解决
18                 }
19             })
20     except Exception as e:
21         print(e)
22     return  JsonResponse({})
5、getall接口的实现
发起get请求,例如:通过查询字符串 http://url/post/>page=2 查询第二页数据
 1 # 参数处理
 2 def validate(d:dict, name:str, type_func, default, validat_func):
 3     try:
 4         result = type_func(d.get(name, default))
 5         result = validat_func(result, default)
 6     except:
 7         result = default
 8     return result
 9
10
11 def getall(request:HttpRequest): # post/?page=1&size=2.....
12     # 比较NB 的写法:
13     # 页码:
14     page = validate(request.GET,'page', int, 1, lambda x,y:x if x>0 else 1)
15     # 每页的多少条
16     size = validate(request.GET, 'size', int, 20, lambda x,y:x if x > 0 and x < 101 else y)
17     #注意:这个数据不要轻易让浏览器端改变,如果允许改变,一定要控制范围
18
19     # # 比较low 的写法,如果多个选项,那得多少冗余的代码
20     # try:
21     #     size = int(request.GET.get('size',20))
22     #     size = size if size > 0 and size < 101 else 20
23     # except:
24     #     size = 20
25     try:# 切片实现分页
26         # 按照id  倒排,一般显示最新的,而且id是主键,顺序IO
27         start = (page - 1) * size # 起点,第一页 从0开始,第二页从 1 开始
28         posts = Post.objects.order_by('-id')# - 表示倒序
29         print(posts.query)# 查看查询语句
30         count =  posts.count()
31
32         posts = posts[start:start +size]
33         print(posts.query)
34
35         return JsonResponse({
36             'posts':[
37                 {
38                     'post_id':post.id,
39                     'title':post.title
40                 } for post in posts
41             ],
42             'pagination':{
43                 'page':page,
44                 'size':size,
45                 'count':count,
46                 'pages':math.ceil(count / size) # 多少页
47             }
48         })
49
50     except Exception as e:
51         print(e)
52         return  HttpResponseBadRequest({})
Django不能设 GET等方法到url的映射,所以只能通过不同的路径来区分