-
在spring中使用注解,我们必须在applicationContext.xml中添加一个标签
-
<context:annotation-config />的作用是让spring中的注解生效

-
<beans xmlns="http://www.springframework.org/schema/beans"
       xmlns:xsi="http://www.w3.org/2001/XMLSchema-instance"
       xmlns:context="http://www.springframework.org/schema/context"
       xsi:schemaLocation="http://www.springframework.org/schema/beans
http://www.springframework.org/schema/beans/spring-beans.xsd
http://www.springframework.org/schema/context http://www.springframework.org/schema/context/spring-context.xsd">
</beans>
-
这时我们在项目中就可以使用注解了
-
但是我们回想之前使用<bean>标签去获取实例对象的过程,spring会先读取applicationContext.xml文件,然后根据里面的<bean>标签指定的类路径,去加载该类的实例。可以想出来,spring是需要知道要扫描的类路径,才知道去哪加载。
-
使用注解是一样的,spring在读取配置文件,我们要在applicationContext.xml文件中加一个context标签,告诉spring去要去扫描的包,这样spring在加载配置文件的时候,就会把这些包中带有注解的都初始化。
-
<!--<context:annotation-config />-->
    <!-- 下面的配置作用是指定spring扫描的包,它包含了context:annotation-config的功能,所以在开发中一般就不需要在配置上面的 -->
    <context:component-scan base-package="com.zhurouwangzi" />
    <!--如果想扫描多个包可以这样-->
    <!--<context:component-scan base-package="com.zhurouwangzi.controller com.zhurouwangzi.entity" />-->
二、在类中添加注解
-
package com.zhurouwangzi.entity; import org.springframework.stereotype.Component; @Component("person")//等价于<bean id="person" class="com.zhurouwangzi.entity.Person"></bean> public class Person { //构造函数 public Person(){ System.out.println("Person被初始化了..."); } public Person(int age,String name){ this.age = age; this.name=name; } public void sayHello(){ System.out.println("Hello....."+"年龄:"+age+" 名字:"+name ); } private int age; private String name; public int getAge() { return age; } public void setAge(int age) { this.age = age; } public String getName() { return name; } public void setName(String name) { this.name = name; } }
-
运行得到同样的效果

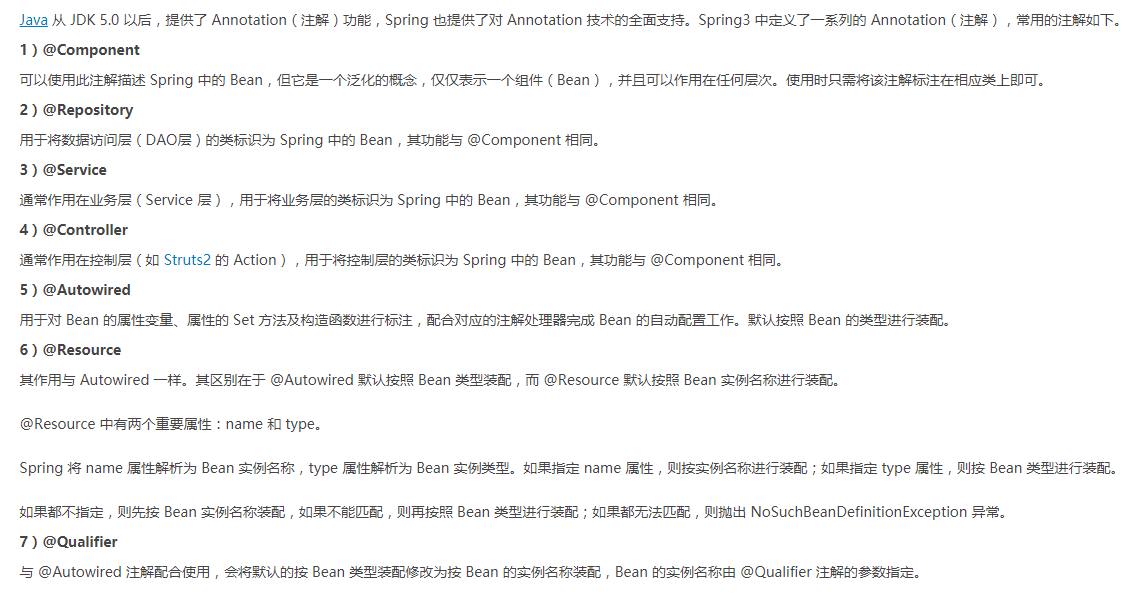
三、Spring中的注解
三、属性的依赖注入
-
简单的属性注入

-
运行得到同样的效果
-
-
注意这个时候我们将属性依赖注入,就不需要在提供set方法了
-
复杂的属性注入
-
添加一个Dog类
-
package com.zhurouwangzi.entity; @Component("dog") public class Dog { public Dog(){ System.out.println("我是一只dog,我被初始化了..."); } public void han(){ System.out.println("大家都听我说,我们都是dog"); } }
-
在Person中添加Dog属性,然后添加注解
-
//@Autowired//spring会根据该注解字段的类型去查找,但是需要Qualifier配合使用 //@Qualifier("dog")//Qualifier指定名字 //private Dog dog; @Resource(name = "dog")//这种形式与上边是等价的,简单,一般会用这种 private Dog dog; public Dog getDog() { return dog; }
-

