Vuls 漏洞扫描工具部署及效果展示
介绍
Vuls根据NVD,OVAL等数据对主流Linux系统进行扫描,并具有完善的报告。
-
支持系统
Distribution Release Alpine 3.3 and later Ubuntu 14, 16, 18, 20 Debian 8, 9, 10 RHEL 5, 6, 7, 8 Oracle Linux 5, 6, 7 CentOS 6, 7, 8 Amazon Linux All FreeBSD 10, 11 SUSE Enterprise 11, 12 Raspbian Jessie, Stretch, Buster -
支持的数据库
Vulnerability Database:
- NVD
- JVN(Japanese)
OVAL
- Red Hat
- Debian
- Ubuntu
- SUSE
- Oracle Linux
Security Advisory
- Alpine-secdb
- Red Hat Security Advisories
- Debian Security Bug Tracker
Commands(yum, zypper, pkg-audit)
- RHSA / ALAS / ELSA / FreeBSD-SA
- Changelog
PoC, Exploit
- Exploit Database
- Metasploit-Framework modules
CERT
- US-CERT
- JPCERT
Libraries
- Node.js Security Working Group
- Ruby Advisory Database
- Safety DB(Python)
- PHP Security Advisories Database
- RustSec Advisory Database
WordPress
- WPScan
更多详情: 官网介绍
参考链接
安装步骤
-
测试机器:CentOS
-
环境要求 Vuls requires the following packages.
- SQLite3, MySQL, PostgreSQL, Redis
- git
- gccGNU Make
- Go 必须安装最新版Go,不然会有各种报错
-
一. 环境部署:
-
1.工具安装
$ sudo yum -y install sqlite git gcc make wget -
2.Go 安装
$ wget https://dl.google.com/go/go$latest_version.linux-amd64.tar.gz $ sudo tar -C /usr/local -xzf go$latest_version.linux-amd64.tar.gz $ mkdir $HOME/go -
3.配置Go环境变量
$ vi /etc/profile.d/goenv.sh -
4.在这个文件中添加以下环境变量
export GOROOT=/usr/local/go export GOPATH=$HOME/go export PATH=$PATH:$GOROOT/bin:$GOPATH/bin -
5.设置环境变量到系统中
$ source /etc/profile.d/goenv.sh -
6.检测 go是否安装成功
$ go version
-
-
二. CVE库部署
-
1.从github下载部署工具并安装
$ sudo mkdir /var/log/vuls $ sudo chown <username> /var/log/vuls $ sudo chmod 700 /var/log/vuls $ mkdir -p $GOPATH/src/github.com/kotakanbe $ cd $GOPATH/src/github.com/kotakanbe $ git clone https://github.com/kotakanbe/go-cve-dictionary.git $ cd go-cve-dictionary $ make install -
2.获取cve漏洞数据 大概需要一小时 1.6G 下载成功后可以看到sqlite数据库 如果想缩短时间可以只获取最近几年的数据
$ for i in `seq 2002 $(date +"%Y")`; do go-cve-dictionary fetchnvd -years $i; done[root@izbp1268h8zj95audt9fdez go-cve-dictionary]# ls -alh cve.sqlite3 -rw-r--r-- 1 root root 1.6G Mar 1 19:04 cve.sqlite3 -
踩坑
-
make install 失败1:可以使用--debug查看更多信息
-
Permission denied 错误是文件权限不够,没有可执行权限,提权即可
[root@izbp1268h8zj95audt9fdez go-cve-dictionary]# make install GO111MODULE=on go install -ldflags "-X 'main.version=v0.5.8' -X 'main.revision=1aa7ea7'" /bin/sh: /usr/local/go/bin/go: Permission denied make: *** [install] Error 126 [root@izbp1268h8zj95audt9fdez go-cve-dictionary]# make install --debug GNU Make 3.82 Built for x86_64-redhat-linux-gnu Copyright (C) 2010 Free Software Foundation, Inc. License GPLv3+: GNU GPL version 3 or later <http://gnu.org/licenses/gpl.html> This is free software: you are free to change and redistribute it. There is NO WARRANTY, to the extent permitted by law. Reading makefiles... Updating goal targets.... File `install' does not exist. Must remake target `install'. Invoking recipe from GNUmakefile:31 to update target `install'. GO111MODULE=on go install -ldflags "-X 'main.version=v0.5.8' -X 'main.revision=1aa7ea7'" /bin/sh: /usr/local/go/bin/go: Permission denied -
make install 失败2: go 包安装失败 这是因为下载网址被墙了,需要设置代理
[root@izbp1268h8zj95audt9fdez go-cve-dictionary]# make install GO111MODULE=on go install -ldflags "-X 'main.version=v0.5.8' -X 'main.revision=1aa7ea7'" go: github.com/PuerkitoBio/goquery@v1.6.1: Get "https://proxy.golang.org/github.com/%21puerkito%21bio/goquery/@v/v1.6.1.mod": dial tcp 172.217.160.113:443: i/o timeout make: *** [install] Error 1 -
如果需要设置代理 解决方法如下
$ go env -w GOPROXY=https://goproxy.cn
-
-
-
三.部署goval-dictionary
-
1.从github下载工具并安装
$ mkdir -p $GOPATH/src/github.com/kotakanbe $ cd $GOPATH/src/github.com/kotakanbe $ git clone https://github.com/kotakanbe/go-cve-dictionary.git $ cd go-cve-dictionary $ make install -
2.收集系统信息 (不同的系统命令不同 详情参阅: goval fetch用法)
$ goval-dictionary fetch-redhat 7 -
踩坑
-
make install失败3:还是包下载问题
[root@izbp1268h8zj95audt9fdez goval-dictionary]# make install GO111MODULE=off go get -u golang.org/x/lint/golint package golang.org/x/lint/golint: unrecognized import path "golang.org/x/lint/golint": https fetch: Get "https://golang.org/x/lint/golint?go-get=1": dial tcp 216.239.37.1:443: i/o timeout make: *** [lint] Error 1 -
一开始我以为还是代理的问题,设置来设置去还是不能解决,
go env命令可以查看go的环境变量,我发现GO111MODULE已经设置为on,但是执行make install的时候,还是off,GO111MODULE涉及到包安装的方式。我分析了安装脚本之后发现脚本内GO111MODULE设置了off,于是修改了脚本。[root@izbp1268h8zj95audt9fdez goval-dictionary]# cat GNUmakefile .PHONY: build install all vendor lint vet fmt fmtcheck pretest test cov clean SRCS = $(shell git ls-files '*.go') PKGS = ./commands ./config ./db ./db/rdb ./fetcher ./models ./util VERSION := $(shell git describe --tags --abbrev=0) REVISION := $(shell git rev-parse --short HEAD) LDFLAGS := -X 'main.version=$(VERSION)' -X 'main.revision=$(REVISION)' GO := GO111MODULE=on go GO_OFF := GO111MODULE=off go all: build build: main.go pretest $(GO) build -a -ldflags "$(LDFLAGS)" -o goval-dictionary $< b: main.go pretest $(GO) build -ldflags "$(LDFLAGS)" -o goval-dictionary $< install: main.go pretest $(GO) install -ldflags "$(LDFLAGS)" lint: $(GO_OFF) get -u golang.org/x/lint/golint // 把lint方法中的GO_OFF改为GO golint $(PKGS) vet: echo $(PKGS) | xargs env $(GO) vet || exit; ... ... ... ```
-
-
踩坑
-
make install失败4: sum.go missing 问题
[root@izbp1268h8zj95audt9fdez goval-dictionary]# make install GO111MODULE=on go get -u golang.org/x/lint/golint golint ./commands ./config ./db ./db/rdb ./fetcher ./models ./util echo ./commands ./config ./db ./db/rdb ./fetcher ./models ./util | xargs env GO111MODULE=on go vet || exit; /root/go/pkg/mod/github.com/mattn/go-isatty@v0.0.12/isatty_tcgets.go:6:8: missing go.sum entry for module providing package golang.org/x/sys/unix (imported by github.com/mattn/go-isatty); to add: go get github.com/mattn/go-isatty@v0.0.12 make: *** [vet] Error 123 -
go.sum 是一个校验包的文件,多次尝试,找到了一个解决方法
go get``` [root@izbp1268h8zj95audt9fdez goval-dictionary]# go get go: downloading golang.org/x/sys v0.0.0-20210119212857-b64e53b001e4 go: downloading github.com/dgrijalva/jwt-go v1.0.2 go: downloading github.com/k0kubun/pp v1.3.0 ```
-
-
-
四. 部署Vuls
-
下载安装工具
$ mkdir -p $GOPATH/src/github.com/future-architect $ cd $GOPATH/src/github.com/future-architect $ git clone https://github.com/future-architect/vuls.git $ cd vuls $ make install -
踩坑
-
git 问题1: error: RPC failed; 这个问题出现了多次,可能是git需要下载的包太大,可能是防火墙或者代理等网络情况
[root@izbp1268h8zj95audt9fdez future-architect]# git clone https://github.com/future-architect/vuls.git Cloning into 'vuls'... remote: Enumerating objects: 7448, done. error: RPC failed; result=18, HTTP code = 200 | 20.00 KiB/s fatal: The remote end hung up unexpectedly fatal: early EOF fatal: index-pack failed -
下面是我总结的解决方法 请逐一尝试
-
更新git
-
检查网络,浏览器访问仓库
-
https:// 替换为 git://
-
增加缓冲区大小
git config --global http.postBuffer 524288000 -
只拉去仓库浅层目录,然后再拉取完整仓库
$ git clone http://github.com/large-repository --depth 1
$ cd large-repository
$ git fetch --unshallow
-
网络问题比较复杂,如果以上都不能起效,最后还可以手动下载复制git仓库
-
举例
```
$ mkdir -p $GOPATH/src/golang.org/x
$ git clone https://github.com/golang/lint.git $GOPATH/src/golang.org/x/lint
$ go get -u golang.org/x/lint/golint
```
-
-
但是我的情况还是有错 如下,最终修改Makefile文件 设置GO111MODULE=on 和上面提的一样
  ```
  [root@izbp1268h8zj95audt9fdez vuls]# make install
  GO111MODULE=off go get -u golang.org/x/lint/golint
  package golang.org/x/tools/go/ast/astutil: unrecognized import path "golang.org/x/tools/go/ast/astutil": https fetch: Get "https://golang.org/x/tools/go/ast/astutil?go-get=1": dial tcp 216.239.37.1:443: i/o timeout
  ```
-
-
五.开始扫描和报告
-
本地模式
-
1.添加配置文件 .toml 文件内容如下
$ cd $HOME $ touch config.toml $ cat config.toml [servers] [servers.localhost] host = "localhost" port = "local" -
2.配置文件检验
$ vuls configtest -
踩坑
- 配置文件读取失败
[root@izbp1268h8zj95audt9fdez ~]# vuls configtest [Mar 2 16:03:43] INFO [localhost] vuls-v0.15.9-build-20210302_155557_1d0c5de [Mar 2 16:03:43] INFO [localhost] Validating config... [Mar 2 16:03:43] INFO [localhost] Detecting Server/Container OS... [Mar 2 16:03:43] INFO [localhost] Detecting OS of servers... [Mar 2 16:03:43] ERROR [localhost] Failed to configtest: Failed to init servers. err: github.com/future-architect/vuls/scanner.Scanner.Configtest /root/go/src/github.com/future-architect/vuls/scanner/serverapi.go:107 - No scannable host OS: github.com/future-architect/vuls/scanner.Scanner.initServers /root/go/src/github.com/future-architect/vuls/scanner/serverapi.go:235 - 已联系作者修改,更新至 ee38a87 提交以后 然后重新执行第四步的make install 重新安装
- 配置文件读取失败
-
3.开始扫描
$ vuls scan ... ... ... Scan Summary ================ localhost centos7.7.1908 540 installed, 218 updatable // 正确扫描结果 -
踩坑
-
err: Failed to scan updatable packages
[root@izbp1268h8zj95audt9fdez ~]# vuls scan [Mar 3 11:59:53] INFO [localhost] vuls-v0.15.9-build-20210303_115852_1ec31d7 [Mar 3 11:59:53] INFO [localhost] Start scanning [Mar 3 11:59:53] INFO [localhost] config: /root/config.toml [Mar 3 11:59:53] INFO [localhost] Validating config... [Mar 3 11:59:53] INFO [localhost] Detecting Server/Container OS... [Mar 3 11:59:53] INFO [localhost] Detecting OS of servers... [Mar 3 11:59:53] INFO [localhost] (1/1) Detected: localhost: centos 7.7.1908 [Mar 3 11:59:53] INFO [localhost] Detecting OS of containers... [Mar 3 11:59:53] INFO [localhost] Checking Scan Modes... [Mar 3 11:59:53] INFO [localhost] Detecting Platforms... [Mar 3 11:59:55] INFO [localhost] (1/1) localhost is running on other [Mar 3 11:59:55] INFO [localhost] Detecting IPS identifiers... [Mar 3 11:59:55] INFO [localhost] (1/1) localhost has 0 IPS integration [Mar 3 11:59:55] INFO [localhost] Scanning OS pkg in fast mode [Mar 3 12:00:05] WARN [localhost] err: Failed to scan updatable packages: github.com/future-architect/vuls/scanner.(*redhatBase).scanPackages /root/go/src/github.com/future-architect/vuls/scanner/redhatbase.go:231 - Failed to SSH: execResult: servername: cmd: repoquery --all --pkgnarrow=updates --qf='%{NAME} %{EPOCH} %{VERSION} %{RELEASE} %{REPO}' exitstatus: 127 stdout: stderr: /bin/sh: repoquery: command not found err: exit status 127: github.com/future-architect/vuls/scanner.(*redhatBase).scanUpdatablePackages /root/go/src/github.com/future-architect/vuls/scanner/redhatbase.go:378 -
解决办法
$ yum -y install yum-utils
-
-
4.报告
-
报告位置
/root/results/ -
View one-line summary
$ vuls report -format-one-line-text -
View short summary
$ vuls report -format-list -
View full report.
$ vuls report -format-full-text | less
-
-
5.进阶报告查看
-
终端展示
$ vuls tui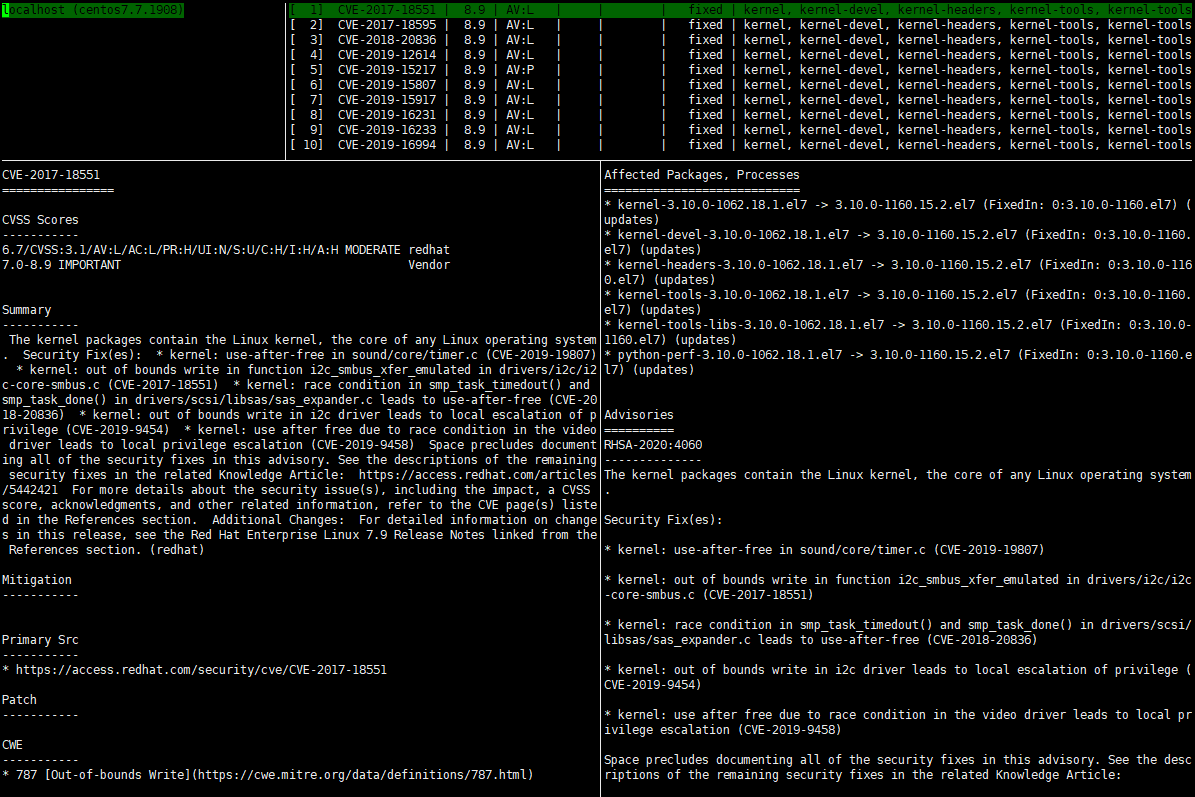
-
web UI 展示
- 获得扫描数据
// 需要现有扫描数据 - 存放目录 /root/results $ vuls scan $ vuls report -format-json - 安装WEB部署工具
$ cd $HOME $ git clone https://github.com/ishiDACo/vulsrepo.git $ cd $HOME/vulsrepo/server $ cp vulsrepo-config.toml.sample vulsrepo-config.toml // 复制sample配置文件 $ vi vulsrepo-config.toml // 根据自己的环境配置 [Server] rootPath = "/home/vuls-user/vulsrepo" resultsPath = "/opt/vuls/results" serverPort = "5111" - 运行
$ pwd
$HOME/vulsrepo/server

$ ./vulsrepo-server
-
-
-
WEB Demo :https://monocosel.jp/vulsrepo/