1. 安装
a. 查看可以安装的版本号
yum list |grep haproxy

b. 在线安装
yum -y install haproxy.x86_64
安装base版本

2. 配置
a. 修改默认用户名
chown -R haproxy:haproxy /etc/haproxy/

b. 更改配置,下面图中注释需要打开
vim /etc/rsyslog.conf

同样在/etc/rsyslog.conf中,需要改日志文件名,同时前面的名字需要改成和另一个配置/etc/haproxy/haproxy.cfg对应
 这个配置在/etc/haproxy/haproxy.cf中

c. 重启日志服务
systemctl restart rsyslog.service

d. 编辑conf配置文件
vim /etc/haproxy/haproxy.cfg
日志修改有三个部分
default
这里进行了两处改动,将加粗部分http改为了tcp
defaults
    mode                    tcp
    log                     global
    option                  tcplog
    option                  dontlognull
    option http-server-close
    option forwardfor       except 127.0.0.0/8
    option                  redispatch
    retries                 3
    timeout http-request    10s
    timeout queue           1m
    timeout connect         10s
    timeout client          1m
    timeout server          1m
    timeout http-keep-alive 10s
    timeout check           10s
    maxconn                 3000
frotend
0.0.0.0表示任意ip都能访问
frontend  mycat
bind 0.0.0.0:8066
bind 0.0.0.0:9066
mode tcp
log global
default_backend mycat_server
backend
这里指定mycat的端口,8066数据访问端口,9066管理端口
listen 监听状态
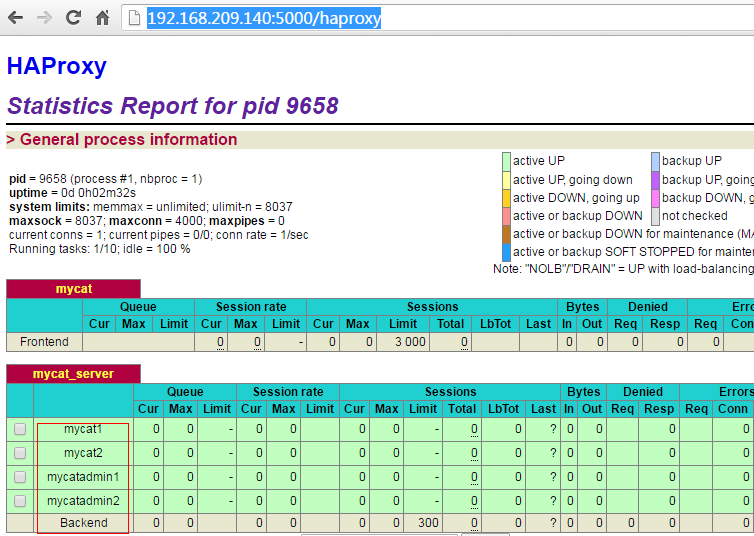
backend mycat_server
balance roundrobin
server mycat1 192.168.209.141:8066 check inter 5s rise 2 fall 3
server mycat2 192.168.209.142:8066 check inter 5s rise 2 fall 3
server mycatadmin1 192.168.209.141:9066 check inter 5s rise 2 fall 3
server mycatadmin2 192.168.209.142:9066 check inter 5s rise 2 fall 3

listen stats
mode http
bind 0.0.0.0:5000
stats enable
stats hide-version
stats uri /haproxy
stats realm Haproxy Statistics
stats auth admin:admin
stats admin if TRUE
3. 测试
a. 需要加一个命令,设置SELinux 成为permissive模式 临时关闭selinux的
setenforce 0

b. 启动日志服务
systemctl restart rsyslog.service

c. 启动haproxy服务,running表示启动成功
systemctl start haproxy.service
systemctl status haproxy.service

d. 浏览器网路地址进行访问,之后还要输入账号密码:admin  admin

http://192.168.209.140:5000/haproxy