一、实验要求
- 找一个系统调用,系统调用号为学号最后2位相同的系统调用
- 通过汇编指令触发该系统调用
- 通过gdb跟踪该系统调用的内核处理过程
- 重点阅读分析系统调用入口的保存现场、恢复现场和系统调用返回,以及重点关注系统调用过程中内核堆栈状态的变化
安装环境
sudo apt install build-essential
sudo apt install qemu # install QEMU
sudo apt install libncurses5-dev bison flex libssl-dev libelf-dev
sudo apt install axel
下载及配置Linux内核
axel -n 20 https://mirrors.edge.kernel.org/pub/linux/kernel/v5.x/linux-5.4.34.tar.xz
xz -d linux-5.4.34.tar.xz
tar -xvf linux-5.4.34.tar cd linux-5.4.34
make defconfig #Default configuration is based on 'x86_64_defconfig'
make menuconfig
#打开debug相关选项
Kernel hacking --->
    Compile-time checks and compiler options --->
        [*] Compile the kernel with debug info
        [*] Provide GDB scripts for kernel debugging [*] Kernel debugging
#关闭KASLR,否则会导致打断点失败
Processor type and features ---->
    [] Randomize the address of the kernel image (KASLR)
编译内核
1 make -j$(nproc)
2 # 测试一下内核能不能正常加载运行,因为没有文件系统最终会kernel panic
3 qemu-system-x86_64 -kernel arch/x86/boot/bzImage
制作根文件系统
axel -n 20 https://busybox.net/downloads/busybox-1.31.1.tar.bz2
tar -jxvf busybox-1.31.1.tar.bz2
cd busybox-1.31.1
make menuconfig
记得要编译成静态链接,不用动态链接库。
Settings --->
    [*] Build static binary (no shared libs)
然后编译安装,默认会安装到源码目录下的 _install 目录中。
make -j$(nproc) && make install
制作内存根文件系统镜像
1 mkdir rootfs
2 cd rootfs
3 cp ../busybox-1.31.1/_install/* ./ -rf
4 mkdir dev proc sys home
5 sudo cp -a /dev/{null,console,tty,tty1,tty2,tty3,tty4} dev/
准备init脚本文件放在根文件系统跟目录下(rootfs/init),添加如下内容到init文件。
1 #!/bin/sh
2 mount -t proc none /proc mount -t sysfs none /sys
3 echo "Wellcome MengningOS!" echo "--------------------"
4 cd home
5 /bin/sh
6 chmod +x init
7 find . -print0 | cpio --null -ov --format=newc | gzip -9 > ../rootfs.cpio.gz
8 qemu-system-x86_64 -kernel linux-5.4.34/arch/x86/boot/bzImage -initrd rootfs.cpio.gz
本人学号最后两位为67,为shmdt 拆卸共享内存命令,这个命令我查询了很多,都没有找到怎么进行系统调用,于是我选择了前面的一个命令,即66号命令,在指定的信号集或信号集内的某个信号上执行控制操作。
编写调用代码
asm volatile(
    "movq %1, %%rdi
	"  // 将第一个参数放入 rdi 寄存器
    "movq %2, %%ecx
	"  // 将第二个参数放入 ecx 寄存器
      "movq %3, %%ebx
	"  // 将第三个参数放入 ebx 寄存器
      "movq %4, %%rsi
	"  // 将第四个参数放入 rsi 寄存器
    "movl $0x42, %eax
	" //传递系统调用号
    "syscall
	" //系统调用
    "movq %%rax, %0
	" // 将函数处理结果返回给 res 变量中
    :"=m"(res)
    :"a"(&x), "b"(&y),"c"(&z),"d"(&k)
  );
之后便是编译并重新制作根目录
gdb调试
#启动qemu
qemu-system-x86_64 -kernel linux-5.4.34/arch/x86/boot/bzImage -initrd rootfs.cpio.gz -S -s -nographic -append "console=ttyS0"
#启动gdb
cd linux-5.4.34
# 启动
gdb vmlinux
target remote:1234
# 在semctl调用处打断点
b __x64_sys_semctl

gdb单步调试
分析与总结
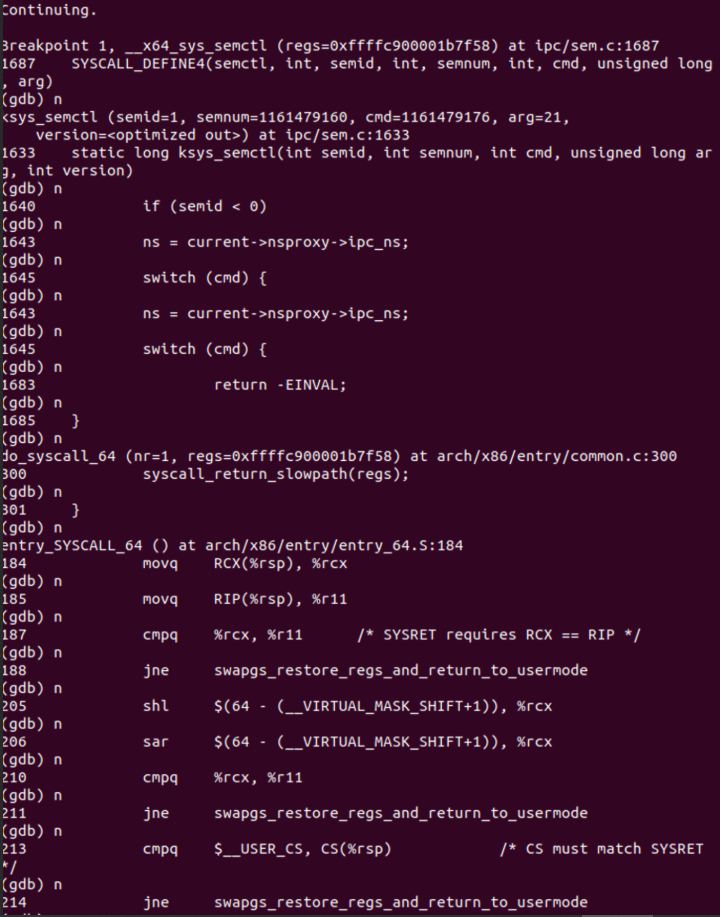
分析可见断点定位在ipc/sem.c:1687,查看
SYSCALL_DEFINE4(semctl, int, semid, int, semnum, int, cmd, unsigned long, arg)
{
    return ksys_semctl(semid, semnum, cmd, arg, IPC_64);
}
系统调⽤的执⾏,也就是⽤户程序触发系统调⽤之后,CPU及内核执⾏系统调⽤ 的过程
int $0x80是CPU压栈⼀些关键寄存器,接着内核负责保存现场,系统调⽤内核 函数处理完后恢复现场,最后通过iret出栈哪些CPU压栈的关键寄存器。
sysenter和syscall都借助CPU内部的MSR寄存器来查找系统调⽤处理⼊⼝,可 以快速切换CPU的指令指针(eip/rip)到系统调⽤处理⼊⼝,但本质上还是中 断处理的思路,压栈关键寄存器、保存现场、恢复现场,最后系统调⽤返回。
x86-64引⼊了swapgs指令,类似快照的⽅式将保存现场和恢复现场时的CPU寄 存器也通过CPU内部的存储器快速保存和恢复,近⼀步加快了系统调⽤。