上一章分析了Live场景中各个元素的作用,这一章开始来分析最关键的部分——打击物件的实现。
上一章放出的视频很模糊,先来看一个清晰版的复习一下:http://www.bilibili.com/video/av1087466/
然后说一下我使用的环境:Win8.1 + VS2013 + Cocos2d-x3.2
接下来为后文作点准备工作:
1、 创建一个空的cocos2d-x项目;
2、 把HelloWorldScene类和它的两个源码文件改名。我使用的名称是LiveScene;
3、 删掉LiveScene类中多余的代码,比如添加一个“Hello World”的Label这种的(说实话cocos2d-x创建空项目每次都要带个这个类挺蛋疼,因为99.99999%的情况我们的项目中根本不需要它,直接创建一个干净的空项目多好);
4、 删掉Resource文件夹中的所有文件;
5、 在AppDelegate类中修改设计分辨率为960×640,像下面这样:
bool AppDelegate::applicationDidFinishLaunching() {
    // ...
    if(!glview) {
        glview = GLView::create("My Game");
        glview->setFrameSize(960, 640);
        director->setOpenGLView(glview);
        glview->setDesignResolutionSize(960, 640, ResolutionPolicy::SHOW_ALL);
    }
	// ...
}
准备工作做完后,可以先编译运行一下。如果跑起来一片黑,那么就OK可以继续了。
准备工作完成,开始分析打击物件。从视频看,打击物件有个3D透视效果:近大远小。Cocos2d-x 3.x的版本已经支持3D模型,可以制作3D游戏了。但是对于这个比较简单的效果,直接上3D有点大炮打蚊子的感觉。可以运用3D透视公式,根据物件的Z轴距离计算出在屏幕上的X和Y坐标以及缩放。
等等,仔细看看那个视频,感觉物件飞过来的过程,和真正的3D比还是有点违和啊……于是,LL(《Love Live!学院偶像祭》,以后都简称LL)中真的是用的3D吗?
此时需要检测一下了。先说一下我的思路:对于下图所示的三个三连打物件,他们的时间间隔是一样的。如果使用了3D透视,那么后两个的屏幕坐标间距一定小于前两个,近大远小嘛。

还是不大能理解?来看看这么一张图(图片源自网络):

不要吐槽远景那些莫名其妙的东西……我们来看铁轨,是不是从画面上看,越远处的枕木越密集?但是实际上枕木和枕木之间的间距是一样的。这个现象用计算机图形学的术语讲,其实就是世界坐标系到摄像机坐标系的变换形成的。因为屏幕上没有Z轴,只有X和Y,物体的Z轴变化只能通过移动位置和缩放来表现。
扯远了,用这一点来验证LL是否使用了3D透视,就是因为物件飞过来的时候,它们的Z轴速度肯定是一定的(从一个音乐游戏来讲,如果是变速运动这游戏基本上没法玩了),而三个物件的时间间隔相同,那么经过坐标变换必然形成后两个的屏幕坐标间距一定小于前两个。
那么打开神奇PS,将三个圆的中心标出来,连上线。不会PS没关系,我把图做好了。背景有点花?盖个黑色图层:
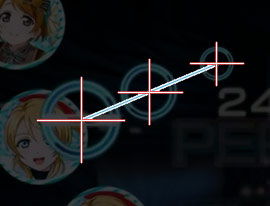
能明显看出,三个圆之间的屏幕距离是相等的。于是乎,这个效果根本没有使用3D透视变换。也就是说,物件在飞向屏幕的过程中,在屏幕上移动的速度也是不变的。
于是事情变得简单了,不需要去计算透视变换了。对于单个的一列,物件飞过来就是X轴不变,Y轴匀速运动。再从飞出来的点拉两条射线出来:
艾玛,缩放也是匀变化的,取值就是一个f(x) = kx + b的一元线性方程嘛。接下来我们来求这个方程的参数k和b。
为了方便测量,以最中间的按钮为准。从视频看这个游戏的长宽比是3:2的,所以文章开始说的的设计分辨率要取960×640。测量值写在图片上了(怎么测量属于PS的应用,与这一系列文章无关,这里就不做介绍了):
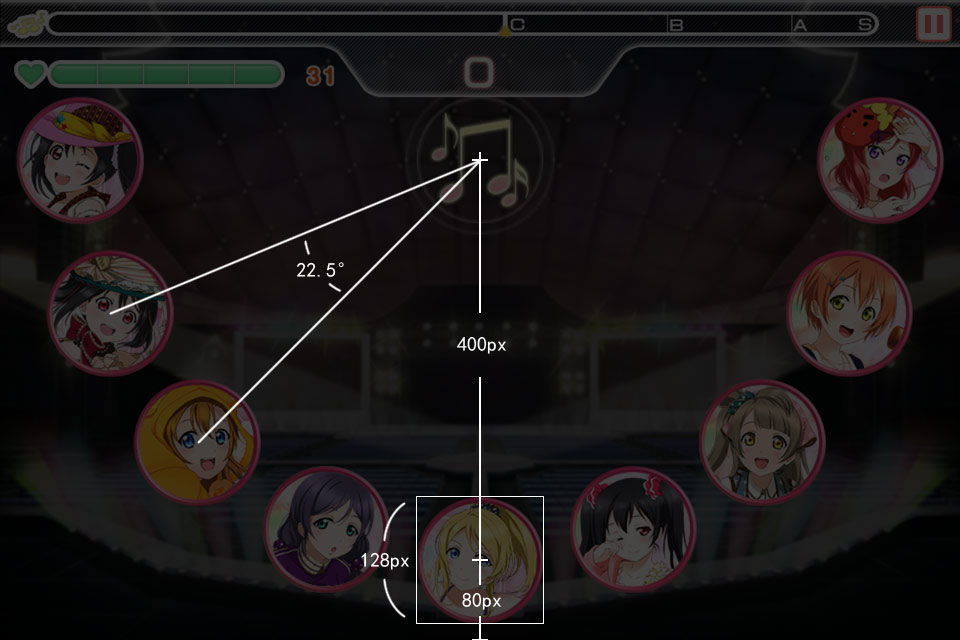
所以就可以知道:物件在0px高度的时候,缩放是0,在-400px高度的时候,缩放是1(这里定义列的锚点是物件出现的点,以方便后续做旋转操作,所以物件的y是从0开始逐渐变小的)。所以可以求得缩放方程式是
scale = -0.0025 * y
可以看出对于圆圈物件,就是一个Sprite对象。对于长条物件,是一个Sprite做头,一个Sprite做中间,一个Sprite做尾。
对于圆圈物件来说,我只要处理缩放和坐标就行。而对于Sprite的中间,则是一个随时在变化的梯形。
Cocos2d-x提供了setSkew方法对Sprite进行扭曲,但是这个扭曲只是一个平行四边形变换,并不是梯形。我们知道OpenGL渲染图形是先渲染顶点,再渲染像素的。所以修改Sprite的四个顶点可以达到想要的效果。说到顶点,自然就想到了顶点着色器,想到了GLSL。不过,这个效果怎么说也不复杂,杀鸡焉用牛刀呢。其实,在Sprite类中有一个成员(CCSprite.h 563行):
// vertex coords, texture coords and color info
V3F_C4B_T2F_Quad _quad;
注释说,这个成员就是Sprite的四个顶点。V3F_C4B_T2F_Quad又是个啥玩意?看看结构定义(ccTypes.h 291行):
//! 4 Vertex3FTex2FColor4B
struct V3F_C4B_T2F_Quad
{
    //! top left
    V3F_C4B_T2F    tl;
    //! bottom left
    V3F_C4B_T2F    bl;
    //! top right
    V3F_C4B_T2F    tr;
    //! bottom right
    V3F_C4B_T2F    br;
};
里面果然是四个成员,分别表示左上,左下,右上,右下四个顶点。而顶点的结构V3F_C4B_T2F是这样的(ccTypes.h 245行):
//! a Vec2 with a vertex point, a tex coord point and a color 4B
struct V3F_C4B_T2F
{
    //! vertices (3F)
    Vec3     vertices;            // 12 bytes

    //! colors (4B)
    Color4B      colors;              // 4 bytes

    // tex coords (2F)
    Tex2F        texCoords;           // 8 bytes
};
这三个成员分别表示:顶点坐标,顶点颜色和UV纹理贴图坐标。我们只需要处理位置即可。然而,_quad成员是一个protected对象,Sprite类也没有对外提供访问接口。因为对象时protected的,我们可以派生一个Sprite类的子类,提供访问_quad的接口。
在项目中添加VertexSprite.h和VertexSprite.cpp,将接口暴露出来(憋了这么久,终于可以敲代码了)。首先是头文件:
#ifndef __VERTEX_SPRITE_H__
#define __VERTEX_SPRITE_H__

#include "cocos2d.h"
USING_NS_CC;

class VertexSprite : public Sprite
{
public:
    static VertexSprite* create(const std::string& filename);
    bool initWithFile(const std::string& filename);

    /*
     * 设置四个顶点的坐标
     * @param pTL 左上角顶点坐标
     * @param pBL 左下角顶点坐标
     * @param pTR 右上角顶点坐标
     * @param pBR 右下角顶点坐标
     */
    void SetVertex(const Vec2& pTL, const Vec2& pBL, const Vec2& pTR, const Vec2& pBR);

private:
    VertexSprite(){}
};

#endif // __VERTEX_SPRITE_H__
然后是实现文件:
#include "VertexSprite.h"

VertexSprite* VertexSprite::create(const std::string& filename)
{
    auto ret = new VertexSprite();

    if (ret->initWithFile(filename))
    {
        ret->autorelease();
    }
    else
    {
        CC_SAFE_DELETE(ret);
    }

    return ret;
}


bool VertexSprite::initWithFile(const std::string& filename)
{
    return Sprite::initWithFile(filename);
}


void VertexSprite::SetVertex(const Vec2& pTL, const Vec2& pBL, const Vec2& pTR, const Vec2& pBR)
{
    // Top Left
    //
    this->_quad.tl.vertices.x = pTL.x;
    this->_quad.tl.vertices.y = pTL.y;
    // Bottom Left
    //
    this->_quad.bl.vertices.x = pBL.x;
    this->_quad.bl.vertices.y = pBL.y;
    // Top Right
    //
    this->_quad.tr.vertices.x = pTR.x;
    this->_quad.tr.vertices.y = pTR.y;
    // Bottom Right
    //
    this->_quad.br.vertices.x = pBR.x;
    this->_quad.br.vertices.y = pBR.y;

    this->setContentSize(Size(0, pTL.y - pBL.y));
}
可以看到SetVertex方法的最后做了一下setContentSize的操作。为什么呢?因为Sprite绘制的时候,会判断自己是否在显示区域内,如果不在,则不绘制(CCSprite.cpp 586行):
// draw

void Sprite::draw(Renderer *renderer, const Mat4 &transform, uint32_t flags)
{
    // Don't do calculate the culling if the transform was not updated
    _insideBounds = (flags & FLAGS_TRANSFORM_DIRTY) ? renderer->checkVisibility(transform, _contentSize) : _insideBounds;

    if(_insideBounds)
    {
        _quadCommand.init(_globalZOrder, _texture->getName(), getGLProgramState(), _blendFunc, &_quad, 1, transform);
        renderer->addCommand(&_quadCommand);
#if CC_SPRITE_DEBUG_DRAW
        _customDebugDrawCommand.init(_globalZOrder);
        _customDebugDrawCommand.func = CC_CALLBACK_0(Sprite::drawDebugData, this);
        renderer->addCommand(&_customDebugDrawCommand);
#endif //CC_SPRITE_DEBUG_DRAW
    }
}
所以设置顶点坐标后,还需要手动设置它的_contentSize。如果不设置,这个值默认就是我们使用的贴图的大小,即1px × 1px。所以在没设置的情况下,这个Sprite稍微移出显示区域一点,整个Sprite就不会显示了。所以我们需要在设定顶点后,手动去修改它的_contentSize。为了节约运算资源,以及考虑到可能出现的情况(只会是梯形,不会出现凹四边形等情况),这里直接设置_contentSize的高度就行了,可以减少一定的运算量。
目前只写了一个从文件创建对象的create方法。当然,今后为了各种需求可以也可以加入其他的比如createWithSpriteFrame等等。
有了一个可设定顶点坐标的类,接下来就可以编写物件类:BeatObject类了。根据框架设计,画面表现部分和数据部分是分开的,所以BeatObject类不能存放这个BeatObject出现的时间等数据,外部仅能改变BeatObject的位置。
当外部调用BeatObject的setPositionY方法(物件只会纵向移动,不应当修改x坐标)时,应当会做如下操作:
1、 计算出头的缩放值;
2、 如果这个BeatObject的类型是Strip,则根据BeatObject的长度计算出尾部的坐标和缩放值;
3、 如果这个BeatObject的类型是Strip,再计算出中间部分的四个顶点坐标。
四个顶点的坐标和尾部的缩放怎么计算呢?请看图:

如图所示是一个Strip物件的示意图。下面的圆是头部,上面的圆是尾部,中间红色的梯形就是我们要进设置顶点的中间部。TL, BL, TR, BR则是四个顶点,直接对应_quad成员中的四个成员。
Length值是由外部设置进去的,表示头部圆心到尾部圆心的长度,也就是梯形的高。头部圆的缩放的公式上文推导出了,尾部圆的缩放公式则是
-0.0025 * (y + length)
y值就是这个坐标系中的原点相对于Colume节点的高度。
我使用的图中,头部尾部的图像虽然是128px×128px,但是圆圈本身有个外发光,导致圆圈实际没有128px那么大。这里我取124px作为中间部一倍缩放宽度。实际制作的时候,这个宽度值应当根据使用的图像作出适当调整。于是,四个顶点的坐标取值如下:
TL: x = -尾部缩放 × 124 / 2, y = length
BL: x = -头部缩放 × 124 / 2, y = 0
TR: x = 尾部缩放 × 124 / 2, y = length
BR: x = 头部缩放 × 124 / 2, y = 0
我使用一个enum来区分BeatObject的类型。这个enum存放在Common.h中,因为在使用物件数据的时候还会用上。圈叫Block因为在传统下落式音乐游戏中那玩意叫“块”。Common.h的内容如下:
#ifndef __COMMON_H__
#define __COMMON_H__


enum BeatObjectType : int
{
    Invalid   = 0x0000,
    Block     = 0x0001,
    Strip     = 0x0002,
    SameTime  = 0x0004,
    Star      = 0x0008
};

#define WASSERT(__COND__) if(!(__COND__)){ DebugBreak(); }

#endif // __COMMON_H__
WASSERT宏用于在断言符合时产生一个断点,而不是生成报错对话框,这样可以方便调试。
如下是BeatObject类的代码,首先是头文件:
#ifndef __BEAT_OBJECT_H__
#define __BEAT_OBJECT_H__

#include "cocos2d.h"
#include "Common.h"
#include "VertexSprite.h"
USING_NS_CC;


class BeatObject : public Node
{
public:
    /*
     * 创建一个BeatObject实例
     * @param pType BeatObject类型,参考BeatObjectType
     * @param pLength BeatObject的长度,仅当该实例为Strip类型时有效
     */
    static BeatObject* create(int pType, float pLength = 0);
    ~BeatObject(){}

public: // Getter
    bool IsBlock();
    bool IsStrip();

public: // Setter
    void setPositionY(float y) override;
    void setRotation(float rotation) override;

private:
    BeatObject();
    bool init(int pType, float pLength = 0);

    // 不允许外部修改BeatObj的坐标
    void setPosition(const Vec2& position){ Node::setPosition(position); }
    void setPositionX(float x){ Node::setPositionX(x); }

private:
    int m_nType;
    Sprite* m_pHead;
    Sprite* m_pTail;
    VertexSprite* m_pBody;
    float m_fLength;
    float m_fCurLength;
};

#endif // __BEAT_OBJECT_H__
实现:
#include "BeatObject.h"

namespace
{
    inline float GetMoveScale(float pY)
    {
        if (pY >= 0)
        {
            return 0;
        }
        return -0.0025f * pY;
    }


    inline bool TypeContains(int pType, const BeatObjectType& pTarType)
    {
        return (pType & pTarType) == pTarType;
    }
}


//////////////////////////////////////////////////////////////////////////
// BeatObject
BeatObject::BeatObject()
    : m_nType(BeatObjectType::Invalid)
    , m_pHead(nullptr)
    , m_pTail(nullptr)
    , m_pBody(nullptr)
    , m_fLength(0)
    , m_fCurLength(0)
{
}


BeatObject* BeatObject::create(int pType, float pLength /* = 0 */)
{
    auto ret = new BeatObject();

    if (ret->init(pType, pLength))
    {
        ret->autorelease();
    }
    else
    {
        CC_SAFE_DELETE(ret);
    }

    return ret;
}


bool BeatObject::init(int pType, float pLength /* = 0 */)
{
    if (!Node::init())
    {
        return false;
    }

    this->m_nType = pType;
    WASSERT(TypeContains(this->m_nType, BeatObjectType::Invalid));

    // 不允许对Block类型设置Length
    // 以及不允许设置Strip类型的Length小于等于0
    //
    if (pLength > 0)
    {
        WASSERT(this->IsStrip());
    }
    else if (pLength < 0)
    {
        WASSERT(false);
    }
    this->m_fLength = pLength;

    if (this->IsStrip())
    {
        this->m_pBody = VertexSprite::create("Strip_Body.png");
        this->m_pTail = Sprite::create("Strip_Tail.png");

        this->m_pBody->setAnchorPoint(Vec2(0.5f, 0));

        this->addChild(this->m_pBody);
        this->addChild(this->m_pTail);
        this->m_pTail->setVisible(false);
    }

    this->m_pHead = Sprite::create("Block.png");
    this->addChild(this->m_pHead);

    if (TypeContains(this->m_nType, BeatObjectType::Star))
    {
        auto s = Sprite::create("Star.png");
        s->setPosition(this->m_pHead->getContentSize() / 2);
        this->m_pHead->addChild(s);
    }

    if (TypeContains(this->m_nType, BeatObjectType::SameTime))
    {
        auto st = Sprite::create("SameTime.png");
        st->setPosition(this->m_pHead->getContentSize() / 2);
        this->m_pHead->addChild(st);
    }

    return true;
}


bool BeatObject::IsBlock()
{
    return TypeContains(this->m_nType, BeatObjectType::Block);
}


bool BeatObject::IsStrip()
{
    return TypeContains(this->m_nType, BeatObjectType::Strip);
}


void BeatObject::setPositionY(float y)
{
    Node::setPositionY(y);
    // 设置圆圈的缩放。若缩放太小直接不显示
    //
    auto headScale = GetMoveScale(y);
    this->m_pHead->setScale(headScale);
    this->m_pHead->setVisible(headScale > 0.05f);
    // 如果该物件是一个Strip,则需要处理其身体和尾部
    //
    if (this->IsStrip())
    {
        // 模拟无限远处飞来的效果,保证尾部的y坐标小于0
        //
        if (y + this->m_fLength > 0)
        {
            this->m_fCurLength = -y;
        }
        else if (this->m_fCurLength != this->m_fLength)
        {
            this->m_fCurLength = this->m_fLength;
            this->m_pTail->setPositionY(this->m_fLength);
        }

        auto tailScale = GetMoveScale(this->getPositionY() + this->m_fCurLength);
        this->m_pTail->setScale(tailScale);
        this->m_pTail->setVisible(tailScale > 0.05f);

        auto harfHeadWidth = headScale * 124 / 2.0f;
        auto harfTailWidth = tailScale * 124 / 2.0f;

        this->m_pBody->SetVertex(
            Vec2(-harfTailWidth, this->m_fCurLength),
            Vec2(-harfHeadWidth, 0),
            Vec2(harfTailWidth, this->m_fCurLength),
            Vec2(harfHeadWidth, 0));
    }
}


void BeatObject::setRotation(float rotation)
{
    this->m_pHead->setRotation(rotation);
}
BeatObject类开放并重写setPositionY方法,屏蔽setPosition和setPositionX,不允许外部直接修改BeatObject的坐标。这里还重写了setRotation方法,但是并没有调用基类的setRotation,原因后面来讲。
BeatObject类目前就是这样了,今后需要其他功能再逐渐添加。接下来我们创建BeatObject的父节点类:BeatObjectColume。
每个物件在运动的时候,都不会离开它们所在的列。换句话说,就是一个在第一列的物件,在任何时候都不会跑到第二列去。BeatObjectColume类就表示一个列。这个类目前比较简单,我就直接放代码了,头文件:
#ifndef __BEAT_OBJECT_COLUME_H__
#define __BEAT_OBJECT_COLUME_H__

#include "cocos2d.h"
#include "BeatObject.h"

USING_NS_CC;

class BeatObjectColume : public Node
{
public:
    CREATE_FUNC(BeatObjectColume);
    ~BeatObjectColume();

public:
    void AddBeatObject(BeatObject* pObj);
    void ClearObjects();
    void SetObjectPositionY(int pIndex, float pY);

private:
    void addChild(Node *child){ Node::addChild(child); }

private:
    BeatObjectColume();
    bool init();

private:
    std::vector<BeatObject*> m_BeatObjList;
};


#endif // __BEAT_OBJECT_COLUME_H__
实现:
#include "BeatObjectColume.h"

BeatObjectColume::BeatObjectColume()
{
}


bool BeatObjectColume::init()
{
    if (!Node::init())
    {
        return false;
    }

    return true;
}


void BeatObjectColume::AddBeatObject(BeatObject* pObj)
{
    pObj->setRotation(-this->getRotation());
    this->addChild(pObj);
    this->m_BeatObjList.push_back(pObj);
}


void BeatObjectColume::ClearObjects()
{
    for (auto it : this->m_BeatObjList)
    {
        it->removeFromParent();
    }

    this->m_BeatObjList.clear();
}


void BeatObjectColume::SetObjectPositionY(int pIndex, float pY)
{
    WASSERT(pIndex >= 0 && pIndex < this->m_BeatObjList.size());

    this->m_BeatObjList.at(pIndex)->setPositionY(pY);
}


BeatObjectColume::~BeatObjectColume()
{
    this->m_BeatObjList.clear();
}
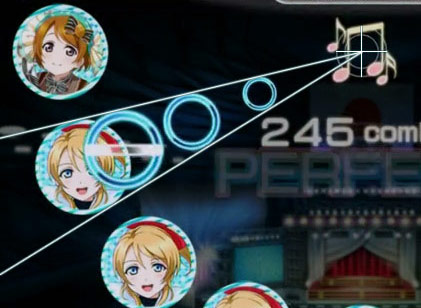
注意在AddBeatObject这个方法中,对添加进去的BeatObject进行了一个旋转处理。为什么呢?因为列是呈扇形分开的,除开最中间的列,其他列都进行过旋转处理。而我们看视频截图:
可以看出在列旋转后,对于Block物件,它相对于屏幕其实是没有旋转的,对于Strip物件(图中没有),它的头对于屏幕也是没有旋转的。所以在添加BeatObject的时候,要对它进行一个和Colume方向相反,大小相同的旋转。而因为Strip物件只有头部进行了旋转,所以上文说的不必调用基类的setRotation。
然后我们在LiveScene类中加入一些东西,看看我们实现的成果(因为是临时使用的代码,变量使用不太规范)。头文件:
#ifndef __LIVE_SCENE_H__
#define __LIVE_SCENE_H__

#include "cocos2d.h"
#include "BeatObject.h"
#include "BeatObjectColume.h"

USING_NS_CC;

class LiveScene : public cocos2d::Layer
{
public:
    // there's no 'id' in cpp, so we recommend returning the class instance pointer
    static cocos2d::Scene* createScene();

    // Here's a difference. Method 'init' in cocos2d-x returns bool, instead of returning 'id' in cocos2d-iphone
    virtual bool init();

    // implement the "static create()" method manually
    CREATE_FUNC(LiveScene);

private:
    void update(float dt);

private:
    BeatObjectColume* m_pColume;
};

#endif // __LIVE_SCENE_H__
实现:
#include "LiveScene.h"


Scene* LiveScene::createScene()
{
    // 'scene' is an autorelease object
    auto scene = Scene::create();

    // 'layer' is an autorelease object
    auto layer = MainScene::create();

    // add layer as a child to scene
    scene->addChild(layer);

    // return the scene
    return scene;
}

// on "init" you need to initialize your instance
bool LiveScene::init()
{
    if (!Layer::init())
    {
        return false;
    }
    // 加入背景图
    //
    auto bg = Sprite::create("bg.jpg");
    bg->setPosition(480, 320);
    this->addChild(bg);
    // 加上黑色半透明蒙层
    //
    auto colorLayer = LayerColor::create(Color4B(0, 0, 0, 192));
    this->addChild(colorLayer);
    // 加上一个列
    //
    this->m_pColume = BeatObjectColume::create();
    this->m_pColume->setPosition(480, 480);
    this->addChild(this->m_pColume);
    // 添加一个BeatObject
    // 如果要添加Block类的Object,则
    // auto obj = BeatObject::create(BeatObjectType::Block);
    auto obj = BeatObject::create(BeatObjectType::Strip | BeatObjectType::SameTime, 256);
    this->m_pColume->AddBeatObject(obj);

    this->scheduleUpdate();

    return true;
}


float moveY = 0;
void LiveScene::update(float dt)
{
    this->m_pColume->SetObjectPositionY(0, moveY);

    moveY -= 4;
    if (moveY < -960)
    {
        moveY = 0;
    }
}
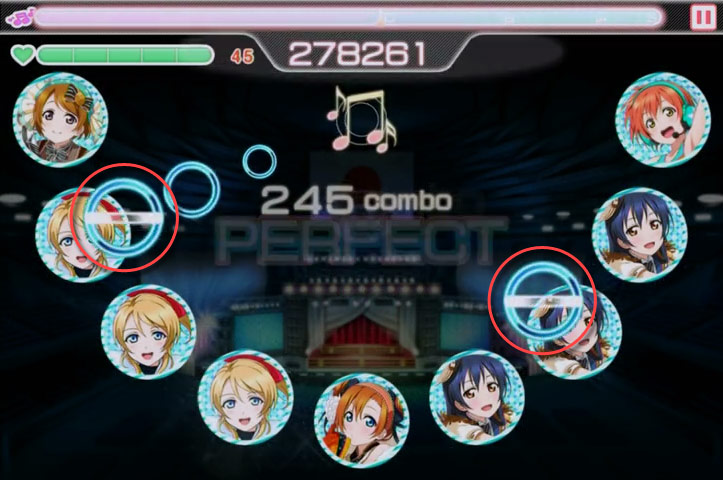
编译运行,如果没有问题的话,看到这样的效果:

这一章就结束了。下一章我们来编写一个BeatObjectManager,将所有的Object管理起来,并通过数据显示我们想要的谱面。
本章所用到的资源:http://pan.baidu.com/s/1dDk0TXZ