改变元素内容:
<!DOCTYPE html>
<html lang="en">

<head>
    <meta charset="UTF-8">
    <meta name="viewport" content="width=device-width, initial-scale=1.0">
    <meta http-equiv="X-UA-Compatible" content="ie=edge">
    <title>Document</title>
    <style>
        div,
        p {
            width: 300px;
            height: 30px;
            line-height: 30px;
            color: #fff;
            background-color: pink;
        }
    </style>
</head>

<body>
    <button>显示当前系统时间</button>
    <div>某个时间</div>
    <p>1123</p>
    <script>
        // 当我们点击了按钮,  div里面的文字会发生变化
        // 1. 获取元素
        var btn = document.querySelector('button');
        var div = document.querySelector('div');
        // 2.注册事件
        btn.onclick = function() {
            // div.innerText = '2019-6-6';
            div.innerHTML = getDate();
        }

        function getDate() {
            var date = new Date();
            // 我们写一个 2019年 5月 1日 星期三
            var year = date.getFullYear();
            var month = date.getMonth() + 1;
            var dates = date.getDate();
            var arr = ['星期日', '星期一', '星期二', '星期三', '星期四', '星期五', '星期六'];
            var day = date.getDay();
            return '今天是:' + year + '年' + month + '月' + dates + '日 ' + arr[day];
        }
        // 我们元素可以不用添加事件
        var p = document.querySelector('p');
        p.innerHTML = getDate();
    </script>
</body>

</html>
innerText和innerHTML的区别:
<!DOCTYPE html>
<html lang="en">

<head>
    <meta charset="UTF-8">
    <meta name="viewport" content="width=device-width, initial-scale=1.0">
    <meta http-equiv="X-UA-Compatible" content="ie=edge">
    <title>Document</title>
</head>

<body>
    <div></div>
    <p>
        我是文字
        <span>123</span>
    </p>
    <script>
        // innerText 和 innerHTML的区别
        // 1. innerText 不识别html标签 非标准  去除空格和换行
        var div = document.querySelector('div');
        // div.innerText = '<strong>今天是:</strong> 2019';
        // 2. innerHTML 识别html标签 W3C标准 保留空格和换行的
        div.innerHTML = '<strong>今天是:</strong> 2019';
        // 这两个属性是可读写的  可以获取元素里面的内容
        var p = document.querySelector('p');
        console.log(p.innerText);
        console.log(p.innerHTML);
    </script>
</body>

</html>
修改元素属性:
<!DOCTYPE html>
<html lang="en">

<head>
    <meta charset="UTF-8">
    <meta name="viewport" content="width=device-width, initial-scale=1.0">
    <meta http-equiv="X-UA-Compatible" content="ie=edge">
    <title>Document</title>
    <style>
        img {
            width: 300px;
        }
    </style>
</head>

<body>
    <button id="ldh">刘德华</button>
    <button id="zxy">张学友</button> <br>
    <img src="images/ldh.jpg" alt="" title="刘德华">

    <script>
        // 修改元素属性  src
        // 1. 获取元素
        var ldh = document.getElementById('ldh');
        var zxy = document.getElementById('zxy');
        var img = document.querySelector('img');
        // 2. 注册事件  处理程序
        zxy.onclick = function() {
            img.src = 'images/zxy.jpg';
            img.title = '张学友思密达';
        }
        ldh.onclick = function() {
            img.src = 'images/ldh.jpg';
            img.title = '刘德华';
        }
    </script>
</body>

</html>
修改表单属性:
<!DOCTYPE html>
<html lang="en">

<head>
    <meta charset="UTF-8">
    <meta name="viewport" content="width=device-width, initial-scale=1.0">
    <meta http-equiv="X-UA-Compatible" content="ie=edge">
    <title>Document</title>
</head>

<body>
    <button>按钮</button>
    <input type="text" value="输入内容">
    <script>
        // 1. 获取元素
        var btn = document.querySelector('button');
        var input = document.querySelector('input');
        // 2. 注册事件 处理程序
        btn.onclick = function() {
            // input.innerHTML = '点击了';  这个是 普通盒子 比如 div 标签里面的内容
            // 表单里面的值 文字内容是通过 value 来修改的
            input.value = '被点击了';
            // 如果想要某个表单被禁用 不能再点击 disabled  我们想要这个按钮 button禁用
            // btn.disabled = true;
            this.disabled = true;
            // this 指向的是事件函数的调用者 btn
        }
    </script>
</body>

</html>
仿京东显示隐藏密码:
<!DOCTYPE html>
<html lang="en">

<head>
    <meta charset="UTF-8">
    <meta name="viewport" content="width=device-width, initial-scale=1.0">
    <meta http-equiv="X-UA-Compatible" content="ie=edge">
    <title>Document</title>
    <style>
        .box {
            position: relative;
            width: 400px;
            border-bottom: 1px solid #ccc;
            margin: 100px auto;
        }

        .box input {
            width: 370px;
            height: 30px;
            border: 0;
            outline: none;
        }

        .box img {
            position: absolute;
            top: 2px;
            right: 2px;
            width: 24px;
        }
    </style>
</head>

<body>
    <div class="box">
        <label for="">
            <img src="images/close.png" alt="" id="eye">
        </label>
        <input type="password" name="" id="pwd">
    </div>
    <script>
        // 1. 获取元素
        var eye = document.getElementById('eye');
        var pwd = document.getElementById('pwd');
        // 2. 注册事件 处理程序
        var flag = 0;
        eye.onclick = function() {
            // 点击一次之后, flag 一定要变化
            if (flag == 0) {
                pwd.type = 'text';
                eye.src = 'images/open.png';
                flag = 1; // 赋值操作
            } else {
                pwd.type = 'password';
                eye.src = 'images/close.png';
                flag = 0;
            }

        }
    </script>
</body>

</html>
修改样式属性:
<!DOCTYPE html>
<html lang="en">

<head>
    <meta charset="UTF-8">
    <meta name="viewport" content="width=device-width, initial-scale=1.0">
    <meta http-equiv="X-UA-Compatible" content="ie=edge">
    <title>Document</title>
    <style>
        div {
            width: 200px;
            height: 200px;
            background-color: pink;
        }
    </style>
</head>

<body>
    <div></div>
    <script>
        // 1. 获取元素
        var div = document.querySelector('div');
        // 2. 注册事件 处理程序
        div.onclick = function() {
            // div.style里面的属性 采取驼峰命名法
            this.style.backgroundColor = 'purple';
            this.style.width = '250px';
        }
    </script>
</body>

</html>
关闭淘宝二维码案例:
<!DOCTYPE html>
<html lang="en">

<head>
    <meta charset="UTF-8">
    <meta name="viewport" content="width=device-width, initial-scale=1.0">
    <meta http-equiv="X-UA-Compatible" content="ie=edge">
    <title>Document</title>
    <style>
        .box {
            position: relative;
            width: 74px;
            height: 88px;
            border: 1px solid #ccc;
            margin: 100px auto;
            font-size: 12px;
            text-align: center;
            color: #f40;
            /* display: block; */
        }

        .box img {
            width: 60px;
            margin-top: 5px;
        }

        .close-btn {
            position: absolute;
            top: -1px;
            left: -16px;
            width: 14px;
            height: 14px;
            border: 1px solid #ccc;
            line-height: 14px;
            font-family: Arial, Helvetica, sans-serif;
            cursor: pointer;
        }
    </style>
</head>

<body>
    <div class="box">
        淘宝二维码
        <img src="images/tao.png" alt="">
        <i class="close-btn">×</i>
    </div>
    <script>
        // 1. 获取元素
        var btn = document.querySelector('.close-btn');
        var box = document.querySelector('.box');
        // 2.注册事件 程序处理
        btn.onclick = function() {
            box.style.display = 'none';
        }
    </script>
</body>

</html>
循环精灵图:
<!DOCTYPE html>
<html lang="en">

<head>
    <meta charset="UTF-8">
    <meta name="viewport" content="width=device-width, initial-scale=1.0">
    <meta http-equiv="X-UA-Compatible" content="ie=edge">
    <title>Document</title>
    <style>
        * {
            margin: 0;
            padding: 0;
        }

        li {
            list-style-type: none;
        }

        .box {
            width: 250px;
            margin: 100px auto;
        }

        .box li {
            float: left;
            width: 24px;
            height: 24px;
            background-color: pink;
            margin: 15px;
            background: url(images/sprite.png) no-repeat;
        }
    </style>
</head>

<body>
    <div class="box">
        <ul>
            <li></li>
            <li></li>
            <li></li>
            <li></li>
            <li></li>
            <li></li>
            <li></li>
            <li></li>
            <li></li>
            <li></li>
            <li></li>
            <li></li>
        </ul>
    </div>
    <script>
        // 1. 获取元素 所有的小li
        var lis = document.querySelectorAll('li');
        for (var i = 0; i < lis.length; i++) {
            // 让索引号 乘以 44 就是每个li 的背景y坐标  index就是我们的y坐标
            var index = i * 44;
            lis[i].style.backgroundPosition = '0 -' + index + 'px';
        }
    </script>
</body>

</html>
显示隐藏文本框内容:
<!DOCTYPE html>
<html lang="en">

<head>
    <meta charset="UTF-8">
    <meta name="viewport" content="width=device-width, initial-scale=1.0">
    <meta http-equiv="X-UA-Compatible" content="ie=edge">
    <title>Document</title>
    <style>
        input {
            color: #999;
        }
    </style>
</head>

<body>
    <input type="text" value="手机">
    <script>
        // 1.获取元素
        var text = document.querySelector('input');
        // 2.注册事件 获得焦点事件 onfocus
        text.onfocus = function() {
                // console.log('得到了焦点');
                if (this.value === '手机') {
                    this.value = '';
                }
                // 获得焦点需要把文本框里面的文字颜色变黑
                this.style.color = '#333';
            }
            // 3. 注册事件 失去焦点事件 onblur
        text.onblur = function() {
            // console.log('失去了焦点');
            if (this.value === '') {
                this.value = '手机';
            }
            // 失去焦点需要把文本框里面的文字颜色变浅色
            this.style.color = '#999';
        }
    </script>

</body>

</html>
通过className修改样式:
<!DOCTYPE html>
<html lang="en">

<head>
    <meta charset="UTF-8">
    <meta name="viewport" content="width=device-width, initial-scale=1.0">
    <meta http-equiv="X-UA-Compatible" content="ie=edge">
    <title>Document</title>
    <style>
        div {
            width: 100px;
            height: 100px;
            background-color: pink;
        }

        .change {
            background-color: purple;
            color: #fff;
            font-size: 25px;
            margin-top: 100px;
        }
    </style>
</head>


<body>
    <div class="first">文本</div>
    <script>
        // 1. 使用 element.style 获得修改元素样式  如果样式比较少 或者 功能简单的情况下使用
        var test = document.querySelector('div');
        test.onclick = function() {
            // this.style.backgroundColor = 'purple';
            // this.style.color = '#fff';
            // this.style.fontSize = '25px';
            // this.style.marginTop = '100px';
            // 让我们当前元素的类名改为了 change

            // 2. 我们可以通过 修改元素的className更改元素的样式 适合于样式较多或者功能复杂的情

            // this.className = 'change';
            // 3. 如果想要保留原先的类名,我们可以这么做 多类名选择器

            this.className = 'first change';
        }
    </script>
</body>

</html>
密码框验证信息:
<!DOCTYPE html>
<html lang="en">

<head>
    <meta charset="UTF-8">
    <meta name="viewport" content="width=device-width, initial-scale=1.0">
    <meta http-equiv="X-UA-Compatible" content="ie=edge">
    <title>Document</title>
    <style>
        div {
            width: 600px;
            margin: 100px auto;
        }

        .message {
            display: inline-block;
            font-size: 12px;
            color: #999;
            background: url(images/mess.png) no-repeat left center;
            padding-left: 20px;
        }

        .wrong {
            color: red;
            background-image: url(images/wrong.png);
        }

        .right {
            color: green;
            background-image: url(images/right.png);
        }
    </style>
</head>

<body>
    <div class="register">
        <input type="password" class="ipt">
        <p class="message">请输入6~16位密码</p>
    </div>
    <script>
        // 首先判断的事件是表单失去焦点 onblur
        // 如果输入正确则提示正确的信息颜色为绿色小图标变化
        // 如果输入不是6到16位,则提示错误信息颜色为红色 小图标变化
        // 因为里面变化样式较多,我们采取className修改样式
        // 1.获取元素
        var ipt = document.querySelector('.ipt');
        var message = document.querySelector('.message');
        //2. 注册事件 失去焦点
        ipt.onblur = function() {
            // 根据表单里面值的长度 ipt.value.length
            if (this.value.length < 6 || this.value.length > 16) {
                // console.log('错误');
                message.className = 'message wrong';
                message.innerHTML = '您输入的位数不对要求6~16位';
            } else {
                message.className = 'message right';
                message.innerHTML = '您输入的正确';
            }
        }
    </script>
</body>

</html>
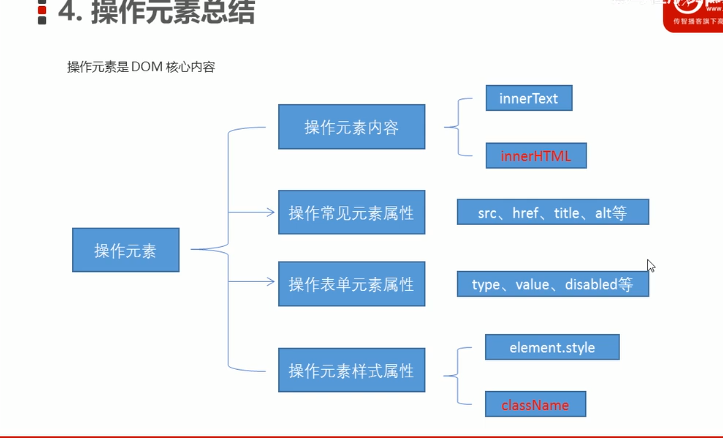
操作元素总结: