第2章.IoC容器
IoC容器概述
abstract: 介绍IoC和bean的用处和使用
IoC容器处于整个Spring框架中比较核心的位置:Core Container: Beans, Core, Context, SpEL
为上层AOP/Aspects/Instrumentation/Messaging提供支持
IoC容器的用途:

创建对象的依赖,最后组装成所需的业务对象
容器通过业务对象和配置(application-context.xml; xxxController.java)-->生成可用对象
在Spring场景下,把对象A/B/C都称作Bean
从代码角度看,一个ApplicationContext (org.springframework.context包下,属于spring-context依赖中)对象就是一个IoC容器
初始化IoC容器:
在web项目的web.xml中,用
<context-param>
<param-name>contextConfigLocation</param-name>
<param-value>classpath:application-context.xml</param-value>
</context-param>
ApplicationContext context = new ClassPathXmlApplicationContext("application-context.xml");
(文件系统中:ApplicationContext context = new FileSystemXmlApplicationContext("/home/user/conf/application-context.xml");)
来初始化。
定义一个Bean:
在application-context.xml中
<beans>
...
<bean id="screwDriver" class="package_url"></bean>
</beans>
使用Bean:
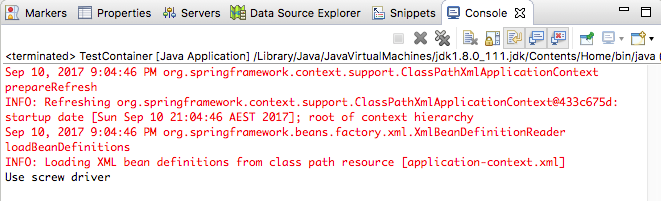
1. 初始化容器:ApplicationContext context = new ClassPathXmlApplicationContext("application-context.xml");
2. 通过getBean()获取对象:ScrewDriver screwDriver = context.getBean("screwDriver", ScrewDriver.class);
3. 使用对象:screwDriver.use();
实例演练:
1. New Maven Project -> Create a simple project (skip archetype selection)
GroupId: com.netease.nanodegree
ArtifactId: spring-container
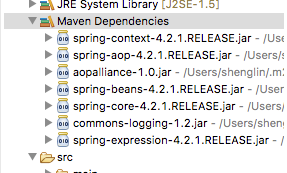
2. 将所需依赖加入pom.xml
<dependencies>
     <dependency>
        <groupId>org.springframework</groupId>
        <artifactId>spring-context</artifactId>
        <version>4.2.1.RELEASE</version>
    </dependency>
</dependencies>
发现依赖的jar包自动被加入
3. 在src/main/resources/下新建application-context.xml
初始为:
<?xml version="1.0" encoding="UTF-8"?>
<beans xmlns="http://www.springframework.org/schema/beans"
    xmlns:xsi="http://www.w3.org/2001/XMLSchema-instance"
    xmlns:context="http://www.springframework.org/schema/context"
    xmlns:p="http://www.springframework.org/schema/p"
    xsi:schemaLocation="http://www.springframework.org/schema/beans
    http://www.springframework.org/schema/beans/spring-beans.xsd
    http://www.springframework.org/schema/context
    http://www.springframework.org/schema/context/spring-context.xsd">

</beans>
此时,还未定义任何bean,因此还不能从容器中获取任何bean
4. 在src/main/java/下新建类ScrewDriver.java
package: com.netease.nanodegree;
package com.netease.nanodegree;

public class ScrewDriver {
    public void ues () {
        System.out.println("Use screw driver");
    }
}
5. 此时有了bean,在application-context.xml中加入相关bean的定义
<bean id = "screwDriver" class = "com.netease.nanodegree.ScrewDriver"></bean>
6. 在src/main/java/com.netease.nanodegree下新建测试类TestContainer.java
7. Run as -> Java Application
Bean的作用域:Bean的有效范围
singleton:与设计模式中的singleton有点像
保证对象在整个容器中最多只能有一个单例,也保证在整个生命周期中只会创建一个实例
上例中bean定义的默认作用域就是singleton
也可以显式定义<bean id="screwDriver" class="com.netease.nanodegree.ScrewDriver" scope="singleton"></bean>
例子Test:
ScrewDriver.java
public class ScrewDriver {
    private String color = "red";
    public void use () {
        //System.out.println("Use screw driver");
        System.out.println("Use " + color + " screw driver");
    }

    public void setColor (String color) {
        this.color = color;
    }
}
TestContainer.java
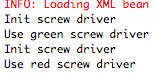
public class TestContainer {
    public static void main(String[] args) {
        ApplicationContext context = new ClassPathXmlApplicationContext("application-context.xml");

        ScrewDriver screwDriver = context.getBean("screwDriver", ScrewDriver.class);
        screwDriver.setColor("green");
        screwDriver.use();

        ScrewDriver screwDriver2 = context.getBean("screwDriver", ScrewDriver.class);
        screwDriver2.use();
    }
}
要想测试是不是单例对象,使用getBean()得到两个对象并设置属性为"green",如果是单例,则两个对象的属性均为"green"
应用:大部分场景下使用singleton模式就能满足业务需求,比如Servlet实例,开始时创建实例,结束时销毁实例,在中间时只需这一个实例来处理即可。
prototype:每次引用时都需要创建一个新的对象/实例,比如每次使用时不希望保留上一次的属性值/状态
<bean id=... class=... scope="prototype"></bean>
例子Test:
将bean screwDriver的scope改为prototype;
此时打印出来的结果应该是第一次为green(因为使用setColor()改了),第二次为red(因为初始为red且并未无改动)
在web应用场景下才出现的作用域:
request:在每个request中分别创建和销毁bean
比如在request1开始时创建了若干个beans,结束时这些beans就被销毁了;而另一个request中又是一个request scope,有它自己的bean的创建和销毁
session:在每个session中的作用域
每个用户对应一个session,在session中可能若干个requests,但是sessionBean在这些request之间是可以共享的
而多个session会有各自的session scope
global session:在此不做介绍
application:每个session之间需要共享的信息

Bean的生命周期回调:
有了Bean的作用域后,我们知道/控制bean的创建/销毁,但是我们不能控制创建/销毁时可以做哪些事情(比如申请/释放资源、创建线程池)--生命周期回调的功能可以支持实现这些功能
Spring提供了两种回调:
InitializingBean接口中的afterPropertiesSet()函数:
public interface InitializingBean {
    void afterPropertiesSet() throws Exception;
}
当一个bean创建完成后调用
例子:
<bean id=... class=... init-method="init"></bean>
public class ScrewDriver {
    public void init() {
        Syso("Init screw driver");
    }
}
DisposableBean接口中的destroy()函数:
public interface DisposableBean {
    void destroy() throws Exception;
}
当一个bean被销毁之后调用
例子:
<bean id=... class=... destroy-method="cleanup"></bean>
public class ScrewDriver {
    public void cleanup() {
        Syso("Clean up screw driver");
    }
}
测试Test结果:
<bean id = "screwDriver" class = "com.netease.nanodegree.ScrewDriver" scope="prototype" init-method="init" destroy-method="cleanup"></bean>
output:
发现没有进行cleanup的回调:因为bean没有被销毁
手动关闭:
((ConfigurableApplicationContext) context).close();
output:还是相同
将bean定义中的scope="prototype"改为默认的singleton后

成功执行cleanup()回调函数
依赖注入
第一章中举的例子:在ScrewDriver中声明变量private Header header = new StraightHeader();
虽然有抽象类header的想法,但是直接用new StraightHeader()创建实例,并没有将抽象的想法实施到位。
如果需要一个带有CrossHeader的screwDriver呢?需要修改ScrewDriver的代码:
private Header header = new CrossHeader();
如果要修改一字刀口螺丝刀的属性,比如颜色等,则需要修改constructor:
private Header header = new StraightHeader("green", 15);
此时:ScrewDriver和StraightHeader的关系是强依赖关系
在第一章中的IoC解决方法是在ScrewDriver的constructor中传入一个Header(抽象接口对象)作为参数
public ScrewDriver(Header header) { this.header = header; }
1. 定义接口:抽象接口Header
2. 实现接口:如StraightHeader和CrossHeader
3. 以接口为基础来进行依赖的注入
基于构造函数的依赖注入方式:如上例中的在constructor中传入接口对象的方法
基于Setter方法的依赖注入方式:和基于构造函数的方式很相近
public class ScrewDriver {
    private Header header;

    public setHeader(Header header) {
        this.header = header;
    }
}
那...究竟是选择哪一种方法呢?
实际开发中的原则:
如果关系是强依赖的,则基于构造函数(比如ScrewDriver必须有一个Header)
如果关系是可选依赖的,则基于Setter方法(可有可无的依赖)
实际开发中可能注入的是基本类型、集合、Bean,或通过配置文件注入等等
例子(只演示基于构造函数的依赖注入):
定义Header接口:Header.java
package com.netease.nanodegree;

public interface Header {
    public void doWork();
    public String getInfo();
}
定义实现类StraightHeader.java
package com.netease.nanodegree;

public class StraightHeader implements Header {
    private String color;
    private int size;

    public StraightHeader(String color, int size) {
        this.color = color;
        this.size = size;
    }

    @Override
    public void doWork() {
        System.out.println("Do work with straight header");
    }

    @Override
    public String getInfo() {
        return "Straight Header: " + this.color + ", " + this.size;
    }
}
定义实现类CrossHeader.java(相似)
定义StraightHeader bean和CrossHeader bean
<bean id = "header" class = "com.netease.nanodegree.StraightHeader">
    <constructor-arg index="0" type="java.lang.String" value="red"></constructor-arg>
    <constructor-arg index="1" type="int" value="15"></constructor-arg>
</bean>
可以通过constructor-arg中的index来说明param的顺序;如index="0"; index="1";
可以通过type来说明param的类型;如type="int"; type="java.lang.String";
可以通过name来说明param的对应的变量名;如name="size"; name="color";
(index/type/name都不是必要的)
Test.java
public static void main(String[] args) {
    ApplicationContext context = new ClassPathXmlApplicationContext("application-context.xml");

    Header header = context.getBean("header", StraightHeader.class);
    System.out.println(header.getInfo());
    header.doWork();
}
output:

如何注入集合呢?
通过map的方式注入
假设StraightHeader的构造函数为:
public StraightHeader(Map<String, String> params) {
    this.color = params.get("color");
    this.size = Integer.parseInt(params.get("size"));
}
此时,定义bean为(使用map的方法)
<bean id = "header" class = "com.netease.nanodegree.StraightHeader">
    <constructor-arg>
        <map>
            <entry key="color" value="red"></entry>
            <entry key="size" value="15"></entry>
        </map>
    </constructor-arg>
</bean>
也可以注入List/Set之类的集合,配置也相似
<bean id = "header" class = "com.netease.nanodegree.StraightHeader">
    <constructor-arg>
        <list>
            <value>red</value>
            <value>14</value>
        </list>
    </constructor-arg>
</bean>
也可以通过配置文件加载一些配置项:比如注入Property的一些属性
<bean id = "header" class = "com.netease.nanodegree.StraightHeader">
    <constructor-arg>
        <props>
            <prop key="color">red</prop>
            <prop key="size">14</prop>
        </props>
    </props>
</bean>
对应的构造函数:
public StraightHeader(Properties props) {
    this.color = props.xxx;
    this.size = props.xxx;
}
那怎么通过配置文件注入呢?
在src/main/resources/下创建一个配置文件header.properties
color=green
size=16
在application-context.xml中加载该配置文件:
<bean id="headerProperties"
    class="org.springframework.beans.factory.config.PropertyPlaceholderConfigurer">
    <property name="location" value="classpath:header.properties"/>
</bean>
property->value为配置文件所在地址
读取配置文件中的信息:
<bean id = "header" class = "com.netease.nanodegree.StraightHeader">
    <constructor-arg name="color" value="${color}"></constructor-arg>
    <constructor-arg name="size" value="${size}"></constructor-arg>
</bean>
上例注入的都是一些基础类型,如果是ScrewDriver需要注入一个Header类型(bean)的参数呢?
ScrewDriver.java
public class ScrewDriver {
    private Header header;

    public ScrewDriver(Header header) {
        this.header = header;
    }

    public void use () {
        System.out.println("Use screw driver with header " + header.getInfo());
    }
}
注入:
<bean id = "screwDriver" class = "com.netease.nanodegree.ScrewDriver">
    <constructor-arg>
        <ref bean="header"/>
    </constructor-arg>
</bean>
Test.java
ScrewDriver screwDriver = context.getBean("screwDriver", ScrewDriver.class);
screwDriver.use();
输出:

通过Setter实现注入:
需要删除constructor
加上Setter()
public void setColor(String color) {
    this.color = color;
}

public void setSize(int size) {
    this.size = size;
}
<!-- setter方法注入 -->
<bean id = "header" class = "com.netease.nanodegree.StraightHeader">
    <property name="color" value="${color}"></property>
    <property name="size" value="${size}"></property>
</bean>
<bean id="headerProperties" class="org.springframework.beans.factory.config.PropertyPlaceholderConfigurer">
    <property name="location" value="classpath:header.properties"/>
</bean>
如果一个bean有很多依赖呢?使用一个依赖添加一个配置的方法吗?
Spring提供了自动装配(Autowiring)的机制(三种)
byName: 根据Bean的名称 (Setter方法)
byType: 根据Bean的类型 (Setter方法)
constructor: 构造函数,根据类型
例子:
<!-- autowiring自动装配的方式 -->
<bean id = "screwDriver" class = "com.netease.nanodegree.ScrewDriver" autowire="byName"></bean>
<bean id = "screwDriver" class = "com.netease.nanodegree.ScrewDriver" autowire="byType"></bean>
在ScrewDriver.java中,不再需要setter,只需在private Header header;前加上@Autowired即可
或使用@Resource(@Autowired和@Resource是存在不同包中的,前者在springframework中,后者在javax.annotation中,相对标准一些)
通过Annotation的方式
@Component:定义Bean
@Value:properties注入
@Autowired (Spring)/ @Resource (Java):自动装配依赖
@PostConstruct & @PreDestroy:生命周期回调
例子:
application-context.xml中:
<context:component-scan base-package="com.netease.nanodegree" />
表示支持通过Annotation来定义bean或其他属性。扫描/搜索com.netease.nanodegree包,使用Annotation的方式进行配置
<?xml version="1.0" encoding="UTF-8"?>
<beans xmlns="http://www.springframework.org/schema/beans"
    xmlns:xsi="http://www.w3.org/2001/XMLSchema-instance" xmlns:context="http://www.springframework.org/schema/context"
    xmlns:p="http://www.springframework.org/schema/p"
    xsi:schemaLocation="http://www.springframework.org/schema/beans
    http://www.springframework.org/schema/beans/spring-beans.xsd
    http://www.springframework.org/schema/context
    http://www.springframework.org/schema/context/spring-context.xsd">

    <context:component-scan base-package="com.netease.nanodegree" />

    <bean id="headerProperties"
        class="org.springframework.beans.factory.config.PropertyPlaceholderConfigurer">
        <property name="location" value="classpath:header.properties"/>
    </bean>

    <bean id = "screwDriver" class = "com.netease.nanodegree.ScrewDriver" autowire="byName"></bean>
</beans>
StraightHeader.java中:
删除setters;
添加Annotation:
import org.springframework.beans.factory.annotation.Value;
import org.springframework.stereotype.Component;

@Componentpublic class StraightHeader implements Header {
    @Value("${color}")
    private String color;
    @Value("${size}")
    private int size;

    @Override
    public void doWork() {...}

    @Override
    public String getInfo() {...}
}
报错:No bean named 'header' is defined
因为写@Component时,默认name为StraightHeader而不是header,因此需要specify
@Component("header")
与生命周期有关的Annotation:
@PostConstruct
public void init() {
    System.out.println("init the header");
}

@PreDestroy
public void destroy() {
    System.out.println("destroy the header");
}

利弊:
XML文件:繁琐,但是代码独立(代码和配置分离);实际开发中有些东西需要XML文件来配置
Annotation:简洁,但是配置和代码耦合,配置位置分散,不好管理;实际开发中用于controller/service等
IoC容器单元测试
下列关于IoC容器的描述错误的是:
- A.容器必须由应用代码主动创建;
- B.应用可以从容器中获取所配置的对象;
- C.容器负责所管理对象的生命周期管理;
- D.根据会根据依赖关系组装对象;
如下关于自动装配(Autowiring)说法中,错误的是:
- A.可以根据Bean名称自动注入;
- B.可以根据Bean的类型通过Setter方法注入;
- C.不可以根据Bean的类型通过构建函数注入;
- D.可以根据Bean的类型自动注入;
关于依赖注入方式,说法错误的是:
- A.可选依赖可以通过构造函数注入;
- B.可以通过构造函数注入;
- C.强依赖必须通过构造函数注入;
- D.可以通过Setter方法注入;
关于Bean作用域的singleton和prototype说法正确的是:
- A.prototype只在容器中创建一个对象;
- B.prototype在每次通过容器获取实例时创建一个对象;
- C.singleton在每次通过容器获取实例时创建一个对象;
- D.singleton只在容器中创建一个对象;
关于Bean的生命周期回调,说明正确的是:
- A.生命周期回调发生在运行时;
- B.可以通过创建(初始化时)回调进行申请资源的操作;
- C.销毁回调发生在对象回收前
- D.可以通过销毁时回调进行资源回收的操作
关于Bean的生命周期回调,说明正确的是:
- A.销毁回调发生在对象回收后
- B.可以通过创建(初始化时)回调进行申请资源的操作;
- C.生命周期回调发生在编译时;
- D.生命周期回调发生在运行时;
IoC容器在初始化时,必须要加载名称为application-context.xml的配置文件;
- A.√
- B.×
IoC容器作业
https://my.oschina.net/hava/blog/758277
我们在示例中通过
context.getBean("header", StraightHeader.class);
方式来获取容器管理的对象,查找并学习Spring的API文档,列出getBean函数的其它形式接口,并解释各个接口的差异。
假设我们有个应用(Application),它包含一个写文件的服务(FileWriterService),该服务在创建时会创建并打开一个文件,销毁时关闭该文件,并且该服务包含一个write(String content)方法:会将content写入到文件中,要求:
1. 使用Spring IoC的相关内容组织该程序;
2. 文件路径通过配置文件(properties)指定;
(如果不清楚或者忘记如何打开,关闭以及写入文件,请回顾一个翁老师的 Java基础 课程)
基本要求:必须附加一个项目说明文档,说明每个功能点对应程序的运行结果(截图),项目的接口说明或者关键代码(不要把全部代码贴出来)等可以反映项目结果的内容。提交作业的时候必须有这个项目说明文档,否则会影响最终评分。