第1章.Spring概述
Spring概述
The Spring Framework is a lightweight solution and a potential one-stop-shop for building your enterprise-ready applications.
特点:轻量级、一站式、开发框架
历史:
2002 Rod Johnson, Apache 2.0 License 初始版, an idea of Spring came out due to the bad efficiency and performance of (EJB) Enterprise Java Beans.
(Btw, JavaEE is as good as Spring nowadays)
2004 版本1.0,核心功能
2006 版本2.0 AOP提升
2007 版本2.5 支持Annotation
2009 版本3.0 功能更新
2013 版本4.0 Java 8支持
Spring核心技术:
IoC (Inversion of Control 控制反转):
类比:形形色色的螺丝刀:开始可能只使用一种一字刀口的就可以,但随着业务增多,可能需要的种类越来越多,需要带几十把螺丝刀-->改进成螺丝刀套装
控制的是刀口的形状;IoC之前:制造商来控制(制造了什么就得用什么);IoC之后:使用者来控制选择螺丝刀头
public class ScrewDriver {
    private Header header = new StraightHeader();

    public void use() {
        Syso("Use straight screw driver");
    }
}
ScrewDriver依赖于StraightHeader,并且直接创建StraightHeader对象(创建的是什么对象就只能使用什么)
如果要使用十字刀,则需要修改ScrewDriver类后重新编译:
public class ScrewDriver {
    private Header header = new CrossHeader();

    public void use() {
        Syso("Use cross screw driver");
    }
}
从设计模式来看,耦合了具体的实现而不是接口
--> 创建的时候可以使用螺丝刀头的接口
public class ScrewDriver {
    private Header header;

    public ScrewDriver (Header header) {
        this.header = header;
    }

    public void use() {
        Syso("Use " + header.type() + " screw driver");
    }
}
控制什么?控制的是对象之间的依赖关系:创建时,把依赖的对象(刀头)注入到螺丝刀对象中 -- Dependency Injection (DI 依赖注入)
谁来控制?IoC之前:对象的提供者
IoC之后:IoC容器,使用者通过配置文件告诉IoC容器需要用到什么对象,IoC将对线创建并组合成最终可用的对象
DI是IoC的目标,IoC是DI的实现方式。
Non-IoC verse IoC:

AOP (Aspect-Oriented Programming 面向切面编程)
目标:实现业务逻辑与非业务逻辑分离
Case: 计算器
逻辑:
public class Calculator {
    public int add(int a, int b) {
        return a + b;
    }
}
加入日志(函数入口出口、异常):
public class Calculator {
    private static final Logger logger = Logger.getLogger(Calculator.class);

    public int add(int a, int b) {
        logger.info("Enter into Calculator.add(a,b) method");

        int result = 0;
        try {
            result = a + b;
        } catch (Exception ex {
            logger.info("Exception in Calculator.add(a,b) method");
        }
        logger.info("Leaving Calculator.add(a,b) method");

        return result;
    }
}
可以看到,核心代码只有一行 result = a + b; 但是需要很多代码来实现日志部分。
如果有很多业务 (比如减法)需要使用到日志功能呢?
--> 业务逻辑 与 非业务逻辑 分开:提高可维护性
public class Calculator {
    public int add(int a, int b) {
        return a + b;
    }
    public int sub(int a, int b) {
        return a - b;
    }
}

public class MyLogger {
    private static final Logger logger = Logger.getLogger(MyLogger.class);
    public void methodEnter (Method method) {
        logger.info("Enter into " + method.getMethodInfo() + " method");
    }
    public void methodException (Method method) {
        logger.info("Exception in " + method.getMethodInfo() + " method");
    }
    public void methodLeave (Method method) {
        logger.info("Leaving " + method.getMethodInfo() + " method");
    }
}
Spring框架提供的模块:
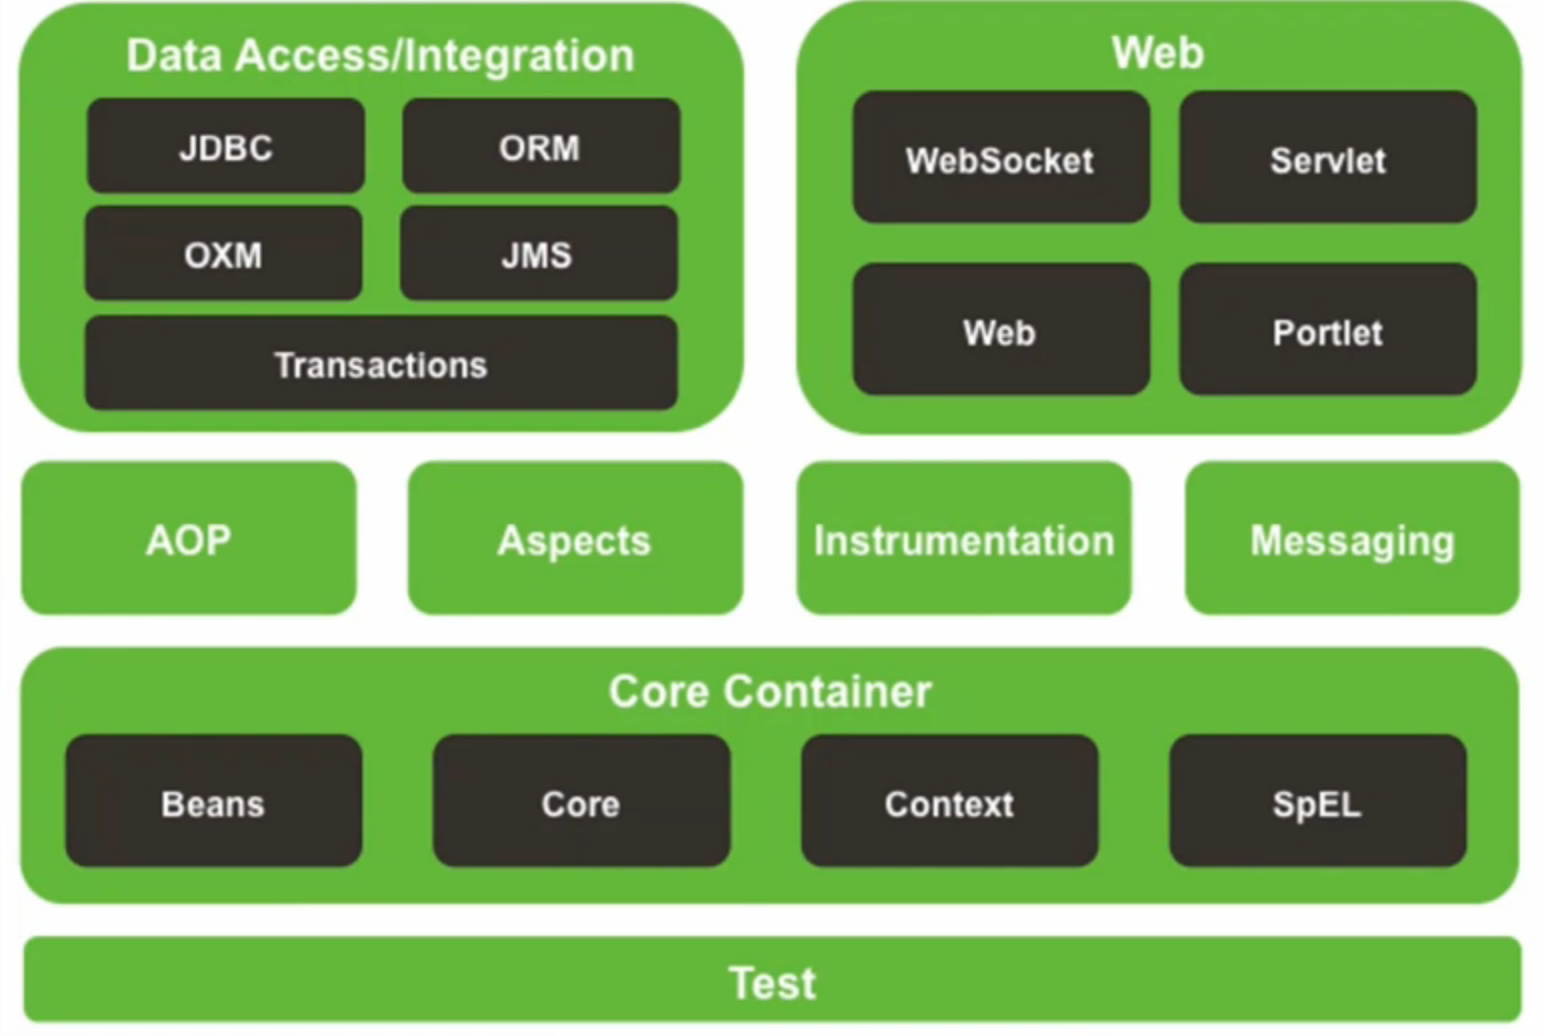
IoC容器--Core Container:对象创建、装配;生命周期管理;上下文环境
AOP;支持AspectJ;/Instrumentation/Messaging(这里不讲)
Data Access 数据访问:
提供JDBC支持,Spring可以将JDBC (连接管理/异常处理等)这些逻辑封装后方便地直接取得访问返回的数据结果
事务管理:Transactions
ORM整合:比如可以整合MyBatis等
OXM/JMS(这里不讲)
Web框架:
提供了基于Servlet的MVC框架
常用Web工具支持
模板支持
Spring其他项目:
Spring包含了很多子项目,Spring framework只是其中一个子项目
比如支持安卓、支持云计算、支持大数据等的框架
https://spring.io/projects
Why Spring framework?
提供方便的开发工具:比如JDBC开发等
整合了常用框架:比如MyBatis
提高了开发者的开发效率
HelloWorld示例:
Eclipse JavaEE中,新建Maven工程
勾选Create a simple project (skip archetype selection)
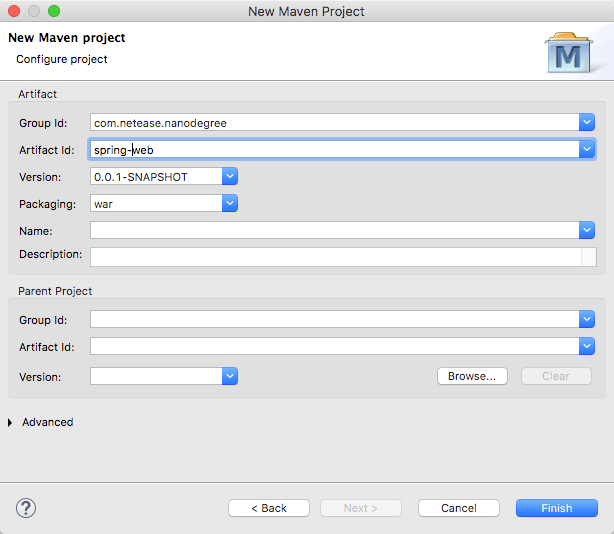
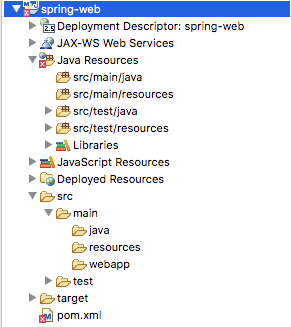
生成符合Maven规范的目录结构
报错:
1. Maven Java EE configuration Problems (1 item) -> web.xml is missing and <failOnMissingWebXML> is set to true
解决:右键项目,Java EE Tools -> Generate Deployment Descriptor Stub
自动在src/main/webapp/下生成了WEB-INF/web.xml文件
<?xml version="1.0" encoding="UTF-8"?>
<web-app xmlns:xsi="http://www.w3.org/2001/XMLSchema-instance"
  xmlns="http://java.sun.com/xml/ns/javaee"
  xsi:schemaLocation="http://java.sun.com/xml/ns/javaee http://java.sun.com/xml/ns/javaee/web-app_2_5.xsd"
  version="2.5">
    <display-name>spring-web</display-name>
    <welcome-file-list>
        <welcome-file>index.html</welcome-file>
        <welcome-file>index.htm</welcome-file>
        <welcome-file>index.jsp</welcome-file>
        <welcome-file>default.html</welcome-file>
        <welcome-file>default.htm</welcome-file>
        <welcome-file>default.jsp</welcome-file>
    </welcome-file-list>
</web-app>
2. Java Build Path Problems (1 item) -> Build path specifies execution environment J2SE-1.5. There are no JREs installed in the workspace that are strictly compatible with this environment.
解决:调整jdk版本:右键项目->Properties->Project Facets->Java->1.7
将写好的index.html文件放置于webapp目录下
对项目添加Tomcat服务:
Servers,添加Server->Tomcat
Run as -> Run on server
http://localhost:8080/spring-web/ 页面出现index.html内容

Spring上下文环境的配置文件:
src/main/resources/application-context.xml
<?xml version="1.0" encoding="UTF-8"?>
<beans xmlns="http://www.springframework.org/schema/beans"
    xmlns:xsi="http://www.w3.org/2001/XMLSchema-instance" xmlns:context="http://www.springframework.org/schema/context"
    xmlns:p="http://www.springframework.org/schema/p"
    xsi:schemaLocation="http://www.springframework.org/schema/beans
    http://www.springframework.org/schema/beans/spring-beans.xsd
    http://www.springframework.org/schema/context
    http://www.springframework.org/schema/context/spring-context.xsd">
</beans>
刚才的web.xml中写入配置:(<welcome-file-list>之后)
<context-param>
    <param-name>contextConfigLocation</param-name>
    <param-value>
    classpath:application-context.xml </param-value>
</context-param>

<listener>
    <listener-class>org.springframework.web.context.ContextLoaderListener</listener-class>
</listener>

<servlet>
    <servlet-name>example</servlet-name>
    <servlet-class>org.springframework.web.servlet.DispatcherServlet</servlet-class>
</servlet>
<servlet-mapping>
    <servlet-name>example</servlet-name>
    <url-pattern>/api/*</url-pattern>
</servlet-mapping>
<listener>中的ContextLoaderListener:在Spring开始的时候到classpath:application-context.xml中加载环境的上下文配置
<servlet>中的DispatcherServlet:Spring中Servlet的入口 (对应servlet文件)
在WEB-INF下添加example-servlet.xml (因为servlet-name为example,需要符合servlet命名规则:在servletname后加上"-servlet")
<beans xmlns="http://www.springframework.org/schema/beans"
    xmlns:context="http://www.springframework.org/schema/context"
    xmlns:mvc="http://www.springframework.org/schema/mvc" xmlns:xsi="http://www.w3.org/2001/XMLSchema-instance"
    xsi:schemaLocation="
    http://www.springframework.org/schema/beans
    http://www.springframework.org/schema/beans/spring-beans.xsd
    http://www.springframework.org/schema/context
    http://www.springframework.org/schema/context/spring-context.xsd
    http://www.springframework.org/schema/mvc
    http://www.springframework.org/schema/mvc/spring-mvc.xsd">

    <context:component-scan base-package="com.netease.nanodegree.web.controller" />
</beans>
能看到这里的配置只有一个:<context:component-scan base-package="com.netease.course.web.controller"/>
表示在这个包下搜索组件
创建Spring MVC中的Controller:
src/main/java -> New Java Class named HelloController.java -> package: com.netease.nanodegree.web.controller
package com.netease.nanodegree.web.controller;

@Controller
@RequestMapping(value = "/hello")
public class HelloController {

    @RequestMapping(value = "/spring")
    public void spring(HttpServletResponse response) throws IOException {
        response.getWriter().write("Hello, Spring Web!");
    }
}
需要在spring-web/pom.xml中添加相应的依赖
<dependencies>
    <dependency>
    <!-- servlet的依赖 -->
        <groupId>javax.servlet</groupId>
        <artifactId>javax.servlet-api</artifactId>
        <version>3.0.1</version>
        <scope>provided</scope>
    </dependency>

    <dependency>
        <!-- Spring的依赖 -->
        <groupId>org.springframework</groupId>
        <artifactId>spring-webmvc</artifactId>
        <version>4.2.2.RELEASE</version>
    </dependency>
</dependencies>
Run on server:
http://localhost:8080/spring-web/api/hello/spring

那么,Spring是怎么提高web开发效率的呢?
在上例中不是很明显,但是如果有很多接口呢?
直接使用Servlet的话,需要设置很多Servlet,每个Servlet都要配置属性;
通过Spring MVC的话,只需要配置Servlet的入口,其他的都可以进行管理