Nginx初接触
基于Nginx的rtmp流媒体直播服务器搭建
致读这篇文章的朋友
首先这个标题其实是有一定程度的欺骗性的,哪个初学Nginx或者没接触过Nginx的说搭就搭出一个这个东西。但是这个这个东西就在我身上发生了,说到底以我现在的技术水平让我说对Nginx的理解和认识,我就一句话那个是老毛子开发的一个很好用扩展性强的HTTP和反向代理服务(反向代理(Reverse Proxy)方式是指以代理服务器来接受internet上的连接请求,然后将请求转发给内部网络上的服务器,并将从服务器上得到的结果返回给internet上请求连接的客户端,此时代理服务器对外就表现为一个反向代理服务器。典型的代表就是CDN加速)感觉会逐渐替代Apache的一个东西吧。你可能问我关于nginx的几个参数我可能都要出查看help或者翻阅资料,但就我所知的很少知识就可以完成今天的目标。本次的搭建肯定会存在种种的不足。但是能够完成我们的基础目标,但是我觉得最重要的意义是想当时它诱惑我一样,让不了解或初学nginx的人产生对nginx的学习兴趣。也侧面的证明了nginx的友好性和强大的功能。
需求
让我们假设一个环境,一天我的老板像要在公司的小会议室里面播放一个视频但是这个会议室并没有投影仪,而且会议室不算大也不小,如果放在一个电脑上肯定有人看不清,更重要的是这次会议还有几个客户代表,如果整个视频不能出现明显的掉帧,最起码要求30帧。这个会议室是有公司的局域网的,所以只要带电脑便可以链接进入网络。
那么我们需要搭建一个可以实时同步的直播平台,但是直播肯定还是存在延迟,但是我们尽量减少延迟时间
那么我们在网上搜索资料,然后的出我们今天的解决方案,基于Nginx的rtmp流媒体直播服务器搭建。
首先
我们需要下载最新的nginx 和它的第三方模块nginx-rtmp-module
nginx我推荐 nginx-1.14.0.tar.gz或最新版本或者1.8.0以上版本可以在官网找到http://nginx.org/en/download.html
nginx-rtmp-module可以在github上下载https://github.com/arut/nginx-rtmp-module
下载并解压
tar xvf nginx-1.14.1.tar.gz

tar xvf nginx-rtmp-module.tar.xz

yum install -y openssl-devel
进入nginx的源码目录
然后配置安装选项可以通过./configure --help 查看配置选项
将ssl和我们的rtmp模块设置编译
cd nginx-1.14.0/

./configure --with-http_ssl_module --add-module=../nginx-rtmp-module

make && make install
然后nginx就添加了openssl和rtmp被默认安装在/usr/local/nginx
我们通过这个网址https://www.nginx.com/resources/wiki/start/topics/examples/systemd/获得centos的nginx.service 模板
[Unit]
Description=The NGINX HTTP and reverse proxy server
After=syslog.target network.target remote-fs.target nss-lookup.target

[Service]
Type=forking
PIDFile=/run/nginx.pid
ExecStartPre=/usr/sbin/nginx -t
ExecStart=/usr/sbin/nginx
ExecReload=/usr/sbin/nginx -s reload
ExecStop=/bin/kill -s QUIT $MAINPID
PrivateTmp=true

[Install]
WantedBy=multi-user.target
我们根据我们的实际情况修改这个文件
vim /lib/systemd/system/nginx.service
[Unit]
Description=The NGINX HTTP and reverse proxy server
After=syslog.target network.target remote-fs.target nss-lookup.target

[Service]
Type=forking
PIDFile=/run/nginx.pid
ExecStartPre=/usr/local/nginx/sbin/nginx -t
ExecStart=/usr/local/nginx/sbin/nginx
ExecReload=/usr/local/nginx/sbin/nginx -s reload
ExecStop=/bin/kill -s QUIT $MAINPID
PrivateTmp=true

[Install]
WantedBy=multi-user.target
:wq
这样我们就可以通过systemctrl 来管理控制nginx服务
然后我们返回我们的服务目录/usr/local/nginx
进入conf目录修改nginx.conf文件
我们可以在rtmp的github页面https://github.com/arut/nginx-rtmp-module查询到相关设置
官方示例
Example nginx.conf
rtmp {

    server {

        listen 1935;

        chunk_size 4000;

        # TV mode: one publisher, many subscribers
        application mytv {

            # enable live streaming
            live on;

            # record first 1K of stream
            record all;
            record_path /tmp/av;
            record_max_size 1K;

            # append current timestamp to each flv
            record_unique on;

            # publish only from localhost
            allow publish 127.0.0.1;
            deny publish all;

            #allow play all;
        }

        # Transcoding (ffmpeg needed)
        application big {
            live on;

            # On every pusblished stream run this command (ffmpeg)
            # with substitutions: $app/${app}, $name/${name} for application & stream name.
            #
            # This ffmpeg call receives stream from this application &
            # reduces the resolution down to 32x32. The stream is the published to
            # 'small' application (see below) under the same name.
            #
            # ffmpeg can do anything with the stream like video/audio
            # transcoding, resizing, altering container/codec params etc
            #
            # Multiple exec lines can be specified.

            exec ffmpeg -re -i rtmp://localhost:1935/$app/$name -vcodec flv -acodec copy -s 32x32
                        -f flv rtmp://localhost:1935/small/${name};
        }

        application small {
            live on;
            # Video with reduced resolution comes here from ffmpeg
        }

        application webcam {
            live on;

            # Stream from local webcam
            exec_static ffmpeg -f video4linux2 -i /dev/video0 -c:v libx264 -an
                               -f flv rtmp://localhost:1935/webcam/mystream;
        }

        application mypush {
            live on;

            # Every stream published here
            # is automatically pushed to
            # these two machines
            push rtmp1.example.com;
            push rtmp2.example.com:1934;
        }

        application mypull {
            live on;

            # Pull all streams from remote machine
            # and play locally
            pull rtmp://rtmp3.example.com pageUrl=www.example.com/index.html;
        }

        application mystaticpull {
            live on;

            # Static pull is started at nginx start
            pull rtmp://rtmp4.example.com pageUrl=www.example.com/index.html name=mystream static;
        }

        # video on demand
        application vod {
            play /var/flvs;
        }

        application vod2 {
            play /var/mp4s;
        }

        # Many publishers, many subscribers
        # no checks, no recording
        application videochat {

            live on;

            # The following notifications receive all
            # the session variables as well as
            # particular call arguments in HTTP POST
            # request

            # Make HTTP request & use HTTP retcode
            # to decide whether to allow publishing
            # from this connection or not
            on_publish http://localhost:8080/publish;

            # Same with playing
            on_play http://localhost:8080/play;

            # Publish/play end (repeats on disconnect)
            on_done http://localhost:8080/done;

            # All above mentioned notifications receive
            # standard connect() arguments as well as
            # play/publish ones. If any arguments are sent
            # with GET-style syntax to play & publish
            # these are also included.
            # Example URL:
            #   rtmp://localhost/myapp/mystream?a=b&c=d

            # record 10 video keyframes (no audio) every 2 minutes
            record keyframes;
            record_path /tmp/vc;
            record_max_frames 10;
            record_interval 2m;

            # Async notify about an flv recorded
            on_record_done http://localhost:8080/record_done;

        }


        # HLS

        # For HLS to work please create a directory in tmpfs (/tmp/hls here)
        # for the fragments. The directory contents is served via HTTP (see
        # http{} section in config)
        #
        # Incoming stream must be in H264/AAC. For iPhones use baseline H264
        # profile (see ffmpeg example).
        # This example creates RTMP stream from movie ready for HLS:
        #
        # ffmpeg -loglevel verbose -re -i movie.avi  -vcodec libx264
        #    -vprofile baseline -acodec libmp3lame -ar 44100 -ac 1
        #    -f flv rtmp://localhost:1935/hls/movie
        #
        # If you need to transcode live stream use 'exec' feature.
        #
        application hls {
            live on;
            hls on;
            hls_path /tmp/hls;
        }

        # MPEG-DASH is similar to HLS

        application dash {
            live on;
            dash on;
            dash_path /tmp/dash;
        }
    }
}

# HTTP can be used for accessing RTMP stats
http {

    server {

        listen      8080;

        # This URL provides RTMP statistics in XML
        location /stat {
            rtmp_stat all;

            # Use this stylesheet to view XML as web page
            # in browser
            rtmp_stat_stylesheet stat.xsl;
        }

        location /stat.xsl {
            # XML stylesheet to view RTMP stats.
            # Copy stat.xsl wherever you want
            # and put the full directory path here
            root /path/to/stat.xsl/;
        }

        location /hls {
            # Serve HLS fragments
            types {
                application/vnd.apple.mpegurl m3u8;
                video/mp2t ts;
            }
            root /tmp;
            add_header Cache-Control no-cache;
        }

        location /dash {
            # Serve DASH fragments
            root /tmp;
            add_header Cache-Control no-cache;
        }
    }
}
Multi-worker streaming example
rtmp_auto_push on;

rtmp {
    server {
        listen 1935;

        application mytv {
            live on;
        }
    }
}
如果我们仅需要完成基本功能
那么我们仅需在配置文件中开启rtmp并设置缓存文件即可
在该文件末尾添加并修改http的server部分即可
以下是我的配置文件
#user  nobody;
worker_processes  1;

#error_log  logs/error.log;
#error_log  logs/error.log  notice;
#error_log  logs/error.log  info;

#pid        logs/nginx.pid;


events {
    worker_connections  1024;
}


http {
    include       mime.types;
    default_type  application/octet-stream;

    #log_format  main  '$remote_addr - $remote_user [$time_local] "$request" '
    #                  '$status $body_bytes_sent "$http_referer" '
    #                  '"$http_user_agent" "$http_x_forwarded_for"';

    #access_log  logs/access.log  main;

    sendfile        on;
    #tcp_nopush     on;

    #keepalive_timeout  0;
    keepalive_timeout  65;

    #gzip  on;

    server {
        listen       81;
        server_name  localhost;

        #charset koi8-r;

        #access_log  logs/host.access.log  main;

        location / {
            root   /usr/local/nginx/html;
            index  index.html index.htm;
        }

        #error_page  404              /404.html;

        # redirect server error pages to the static page /50x.html
        #
        error_page   500 502 503 504  /50x.html;
        location = /50x.html {
            root   html;
        }

        # proxy the PHP scripts to Apache listening on 127.0.0.1:80
        #
        #location ~ .php$ {
        #    proxy_pass   http://127.0.0.1;
        #}

        # pass the PHP scripts to FastCGI server listening on 127.0.0.1:9000
        #
        #location ~ .php$ {
        #    root           html;
        #    fastcgi_pass   127.0.0.1:9000;
        #    fastcgi_index  index.php;
        #    fastcgi_param  SCRIPT_FILENAME  /scripts$fastcgi_script_name;
        #    include        fastcgi_params;
        #}

        # deny access to .htaccess files, if Apache's document root
        # concurs with nginx's one
        #
        #location ~ /.ht {
        #    deny  all;
        #}
    }


    # another virtual host using mix of IP-, name-, and port-based configuration
    #
    #server {
    #    listen       8000;
    #    listen       somename:8080;
    #    server_name  somename  alias  another.alias;

    #    location / {
    #        root   html;
    #        index  index.html index.htm;
    #    }
    #}


    # HTTPS server
    #
    #server {
    #    listen       443 ssl;
    #    server_name  localhost;

    #    ssl_certificate      cert.pem;
    #    ssl_certificate_key  cert.key;

    #    ssl_session_cache    shared:SSL:1m;
    #    ssl_session_timeout  5m;

    #    ssl_ciphers  HIGH:!aNULL:!MD5;
    #    ssl_prefer_server_ciphers  on;

    #    location / {
    #        root   html;
    #        index  index.html index.htm;
    #    }
    #}

}
rtmp_auto_push on;

rtmp {
    server {
        listen 1935;

        application mytv {
            live on;
        hls on;
        hls_path /usr/local/nginx/html/hls;
        hls_fragment 2s;
        }
    }
}
然后创建hls目录
mkdir /usr/local/nginx/html/hls
关闭或修改selinux和修改防火墙策略
这步不演示请根据需要修改,
我直接将两个全部关闭
最后通过
systemctl start nginx.service
启动服务
至此我们的流媒体直播服务器就搭建完成了
在obs中设置推流地址

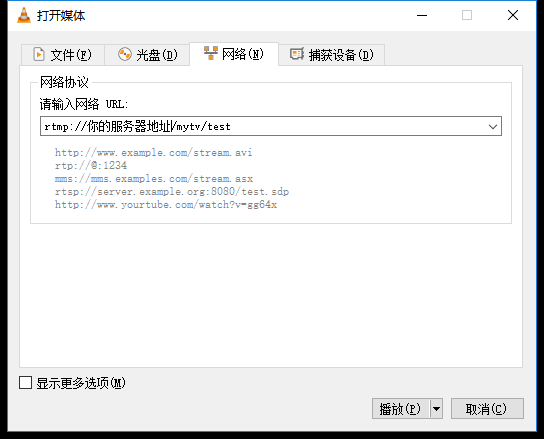
在vlc中设置串流地址
这样我们就完成了简单的流媒体直播服务器,推流和串流。