A◇命令简汇
- yum list installed mysql*                       // 查看是否安装
- rpm -qa | grep mysql*
- systemctl status mysqld                         // 查看运行状态
- service mysqld status
- systemctl list-unit-files | grep enabled        // 查看是否随机启动
- ntsysv
- ps -ef | grep mysqld                            // 查看mysql路径
- whereis mysql
- which mysql
B◇安装准备
1、卸载旧版本
- CentOS6
| [root@wg ~]# rpm -qa | grep mysql              // 查看是否安装,建议用↓
| [root@wg ~]# yum list installed | grep mysql   // 如不知安装方式,用这种
| [root@wg ~]# service mysqld status
| [root@wg ~]# service mysqld stop
| -------------------
| [root@wg ~]# rpm -ev --nodeps MySQL-devel-5.6.23-1.linux_glibc2.5
| [root@wg ~]# rpm -ev --nodeps MySQL-server...
| [root@wg ~]# rpm -ev ...
| -------------------
| [root@wg ~]# chkconfig --list | grep -i mysql  // 查看是否有mysql启动项

- CentOS7
| [root@wg ~]# rpm -qa | grep mariadb            // centos7默认mariadb
| [root@wg ~]# yum list installed | grep mariadb
| [root@wg ~]# systemctl status mariadb
| [root@wg ~]# systemctl stop mariadb
| [root@wg ~]# systemctl list-unit-files | grep mariadb   // 查询启动项
| [root@wg ~]# yum remove mariadb
| [root@wg ~]# systemctl disable mariadb
| # 如无记错centos7中mariadb的lib块提供对mysql的启动支持,非编译安装不卸,否则坑多

# rpm -e --nodeps 强制接卸(--nodeps 不检查依赖关系;--force 强制安装)
# rpm删除费劲,有依赖关系,可以用yum remove + 包名来删除
2、清除旧文件
[root@wg ~]# find / -name mysql      // 最好用find查
[root@wg ~]# whereis mysql           // 另外一种方式
... 删除对应文件...

[root@wg ~]# find -name my.cnf       // 删除原/etc/my.cnf或备份
3、检查、创建用户和用户组
[root@wg ~]# cat /etc/group |grep mysql
[root@wg ~]# cat /etc/passwd | grep mysql
[root@wg ~]# useradd -r -s /sbin/nologin mysql
C◇方式 I — yum(二进制包)
1、编辑yum源文件
[root@wg ~]# vi /etc/yum.repos.d/mysql-community.repo
----------
[mysql57-community]
name=MySQL 5.7 Community Server
baseurl=http://repo.mysql.com/yum/mysql-5.7-community/el/7/$basearch/
enabled=1
gpgcheck=0
gpgkey=file:////etc/pki/rpm-gpg/RPM-GPG-KEY-mysql
----------
2、装载和启动
[root@wg ~]# yum -y install mysql-community-server
[root@wg ~]# systemctl start mysqld
[root@wg ~]# systemctl enable mysqld
D◇方式 II — rpm包(二进制包)
1、下载
wget https://cdn.mysql.com/Downloads/MySQL-5.7/mysql-community-server-5.7.36-1.el7.x86_64.rpm
wget https://cdn.mysql.com/Downloads/MySQL-5.7/mysql-community-client-5.7.36-1.el7.x86_64.rpm
wget https://cdn.mysql.com/Downloads/MySQL-5.7/mysql-community-libs-5.7.36-1.el7.x86_64.rpm
wget https://cdn.mysql.com/Downloads/MySQL-5.7/mysql-community-common-5.7.36-1.el7.x86_64.rpm
2、包说明
  RPM包                             简介
----------------------------------------------------------
| mysql-community-server          | 数据库服务端与相关工具
| mysql-community-client          | MySQL客户端
| mysql-community-common          | 服务端和客户端常用库文件
| mysql-community-devel           | 客户端开发用的头文件及库
| mysql-community-libs            | MySQL数据库客户端共享库
| mysql-community-libs-compat     | 兼容老版本的共享库
| mysql-community-embedded        | MySQL嵌入式版本
| mysql-commercial-embedded-devel | 嵌入式版本的头文件与库
| mysql-community-test            | MySQL测试套件
3、安装
[root@wg ~]# rpm -ivh mysql-community-client-5.7.36-1.el7.x86_64.rpm
[root@wg ~]# rpm -ivh ...
[root@wg ~]# rpm ...
[root@wg ~]# ...
E◇方式 III — tar包(二进制包)
1、准备
[root@wg opt]# yum install -y ncurses-devel libaio-devel glibc autoconf gcc-c++ openssl openssl-devel
[root@wg opt]# tar xvf mysql...glibc2.12-x86_64.tar.gz -C /usr/local
--- 想了想,还是怕自己会忘,加上吧,跳转到/usr/local目录 ---
[root@wg local]# ln -sv mysql-5.7.35-linux-glibc2.12-x86_64 mysql
[root@wg local]# chown -R mysql:mysql mysql/
[root@wg local]# chmod -R 755 mysql/
2、初始化数据库
- 1.创建相关目录并设置权限
| [root@wg local]# mkdir -p /data/mysql/3306/{data,log,tmp,mysqld}
| [root@wg local]# chown -R mysql:mysql /data/mysql/
| [root@wg local]# chmod -R 755 /data/mysql/
¤ 记忆扭曲,tar包和源码包在这配置my.cnf;yum和rpm可不配;见配置文件部分 ¤
- 3.初始化数据库
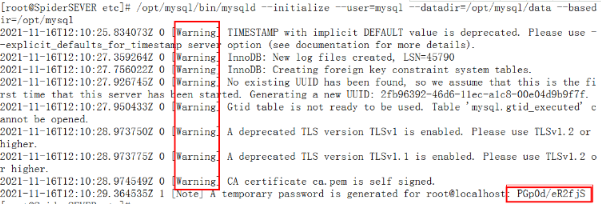
| [root@wg ~]# /usr/local/mysql/bin/mysqld --initialize --user=mysql --datadir=/data/mysql/3306/data
| # 如没产生error,安装成功,台式机正常
| # 再笔记本做出现error,提示shutdown now,重启正常
| # 图右下角为临时密码,首次登录需使用临密登录,除非跳过密码验证
| # --initialize-insecure也可以跳过密码验证
| # 其实初始化步骤可省略,直接启
3、CentOS7
【CentOS7完成1、2后,配置systemd文件,重启生效】
[root@wg ~]# vi /usr/lib/systemd/system/mysqld.service
| [Unit]
| Description=MySQL Server	   // 服务描述或名称
| Documentation=man:mysqld(8)      // 帮助文档,下同
| Documentation=http://dev.mysql.com/doc/refman/en/using-systemd.html
| After=network.target	           // 启动顺序,在network之后
| After=syslog.target
|
| [Install]
| WantedBy=multi-user.target	   // 开机启动功能
|
| [Service]
| User=mysql		           // 用户
| Group=mysql			   // 用户组
| Type=forking                     // ExecStart产生子进程成为服务的主进程。启动完后父进程退出。
| PIDFile=/data/mysql/3306/mysqld/mysqld.pid	// pid文件
| # Disable service start and stop timeout logic of systemd for mysqld service.
| TimeoutSec=0
| # Execute pre and post scripts as root
| PermissionsStartOnly=true
| # Needed to create system tables
| ExecStartPre=/usr/local/mysql/bin/mysqld_pre_systemd
| # Start main service
| ExecStart=/usr/local/mysql/bin/mysqld --daemonize --pid-file=/data/mysql/3306/mysqld/mysqld.pid $MYSQLD_OPTS
| # Use this to switch malloc implementation
| EnvironmentFile=-/etc/sysconfig/mysql
| # Sets open_files_limit
| LimitNOFILE = 5000
| Restart=on-failure
| RestartPreventExitStatus=1
| PrivateTmp=false

[root@wg ~]# systemctl daemon-reload
[root@wg ~]# reboot
[root@wg ~]# systemctl start mysqld
[root@wg ~]# systemctl enable mysqld
3、CentOS6
【CentOS6完成1、2后,执行剩余步骤,重启生效——N久前做的,步骤可能有问题,回头再整理】
- 1.复制启动脚本到资源目录并设执行权限
| [root@wg ~]# cp /usr/local/mysql/support-files/mysql.server /etc/rc.d/init.d/mysqld
| [root@wg ~]# chmod +x /etc/rc.d/init.d/mysqld
| [root@wg ~]# chkconfig --add mysqld
| # /etc/init.d和/etc/rc.d/init.d又傻傻分不清楚哩~
| # chkconfig是6的,又晕乎的用这了(将mysqld服务加入到系统服务)

- 2.创建命令的软连接(这里有问题)
| [root@wg ~]# ln -s /usr/local/mysql/bin/mysql /usr/bin
| [root@wg ~]# ln -sf /usr/local/mysql/mysql/bin/mysql /usr/local/bin/mysql
| # 第二条命令不创建的话 在6可能会报 bash:command not found的错误
| # mysqladmin mysqldump等不可用时候都可按此方法操作

- 3.添加环境变量
| [root@wg ~]# echo 'export PATH=$PATH:/usr/local/mysql/bin/' > /etc/profile.d/mysql.sh
| [root@wg ~]# source /etc/profile.d/mysql.sh

[root@wg ~]# reboot
[root@wg ~]# service mysqld start
G◇配置文件
- yum安装已经生成了my.cnf配置文件,参照下边做相应调整,再重启mysql

- rpm包好像可能应该也有my.cnf配置文件,有没有都可以参照下方

- tar包和源码包启动mysql前要先创建和配置my.cnf文件

[root@wg bin]# vi /etc/my.cnf
| [client]
| socket=/data/mysql/3306/tmp/mysql.sock
| port=3306
|
| [mysqld]
| port=3306
| basedir=/usr/local/mysql
| datadir=/data/mysql/3306/data
| pid-file=/data/mysql/3306/mysqld/mysqld.pid
| log_error=/data/mysql/3306/log/mysqld.log
| slow_query_log_file=/data/mysql/3306/log/mysql-slow.log
| socket=/data/mysql/3306/tmp/mysql.sock
| user=mysql
| slow_query_log=1
| long_query_time=1
| skip-external-locking
| key_buffer_size=32M
| max_allowed_packet=1024M
| table_open_cache=128
| sort_buffer_size=768K
| net_buffer_length=8K
| read_buffer_size=768K
| read_rnd_buffer_size=512K
| myisam_sort_buffer_size=8M
| thread_cache_size=16
| query_cache_size=16M
| tmp_table_size=32M
| performance_schema_max_table_instances=1000
| explicit_defaults_for_timestamp=true
| #skip-networking
| max_connections=500
| max_connect_errors=100
| open_files_limit=65535
| log_bin=mysql-bin
| binlog_format=mixed
| server_id=232
| expire_logs_days=10
| early-plugin-load=""
| default_storage_engine=InnoDB
| innodb_file_per_table=1
| innodb_buffer_pool_size=128M
| innodb_log_file_size=32M
| innodb_log_buffer_size=8M
| innodb_flush_log_at_trx_commit=1
| innodb_lock_wait_timeout=50
|
| [mysqldump]
| quick
| max_allowed_packet=16M
|
| [mysql]
| no-auto-rehash
|
| [myisamchk]
| key_buffer_size=32M
| sort_buffer_size=768K
| read_buffer=2M
| write_buffer=2M
|
| -- 我需要重新组织语言,这些莫乱加,没整理清楚,可能会影响启动,跟上边是否重复的也不知道 --
| skip-grant-tables                      // 设置跳过密码验证;可选
| validate_password_policy=0             // 设置密码强度等级;可选
| default-storage-engine=InnoDB          // 默认引擎innodb;可选
| transaction_isolation=READ-COMMITTED   // 事务隔离级别;可选
| gtid-mode=on                           // gtid是否开启;可选
| enforce-gtid-consistency=1             // 检测事务是否有gtid;可选
| slave_parallel_type=logical_clock      // 多线程复制类型为本地时钟;可选
| slave_parallel_worker=5                // 发起多少个sql thread线程;可选
| explicit_defaults_for_timestamp=true   // 5.66以后的一个坑
| ...
H◇密码设置
- yum和rpm直接启动mysql,就能生成临时密码
| [root@wg log]# systemctl start mysqld
| [root@wg log]# grep 'temporary password' /data/mysql/3306/log/mysqld.log
| 2020...password...@localhost: >jU&(!NLy2B/   // 冒号后全部是临密,不含空格
| # 默认日志文件,也就是存放临时密码文件在 /var/log/mysqld.log,我的改了
| -------
| [root@wg log]# mysql -uroot -p
| Enter password:                              // 复制密码登录
| Welcome to the MySQL monitor.  Commands end with ; or \g.
| Your MySQL connection id is 5
| Server version: 5.7.36
| ...
| -------
| [root@wg log]# ALTER USER 'root'@'localhost' IDENTIFIED BY '密码';
| Query OK, 0 rows affected (0.11 sec)
| # 修改密码,密码自设,不改不能操作;只能是localhost或者本地ip,授权远程另写;

- tar包和源码包临时密码初始化后生成,直接grep找密码就行了
| # 我在这两种方式安装时,修改了mysqld.log路径,
| # /data/mysql/3306/log下,见配置文件或安装时mkdir路径

- 跳过密码设置
| skip-grant-tables                     // 在配置文件my.cnf的[mysqld]下加入
| [root@wg log]# systemctl restart mysqld  // 重启生效;没启的直接启动
| # 跳过密码方式2: 初始化步骤 --initialize-insecure 也可以跳过密码验证
| -------
| [root@wg log]# mysql -uroot -p password  // 两次回车直接登录

- 如果使用了跳过密码,则上边的修改方式无效,用下边的方法
| mysql> update user set authentication_string=password("密码") where user="root" and Host="localhost";

- 5.6版本没有初始密码,执行下边命令,两次回车直接登录
| [root@wg log]# mysqladmin -uroot -p password

- 如因密码强度高,无法正常修改,可以先降低密码强度等级
| mysql> set global validate_password_policy=LOW;
| # 也可在配置文件里设置或初始化时操作
I◇开启远程连接
mysql> show databases;
mysql> use mysql;
mysql> show tables;
mysql> select * from user\G
mysql> select user,host from user;
mysql> grant all privileges on *.* to 'root'@'%' identified by '密码' with grant option;
mysql> flush privileges;              // 权限刷新
mysql> select user,host from user;

- 授权语句全翻译
| GRANT:赋权命令
| ALL PRIVILEGES:当前用户的所有权限
| ON:介词
| *.*:当前用户对所有数据库和表的相应操作权限
| TO:介词
| ‘root’@’%’:权限赋给root用户,所有ip都能连接
| IDENTIFIED BY 'password':连接时输入密码,密码是设置好的真实密码
| WITH GRANT OPTION:允许级联赋权
| 级联赋权意思是可以把自身的权限传递给要被赋权的用户
| show grants;可以查看自身权限

- flush privileges; 出现error 1146 情况
| mysql库查servers表,可看到server.ibd和server.frm 可知是innodb表
| 删除这个表 drop table if exists servers;
| 重新创建表,用MyISAM引擎
|---------------------------------------------
| mysql> CREATE TABLE 'servers'(
|     -> 'Server_name' char(64) NOT NULL,
|     -> 'Host' char(64) NOT NULL,
|     -> 'Db' char(64) NOT NULL,
|     -> 'Username' char(64) NOT NULL,
|     -> 'Password' char(64) NOT NULL,
|     -> 'Port' int(4) DEFAULT NULL,
|     -> 'Socket' char(64) DEFAULT NULL,
|     -> 'Wrapper' char(64) NOT NULL,
|     -> 'Owner' char(64) NOT NULL,
|     -> PRIMARY KEY ('Server_name')
|     -> ) ENGINE=MyISAM DEFAULT CHARSET=utf8;
K◇配置防火墙
¤ 又是不知道多少年前写的了,回头整理防火墙的时候一并处理 ¤

- centos6是iptables
- centos7是firewalld

vi /etc/sysconfig/iptables           // 黏贴下方代码到22端口下边
-----分割线-----
 -A INPUT -p tcp -m state --state NEW -m tcp --dport 22 -j ACCEPT
-----分割线-----

systemctl start iptables.service
systemctl restart iptables.service   // 重启防火墙使配置生效
systemctl enable iptables.service    // 设置防火墙开机启动

- 安装iptables
| systemctl stop firewalld           // 晕,又回7了,先停了firewall
| systemctl mask firewalld
| yum install -y iptables
| yum install iptables-services

- iptables相关命令
| service iptables status            // 检查是否安装了iptables
| yum list installed | grep iptables
| yum install -y iptables            // 安装iptables
| yum update iptables                // 升级iptables
| yum install iptables-services      // 安装iptables-services
| systemctl disable iptables         // 禁止iptables服务
| systemctl stop iptables            // 暂停服务
| systemctl enable iptables          // 解除禁止iptables
| systemctl start iptables           // 开启服务