以下内容引用自http://wiki.jikexueyuan.com/project/jdbc/transactions.html:
如果JDBC连接是处于自动提交模式下,该模式为默认模式,那么每句SQL语句都是在其完成时提交到数据库。
对简单的应用程序来说这种模式相当好,但有三个原因可能想关闭自动提交模式,并管理自己的事务
- 为了提高性能
- 为了保持业务流程的完整性
- 使用分布式事务
可以通过事务在任意时间来控制以及更改应用到数据库。它把单个SQL语句或一组SQL语句作为一个逻辑单元,如果其中任一语句失败,则整个事务失败。
若要启用手动事务模式来代替JDBC驱动程序默认使用的自动提交模式的话,使用Connection对象的的setAutoCommit()方法。如果传递一个布尔值false到setAutoCommit()方法,就关闭自动提交模式。也可以传递一个布尔值true将其再次打开。
例如,如果有一个名为conn的Connection对象,以下的代码将关闭自动提交模式:
conn.setAutoCommit(false);
一、提交和回滚
当完成了修改,并且要提交修改,可以在connection对象里调用commit()方法,如下所示:
conn.commit( );
另外,用名为conn的连接回滚数据到数据库,使用如下所示的代码:
conn.rollback( );
下面的例子说明了如何使用提交和回滚对象:
try{
   //Assume a valid connection object conn
   conn.setAutoCommit(false);
   Statement stmt = conn.createStatement();

   String SQL = "INSERT INTO Employees  " + "VALUES (106, 20, 'Rita', 'Tez')";
   stmt.executeUpdate(SQL);
   //Submit a malformed SQL statement that breaks
   String SQL = "INSERTED IN Employees  " + "VALUES (107, 22, 'Sita', 'Singh')";
   stmt.executeUpdate(SQL);
   // If there is no error.
   conn.commit();
}catch(SQLException se){
   // If there is any error.
   conn.rollback();
}
在这种情况下,之前的INSERT语句不会成功,一切都将被回滚到最初状态。
示例:
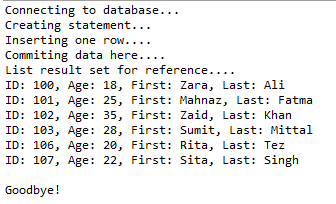
//STEP 1. Import required packages
import java.sql.*;

public class JDBCExample {
    // JDBC driver name and database URL
    static final String JDBC_DRIVER = "com.mysql.jdbc.Driver";
    static final String DB_URL = "jdbc:mysql://localhost/Test?serverTimezone=UTC";

    // Database credentials
    static final String USER = "root";
    static final String PASS = "root";

    public static void main(String[] args) {
        Connection conn = null;
        Statement stmt = null;
        try {
            // STEP 2: Register JDBC driver
            Class.forName("com.mysql.jdbc.Driver");

            // STEP 3: Open a connection
            System.out.println("Connecting to database...");
            conn = DriverManager.getConnection(DB_URL, USER, PASS);

            // STEP 4: Set auto commit as false.
            conn.setAutoCommit(false);

            // STEP 5: Execute a query to create statment with
            // required arguments for RS example.
            System.out.println("Creating statement...");
            stmt = conn.createStatement(ResultSet.TYPE_SCROLL_INSENSITIVE, ResultSet.CONCUR_UPDATABLE);

            // STEP 6: INSERT a row into Employees table
            System.out.println("Inserting one row....");
            String SQL = "INSERT INTO Employees " + "VALUES (106, 20, 'Rita', 'Tez')";
            stmt.executeUpdate(SQL);

            // STEP 7: INSERT one more row into Employees table
            SQL = "INSERT INTO Employees " + "VALUES (107, 22, 'Sita', 'Singh')";
            stmt.executeUpdate(SQL);

            // STEP 8: Commit data here.
            System.out.println("Commiting data here....");
            conn.commit();

            // STEP 9: Now list all the available records.
            String sql = "SELECT id, first, last, age FROM Employees";
            ResultSet rs = stmt.executeQuery(sql);
            System.out.println("List result set for reference....");
            printRs(rs);

            // STEP 10: Clean-up environment
            rs.close();
            stmt.close();
            conn.close();
        } catch (SQLException se) {
            // Handle errors for JDBC
            se.printStackTrace();
            // If there is an error then rollback the changes.
            System.out.println("Rolling back data here....");
            try {
                if (conn != null)
                    conn.rollback();
            } catch (SQLException se2) {
                se2.printStackTrace();
            } // end try

        } catch (Exception e) {
            // Handle errors for Class.forName
            e.printStackTrace();
        } finally {
            // finally block used to close resources
            try {
                if (stmt != null)
                    stmt.close();
            } catch (SQLException se2) {
            } // nothing we can do
            try {
                if (conn != null)
                    conn.close();
            } catch (SQLException se) {
                se.printStackTrace();
            } // end finally try
        } // end try
        System.out.println("Goodbye!");
    }// end main

    public static void printRs(ResultSet rs) throws SQLException {
        // Ensure we start with first row
        rs.beforeFirst();
        while (rs.next()) {
            // Retrieve by column name
            int id = rs.getInt("id");
            int age = rs.getInt("age");
            String first = rs.getString("first");
            String last = rs.getString("last");

            // Display values
            System.out.print("ID: " + id);
            System.out.print(", Age: " + age);
            System.out.print(", First: " + first);
            System.out.println(", Last: " + last);
        }
        System.out.println();
    }// end printRs()
}// end JDBCExample
这将产出如下所示的结果:
第二次运行时错误进行回滚:

二、使用还原点
新的JDBC 3.0还原点接口提供了额外的事务控制。大部分现代的数据库管理系统的环境都支持设定还原点,例如Oracle的PL/SQL。
当在事务中设置一个还原点来定义一个逻辑回滚点。如果在一个还原点之后发生错误,那么可以使用rollback方法来撤消所有的修改或在该还原点之后所做的修改。
Connection对象有两个新的方法来管理还原点:
-
setSavepoint(String savepointName):定义了一个新的还原点。它也返回一个Savepoint对象。
- releaseSavepoint(Savepoint savepointName):删除一个还原点。请注意,它需要一个作为参数的Savepoint对象。这个对象通常是由setSavepoint()方法生成的一个还原点。
有一个rollback (String savepointName)方法,该方法可以回滚到指定的还原点。
下面的例子说明了如何使用Savepoint对象:
try{
   //Assume a valid connection object conn
   conn.setAutoCommit(false);
   Statement stmt = conn.createStatement();

   //set a Savepoint
   Savepoint savepoint1 = conn.setSavepoint("Savepoint1");
   String SQL = "INSERT INTO Employees " + "VALUES (106, 20, 'Rita', 'Tez')";
   stmt.executeUpdate(SQL);
   //Submit a malformed SQL statement that breaks
   String SQL = "INSERTED IN Employees " + "VALUES (107, 22, 'Sita', 'Tez')";
   stmt.executeUpdate(SQL);
   // If there is no error, commit the changes.
   conn.commit();

}catch(SQLException se){
   // If there is any error.
   conn.rollback(savepoint1);
}
在这种情况下,之前的 INSERT 语句不会成功,一切都将被回滚到最初状态。
示例:
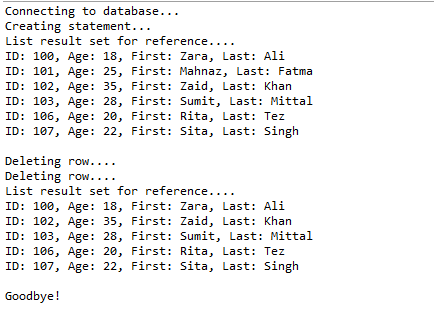
//STEP 1. Import required packages
import java.sql.*;

public class JDBCExample2 {
    // JDBC driver name and database URL
    static final String JDBC_DRIVER = "com.mysql.jdbc.Driver";
    static final String DB_URL = "jdbc:mysql://localhost/Test?serverTimezone=UTC";

    // Database credentials
    static final String USER = "root";
    static final String PASS = "root";

    public static void main(String[] args) {
        Connection conn = null;
        Statement stmt = null;
        try {
            // STEP 2: Register JDBC driver
            Class.forName("com.mysql.jdbc.Driver");

            // STEP 3: Open a connection
            System.out.println("Connecting to database...");
            conn = DriverManager.getConnection(DB_URL, USER, PASS);

            // STEP 4: Set auto commit as false.
            conn.setAutoCommit(false);

            // STEP 5: Execute a query to delete statment with
            // required arguments for RS example.
            System.out.println("Creating statement...");
            stmt = conn.createStatement();

            // STEP 6: Now list all the available records.
            String sql = "SELECT id, first, last, age FROM Employees";
            ResultSet rs = stmt.executeQuery(sql);
            System.out.println("List result set for reference....");
            printRs(rs);

            // STEP 7: delete rows having ID grater than 104
            // But save point before doing so.
            Savepoint savepoint1 = conn.setSavepoint("ROWS_DELETED_1");
            System.out.println("Deleting row....");
            String SQL = "DELETE FROM Employees " + "WHERE ID = 100";
            stmt.executeUpdate(SQL);
            // oops... we deleted too wrong employees!
            // STEP 8: Rollback the changes afetr save point 2.
            conn.rollback(savepoint1);

            // STEP 9: delete rows having ID grater than 104
            // But save point before doing so.
            Savepoint savepoint2 = conn.setSavepoint("ROWS_DELETED_2");
            System.out.println("Deleting row....");
            SQL = "DELETE FROM Employees " + "WHERE ID = 101";
            stmt.executeUpdate(SQL);

            // STEP 10: Now list all the available records.
            sql = "SELECT id, first, last, age FROM Employees";
            rs = stmt.executeQuery(sql);
            System.out.println("List result set for reference....");
            printRs(rs);

            // STEP 10: Clean-up environment
            rs.close();
            stmt.close();
            conn.close();
        } catch (SQLException se) {
            // Handle errors for JDBC
            se.printStackTrace();
            // If there is an error then rollback the changes.
            System.out.println("Rolling back data here....");
            try {
                if (conn != null)
                    conn.rollback();
            } catch (SQLException se2) {
                se2.printStackTrace();
            } // end try

        } catch (Exception e) {
            // Handle errors for Class.forName
            e.printStackTrace();
        } finally {
            // finally block used to close resources
            try {
                if (stmt != null)
                    stmt.close();
            } catch (SQLException se2) {
            } // nothing we can do
            try {
                if (conn != null)
                    conn.close();
            } catch (SQLException se) {
                se.printStackTrace();
            } // end finally try
        } // end try
        System.out.println("Goodbye!");
    }// end main

    public static void printRs(ResultSet rs) throws SQLException {
        // Ensure we start with first row
        rs.beforeFirst();
        while (rs.next()) {
            // Retrieve by column name
            int id = rs.getInt("id");
            int age = rs.getInt("age");
            String first = rs.getString("first");
            String last = rs.getString("last");

            // Display values
            System.out.print("ID: " + id);
            System.out.print(", Age: " + age);
            System.out.print(", First: " + first);
            System.out.println(", Last: " + last);
        }
        System.out.println();
    }// end printRs()
}// end JDBCExample
注意:有了Savepoint对象之后可以不用commit方法进行提交。
这将产生如下所示结果:
测试工程:https://github.com/easonjim/5_java_example/tree/master/jdbcbasics/test5