写在前面的话
前面我们提到过,纯手敲 K8S 名称管理 K8S 服务只是作为我们了解 K8S 的一种方案,而我们最终管理 K8S 的方法还是通过接下来的资源清单的方式进行管理。
所以从本章节开始,将会迎来 K8S 的重中之重,我们能否说我们会 K8S 就看就看接下来的学习。
另外,在 K8S 中,我们需要树立一个这样的概念,几乎能用到的东西都可以把它称作资源,而这个定义了规则的 yaml 文件就是资源清单。
资源清单格式
资源清单格式:
apiVersion: group/apiversion  # 如果没给定 group 名称,默认 core,可使用 kubectl api-versions 查看当前所有
kind:           # 资源类别
metadata:       # 资源元素据
    name
    namespace   # K8S 自身的 namespace
    labels      # 标签,键值对
    annotations # 资源注解
spec:           # 期望的状态(最重要)
status:         # 当前状态,用户不用定义
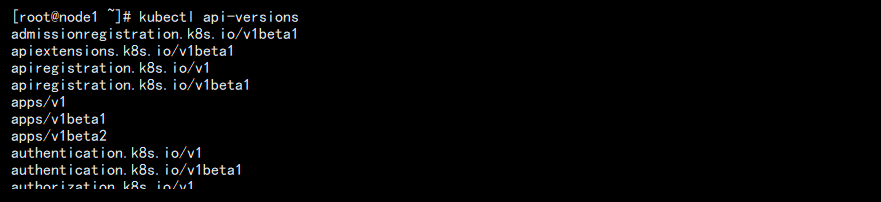
查看支持的 apiVersion:
获取资源清单一级字段:
kubectl explain pod
结果如图:

获取资源清单二级字段:
kubectl explain pod.metadata
结果如图:

同理,查看三级字段继续使用 . 加关键字就行了。
创建第一个 Pod 资源清单
创建一个简单的 Pod 资源清单:
vim pod-demo.yaml
内容如下:
apiVersion: v1
kind: Pod
metadata:
  name: pod-demo
  namespace: default
  labels:
    app: pod-demo
    tier: frontend
spec:
  containers:
  - name: app-container
    image: ikubernetes/myapp:v1
  - name: busy-container
    image: busybox:latest
    command: ["/bin/sh", "-c", "sleep 3600"]
简单说明:在我们 explain 查看某个关键字下面的关键字的时候,如果关键字的值类型是:<[]Object>,则代表是列表对象,需要使用 -,如果是:<map[string]string>,则是键值对,不需要 - 。
在上面的 yaml 中,containers 就是列表对象,而 labels 就是键值对。
我们可以定义多个容器组成一个 Pod,之前我们说过 Pod 由一个或者多个容器组成,同时我们也可以使用 command 指令来修改 Pod 中容器的初始运行命令。可以以列表的形式,也可以是 yaml 格式。我这里为例阅读性,选用的是列表的形式。
根据文件创建 Pod:
# 创建
kubectl create -f pod-demo.yaml

# 查看
kubectl get pods -o wide

# 查看详情
kubectl describe pod pod-demo
结果如图:

我们可以在 describe 中看到我们在 yaml 中定义的所有信息。甚至更多的包括系统给我们补全的一些默认信息。
此时我们可以内部访问一下我们这个 Pod:

同时,资源清单 yaml 文件还给我们提供了一个方便之处在于,我们删除变得更为简单:
kubectl delete -f pod-demo.yaml
结果如图:可能会出现稍微卡一下

标签选择
我们在这里补充一个知识点,在上面我们定义的资源清单中,在 metadata 中提到了 labels 标签选项,那么对于这个标签我们应该如何利用:
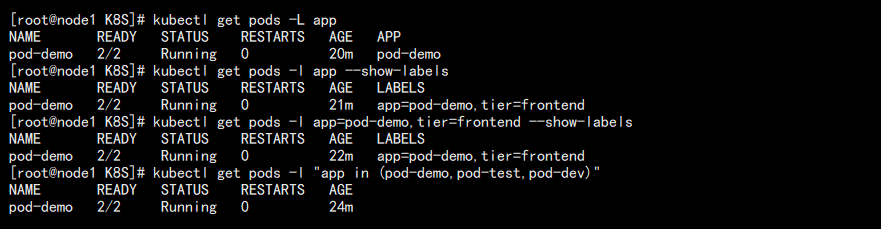
# 查看 pod 的标签
kubectl get pods --show-labels
结果如图:

标签筛选:在判断关系的时候,标签的关系可以是 =,!=,in,notin
# 显示指定标签的值
kubectl get pods -L app

# 显示包含指定标签的 pod
kubectl get pods -l app --show-labels

# 显示指定标签为指定值的 pod
kubectl get pods -l app=pod-demo,tier=frontend --show-labels

# 关系筛选
kubectl get pods -l "app in (pod-demo,pod-test,pod-dev)"
结果如图:
给 Pod 打标签或者修改标签:
# 给 pod 打标签
kubectl label pods pod-demo tag=v1.0

# 修改 pod 标签
kubectl label pods pod-demo tag=v2.0 --overwrite
查看结果:

给节点打标签:
kubectl label nodes node2 serverType=app
查看同理。
pod.spec 字段
对于 yaml 资源清单,我们需要知道的是,其主要配置都在 spec 字段中。我们这里就针对 Pod 资源的 spec 里面常用的方法做个说明:
| pod.spec | |||
|---|---|---|---|
| containers | 容器相关配置 | ||
| name | 容器名称 | ||
| image | 容器镜像 | ||
| imagePullPolicy | 容器获取策略,Always / Never / IfNotPresent,镜像版本是 latest 默认 Always | ||
| ports | 说明端口。并非暴露端口 | ||
| name | 给这个端口命名,后面可以根据这个名字调用这个端口 | ||
| containerPort | 说明具体端口。并非暴露端口 | ||
| protocol | 协议,UDP / TCP / SCTP,默认 TCP | ||
| hostIP | 绑定端口,意义不大,一般默认 0.0.0.0 | ||
| command | 运行指定命令,替代 docker 中默认定义的 | ||
| args | 参数,如果有配置,docker 中默认的参数将被改配置取代 | ||
| livenessProbe | 存活性检测 | ||
| exec | command <[]string>,通过命令来直接探测 | ||
| httpGet | HTTP 探测,host 主机一般不配置,port 请求端口,path | ||
| tcpSocket | tcp 检测 | ||
| failureThreshold | 探测失败次数,默认 3 次 | ||
| periodSeconds | 每次间隔时间,默认 10 秒 | ||
| timeoutSeconds | 超时时间,默认 1 秒 | ||
| initialDelaySeconds | 容器启动后多久开始探测 | ||
| readinessProbe | 就绪性检测 | ||
| lifecycle | 生命周期 | ||
| postStart | 启动前,方法和 livenessProbe 类似 | ||
| preStop | 启动后,方法和 livenessProbe 类似 | ||
| nodeSelector | 节点标签选择器,可以限定 Pod 运行的节点 | ||
| nodeName | 直接指定运行节点 | ||
| restartPolicy | 重启策略,Always / OnFailure / Never,默认 Always | ||
资源清单示例
在这之前我们先给一个节点打标签:
kubectl label nodes node2 serverType=app-server --overwrite
【1】普通的较为完整的资源清单:
apiVersion: v1
kind: Pod
metadata:
  name: pod-normal-demo
  namespace: default
  labels:
    app: erp
    tier: frontend
    release: stable
  annotations:
    ezops.cn/create-by: "Dylan"
spec:
  containers:
  - name: myapp
    image: ikubernetes/myapp:v1
    imagePullPolicy: IfNotPresent
    ports:
    - name: http
      containerPort: 80
    - name: https
      containerPort: 443
  - name: busybox-demo
    image: busybox:latest
    imagePullPolicy: Always
    command: ["/bin/sh", "-c", "sleep 3600"]
    #args: ["-f", "-h /tmp"]
  nodeSelector:
    serverType: app-server
  restartPolicy: Never
我们这里修改了容器内部运行的默认命令。并通过标签选择器选择了指定节点。配置了重启规则。
kubectl create -f pod-normal-demo.yaml
查看创建结果:

可以看到已经成功在我们选择的 Node 2 节点上面运行起来,查看详情:(由于内容太多,我直接贴处理)
Name:               pod-normal-demo
Namespace:          default
Priority:           0
PriorityClassName:  <none>
Node:               node2/192.168.100.102
Start Time:         Wed, 29 May 2019 09:56:11 +0800
Labels:             app=erp
                    release=stable
                    tier=frontend
Annotations:        ezops.cn/create-by: Dylan
Status:             Running
IP:                 10.1.1.14
Containers:
  myapp:
    Container ID:   docker://e4e97361c6cc533a4533080f06f7b596e0bc0caa954f7f2ef503d6d9a2aae631
    Image:          ikubernetes/myapp:v1
    Image ID:       docker-pullable://ikubernetes/myapp@sha256:9c3dc30b5219788b2b8a4b065f548b922a34479577befb54b03330999d30d513
    Ports:          80/TCP, 443/TCP
    Host Ports:     0/TCP, 0/TCP
    State:          Running
      Started:      Wed, 29 May 2019 09:56:12 +0800
    Ready:          True
    Restart Count:  0
    Environment:    <none>
    Mounts:
      /var/run/secrets/kubernetes.io/serviceaccount from default-token-jr9rz (ro)
  busybox-demo:
    Container ID:  docker://0cce3f9dcc16b40aabcceb94c44be49e3434bff28dfc6800c7769cd8d1d5948f
    Image:         busybox:latest
    Image ID:      docker-pullable://busybox@sha256:4b6ad3a68d34da29bf7c8ccb5d355ba8b4babcad1f99798204e7abb43e54ee3d
    Port:          <none>
    Host Port:     <none>
    Command:
      /bin/sh
      -c
      sleep 3600
    State:          Running
      Started:      Wed, 29 May 2019 09:56:14 +0800
    Ready:          True
    Restart Count:  0
    Environment:    <none>
    Mounts:
      /var/run/secrets/kubernetes.io/serviceaccount from default-token-jr9rz (ro)
Conditions:
  Type              Status
  Initialized       True
  Ready             True
  ContainersReady   True
  PodScheduled      True
Volumes:
  default-token-jr9rz:
    Type:        Secret (a volume populated by a Secret)
    SecretName:  default-token-jr9rz
    Optional:    false
QoS Class:       BestEffort
Node-Selectors:  serverType=app-server
Tolerations:     node.kubernetes.io/not-ready:NoExecute for 300s
                 node.kubernetes.io/unreachable:NoExecute for 300s
Events:
  Type    Reason     Age   From               Message
  ----    ------     ----  ----               -------
  Normal  Scheduled  18m   default-scheduler  Successfully assigned default/pod-normal-demo to node2
  Normal  Pulled     18m   kubelet, node2     Container image "ikubernetes/myapp:v1" already present on machine
  Normal  Created    18m   kubelet, node2     Created container myapp
  Normal  Started    18m   kubelet, node2     Started container myapp
  Normal  Pulling    18m   kubelet, node2     Pulling image "busybox:latest"
  Normal  Pulled     18m   kubelet, node2     Successfully pulled image "busybox:latest"
  Normal  Created    18m   kubelet, node2     Created container busybox-demo
  Normal  Started    18m   kubelet, node2     Started container busybox-demo
其中红色部分就是这次我们特别定义的一些规则。
【2】存活性检测资源清单:
apiVersion: v1
kind: Pod
metadata:
  name: liveness-pod
  namespace: default
  labels:
    app: erp
    tier: frontend
    release: stable
  annotations:
    ezops.cn/create-by: "Dylan"
spec:
  containers:
  - name: myapp
    image: ikubernetes/myapp:v1
    imagePullPolicy: IfNotPresent
    ports:
    - name: http
      containerPort: 80
    - name: https
      containerPort: 443
    livenessProbe:
      httpGet:
        port: http
        path: /index.html
      initialDelaySeconds: 10
      periodSeconds: 3
  restartPolicy: Always
我们这里有两个知识点:
1. ports 里面定义的 name 我们在后面是可以引用的,如 httpGet 的 port 我们就直接些上面定义的 http。
2. livenessProbe 的应用,再配合 restartPolicy 完成程序自检和维护。
如果用 exec 命令样式,可以用来检测文件是否存在,如:
livenessProbe:
  exec:
    command: ["/bin/test" "-e /tmp/1.txt"]
另外,就绪性检测和存活性检测类似。
【3】生命周期 poststart:
apiVersion: v1
kind: Pod
metadata:
  name: poststart-demo
  namespace: default
  labels:
    app: erp
  annotations:
    ezops.cn/create-by: "Dylan"
spec:
  containers:
  - name: httpd-server
    image: busybox:latest
    imagePullPolicy: IfNotPresent
    lifecycle:
      postStart:
        exec:
          command: ["mkdir", "-p"," /data/web/html"]
 command: ["/bin/sh","-c","sleep 3600"]
小结
本章节初步使用了资源清单,这些关键不要求死记硬背,但是一定得知道个大概,基础得框架我们得记住。至于其他详细得则可以通过 explain 查询。
另外我们之前提了自主式 Pod,我们这里建立的都是自主式 Pod,没有上级管理,因为着删除了这个 Pod 不会自动重建。