1.Color、Colors
(1) Color(structure):
WPF的颜色被封装成Color结构(structure),定义在System.Window.Media命名空间中。
clr.A = 255;
clr.R = 255;
clr.G = 0;
clr.B = 255;
如上代码,除了三原色(R、G、B)外,Color结构还有一个"alpha chanel",其property名称为 A。用来控制颜色不透明的。(0 - 255,完全透明 - 不透明)。
(2)Colors:
和Color在同一命名空间,包含有141个静态只读property,他们大都是好记的颜色引用方式,注意的是:其alpha 都是 255;
实例程序:
见第 2 节中。
2.SolidBrushColor、Brushes
(1)SolidBrushColor
最简单的画刷,单色画刷。
SolidBrushColor brush = new SolidBrushColor(clr);
Background = brush;
用一行代码书写:
实例程序:
using System.Collections.Generic;
using System.Text;
using System.Windows;
using System.Windows.Media;
namespace Jack.VaryTheBackground
{
public class VaryTheBackground : Window
{
SolidColorBrush brush = new SolidColorBrush(Colors.Black);
[STAThread]
public static void Main()
{
Application app = new Application();
app.Run(new VaryTheBackground());
}
public VaryTheBackground()
{
Title = " Vary the Back Ground";
Width = 384;
Height = 384;
Background = brush;
}
protected override void OnMouseMove(System.Windows.Input.MouseEventArgs e)
{
double width = ActualWidth
- 2 * SystemParameters.ResizeFrameVerticalBorderWidth;
double height = ActualHeight - 2 * SystemParameters.ResizeFrameHorizontalBorderHeight - SystemParameters.CaptionHeight;
Point ptMouse = e.GetPosition(this);
Point ptCenter = new Point(width / 2, height / 2);
Vector vectMouse = ptMouse - ptCenter;
double angle = Math.Atan2(vectMouse.Y, vectMouse.X);
Vector vecEllipse = new Vector(width / 2 * Math.Cos(angle), height / 2 * Math.Sin(angle));
Byte byLevel = (byte)(255 * (1 - Math.Min(1, vectMouse.Length / vecEllipse.Length)));
Color clr = brush.Color;
clr.R = clr.G = clr.B = byLevel;
brush.Color = clr;
}
}
}
(2) Brushes
正如Colors类提供的141个静态只读的property一样,Brushes(也是复数)类也提供了141个静态只读的property,名称和Color的property都一样,但是Brushes的property返回的是SolidBrushColor对象。
等价于:
这两种方法均可以把窗口填上特定的颜色,但是这两种做法其实是存在一定差异的,想上面的实力程序VaryBackground这样的程序就可以感受这个差异。
将
写成:
重新编译,并执行,鼠标经过Window窗体时,将会弹出一个" Invalid Operation Exception"(无效操作异常)消息框,详细信息是"无法设定'#FF000000' 对象的property,因为此对象为只读状态"。问题发生在OnMouseMove方法的最后一条语句(brush.Color = clr;)这里是试图重新设定画刷的Color的property。(异常信息的单引号中出现的十六进制数,是当前Color property的值。)
分析:"Brushes.Black" , 利用的Brushes所取得的这个SolidColorBrush对象是处于冻结(frozen)状态。也就是说,不能再被改变。就像Changed事件一样,Freezeable实现了冻结,而Brush的冻结正是从这里继承而来的。如果Freezeable对象的CanFreeze property是true,可以调用Freeze方法来实现对象的冻结和不可变动。IsFrozen property如果变成了true,就表示(对象)已经被冻结了。将对象冻结可以提高效率,因为被冻结的对象不会被改变了,所以不需监控。冻结的Freezable对象还可以在不同的线程之间共享,没有被冻结的Freezable对象则不行。虽然,无法将冻结对象解冻,但是你可以做出一个没有冻结的复制版本。
下面 版本可以定义VaryTheBackground中的brush字段(field):
错误将消失。
如果你想看到这141个画刷出现在同一个窗口的客户去。FlipThroughTheBrush 程序可以达成你的愿望,你可以用上下箭头(Up 上;Down下)来改变画刷。
请看程序:
using System.Text;
using System.Media;
using System.Windows;
using System.Reflection;
using System.Windows.Media;
using System.Windows.Input;
namespace Jack.PartTwo
{
public class FlipThroughTheBrushes : Window
{
int index = 0;
PropertyInfo[] props;
public FlipThroughTheBrushes()
{
props = typeof(Brushes).GetProperties(BindingFlags.Static | BindingFlags.Public);
// 使用reflaction(反射)取得Brushes的所有成员,
// 调用GetProperties时,以BinddingFlags为参数,
// 程序就可以清楚地把自己限制在Brushes公开和静态的property上。
SetTitleAndBackGround();
}
[STAThread]
public static void Main()
{
Application app = new Application();
app.Run(new FlipThroughTheBrushes());
}
protected override void OnKeyDown(KeyEventArgs e)
{
if (e.Key == Key.Down || e.Key == Key.Up)
{
index += e.Key == Key.Up ? 1 : props.Length - 1;
index %= props.Length;
SetTitleAndBackGround();
}
base.OnKeyDown(e);
}
// 被调方法,将Title property和Background property设定为Brushes类的某个成员
private void SetTitleAndBackGround()
{
// "props[0].Name"会返回一个字符串,这是类第一个property
Title = "Flip Through the Brushes - " + props[index].Name;
Background = (Brush)props[index].GetValue(null, null);
}
}
}
说明的是:props[0].GetValue(null,null); 返回实际的SolidColorBrush对象,这里的GetValue方法需要两个null参数;通常第一个参数是property所在的对象,因为Brushes是一个静态的property,所以没有对应的对象,因此传入null;第二个参数只有在property是indexer(索引器)时才必要。
3.GradientBrush(Abstract)(1.LinearGradientBrush、2.RadialGradientBrush)
渐变画刷的使用:
(1)LinearGradientBrush
这个是最简单的渐变画刷形式,只需要两个Color(如 clr1 和 clr2)对象,和两个Point(pt1 和 pt2)对象。pt1位置的颜色是clr1,pt2位置的颜色是clr2.在两个位置的连线上,则是混合了两种颜色,即一种渐变的效果,连线的中心则就是两种颜色的平均值。垂直于连线的位置,和连线上的点使用相同的颜色。至于操过pt1和pt2的两边的颜色是什么颜色,以后待说。
实例程序:
效果见下图:
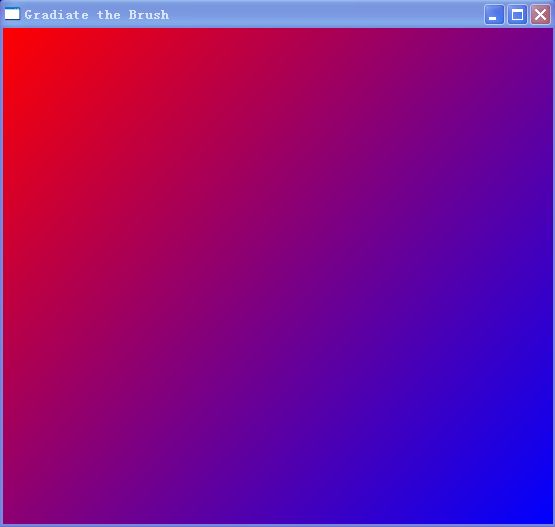
如果,上面实例代码中(1,1 )改成(0.25,0.25)效果如下:

你会发现窗口右下角有一大块超出(0.25,0.25)这点之外。默认情况下,这里会着上第二种颜色。这受SpreadMethod property属性的控制。此property类型是GradientSPreadMethod枚举,默认是Pad,表示超出的部分延续之前的颜色不再变化;除了Pad,还有Reflact 和 Repeat。你可以试着把GradientTheBrush程序修改成下面这样:
new LinearGradientBrush(Colors.Red, Colors.Blue, new Point(0, 0), new Point(0.25, 0.25));
brush.SpreadMethod = GradientSpreadMethod.Reflect;
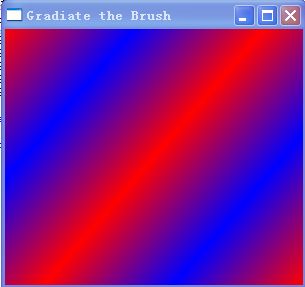
可见,(0,0)和(0.25,0.25)之间,画刷从红到蓝渐变;然后再(0.25,0.25)和(0.5,0.5)之间,从蓝到红;接着在(0.5,0.5)和(0.75,0.75)之间,从红到蓝渐变,在(0.75,0.75)和(1,1)之间,从蓝到红渐变。
看下面这个实例程序,据窗体计算对角线垂直变量(有详细注释):
using System;
using System.Collections.Generic;
using System.Text;
using System.Windows;
using System.Windows.Media;
namespace Jack.PartTwo
{
public class AdjustTheGradient : Window
{
LinearGradientBrush brush;
[STAThread]
public static void Main()
{
Application app = new Application();
app.Run(new AdjustTheGradient()); // 设置你的启动程序类(该类理解为继承自Window的窗体)
}
public AdjustTheGradient()
{
Title = "Adjust the Gradient";
this.SizeChanged += new SizeChangedEventHandler(AdjustTheGradient_SizeChanged);
brush = new LinearGradientBrush(Colors.Red, Colors.Blue, 0);
brush.MappingMode = BrushMappingMode.Absolute; // BrushMappingMode枚举类型,只有两个值:
// 1.RelativeToBoundBox : 使用相对坐标默认值(左上角顶点为(0,0),中间点为(0.5,0.5))
// 2.Absolute : 与设备无关
Background = brush;
}
void AdjustTheGradient_SizeChanged(object sender, SizeChangedEventArgs e)
{
// 实际工作去的宽度
double width = ActualWidth
- 2 * SystemParameters.ResizeFrameVerticalBorderWidth; // 左右两边的厚度
// 实际工作区的高度
double height = ActualHeight
- 2 * SystemParameters.ResizeFrameHorizontalBorderHeight // 上下两边的厚度
- SystemParameters.CaptionHeight; // 窗体非工作区(标题(Title),快捷按钮(×,最大化等)等)
Point ptCenter = new Point(width / 2, height / 2); // 工作区的中心点位置
//Vector Define
Vector vectDiag = new Vector(width, - height); // 对角线的向量 (从左下到右上)
//等价于vectDiag = new Point(width, 0) - new Point(0,height)
Vector vectPerp = new Vector(vectDiag.Y, -vectDiag.X); // 该向量垂直于对角线,即 是一个与vectDiag垂直的向量
// 得到的方法:只要把X和Y的值对调,并把其中一个数的正负号反向就可以了。
vectPerp.Normalize(); // 规格化操作,将该向量的X和Y分别除以Leght,是该向量的Length变成1。
vectPerp *= width * height / vectDiag.Length;
// Vector.Length 指的是这个向量的量,即开始点和终点的距离
brush.StartPoint = ptCenter + vectPerp;
brush.EndPoint = ptCenter - vectPerp;
}
}
}
(2) RadialGradientBrush
基础概念:
RadialGradientBrush的许多property都已经具备实用的默认值。其中三个property用来定义一个椭圆:Center是Point类型,定义为(0.5,0.5),也就是画刷涵盖区域的中心点。RadiusX以及RadiusY的property皆为double类型,分别代表椭圆的水平和垂直轴半径,默认值是0.5,所以,无论是横向还是纵向,椭圆都达到了挡墙画刷作用域 的边界。
椭圆的圆周受到Center、RadiusX、RadiusY 三个property的影响,圆周的颜色,正是Offset property为1时的颜色。
还有个名为GradientOrigin的property,和Center一样,是Point对象,默认值为(0.5,0.5)。顾名思义,GradientOrigin是渐变开始的原点。在这个点,你会看到Offset property为0时的颜色。
在GradientOrigin和椭圆圆周之间,就是发生渐变的地方。下面是几个实例程序:
(1)一系列的同心渐变圆圈
using System.Collections.Generic;
using System.Text;
using System.Windows;
using System.Windows.Media;
using System.Windows.Input;
namespace Jack.PartTwo
{
public class ClickTheGradientCenter : Window
{
RadialGradientBrush brush;
[STAThread]
public static void Main()
{
Application app = new Application();
app.Run(new ClickTheGradientCenter()); // 设置你的启动程序类(该类理解为继承自Window的窗体)
}
public ClickTheGradientCenter()
{
Title = " Click the Gradient Brush";
brush = new RadialGradientBrush(Colors.White, Colors.Red);
brush.RadiusX = brush.RadiusY = 0.20;
//brush.SpreadMethod = GradientSpreadMethod.Repeat;
Background = brush;
}
protected override void OnMouseDown(MouseButtonEventArgs e)
{
double width = ActualWidth - 2 * SystemParameters.ResizeFrameVerticalBorderWidth;
double height = ActualHeight - 2 * SystemParameters.ResizeFrameHorizontalBorderHeight - SystemParameters.CaptionHeight;
Point ptMouse = e.GetPosition(this);
ptMouse.X /= width;
ptMouse.Y /= height;
if (e.ChangedButton == MouseButton.Left)
{
brush.Center = ptMouse;
brush.GradientOrigin = ptMouse;
}
if(e.ChangedButton == MouseButton.Right)
{
brush.GradientOrigin = ptMouse;
}
}
}
}
(2)动画效果:
using System.Collections.Generic;
using System.Text;
using System.Windows;
using System.Windows.Media;
using System.Windows.Threading;
namespace Jack.PartTwo
{
public class RotateTheGradientOrigin : Window
{
RadialGradientBrush brush;
double angle;
[STAThread]
public static void Main()
{
Application app = new Application();
app.Run(new RotateTheGradientOrigin()); // 设置你的启动程序类(该类理解为继承自Window的窗体)
}
public RotateTheGradientOrigin()
{
Title = "Rotate the Gradient Origin";
WindowStartupLocation = WindowStartupLocation.CenterScreen;
Width = 384; // 相当于4英寸
Height = 384;
brush = new RadialGradientBrush(Colors.White, Colors.Blue);
brush.Center = brush.GradientOrigin = new Point(0.5, 0.5);
brush.RadiusX = brush.RadiusY = 0.10;
brush.SpreadMethod = GradientSpreadMethod.Repeat;
Background = brush;
DispatcherTimer tmr = new DispatcherTimer();
tmr.Interval = TimeSpan.FromMilliseconds(100);
tmr.Tick += new EventHandler(tmr_Tick);
tmr.Start();
}
void tmr_Tick(object sender, EventArgs e)
{
Point pt = new Point(0.5 + 0.5 * Math.Cos(angle), 0.5 + 0.05 * Math.Sin(angle));
brush.GradientOrigin = pt;
angle += Math.PI / 6;
}
}
}
我们这章是来学习和WPF基本画刷的使用和一些技术点,将焦点放在Window的Background property,但是Window还有另外三个Property也是Brush类型的。一个是OpacityMask,这个property是从UIElement继承而来的,后面讨论位图(bitmap)时再对其做较多介绍了;另外两个Brush property都是从Control继承而来的。一个是BorderBrush,可以在客户区的周边绘制一个边框;另一个是Foreground。