Zabbix简介
zabbix(音同 zæbix)是一个基于WEB界面的提供分布式系统监视以及网络监视功能的企业级的开源解决方案。
zabbix能监视各种网络参数,保证服务器系统的安全运营;并提供灵活的通知机制以让系统管理员快速定位/解决存在的各种问题。
zabbix由2部分构成,zabbix server与可选组件zabbix agent。
zabbix server可以通过SNMP,zabbix agent,ping,端口监视等方法提供对远程服务器/网络状态的监视,数据收集等功能,它可以运行在Linux,Solaris,HP-UX,AIX,Free BSD,Open BSD,OS X等平台上。
官方中文文档:https://www.zabbix.com/documentation/3.4/zh/manual
Zabbix 通过 C/S 模式采集数据,通过 B/S 模式在 web 端展示和配置。
被监控端:主机通过安装 agent 方式采集数据,网络设备通过 SNMP 方式采集数据
Server 端:通过收集 SNMP 和 agent 发送的数据,写入数据库(MySQL,ORACLE 等) ,
再通过 php+apache 在 web 前端展示。
Zabbix 运行条件:
Server:Zabbix Server 需运行在 LAMP(Linux+Apache+Mysql+PHP)环境下(或者
LNMP),对硬件要求低
Agent:目前已有的 agent 基本支持市面常见的 OS,包含 Linux、HPUX、Solaris、Sun 、
windows
SNMP:支持各类常见的网络设备
zabbix优劣势
优点:
开源,无软件成本投入;
Server 对设备性能要求低;
支持设备多,自带多种监控模板;
支持分布式集中管理,有自动发现功能,可以实现自动化监控;
开放式接口,扩展性强,插件编写容易;
当监控的 item 比较多服务器队列比较大时可以采用被动状态,被监控客户端主动从server 端去下载需要监控的 item 然后取数据上传到 server 端。这种方式对服务器的负载比较小。Api 的支持,方便与其他系统结合;
缺点:
需在被监控主机上安装 agent,所有数据都存在数据库里,产生的数据据很大,瓶颈主要在数据库;
Zabbix安装部署
系统环境
|
IP |
主机名 |
功能 |
系统 |
|
192.168.128.165 |
compute |
Zabbix_server |
CentOS 7.4.17 |
|
192.168.128.166 |
controller |
Zabbix_agent |
CentOS 7.4.17 |
1、  先把ip和主机名写入/hosts文件(两台都要)

[root@compute ~]# echo "192.168.128.166   controller" >>/etc/hosts

[root@compute ~]# echo "192.168.128.165   compute" >>/etc/hosts

2、修改yum源(两台都要)

[root@compute~]#wget -O /etc/yum.repos.d/CentOS-Base.repo http://mirrors.aliyun.com/repo/Centos-7.repo

[root@compute ~]# yum clean all && yum makecache

[root@compute ~]# wget -O /etc/yum.repos.d/epel.repo http://mirrors.aliyun.com/repo/epel-7.repo

3、关闭iptables和selinux
时间同步
[root@compute ~]# yum install -y ntp

[root@compute ~]# systemctl start ntpd

加入定时任务中:

* * * * * /usr/sbin/ntpdate time.asia.apple.com && hwclock -w >/dev/null 2>&1
Server端部署
 rpm -i http://repo.zabbix.com/zabbix/3.4/rhel/7/x86_64/zabbix-release-3.4-2.el7.noarch.rpm

 yum install zabbix-server-mysql zabbix-web-mysql zabbix-agent -y
 yum install -y mariadb-server
[root@compute ~]# systemctl start mariadb

[root@compute ~]# systemctl enable mariadb

[root@compute ~]# mysql

Welcome to the MariaDB monitor.  Commands end with ; or g.

Your MariaDB connection id is 375

Server version: 10.1.20-MariaDB MariaDB Server

Copyright (c) 2000, 2016, Oracle, MariaDB Corporation Ab and others.

Type 'help;' or 'h' for help. Type 'c' to clear the current input statement.

MariaDB [(none)]> create database zabbix character set utf8 collate utf8_bin;

MariaDB [(none)]> grant all privileges on zabbix.* to zabbix@localhost identified by 'zabbix';

MariaDB [(none)]> quit;

#导入数据库

[root@compute ~]# zcat /usr/share/doc/zabbix-server-mysql*/create.sql.gz | mysql -uzabbix -p zabbix

#修改zabbix_server.config添加DBHost、DBPassword

[root@compute ~]# grep ^[a-Z] /etc/zabbix/zabbix_server.conf

LogFile=/var/log/zabbix/zabbix_server.log

LogFileSize=0

PidFile=/var/run/zabbix/zabbix_server.pid

SocketDir=/var/run/zabbix

DBName=zabbix

DBUser=zabbix

SNMPTrapperFile=/var/log/snmptrap/snmptrap.log

Timeout=4

AlertScriptsPath=/usr/lib/zabbix/alertscripts

ExternalScripts=/usr/lib/zabbix/externalscripts

LogSlowQueries=3000

DBHost=localhost

DBPassword=zabbix

#启动zabbix_servera服务

[root@compute ~]# systemctl start zabbix-server

[root@compute ~]# systemctl enable zabbix-server

#修改httpd中的zabbix.conf

[root@compute ~]# vim /etc/httpd/conf.d/zabbix.conf 设置php.ini正确的时区

        php_value max_execution_time 300

        php_value memory_limit 128M

        php_value post_max_size 16M

        php_value upload_max_filesize 2M

        php_value max_input_time 300

        php_value always_populate_raw_post_data -1

        php_value date.timezone Asia/Shanghai

#启动httpd服务

[root@compute ~]# systemctl enable httpd

[root@compute ~]# systemctl start httpd
客户端zabbix_Agent部署
rpm -i http://repo.zabbix.com/zabbix/3.4/rhel/7/x86_64/zabbix-release-3.4-2.el7.noarch.rpm
yum install -y zabbix-agent
#修改/etc/zabbix/zabbix_agentd.conf
#Server=127.0.0.1
Server=192.168.128.165
#ServerActive=127.0.0.1
ServerActive=192.168.128.165           //server端ip
HostName=controller                    //主机名唯一的
HostMetadataItem=system.uname          //设置默认模板,server端自动发现
#启动agent服务
systemctl start zabbix-agent
systemctl enable zabbix-agent
配置zabbix_web
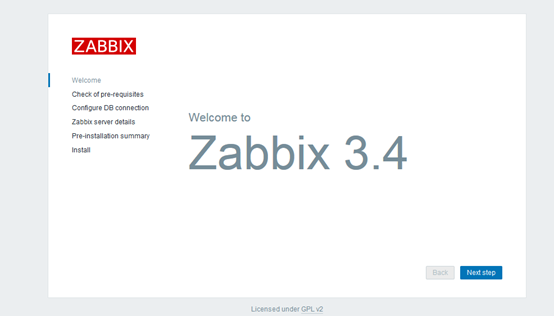
1.浏览器打开http://192.168.128.165/zabbix进入界面
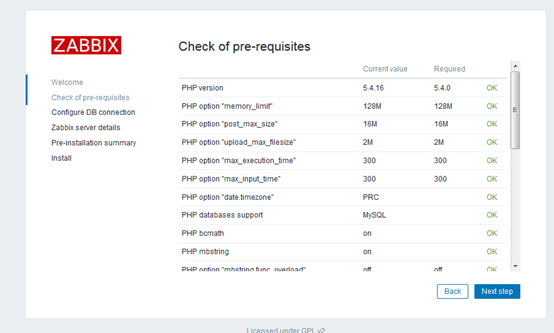
2.环境检测
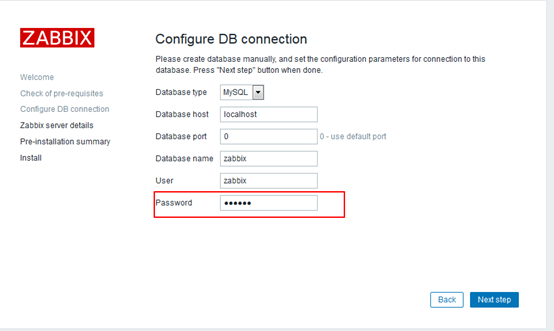
3.初始化数据库,密码为zabbix数据库密码
4.详细信息如默认,Name任意取

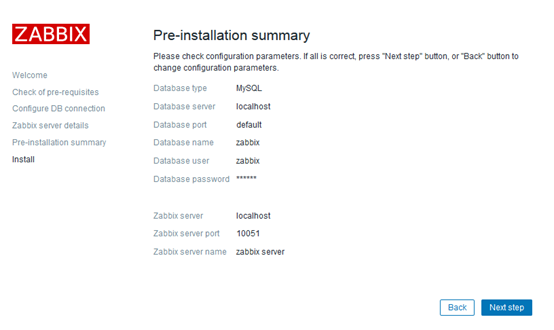
5.全部配置概要
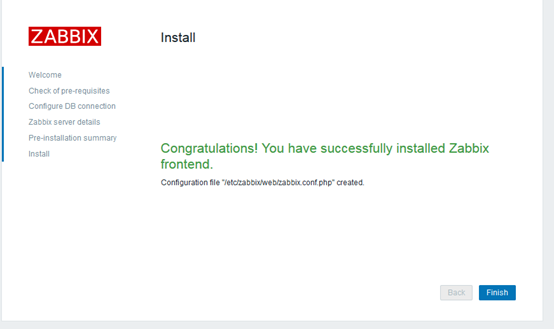
6.安装
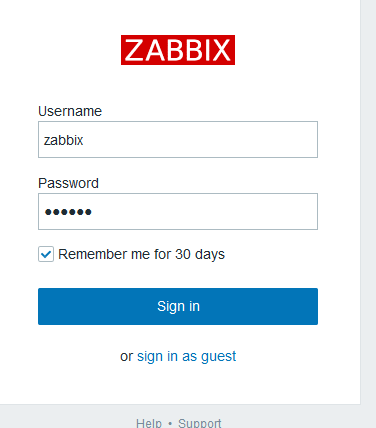
7.登录zabbix,默认账号/密码:Admin/zabbix