Nginx+Keepalived负载均衡高可用方案
1、实验环境:(centos6.9 minimal)
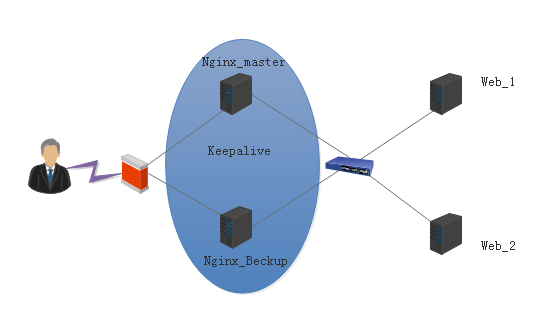
| 主机名 | IP | 作用 |
| Nginx_master | 192.168.128.155 | 主负载均衡 |
| Nginx_backup | 192.168.128.156 | 备负载均衡 |
| Web_1 | 192.168.128.157 | web服务器 |
| Web_2 | 192.168.128.158 | web服务器 |
| Nginx_vip | 192.168.128.199 | 网站vip地址 |
2、实验拓扑图:
3、分别安装nginx负载均衡器及配置脚本
1)安装nginx
yum install -y gcc gcc+ gcc-c++ openssl opensll-devel  wget  vim          //安装基础环境

/etc/init.d/iptables stop                                                 //关闭防火墙

groupadd www                                             //添加组

useradd -g www www                                       //添加用户

mkdir -p /data/logs                                                      //创建日志文件夹

chown -R www:www /data/logs/                                //更改属主

cd /usr/local/src/                                                      //安装路径
wget http://nginx.org/download/nginx-1.6.2.tar.gz
tar xf nginx-1.6.2.tar.gz
cd nginx-1.6.2
./configure --user=www --group=www --prefix=/usr/local/nginx --with-http_stub_status_module --with-http_ssl_module --without-http_rewrite_module
 报错解决
报错解决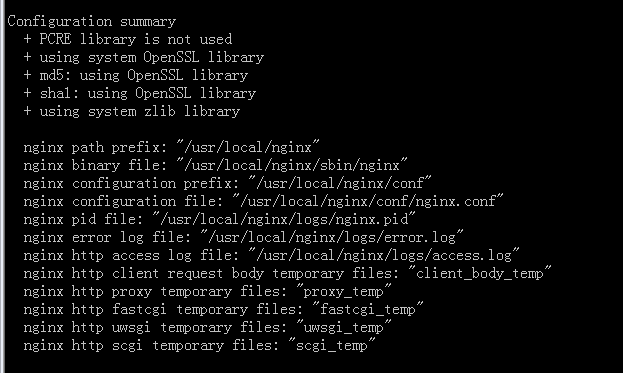
备份:cp /usr/local/nginx/conf/nginx.conf{,.bak}
修改配置文件:vim /usr/local/nginx/conf/nginx.confuser www www;
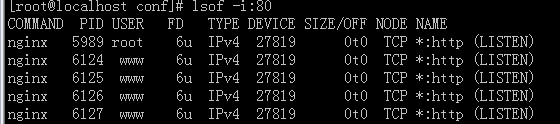
worker_processes 4; //nginx进程数
pid /usr/local/nginx/logs/nginx.pid;
worker_rlimit_nofile 51200;
events {
worker_connections 1024;
}
http {
include mime.types;
default_type application/octet-stream;
sendfile on;
tcp_nopush on;
keepalive_timeout 65;
gzip on;
gzip_min_length 1k;
gzip_buffers 4 16k;
gzip_http_version 1.0;
upstream backend //负载均衡
{
ip_hash; //轮询算法
server 192.168.128.157:80;
server 192.168.128.158:80;
}
server {
listen 80;
server_name www.123.com;
location / {
root /var/www/html;
index index.php index.html index.htm;
proxy_redirect off;
proxy_set_header Host $host;
proxy_set_header X-Real-IP $remote_addr;
proxy_set_header X-Forwarded-For proxy_add_x_forwarded_for;
proxy_pass http://backend;
}
error_page 500 502 503 504 /50x.html;
location = /50x.html {
root html;
}
}
}
2)安装keepalive
yum install keepalived -y
修改配置文件:(Master) vim /etc/keepalived/keepalived.conf
! Configuration File for keepalived
global_defs {
   notification_email {
     acassen@firewall.loc
   }
   notification_email_from Alexandre.Cassen@firewall.loc
   smtp_server 192.168.128.155
   smtp_connect_timeout 30
   router_id LVS_DEVEL
}
vrrp_instance VI_1 {
    state MASTER
    interface eth0
    virtual_router_id 51
    mcast_src_ip 192.168.128.155
    priority 100
    advert_int 1
    authentication {
        auth_type PASS
        auth_pass chtopnet
    }
    virtual_ipaddress {
        192.168.128.199      //虚拟VIP
    }
}
修改配置文件:(Backup)
! Configuration File for keepalived
global_defs {
   notification_email {
     acassen@firewall.loc
     failover@firewall.loc
     sysadmin@firewall.loc
   }
   notification_email_from Alexandre.Cassen@firewall.loc
   smtp_server 192.168.128.155
   smtp_connect_timeout 30
   router_id LVS_DEVEL
}
vrrp_instance VI_1 {
    state BACKUP
    interface eth0
    virtual_router_id 51
    mcast_src_ip 192.168.128.156
    priority 99
    advert_int 1
    authentication {
        auth_type PASS
        auth_pass chtopnet
    }
    virtual_ipaddress {
        192.168.128.199
    }
}
启动keepalive:
service keepalived start
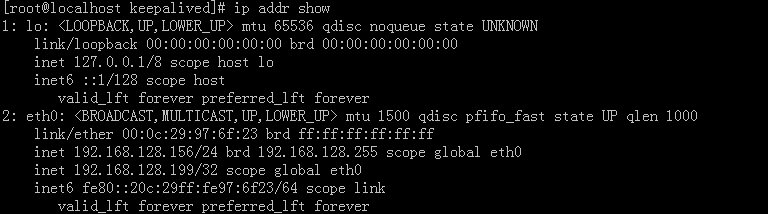
在主keepalive上查看,已经接管VIP:
ip addr show

3 ) 安装web服务
yum install httpd -y
修改配置文件:
echo "ServerAdmin 192.168.128.157" >>/etc/httpd/conf/httpd.conf
启动web服务:
service httpd start
为了测试添加一个web网页:
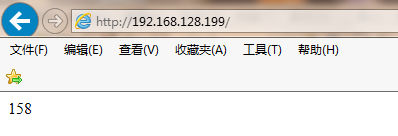
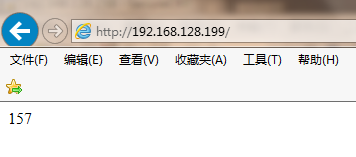
cat >>/var/www/html/index.html<<EOF
> </h>
> 157
> <h>
> EOF
测试1:
测试2 关闭158web服务:
编写Nginx监控脚本:
!/bin/bash
while :
do
nginxpid=`ps -C nginx --no-header|wc -l`
if [ $nginxpid -eq 0 ];then
        /usr/local/nginx/sbin/nginx
        sleep 5
        nginxpid=`ps -C nginx --no-header|wc -l`
        echo $nginxpid
        if [ $nginxpid -eq 0 ];then
        /etc/init.d/keepalived stop
        fi
fi
sleep 5
done

放入后台nohup /bin/bash /root/nginx_pid.sh &
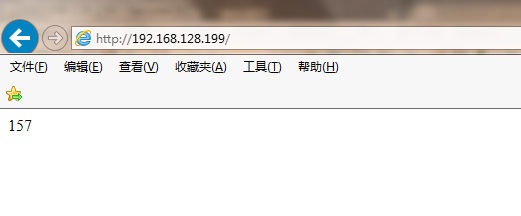
测试3:模拟主Nginx宕机:

备keepalive上自动接管VIP:
查看网站正常打开:
另外:
1. 要使得Nginx支持https只需在负载均衡器上开启ssl功能,监听443端口(防火墙做好映射)将证书放在负载均衡器上而不是后面的web服务器。
     server {
        listen       443 ;
        server_name  www.123.com;
        ssl_certificate      /usr/local/nginx/keys/www.123.com.crt;
        ssl_certificate_key  /usr/local/nginx/keys/www.123.com.key;
        ssl_session_cache    shared:SSL:1m;
        ssl_session_timeout  5m;
        ssl_ciphers  HIGH:!aNULL:!MD5;
        ssl_prefer_server_ciphers  on;
        location / {
            root   html;
            index  index.html index.htm;
        }
    }
2. 获取客户端真实IP
          proxy_set_header Host $host;
          proxy_set_header X-Real-IP $remote_addr;
          proxy_set_header X-Forwarded-For proxy_add_x_forwarded_for;
3. 上述为nginx主从架构配置(即一个Nginx_VIP)若无故障从nginx长期处于备份状态,而主Nginx负载就很高,如果我想两台负载均衡器都处在工作状态来实现负载均衡也很容易(配置两个VIP)。通过keepalive生成两个实例,两台Nginx互为备机。
主Nginx机器之一的keepalived.conf配置如下:
 1 vrrp_instance VI_1 {
 2     state MASTER
 3     interface eth0
 4     virtual_router_id 51
 5     priority 100
 6     advert_int 1
 7     authentication {
 8         auth_type PASS
 9         auth_pass chtopnet
10     }
11     virtual_ipaddress {
12         192.168.128.198
13     }
14 vrrp_instance VI_2 {
15     state BACKUP
16     interface eth0
17     virtual_router_id 55
18     priority 99
19     advert_int 2
20     authentication {
21         auth_type PASS
22         auth_pass chtopnet
23     }
24     virtual_ipaddress {
25         192.168.128.199
26     }