1.拷贝/opt/kubernetes目录到新的master上(注意如果新机上部署了etcd要排除掉)
scp -r /opt/kubernetes/ root@192.168.24.12:/opt/
2.拷贝主件服务
scp /usr/lib/systemd/system/{kube-apiserver.service,kube-controller-manager.service,kube-scheduler.service} root@192.168.24.12:/usr/lib/systemd/system/
3.修改配置文件kube-apiserver的ip为新master ip

4.启动服务
systemctl start kube-apiserver
systemctl start kube-controller-manager
systemctl start kube-scheduler
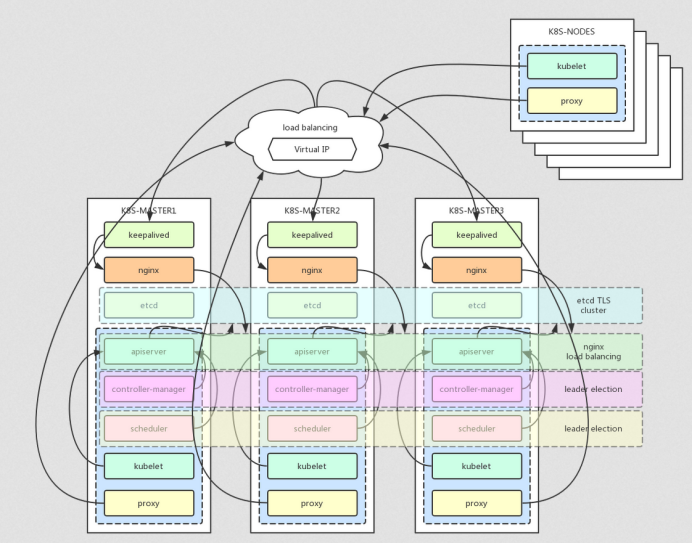
二、在LB上安装nginx(master,backup)且配置一样。
1、yum安装
Install the prerequisites:
sudo yum install yum-utils
To set up the yum repository, create the file named /etc/yum.repos.d/nginx.repo with the following contents:
[nginx-stable]
name=nginx stable repo
baseurl=http://nginx.org/packages/centos/$releasever/$basearch/
gpgcheck=1
enabled=1
gpgkey=https://nginx.org/keys/nginx_signing.key
[nginx-mainline]
name=nginx mainline repo
baseurl=http://nginx.org/packages/mainline/centos/$releasever/$basearch/
gpgcheck=1
enabled=0
gpgkey=https://nginx.org/keys/nginx_signing.key
By default, the repository for stable nginx packages is used. If you would like to use mainline nginx packages, run the following command:
sudo yum-config-manager --enable nginx-mainline
To install nginx, run the following command:
sudo yum install nginx
2、二进制安装
一、安装依赖包
yum install -y gcc gcc-c++ pcre pcre-devel zlib zlib-devel openssl openssl-devel
依赖包说明:
1、编译依赖 gcc 环境,所以需要:gcc gcc-c++;
2、PCRE(Perl Compatible Regular Expressions) 是一个Perl库,包括 perl 兼容的正则表达式库。nginx 的 http 模块使用 pcre 来解析正则表达式,所以需要在 linux 上安装 pcre 库,pcre-devel 是使用 pcre 开发的一个二次开发库,所以需要:pcre pcre-devel ;
3、zlib 库提供了很多种压缩和解压缩的方式, nginx 使用 zlib 对 http 包的内容进行 gzip ,所以需要在 Centos 上安装 zlib 库,所以需要:zlib zlib-devel ;
4、OpenSSL 是一个强大的安全套接字层密码库,囊括主要的密码算法、常用的密钥和证书封装管理功能及 SSL 协议,并提供丰富的应用程序供测试或其它目的使用。nginx 不仅支持 http 协议,还支持 https(即在ssl协议上传输http),所以需要在 Centos 安装 OpenSSL 库,所以需要:openssl openssl-devel ;
二、从官网下载安装包
wget https://nginx.org/download/nginx-1.16.0.tar.gz
三、解压并安装
tar zxvf nginx-1.16.0.tar.gz
cd nginx-1.16.0
./configure --prefix=/usr/local/nginx --with-http_stub_status_module --with-http_ssl_module --with-http_realip_module --with-http_flv_module --with-http_mp4_module --with-http_gzip_static_module --with-stream --with-stream_ssl_module
make && make install
配置nginx文件:
stream {
   log_format  main  '$remote_addr $upstream_addr - [$time_local] $status $upstream_bytes_sent';
    access_log  /var/log/nginx/k8s-access.log  main;
upstream k8s-apiserver {
    server 192.168.0.211:6443;
    server 192.168.0.214:6443;
}
server {
    listen 0.0.0.0:6443;
    proxy_passs k8s-apiserver;
}
}
三、安装keepalived(master.backup)
yum安装keepalived
yum install keepalived -y
修改master配置文件:
! Configuration File for keepalived
global_defs {
# 接收邮件地址
notification_email {
acassen@firewall.loc
failover@firewall.loc
sysadmin@firewall.loc
}
# 邮件发送地址
notification_email_from Alexandre.Cassen@firewall.loc
smtp_server 127.0.0.1
smtp_connect_timeout 30
router_id NGINX_MASTER
}
vrrp_script check_nginx {
script "/usr/local/nginx/sbin/check_nginx.sh"
}
vrrp_instance VI_1 {
state MASTER
interface ens32 #主机网卡
virtual_router_id 51 # VRRP 路由 ID实例,每个实例是唯一的
priority 100 # 优先级,备服务器设置 90
advert_int 1 # 指定VRRP 心跳包通告间隔时间,默认1秒
authentication {
auth_type PASS
auth_pass 1111
}
virtual_ipaddress {
192.168.7.43/24
}
track_script {
check_nginx
}
}
修改backup配置文件:
! Configuration File for keepalived
global_defs {
# 接收邮件地址
notification_email {
acassen@firewall.loc
failover@firewall.loc
sysadmin@firewall.loc
}
# 邮件发送地址
notification_email_from Alexandre.Cassen@firewall.loc
smtp_server 127.0.0.1
smtp_connect_timeout 30
router_id NGINX_MASTER
}
vrrp_script check_nginx {
script "/usr/local/nginx/sbin/check_nginx.sh"
}
vrrp_instance VI_1 {
state BACKUP
interface ens32 #主机网卡
virtual_router_id 51 # VRRP 路由 ID实例,每个实例是唯一的
priority 90 # 优先级,备服务器设置 90
advert_int 1 # 指定VRRP 心跳包通告间隔时间,默认1秒
authentication {
auth_type PASS
auth_pass 1111
}
virtual_ipaddress {
192.168.7.43/24
}
track_script {
check_nginx
}
}
添加检查脚本:
/usr/local/nginx/sbin/check_nginx.sh
count=$(ps -ef |grep nginx |egrep -cv "grep|$$")
if [ "$count" -eq 0 ];then
systemctl stop keepalived
fi
启动keepalived:
systemctl start keepalived
四、修改node配置文件
systemctl restart kubelet
systemctl restart kube-proxy