RedHat5.5 linux下Oracle11g软件安装
一、配置虚拟机
为了创建和配置虚拟机,你需要添加硬件设备如磁盘和cpu,在你开始安装之前,创建一个windows目录作为存放虚拟机的目录
目录不一定是E:盘,找一个自己磁盘空间比较大的硬盘就可以。
E:>mkdir stu1(创建目录)
双击桌面上的虚拟机工作站图标以打开虚拟机
1. Press CTRL-N to create a new virtual machine.
2. New Virtual Machine Wizard:
a. Virtual machine configuration: Select Custom(advanced).
b. click Next to continue
3. Virtual Machine Hardware compatibility: Click on Next.
4. Select I will install the operating system later , Click on Next.
5. Select a Guest Operating System:
a. Guest operating system: Select Linux.
b. Version: Select Red Hat Enterprise Linux 5 64-bit.
6. Name the Virtual Machine:
a. Virtual machine name: Enter “stu1”
b. Location: Enter “E:stu1”
7. Processor Configuration:
a. Number of Processors: Select "1".
b. Number of cores per processor: Select "1".
c. Click on Next.
8. Memory for the Virtual Machine:
a. Memory: Select "2048 MB"
b. Click on Next
9. Network Type:
a. Network connection: Select Use network address translation(NAT)
10. Select I/O Controller Types:
a. I/O Controller types: Select LSI Logic(Recommended).
11. Select a Disk:
a. Disk: Select Create a new virtual disk.
12. Select a Disk Type:
a. Virtual Disk Type: Select SCSI (Recommended).
13. Specify Disk Capacity:
a. Maximum disk size(GB): Enter “30”
b. Deselect Allocate all disk space now. To save space, you do not have to allocate all the disk space now.
c.Select split virtual disk into multiple files
d.click on Next
14. Specify Disk File:
a. Disk file: Enter “stu1.vmdk.”
b. Click on Next
15. Ready to create virtul machine
a. Click on Finish.
二、安装和配置64位的Red Hat linux 5.5
双击刚刚安装好的虚拟机的CD/DVD,选择右侧的使用ISO文件,选择rhel-server-5.5-x86_64-dvd安装介质
- VMware workstation:
- Click on Power on this virtual machine.
- Hit Enter to install in graphical mode.
- Skip the media test and start the installation.
- Red Hat Enterprise Linux 5: Click on Next.
- Language Selection: <select your language preference>.
- Keyboard Configuration: U.S.English.
- installation Number: select entering installation Number
a.click on“skip”
- would you like to initialize this drive,erasing ALL DATA?
Click on YES
- Disk Partitioning Setup:create custom layout
- Disk Setup: Allocate disk space on /dev/sda drive by double-clicking on /dev/sda free space for the mount points (/) and swap space.
- Add Partition:
_ Mount Point: /
_ File System Type: ext3
_ Start Cylinder: 1
_ End Cylinder: 3394
_ File System Type: Swap
_ Start Cylinder: 3395
_ End Cylinder: 3916
11. Boot Loader Configuration: Select only the default /dev/sda1 and leave the rest unchecked.
12. Network Configuration:
a. Network Devices
_ Select and edit eth0
1. SelectEnable IPv4 support
2. De-selectEnable IPv6 support
3. Select Manual configuration
4. IP Address: Enter “192.168.1.6”
5. Netmask: Enter “255.255.255.0.”
6. click on OK
b. Hostname
_ Select manually and enter “stu1”
c. Miscellaneous Settings
_ Gateway:<optional>
_ Primary DNS: <optional>
_ Secondary DNS: <optional>
d. Click on Next
13. Error with data ,select continue
14. Time Zone Selection:<select your time zone>
15. Set Root Password: <enter your root password>
16. Select Customize now
17. Package Group Selection:
a.Desktop Environments
GONME Desktop Environment
b.Applications
Graphical Internet
Text-based internet
c.Development
Development Libraries
Development Tools
l Gcc44-4.4.0-6.el5.x86_64
l Gcc44-c++-4.4.0-6.el5.x86_64
GNOME Software Development
KDE Software Development
Legacy Software Development
X Software Development
l Openmotif-devel-2.3.1-2.el5_4.1.i386
l Xorg-x11-server-sdk-1.1.1-48.76.el5.x86_64
d.Servers
Legacy Network Server
Server Configuration Tools
e.Base System
Administration Tools
Base
Java
Legacty Software Support
l Compat-db-4.2.52-5.1.i386
OpenFabrics Enterprise Distribution
System Tools
l Hwbrowser-0.30-3.el5.noarch
l Sysstat-7.0.2-3.el5.x86_64
X Window System
f.Languages.
Chinese Support
18. About to Install: Click on Next.
19. congratulations,the installation is complete: Click on Reboot.
20. Welcome: Click on Forward
21. License Agreement: Select Yes, I agree to the License Agreement.
22. Firewall:select Disabled,when see the warning click Yes
23. SELinux :SELinux Setting,select Disabled,when warning click Yes
24. Kdump: click on forward
25. Date and Time: Set the date and time.
26. Set Up Software Updates :No I prefer to register at a later time
27. when you see the warning :No Thanks,I’ll connect later
28. Finish Updates Setup:click on Forward
29. Create User:Leave the entries blank and click on Forward
30. When you see the warning , select continue
31. Sound Card:click on Forward
32. Additional CDs: Click on Finish
33. When you see the warning , select Ok

Congratulations, you have just installed Red Hat Enterprise Linux on VMware Server!
34.使用ssh上传并安装unixODBC、unixODBC-devel和libaio-devel软件包
[root@instuctor pkg]# pwd
/root/pkg
[root@instuctor pkg]# ls
libaio-devel-0.3.106-5.x86_64.rpm
unixODBC-2.2.11-7.1.x86_64.rpm
unixODBC-devel-2.2.11-7.1.x86_64.rpm
35.根据需要配置vmware tools工具
三、配置Linux系统环境和oracle用户环境变量
对于Oracle软件在Linux 5系统下的安装,需要用户提前在Linux系统下做一些配置,从而满足安装Oracle软件的基本需求。
以下0、1、2、3、4步使用root用户,第5和6步使用分别使用grid用户和oracle用户
0.要配置/etc/hosts 添加ip地址、主机,否则grid的netca配置的时候会报错。
[root@instuctor ~]# vi /etc/hosts
# Do not remove the following line, or various programs
# that require network functionality will fail.
127.0.0.1 localhost.localdomain localhost
192.168.1.6study
1.创建oracle用户和组
/usr/sbin/groupadd -g 501 oinstall
/usr/sbin/groupadd -g 502 dba
/usr/sbin/groupadd -g 503 oper
/usr/sbin/groupadd -g 504 asmadmin
/usr/sbin/groupadd -g 505 asmoper
/usr/sbin/groupadd -g 506 asmdba
/usr/sbin/useradd -g oinstall -G dba,asmdba,oper oracle
/usr/sbin/useradd -g oinstall -G asmadmin,asmdba,asmoper,oper,dba grid
passwd grid
passwd oracle
2.创建安装grid软件和oracle软件的目录,并授予相应的权限
mkdir -p /u01/app/oracle/product/11.2.0/db
mkdir -p /u01/app/grid/product/11.2.0/grid
chown -R oracle:oinstall /u01/app/
chown -R grid:oinstall /u01/app/grid
chmod -R 775 /u01/
3.配置系统文件和进程限制,配置内核参数
cat >> /etc/security/limits.conf <<EOF
#ORACLE SETTING
grid soft nproc 2047
grid hard nproc 16384
grid soft nofile 1024
grid hard nofile 65536
oracle soft nproc 2047
oracle hard nproc 16384
oracle soft nofile 1024
oracle hard nofile 65536
EOF
cat >>/etc/pam.d/login<<EOF
#ORACLE SETTING
session required pam_limits.so
EOF
cat >>/etc/sysctl.conf<<EOF
#ORACLE SETTING
fs.aio-max-nr = 1048576
fs.file-max = 6815744
kernel.shmmni = 4096
kernel.sem = 250 32000 100 128
net.ipv4.ip_local_port_range = 9000 65500
net.core.rmem_default = 262144
net.core.rmem_max = 4194304
net.core.wmem_default = 262144
net.core.wmem_max = 1048586
EOF
使配置的内核参数生效,使用sysctl -p命令
sysctl -p
4.关闭NTP服务和删除NTP配置文件
grid时间同步所需要的设置
Network Time Protocol Setting
/sbin/service ntpd stop
chkconfig ntpd off
rm /etc/ntp.conf
or, mv /etc/ntp.conf to /etc/ntp.conf.org.
5.设置/etc/profile
if [ $USER = "oracle" ] || [ $USER = "grid" ]; then
if [ $SHELL = "/bin/ksh" ]; then
ulimit -p 16384
ulimit -n 65536
else
ulimit -u 16384 -n 65536
fi
umask 022
fi
6.用户grid的环境变量的设置
grid 用户配置文件 ORACLE_HOSTNAME请自行设置,这个配置使用grid用户
#su - grid
$vi .bash_profile
export LD_ASSUME_KERNEL=2.6.18
export TMP=/tmp
export TMPDIR=$TMP
export ORACLE_HOSTNAME=study
export ORACLE_BASE=/u01/app/grid
export ORACLE_HOME=$ORACLE_BASE/product/11.2.0/grid
export ORACLE_SID=+ASM
export ORACLE_TERM=xterm
export PATH=$PATH:$ORACLE_HOME/bin
umask 022
使用source命令是环境变量生效
source .bash_profile
7.用户oracle的环境变量的设置
oracle用户配置文件 ORACLE_HOSTNAME请自行设置,这个配置使用oacle用户
#su - oracle
$vi .bash_profile
# Oracle Settings oracle
export LD_ASSUME_KERNEL=2.6.18
export TMP=/tmp
export TMPDIR=$TMP
export ORACLE_HOSTNAME=study
export ORACLE_BASE=/u01/app/oracle
export ORACLE_HOME=$ORACLE_BASE/product/11.2.0/db
export ORACLE_SID=db01
export ORACLE_TERM=xterm
export LD_LIBRARY_PATH=$ORACLE_HOME/lib:/lib:/usr/lib
export CLASSPATH=$ORACLE_HOME/JRE:$ORACLE_HOME/jlib:$ORACLE_HOME/rdbms/jlib
export PATH=/usr/sbin:$PATH
export PATH=$ORACLE_HOME/bin:$PATH
使用source使环境变量立即生效
source .bash_profile
第四步、安装和配置ASM
关闭虚拟机,添加硬盘sdb、sdc和sdd,大小都是3G,启动虚拟机,使用fdisk对添加的硬盘分区,使用wincp上传相应内核的asmlib软件到服务器,并安装
[root@stu1 asm]# fdisk /dev/sdb
Device contains neither a valid DOS partition table, nor Sun, SGI or OSF disklabel
Building a new DOS disklabel. Changes will remain in memory only,
until you decide to write them. After that, of course, the previous
content won't be recoverable.
Warning: invalid flag 0x0000 of partition table 4 will be corrected by w(rite)
Command (m for help): n
Command action
e extended
p primary partition (1-4)
p
Partition number (1-4): 1
First cylinder (1-391, d efault 1):
Using default value 1
Last cylinder or +size or +sizeM or +sizeK (1-391, default 391):
Using default value 391
Command (m for help): w
The partition table has been altered!
Calling ioctl() to re-read partition table.
Syncing disks.
[root@stu1 asm]# fdisk /dev/sdc
Device contains neither a valid DOS partition table, nor Sun, SGI or OSF disklabel
Building a new DOS disklabel. Changes will remain in memory only,
until you decide to write them. After that, of course, the previous
content won't be recoverable.
Warning: invalid flag 0x0000 of partition table 4 will be corrected by w(rite)
Command (m for help): n
Command action
e extended
p primary partition (1-4)
p
Partition number (1-4): 1
First cylinder (1-391, default 1):
Using default value 1
Last cylinder or +size or +sizeM or +sizeK (1-391, default 391):
Using default value 391
Command (m for help): w
The partition table has been altered!
Calling ioctl() to re-read partition table.
Syncing disks.
[root@stu1 asm]# fdisk /dev/sdd
Device contains neither a valid DOS partition table, nor Sun, SGI or OSF disklabel
Building a new DOS disklabel. Changes will remain in memory only,
until you decide to write them. After that, of course, the previous
content won't be recoverable.
Warning: invalid flag 0x0000 of partition table 4 will be corrected by w(rite)
Command (m for help): n
Command action
e extended
p primary partition (1-4)
p
Partition number (1-4): 1
First cylinder (1-391, default 1):
Using default value 1
Last cylinder or +size or +sizeM or +sizeK (1-391, default 391):
Using default value 391
Command (m for help): w
The partition table has been altered!
Calling ioctl() to re-read partition table.
Syncing disks.
[root@stu1 asm]# ll
oracleasm-2.6.18-194.el5-2.0.5-1.el5.x86_64.rpm
oracleasmlib-2.0.4-1.el5.x86_64.rpm
oracleasm-support-2.1.7-1.el5.x86_64.rpm
[root@stu1 asm]# rpm -Uvh *.rpm
warning: oracleasm-2.6.18-194.el5-2.0.5-1.el5.x86_64.rpm: Header V3 DSA signature: NOKEY, key ID 1e5e0159
Preparing... ################################## [100%]
1:oracleasm-support ################################## [ 33%]
2:oracleasm-2.6.18-194.el################################## [ 67%]
3:oracleasmlib ################################## [100%]
[root@stu1 asm]# /etc/init.d/oracleasm configure
Configuring the Oracle ASM library driver.
This will configure the on-boot properties of the Oracle ASM library
driver. The following questions will determine whether the driver is
loaded on boot and what permissions it will have. The current values
will be shown in brackets ('[]'). Hitting <ENTER> without typing an
answer will keep that current value. Ctrl-C will abort.
Default user to own the driver interface []: grid
Default group to own the driver interface []: asmadmin
Start Oracle ASM library driver on boot (y/n) [n]: y
Scan for Oracle ASM disks on boot (y/n) [y]: y
Writing Oracle ASM library driver configuration: done
Initializing the Oracle ASMLib driver: [ OK ]
Scanning the system for Oracle ASMLib disks: [ OK ]
[root@stu1 asm]#
[root@stu1 asm]# /etc/init.d/oracleasm createdisk VOL1 /dev/sdb1
Marking disk "VOL1" as an ASM disk: [ OK ]
[root@stu1 asm]# /etc/init.d/oracleasm createdisk VOL2 /dev/sdc1
Marking disk "VOL2" as an AcSM disk: [ OK ]
[root@stu1 asm]# /etc/init.d/oracleasm createdisk VOL3 /dev/sdd1
Marking disk "VOL3" as an ASM disk: [ OK ]
[root@stu1 asm]# /etc/init.d/oracleasm scandisks
Scanning the system for Oracle ASMLib disks: [ OK ]
[root@stu1 asm]# /etc/init.d/oracleasm listdisks
VOL1
VOL2
VOL3
第五步、安装grid软件
用ssh上传grid软件(p10404530_112030_Linux-x86-64_3of7)到grid用户的主目录/home/grid,并使用unzip命令解压
$unzip p10404530_112030_Linux-x86-64_3of7
[grid@easthome ~]$ ls
grid

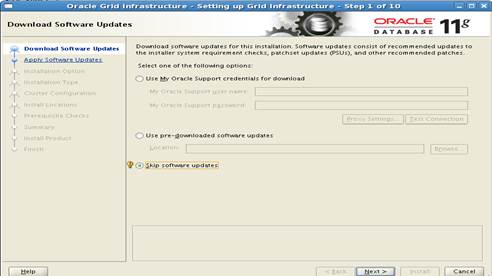
选择skip software updates,选next继续

选择configure oracle grid infrastructure for a standalone server,选择next继续

选择next,继续

选择红圈部分内容,选next继续

选择use same password for these accounts,口令长度要求8位以上,有大写和小写字符,包含数字

选择next,继续

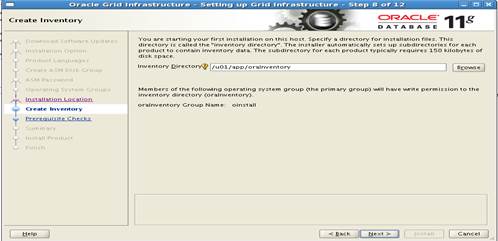
确认红圈部分目录正确,点击next继续
选择next继续

选择install开始安装

等待安装...........,当看到下面的界面时,不要着急点OK,单独打开一个终端,使用root用户执行窗口中提示的两个脚本,执行之后点击OK

[root@easthome ~]# cd /u01/app/oraInventory/
[root@easthome oraInventory]# ./orainstRoot.sh
Changing permissions of /u01/app/oraInventory.
Adding read,write permissions for group.
Removing read,write,execute permissions for world.
Changing groupname of /u01/app/oraInventory to oinstall.
The execution of the script is complete.
[root@easthome oraInventory]# cd /u01/app/grid/product/11.2.0/grid
[root@easthome grid]# ./root.sh
Performing root user operation for Oracle 11g
The following environment variables are set as:
ORACLE_OWNER= grid
ORACLE_HOME= /u01/app/grid/product/11.2.0/grid
Enter the full pathname of the local bin directory: [/usr/local/bin]:
Copying dbhome to /usr/local/bin ...
Copying oraenv to /usr/local/bin ...
Copying coraenv to /usr/local/bin ...
Creating /etc/oratab file...
Entries will be added to the /etc/oratab file as needed by
Database Configuration Assistant when a database is created
Finished running generic part of root script.
Now product-specific root actions will be performed.
Using configuration parameter file: /u01/app/grid/product/11.2.0/grid/crs/install/crsconfig_params
Creating trace directory
LOCAL ADD MODE
Creating OCR keys for user 'grid', privgrp 'oinstall'..
Operation successful.
LOCAL ONLY MODE
Successfully accumulated necessary OCR keys.
Creating OCR keys for user 'root', privgrp 'root'..
Operation successful.
CRS-4664: Node easthome successfully pinned.
Adding Clusterware entries to inittab
easthome 2013/04/06 15:56:22 /u01/app/grid/product/11.2.0/grid/cdata/easthome/backup_20130406_155622.olr
Successfully configured Oracle Grid Infrastructure for a Standalone Server
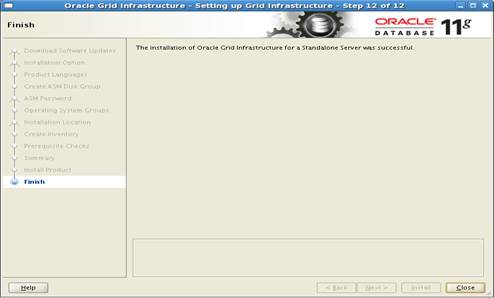
但看到这个界面的时候,表示安装结束,点击close退出安装。
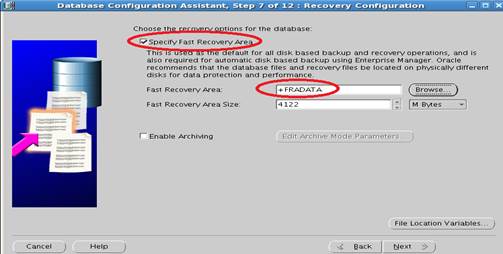
第六步、添加磁盘组fradata
使用ASMCA工具添加新的磁盘组fradata,用于将来数据库归档目录

选择create,创建磁盘组

按照红圈中的选择,然后点OK

看到这个界面,表示磁盘组创建成功!

选择exit退出
第七部、安装oracle软件
用ssh上传oracle安装软件(p10404530_112030_Linux-x86-64_1of7、p10404530_112030_Linux-x86-64_2of7)到oracle用户的主目录/home/oracle,并使用unzip命令解压
$unzip p10404530_112030_Linux-x86-64_1of7
$unzip p10404530_112030_Linux-x86-64_2of7
[oracle@easthome ~]$ ls
database


勾掉红圈部分,当弹出小窗口时,选择yes,点击next继续

选择skip software updates,点击next继续

选择红圈选项,点击next继续

选择红圈部分选项,点击next继续

选择next继续

选择红圈部分,点击next继续

确认红圈中显示的目录正确,点击next继续

选择next继续

确认没有检查失败选项,选择install开始安装
当看到下面的界面时,不要着急点OK,单独打开一个终端,使用root用户执行窗口中提示的脚本,执行之后点击OK


软件安装完成,点击close退出。
第八步、使用dbca创建数据库

点击next继续

选择红圈部分,点击next继续

选择红圈选项,点击next继续

填入数据库名称,要求小于8个字节,点击next继续

选择next继续
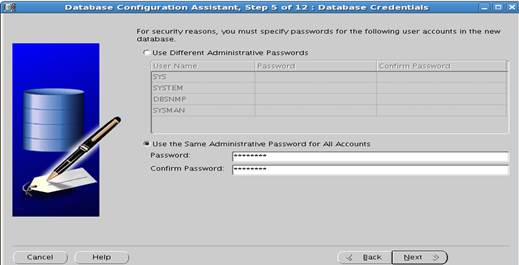
输入用户口令,点击next继续

选择红圈部分中选项,点击next继续
选择红圈选项,点击next继续

选中红圈中选线,点击next继续
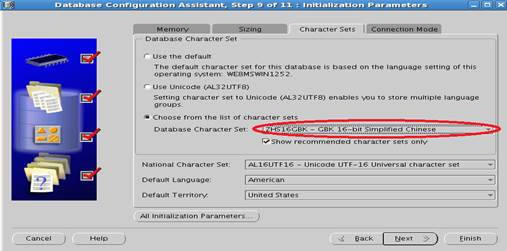
设置合适的内存大小和字符集,选择next继续

选择next继续

点击finish开始安装


选择exit退出安装!数据库安装完成。