(1)需要安装Docker容器,在Docker容器内安装jenkins,gogs,tomcat。 新建maven项目,添加findbugs plugin。
使用docker启动jenkins,gogs,Tomcat的命令gogs :
  docker run -itd -p 10022:22 -p 10080:3000 --restart=always --privileged=true --name=gogs -v /var/gogs:/data gogs/gogs

jenkins:
   docker run -itd -p 8800:8080 -p 50000:50000 --restart=always --privileged=true --name=jenkins -v /home/jenkins:/var/jenkins_home jenkins

tomcat:
     docker run -itd -p 8080:8080  --restart=always --privileged=true --name=tomcat -v /usr/local/tomcat:/var/tomcat_home tomcat:8.0
后来启动tomcat的命令:
 docker run -itd -p 8080:8080  --restart=always --privileged=true --name=tomcat -v /usr/local/tomcat:/home/tomcat/tomcat_home tomcat:8.0
解释:
-i :表示以交互形式打开
-d :后台运行
-t :伪终端
-p :指定端口 前面的是你指定用户用来访问的端口号,后面的是指该软件本来默认的端口号
--restart=always : 使得程序总是处于运行状态,自动启动
--privileged=true : 和防火墙有关,selinux权限 (设置这个程序不会受防火墙的影响)
--name : 指定容器运行的名称
 -v : 容器挂载,前面是实实在在存在的数据卷,后面是挂载目录
最后的 gogs/gogs   jenkins  tomcat:8.0 是镜像名,docker pull命令后面跟的参数
(2)在jenkins上安装插件: maven Intergration plugin ,gogs-plugin ,publish over ssh, findbugs-plugin,Deploy to a container (jdk ,git 都使用Docker中默认的,安装jenkins的时候不需要配置这两项的路径)
(3)tomcat需要配置用户: 通过 find / -name "tomcat" ,找到Tomcat的安装路径,再将内容添加到 conf/tomcat-users.xml文件中 <tomcat-users>大概这个位置</tomcat-users>
<role rolename="admin"/>
  <role rolename="manager"/>
  <role rolename="manager-gui"/>
  <role rolename="manager-script"/>
  <user username="tomcat" password="tomcat" roles="admin,manager,manager-gui,manager-script"/>
(4)gogs创建仓库时,记得私有化,配置git钩子,在.git/hooks/目录下添加 pre-commit 文件,pre-commit 文件中的内容如下
#!/bin/sh
#execute shell before commit,check the code
mvn clean install

#recieve the  execute result
result=$?
#output the result ,if the result less or equal 0 ,it proves this project has bugs,otherwise don't.
echo $result

if [ $result -ne 0 ]
then
    mvn findbugs:gui
    echo "REGRETFUL! BUILD FAILURE"
    exit 1
else
    echo "CONGRATURATION! BUILD SUCCESS"
    exit 0
fi
注释: 配置webhook时,如果推送的时候出现了 403错误,要查看jenkins中是否安装了 gogs-plugin这个插件(因为我当时出错了半天,就是因为没有安装gogs-plugin)
webhook示例:http://172.150.15.9:8800/gogs-webhook/?job=WebdemoIn7 //WebdemoIn7是我的enkins项目名
(5)创建maven项目时,pom.xml中的内容
<project xmlns="http://maven.apache.org/POM/4.0.0" xmlns:xsi="http://www.w3.org/2001/XMLSchema-instance"
    xsi:schemaLocation="http://maven.apache.org/POM/4.0.0 http://maven.apache.org/maven-v4_0_0.xsd">
    <modelVersion>4.0.0</modelVersion>
    <groupId>cn.demo</groupId>
    <artifactId>WebdemoIn7</artifactId>
    <packaging>war</packaging> <!-- 打包为war包 -->
    <version>0.0.1-SNAPSHOT</version>
    <name>WebdemoIn7 Maven Webapp</name>
    <url>http://maven.apache.org</url>
    <build>
        <finalName>WebdemoIn7</finalName>
        <plugins>
            <plugin>
                <inherited>true</inherited>
                <groupId>org.apache.maven.plugins</groupId>
                <artifactId>maven-compiler-plugin</artifactId>
                <version>3.5.1</version>
                <configuration>
                    <source>${compiler.source}</source>
                    <target>${compiler.target}</target>
                    <encoding>${project.build.sourceEncoding}</encoding>
                    <compilerArguments>
                        <extdirs>${project.basedir}/src/main/webapp/WEB-INF/lib</extdirs>
                    </compilerArguments>
                </configuration>
            </plugin>
            <!-- 指定执行的主类(main方法所在的类)-->
            <plugin>
                <groupId>org.apache.maven.plugins</groupId>
                <artifactId>maven-jar-plugin</artifactId>
                <version>2.6</version>
                <configuration>
                    <archive>
                    <!-- 添加index则不从mainfest中读取classpath,而是从Index.list中读取 -->
                    <!-- <index>true</index> -->
                        <manifest>
                            <mainClass>cn.demo.JavademoIn7.application.ApplicationMain</mainClass>
                        </manifest>

                    </archive>
                </configuration>
            </plugin>

            <!-- findbugs插件 :静态检查代码的错误-->
        <plugin>
            <groupId>org.codehaus.mojo</groupId>
            <artifactId>findbugs-maven-plugin</artifactId>
            <version>3.0.4</version>
            <configuration>
                <!-- 设置分析工作的等级,可以为Min、Default和Max -->
                <effort>Low</effort>
                <!-- Low、Medium和High (Low最严格) -->
                <threshold>Medium</threshold>
                <failOnError>true</failOnError>
                <includeTests>true</includeTests>
                <!--findbugs需要忽略的错误的配置文件-->
               <!--  <excludeFilterFile>compile.bat</excludeFilterFile> -->
            </configuration>
            <executions>
                <execution>
                    <id>run-findbugs</id>
                    <!-- 在install 阶段触发执行findbugs检查,比如执行 mvn clean package-->
                    <phase>install</phase>
                    <goals>
                        <goal>check</goal>
                    </goals>
                </execution>
            </executions>
        </plugin>

        </plugins>
    </build>
    <properties>
        <project.build.sourceEncoding>UTF-8</project.build.sourceEncoding>
        <compiler.source>1.7</compiler.source>
        <compiler.target>1.7</compiler.target>

        <!-- servlet/jsp/EL (2.4/2.0/?)(2.5/2.1/2.1),(3.0/2.2/2.2),(3.1/2.3/3.0) -->
        <servlet.version>3.1.0</servlet.version>
        <jsp.version>2.3.1</jsp.version>
        <jstl.version>1.2</jstl.version>
        <junit.version>4.12</junit.version>
    </properties>
    <dependencies>
        <dependency>
            <groupId>org.apache.maven.plugins</groupId>
            <artifactId>maven-clean-plugin</artifactId>
            <version>2.5</version>
        </dependency>
        <dependency>
            <groupId>junit</groupId>
            <artifactId>junit</artifactId>
            <version>${junit.version}</version>
            <scope>test</scope>
        </dependency>
        <dependency>
            <groupId>javax.servlet</groupId>
            <artifactId>javax.servlet-api</artifactId>
            <version>${servlet.version}</version>
            <scope>provided</scope>
        </dependency>
        <dependency>
            <groupId>javax.servlet.jsp</groupId>
            <artifactId>javax.servlet.jsp-api</artifactId>
            <version>${jsp.version}</version>
            <scope>provided</scope>
        </dependency>
        <dependency>
            <groupId>javax.servlet</groupId>
            <artifactId>jstl</artifactId>
            <version>${jstl.version}</version>
        </dependency>
    </dependencies>
</project>
(6)jenkins构建项目时,前面的配置一如往常,可以查看其它的案例
主要配置 源码管理,构建触发器,build,构建后操作
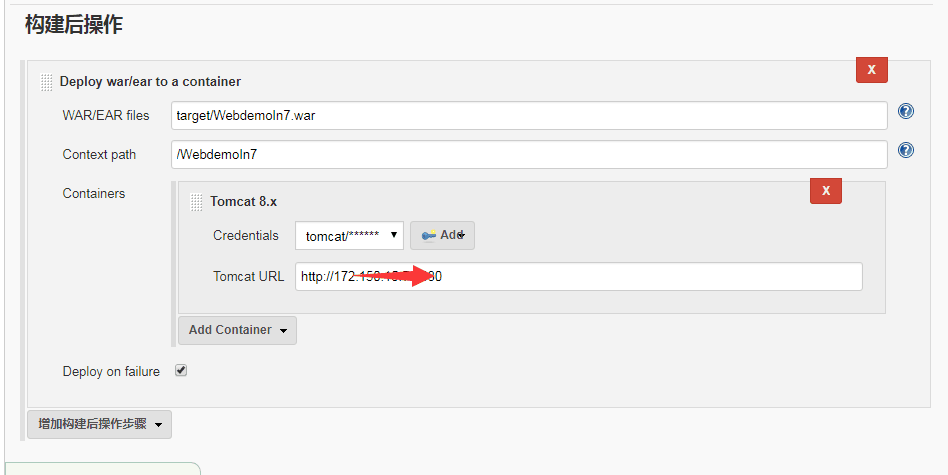
然后部署可以访问了
http://172.150.12.32:8080/WebdemoIn7