(1)新建java项目(maven构建)
pom.xml


<project xmlns="http://maven.apache.org/POM/4.0.0" xmlns:xsi="http://www.w3.org/2001/XMLSchema-instance"
  xsi:schemaLocation="http://maven.apache.org/POM/4.0.0 http://maven.apache.org/xsd/maven-4.0.0.xsd">
  <modelVersion>4.0.0</modelVersion>

    <groupId>cn.demo</groupId>
    <artifactId>jenkins_jar</artifactId>
    <version>0.0.1-SNAPSHOT</version>
    <packaging>jar</packaging>
    <name>jenkins_jar</name>
    <url>http://maven.apache.org</url>

    <build>
        <finalName>jenkins_jar</finalName>
        <plugins>
            <plugin>
                <inherited>true</inherited>
                <groupId>org.apache.maven.plugins</groupId>
                <artifactId>maven-compiler-plugin</artifactId>
                <version>3.1</version>
                <configuration>
                    <source>${compiler.source}</source>
                    <target>${compiler.target}</target>
                    <encoding>${project.build.sourceEncoding}</encoding>
                </configuration>
            </plugin>
            <!-- 源码打包
            <plugin>
                <inherited>true</inherited>
                <groupId>org.apache.maven.plugins</groupId>
                <artifactId>maven-source-plugin</artifactId>
                <version>3.0.1</version>
                <executions>
                    <execution>
                        <id>attach-sources</id>
                        <goals>
                            <goal>jar</goal>
                        </goals>
                    </execution>
                </executions>
            </plugin>
            -->
            <plugin>
    <groupId>org.apache.maven.plugins</groupId>
    <artifactId>maven-shade-plugin</artifactId>
    <version>2.4.1</version>
    <configuration>
        <createDependencyReducedPom>false</createDependencyReducedPom>
    </configuration>
    <executions>
        <execution>
            <phase>package</phase>
            <goals>
                <goal>shade</goal>
            </goals>
            <configuration>
                <filters>
                    <filter>
                        <artifact>*:*</artifact>
                        <excludes>
                            <exclude>META-INF/*.SF</exclude>
                            <exclude>META-INF/*.DSA</exclude>
                            <exclude>META-INF/*.RSA</exclude>
                        </excludes>
                    </filter>
                </filters>
                <transformers>
                    <transformer implementation="org.apache.maven.plugins.shade.resource.ManifestResourceTransformer">
                        <mainClass>cn.demo.jenkins_jar.demo.Demo</mainClass>
                    </transformer>
                    <transformer
                            implementation="org.apache.maven.plugins.shade.resource.AppendingTransformer">
                        <resource>META-INF/spring.handlers</resource>
                    </transformer>
                    <transformer
                            implementation="org.apache.maven.plugins.shade.resource.AppendingTransformer">
                        <resource>META-INF/spring.schemas</resource>
                    </transformer>
                </transformers>
            </configuration>
        </execution>
    </executions>
</plugin>
        </plugins>
    </build>
    <properties>
        <project.build.sourceEncoding>UTF-8</project.build.sourceEncoding>
        <compiler.source>1.7</compiler.source>
        <compiler.target>1.7</compiler.target>
        <junit.version>4.12</junit.version>
    </properties>

    <dependencies>
        <dependency>
            <groupId>junit</groupId>
            <artifactId>junit</artifactId>
            <version>${junit.version}</version>
            <scope>test</scope>
        </dependency>
    </dependencies>
</project>
(2)新建jenkins项目
(3)下载插件 Publish over SSH
(4)配置publish over ssh (点击系统管理 ---》 系统设置)

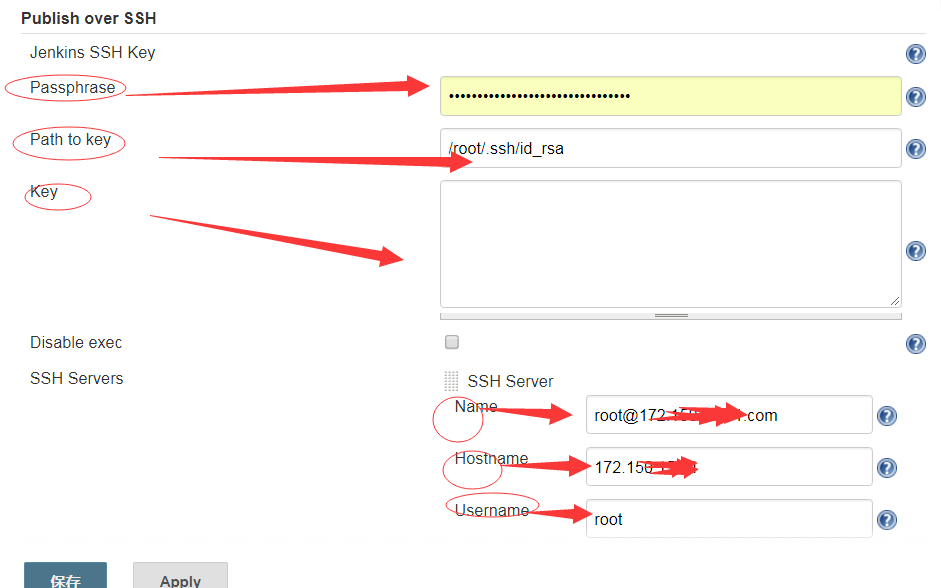
(5)进入系统配置页面,前面的配置保持不变,下拉到Publish Over SSH配置
Passphrase:这里是你的主机生成 SSH key时的Passphrase值,如果你一直是enter ,这里就是空,什么都不用写 ,空白就行
Path to key :这是写主机 秘钥的位置,记住是id_ras,而不是 id_ras.pub
key:如果你上面没写主机秘钥 位置,这里就直接将秘钥内容复制--粘贴过来
Name :这个名字你自己取 ,都可以 我这里取的是 用户名@主机号.com
Hostname: 这里必须写 主机IP
Username :是用户名 一般为 root
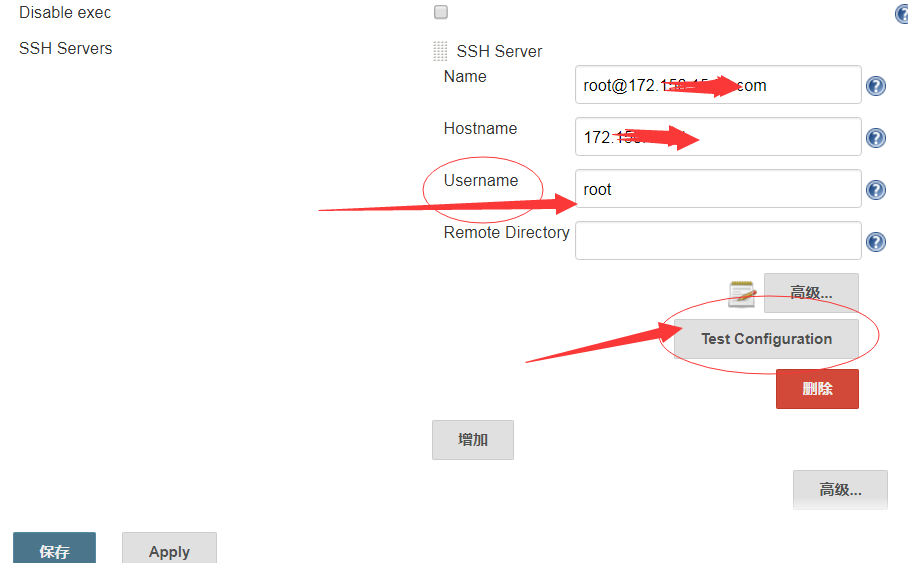
(6)继续如下配置:到这里配置完后,选择 testConfiguration ,没写错 就会出现 success
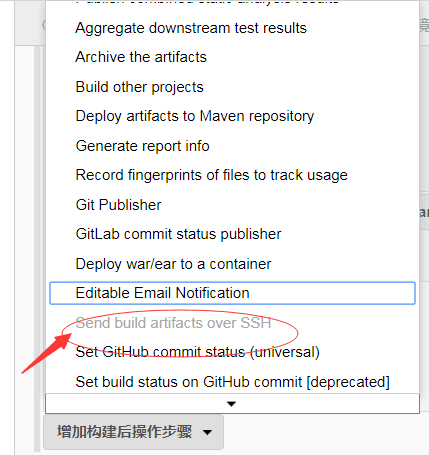
(7)出现success后 表示配置成功,然后就可以开始进行项目的配置了,前面的配置不变 ,在增加构建后操作这里配置 选择Send buiild artifacets over SSH
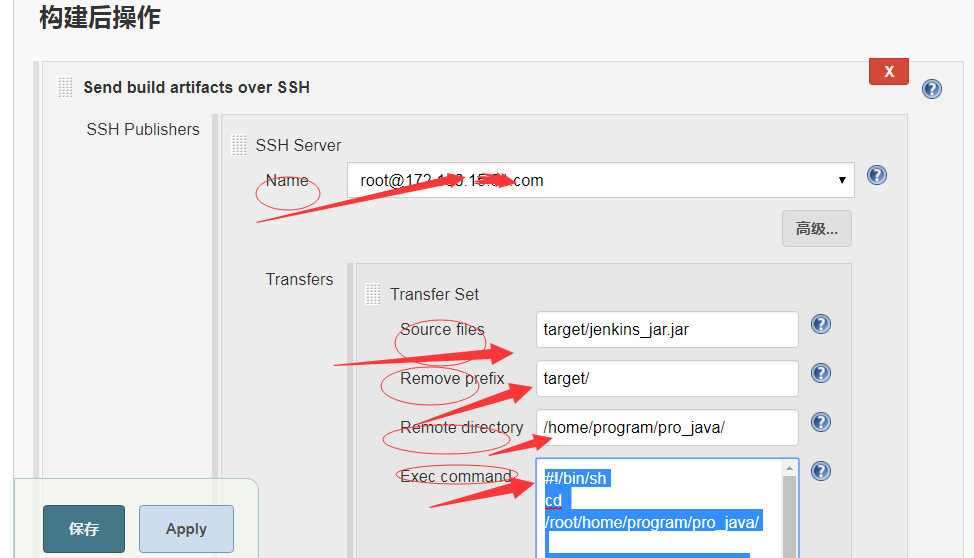
(8)进入配置
Name:是刚刚在系统设置里面Publish OVer SSH 配置的 name
Source Filew:项目jar包的位置,这是jenkins自动打包编译的,都在 target目录下
Remove prefix : 移除前缀 target
Remote directory : 远程linux存放项目jar包的目录
Exec Command:执行的shell脚本 #这里和部署到本地的脚本类似
脚本内容:
#!/bin/sh
cd /root/home/program/pro_java/ #进入项目jar包存放目录
#得到进程ID pid,kill该进程
pid=`cat /root/home/program/pro_java/pid` #得到该目录下 pid文件中的进程id
if [ -n "$pid" ]
then
echo "kill -9 的pid:" $pid
kill -9 $pid #kill该进程
fi
#执行jar,并将进程挂起,保存进程ID到 pid文件
echo "Execute shell Finish"
BUILD_ID=dontKillMe nohup java -jar /root/home/program/pro_java/jenkins_jar.jar & echo "$!" > pid #执行项目jar包,将进程挂起,然后将进程id写入当前目录下的pid文件中
然后就可以完成构建了