一、vue3.0写法
-
这次项目使用vue3.0来写,写的过程中突然发现差别挺大的,感觉不会写vue了,所以总结总结。。。
-
This is an 官网地址:
1、安装vue-cli 3.0
- npm i @vue/cli -g
2、运行
- npm run serve
3、TypeScript的支持
遇到的vue3.0写法
import { Watch, Component, Vue, Emit, Prop } from "vue-class-decorator"; // 没有组件 @component// 有组件 // import children from "./components/children.vue"; // @component({ components:{children} }) export default class MyChildren extends Vue{ username = ""; // 名字 //userId 父子之间传值,必传默认是null @Prop({ type: String, required: true, default: null}) userId: string; @Emit("changeChildren") changeChildren(){} created(){} mounted(){} // 方法 cancel() { // 调用自定义函数 this.changeChildren() } }
- 以下是我百度看到的,写的非常详细
- 在3.0版本中,选择启动typescript语法后,vue组件的书写格式有特定的规范。
- 示例代码
百度查看的结果
     import { Component, Emit, Inject, Model, Prop, Provide, Vue, Watch } from "vue-property-decorator"
	const s = Symbol('baz')
	@Component
	export class MyComponent extends Vue {
	  @Emit()
	  addToCount(n: number){ this.count += n}
	  @Emit('reset')
	  resetCount(){ this.count = 0 }
	  @Inject() foo: string
	  @Inject('bar') bar: string
	  @Inject(s) baz: string
	  @Model('change') checked: boolean
	  @Prop()
	  propA: number
	  @Prop({ default: 'default value'})
	  propB: string
	  @Prop([String, Boolean])
	  propC: string | boolean
	  @Provide() foo = 'foo'
	  @Provide('bar') baz = 'bar'
	  @Watch('child')
	  onChildChanged(val: string, oldVal: string) { }
	  @Watch('person', { immediate: true, deep: true})
	  onPersonChanged(val: Person, oldVal: Person){}
	}
以上代码相当于
  const s = Symbol("baz");
  export const myComponent = Vue.extend({
    name: "MyComponent",
    inject: {
      foo: "foo",
      bar: "bar",
      [s]: s
    },
    model: {
      prop: "checked",
      event: "change"
    },
    props: {
      checked: Boolean,
      propA: Number,
      propB: {
        type: String,
        default: "default value"
      },
      propC: [String, Boolean]
    },
    data() {
      return {
        foo: "foo",
        baz: "bar"
      };
    },
    provide() {
      return {
        foo: this.foo,
        bar: this.baz
      };
    },
    methods: {
      addToCount(n) {
        this.count += n;
        this.$emit("add-to-count", n);
      },
      resetCount() {
        this.count = 0;
        this.$emit("reset");
      },
      onChildChanged(val, oldVal) {},
      onPersonChanged(val, oldVal) {}
    },
    watch: {
      child: {
        handler: "onChildChanged",
        immediate: false,
        deep: false
      },
      person: {
        handler: "onPersonChanged",
        immediate: true,
        deep: true
      }
    }
  });
- This is an 更多详细内容:
4、知识点
- 选项/组合 provide/inject
- @Provide 提供 / @inject注入
(1)、类型
- provide: Object | () => Object
- inject: Array
| { [key: string]: string | Symbol | Object } - 这对选项需要一起使用,以允许一个祖先组件向其所有子孙后代注入一个依赖,不论组件层次有多深,并在起上下游关系成立的时间里始终生效。
(2)、示例
// 父级组件提供'foo'
var Provider = {
	provide: {
		foo: 'bar'
	}
}
// 子件注入'foo'
var Child = {
	inject: ['foo'],
	created() {
		console.log(this.f00) // bar
	}
}
(3)、vue-property-decorator
- npm install --save vue-property-decorator /npm i -S vue-property-decorator
vue-property-decorator提供OO的风格Vue Component方便类型声明
vue-class-component 以class的模式写vue组件
vue class component 是vue官方出的
vue property decorator 是社区出的
其中vue class component 提供了vue component等等
vue property decorator深度依赖了vue class component扩展出了很多操作符@Prop @Emit @Inject等等 可以说是vue class component的一个超集
正常开发的时候 你只需要使用vue property decorator 中提供的操作符即可 不再从vue class component引入vue
二、相同页面点击不同按钮出现内容
新增和修改都是用同一个页面,希望点击各自的按钮跳转到页面时调用各自的接口
-
效果图

-
子组件
<template> <!-- 新增/修改 --> <div class="role-change table-mask"> <div class="role-body"> <div class="role-main"> <span class="svg-container table-close" @click="cancel" > <svg-icon icon-class="close" /> </span> <div class="main-box"> <div class="main-item"> <p><span class="m-start">*</span>角色编码:</p> <el-input v-model.trim="Code" /> </div> <div class="main-item"> <p><span class="m-start">*</span>角色名称:</p> <el-input v-model.trim="Name" /> </div> </div> <div class="box-btn-bg add-bg tac"> <el-button class="f18 box-btn" @click="cancel" >取消</el-button> <el-button class="f18 box-btn" @click="addSubmit" >保存</el-button> </div> </div> </div> </div> </template> <script lang="ts"> import { Watch, Component, Vue, Emit, Prop } from "vue-class-decorator"; import { addRole, getRoleDetails, getUpdateRole } from "@/api/System/role"; @Component export default class AddRole extends Vue { Code = ""; // 角色编码 Name = ""; // 角色名称 @Emit("addRole") addRole(flag) {} @Prop({ type: String, default: null }) addId: string; cancel() { this.addRole(false); } addSubmit() { if (this.Code === "") { this.$message({ message: "请输入角色编码", type: "warning" }); } else if (this.Name === "") { this.$message({ message: "请输入角色名称", type: "warning" }); } else { if (this.addId) { // 修改接口 // 调用自定义方法 this.addRole(true); } else { // 新增接口 this.addRole(true); } } } } </script> -
父组件
<!-- 新增/修改 --> <add-role v-if="roleShow" :addId="addId" @addRole="addRole" ></add-role> <script lang="ts"> import AddRole from "./components/AddRole.vue"; @Component({ components: { AddRole } }) export default class RoleList extends Vue { roleShow = false; // 默认弹框不显示 addId = null; // 传给子组件的id // 新增/修改的自定义方法 addRole(flag) { if (flag) { } this.addId = null; this.roleShow = false; } // 点击新增按钮 add(){ this.roleShow = true; } //点击修改按钮 edit(){ this.addId = 'newId'; this.roleShow = true; } } </script> -
思路
-
父子之间传值,点击修改的时候传newId,新增的时候不传默认是null,这样就可以在子组件里区分是新增页面还是修改页面
三、Element 默认勾选表格 toggleRowSelection
element type="selection" 我希望当我点击勾选框后第二次点击是选中的状态;
我只是为了实现内容,实际用到的要走接口
- 效果图

1、子组件内容
(1)、html
<template>
  <div class="table-mask">
    <div class="table-main">
      <el-table
        ref="multipleTable"
        :data="tableData"
        style=" 100%"
        border
        row-key="id"
        @selection-change="handleSelectionChange"
        @row-click="clickRow"
      >
        <el-table-column
          type="selection"
          width="50"
          :reserve-selection="true"
          align="center"
        >
        </el-table-column>
        <el-table-column
          label="日期"
          width="100"
          align="center"
        >
          <template slot-scope="scope">{{ scope.row.date }}</template>
        </el-table-column>
        <el-table-column
          prop="name"
          label="姓名"
          width="90"
          align="center"
        >
        </el-table-column>
        <el-table-column
          prop="address"
          align="center"
          label="地址"
        >
        </el-table-column>
      </el-table>
      <div>
        <el-button
          type="info"
          @click.stop="cancel"
        >取消</el-button>
        <el-button
          type="primary"
          @click.stop="submit"
        >保存</el-button>
      </div>
    </div>
  </div>
</template>
(2)、样式内容
less
.table-mask {
    position: fixed;
    top: 0;
    left: 0;
    bottom: 0px;
    right: 0px;
    z-index: 9;
    overflow-x: hidden;
    overflow-y: scroll;
    background: rgba(0, 0, 0, 0.5);
    .table-main {
      position: absolute;
      left: 50%;
      top: 50%;
      margin-top: -200px;
      margin-left: -280px;
       560px;
      padding: 20px;
      box-sizing: border-box;
      background: #fff;
    }
  }
(3)、js逻辑
ts实现
  import { Watch, Component, Vue, Emit, Prop } from "vue-class-decorator";
  @Component
  export default class ChangeTable extends Vue {
    $refs: {
      multipleTable: any;
    };
    tableData = [
      {
        id: 1,
        date: "2016-05-03",
        name: "王小虎",
        address: "上海市普陀区金沙江路 1518 弄"
      },
      {
        id: 2,
        date: "2016-05-02",
        name: "王小虎",
        address: "上海市普陀区金沙江路 1518 弄"
      },
      {
        id: 3,
        date: "2016-05-04",
        name: "王小虎",
        address: "上海市普陀区金沙江路 1518 弄"
      },
      {
        id: 4,
        date: "2016-05-01",
        name: "王小虎",
        address: "上海市普陀区金沙江路 1518 弄"
      },
      {
        id: 5,
        date: "2016-05-08",
        name: "王小虎",
        address: "上海市普陀区金沙江路 1518 弄"
      },
      {
        id: 6,
        date: "2016-05-06",
        name: "王小虎",
        address: "上海市普陀区金沙江路 1518 弄"
      },
      {
        id: 7,
        date: "2016-05-07",
        name: "王小虎",
        address: "上海市普陀区金沙江路 1518 弄"
      }
    ];
    multipleSelection = [];
    @Emit("ChangeClick")
    ChangeClick(flag) {}
    @Prop({ type: Array, required: true })
    hasArray: any[];
    created() {
      this.InitData();
    }
    // 初始化
    InitData() {
      if (this.hasArray) {
        const indexList = []; // 存储交集的index,用来勾选状态
        this.hasArray.forEach(table => {
          this.tableData.forEach((item, index) => {
            if (table.id === item.id) {
              indexList.push(index);
            }
          });
        });
        this.$nextTick(() => {
          indexList.forEach(e => {
            this.$refs.multipleTable.toggleRowSelection(this.tableData[e], true);
          });
        });
      }
    }
    // 获取选中的值
    handleSelectionChange(val) {
      this.multipleSelection = val;
    }
    // 单击某一行数据时选中对应的复选框
    clickRow(row) {
      this.$refs.multipleTable.toggleRowSelection(row);
    }
    cancel() {
      this.ChangeClick(false);
    }
    submit() {
      this.ChangeClick({ flag: true, checked: this.multipleSelection });
    }
  }
2、父组件内容
html
<el-button
@click="handleTable"
type="primary"
>点击弹出表格</el-button>
<my-table
  v-if="isTableShow"
  :hasArray="hasArray"
  @ChangeClick="ChangeClick"
></my-table>
js
 import myTable from "./components/table.vue";

  @Component({
    components: {
      myTable
    }
  })
  export default class ChangePassword extends Vue {
 	isTableShow = false;
    hasArray = [];
    handleTable() {
      this.isTableShow = true;
    }
    ChangeClick(flag) {
      if (flag) {
        this.hasArray = flag.checked;
      }
      this.isTableShow = false;
    }
  }
3、知识点
- 官网

(1)、toggleRowSelection
- toggleRowSelection(row,selected)接收两个参数,row传递被勾选行的数据,selected设置是否选中
- 调用toggleRowSelection这个方法需要获取真实dom所以需要注册ref来引用它。
(2)、row-click 点击行事件
// 单击某一行数据时选中对应的复选框
clickRow(row) {
  this.$refs.multipleTable.toggleRowSelection(row);
}
(3)、element ui tree 获取到选中节点
<el-tree
ref="tree"
:data="dataList"
:props="defaultProps"
node-key="Code"
:default-checked-keys="defaultId"
show-checkbox
@check-change="getChecked"
>
</el-tree>
<!-- default-checked-keys	默认勾选的节点的 key 的数组 -->
-
方法
  getChecked(){
  	this.$refs.tree.getCheckedNodes();
  }
其他
-
reserve-selection
-
仅对 type=selection 的列有效,类型为 Boolean,为 true 则会在数据更新之后保留之前选中的数据(需指定 row-key)(默认false)
-
row-key
-
行数据的 Key,用来优化 Table 的渲染;在使用 reserve-selection 功能与显示树形数据时,该属性是必填的。类型为 String 时,支持多层访问:user.info.id,但不支持 user.info[0].id,此种情况请使用 Function。
四、导出excel(下载excel)
- 也要根据后端写的接口来,不一定适用所有的下载excel
  // 提取导出文件的文件扩展名(类型)
  const [, extName] = /filename=".*(..*)";/.exec(
    res.headers["content-disposition"]
  );
  // 构造下载文件名的名字
  const fileName = new Date().getTime().toString() + (extName || "");


  // #region 进行下载
  const link = document.createElement("a");
  link.href = window.URL.createObjectURL(res.data);
  link.download = fileName;
  // 此写法兼容可火狐浏览器
  document.body.appendChild(link);
  const evt = document.createEvent("MouseEvents");
  evt.initEvent("click", false, false);
  link.dispatchEvent(evt);
  document.body.removeChild(link);
  // #endregion
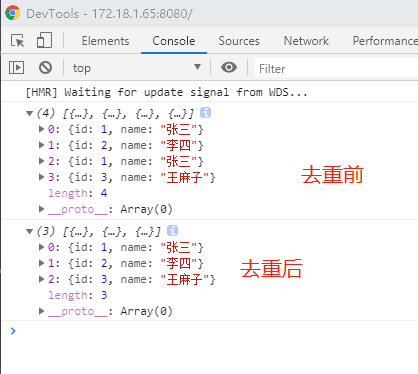
五、数组中多条对象去重
数组去重
 const list1 = [
    {
      id: 1,
      name: "张三"
    },
    {
      id: 2,
      name: "李四"
    }
  ];
  const list2 = [
    {
      id: 1,
      name: "张三"
    },
    {
      id: 3,
      name: "王麻子"
    }
  ];
  const oldArray = [...list1, ...list2];
  console.log(oldArray);
  const newArray = [];
  for (let i = 0; i < oldArray.length; i++) {
    let flag = true;
    for (let j = 0; j < newArray.length; j++) {
      if (oldArray[i].id === newArray[j].id) {
        flag = false;
      }
    }
    if (flag) {
      newArray.push(oldArray[i]);
    }
  }
  console.log(newArray);
- 打印效果
vue store存储commit和dispatch
- this.$store.commit("toShowLoginDialog",true)
- this.$store.dispatch('toShowLoginDialog',false)
- 主要区别是
- dispatch:含有异步操作,例如向后台提交数据,写法:this.$store.dispatch('mutations方法名',值)
- commit:同步操作,写法:this.$store.commit('mutataions方法名',值)