实验十三 图形界面事件处理技术
实验时间 2018-11-22
1、实验目的与要求
(1) 掌握事件处理的基本原理,理解其用途;
(2) 掌握AWT事件模型的工作机制;
(3) 掌握事件处理的基本编程模型;
(4) 了解GUI界面组件观感设置方法;
(5) 掌握WindowAdapter类、AbstractAction类的用法;
(6) 掌握GUI程序中鼠标事件处理技术。
2、实验内容和步骤
实验1: 导入第11章示例程序,测试程序并进行代码注释。
测试程序1:
l 在elipse IDE中调试运行教材443页-444页程序11-1,结合程序运行结果理解程序;
l 在事件处理相关代码处添加注释;
l 用lambda表达式简化程序;
l 掌握JButton组件的基本API;
l 掌握Java中事件处理的基本编程模型。
package button;

import java.awt.*;
import java.awt.event.*;
import javax.swing.*;

/**
 *
//带按钮面板的框架
*/
public class ButtonFrame extends JFrame
{
   private JPanel buttonPanel;
   private static final int DEFAULT_WIDTH = 300;
   private static final int DEFAULT_HEIGHT = 200;
//像素大小
public ButtonFrame() {
 setSize(DEFAULT_WIDTH, DEFAULT_HEIGHT);

//创建按钮
JButton yellowButton = new JButton("Yellow");
 JButton blueButton = new JButton("Blue");
JButton redButton = new JButton("Red");
buttonPanel = new JPanel();
//
向面板添加按钮
 buttonPanel.add(yellowButton);
 buttonPanel.add(blueButton);
 buttonPanel.add(redButton);

// add panel to frame  add(buttonPanel);
 // create button actions ColorAction yellowAction = new ColorAction(Color.YELLOW);
 ColorAction blueAction = new ColorAction(Color.BLUE); ColorAction redAction = new ColorAction(Color.RED);

//
用按钮关联动作
yellowButton.addActionListener(yellowAction);
blueButton.addActionListener(blueAction);
 redButton.addActionListener(redAction);
 }
 /** * An action listener that sets the panel's background color. */

private class ColorAction implements ActionListener { private Color backgroundColor;

public ColorAction(Color c) { backgroundColor = c;
 }
 public void actionPerformed(ActionEvent event)
{
 buttonPanel.setBackground(backgroundColor);
 }
 }
 }
package button;

import java.awt.*;
import javax.swing.*;

/**
 * @version 1.34 2015-06-12
 * @author Cay Horstmann
 */
public class ButtonTest
{
   public static void main(String[] args)
   {
      EventQueue.invokeLater(() -> {
         JFrame frame = new ButtonFrame();
         frame.setTitle("ButtonTest");
         frame.setDefaultCloseOperation(JFrame.EXIT_ON_CLOSE);
         frame.setVisible(true);
      });
   }
}
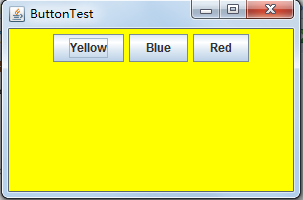
实验结果:
测试程序2:
l 在elipse IDE中调试运行教材449页程序11-2,结合程序运行结果理解程序;
l 在组件观感设置代码处添加注释;
l 了解GUI程序中观感的设置方法。
package plaf;

import javax.swing.JButton;
import javax.swing.JFrame;
import javax.swing.JPanel;
import javax.swing.SwingUtilities;
import javax.swing.UIManager;

/**
 * A frame with a button panel for changing look-and-feel
 */
public class PlafFrame extends JFrame
{
   private JPanel buttonPanel;

   public PlafFrame()
   {
      buttonPanel = new JPanel();
// 获得一个用于描述已安装的观感实现的对象数组
      UIManager.LookAndFeelInfo[] infos = UIManager.getInstalledLookAndFeels();
      for (UIManager.LookAndFeelInfo info : infos)
         makeButton(info.getName(), info.getClassName());

      add(buttonPanel);
      pack();
   }

   /**
    * Makes a button to change the pluggable look-and-feel.
    * @param name the button name
    * @param className the name of the look-and-feel class
    */
   private void makeButton(String name, String className)
   {
      // add button to panel

      JButton button = new JButton(name);
      buttonPanel.add(button);

      //设置按钮动作
      button.addActionListener(event -> {
         // button action: switch to the new look-and-feel
         try
         {
            UIManager.setLookAndFeel(className);
            SwingUtilities.updateComponentTreeUI(this);
            pack();
         }
         catch (Exception e)
         {
            e.printStackTrace();
         }
      });
   }
}
package plaf;

import java.awt.*;
import javax.swing.*;

/**
 * @version 1.32 2015-06-12
 * @author Cay Horstmann
 */
public class PlafTest
{
   public static void main(String[] args)
   {
      EventQueue.invokeLater(() -> {
         JFrame frame = new PlafFrame();
         frame.setTitle("PlafTest");
         frame.setDefaultCloseOperation(JFrame.EXIT_ON_CLOSE);
         frame.setVisible(true);
      });
   }
}
实验结果:

测试程序3:
l 在elipse IDE中调试运行教材457页-458页程序11-3,结合程序运行结果理解程序;
l 掌握AbstractAction类及其动作对象;
l 掌握GUI程序中按钮、键盘动作映射到动作对象的方法。
package action;

import java.awt.*;
import java.awt.event.*;
import javax.swing.*;

/**
 *
具有显示颜色变化动作的面板的框架。
*/
public class ActionFrame extends JFrame
{
   private JPanel buttonPanel;
   private static final int DEFAULT_WIDTH = 300;
   private static final int DEFAULT_HEIGHT = 200;

   public ActionFrame()
   {
      setSize(DEFAULT_WIDTH, DEFAULT_HEIGHT);

      buttonPanel = new JPanel();
// 定义动作
      Action yellowAction = new ColorAction("Yellow", new ImageIcon("yellow-ball.gif"),
            Color.YELLOW);
      Action blueAction = new ColorAction("Blue", new ImageIcon("blue-ball.gif"), Color.BLUE);
      Action redAction = new ColorAction("Red", new ImageIcon("red-ball.gif"), Color.RED);
// 为这些操作添加按钮
      buttonPanel.add(new JButton(yellowAction));
      buttonPanel.add(new JButton(blueAction));
      buttonPanel.add(new JButton(redAction));

      // add panel to frame
      add(buttonPanel);

      // associate the Y, B, and R keys with names
      InputMap imap = buttonPanel.getInputMap(JComponent.WHEN_ANCESTOR_OF_FOCUSED_COMPONENT);
      imap.put(KeyStroke.getKeyStroke("ctrl Y"), "panel.yellow");
      imap.put(KeyStroke.getKeyStroke("ctrl B"), "panel.blue");
      imap.put(KeyStroke.getKeyStroke("ctrl R"), "panel.red");

      // associate the names with actions
      ActionMap amap = buttonPanel.getActionMap();
      amap.put("panel.yellow", yellowAction);
      amap.put("panel.blue", blueAction);
      amap.put("panel.red", redAction);
   }

   public class ColorAction extends AbstractAction
   {
      /**
       *构造颜色动作。
       * @param name the name to show on the button
       * @param icon the icon to display on the button
       * @param c the background color
       */
      public ColorAction(String name, Icon icon, Color c)
      {
         putValue(Action.NAME, name);
         putValue(Action.SMALL_ICON, icon);
         putValue(Action.SHORT_DESCRIPTION, "Set panel color to " + name.toLowerCase());
         putValue("color", c);
      }

      public void actionPerformed(ActionEvent event)
      {
         Color c = (Color) getValue("color");
         buttonPanel.setBackground(c);
      }
   }
}
package action;

import java.awt.*;
import javax.swing.*;

/**
 * @version 1.34 2015-06-12
 * @author Cay Horstmann
 */
public class ActionTest
{
   public static void main(String[] args)
   {
      EventQueue.invokeLater(() -> {
         JFrame frame = new ActionFrame();
         frame.setTitle("ActionTest");
         frame.setDefaultCloseOperation(JFrame.EXIT_ON_CLOSE);
         frame.setVisible(true);
      });
   }
}
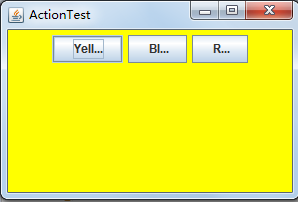
实验结果:
测试程序4:
l 在elipse IDE中调试运行教材462页程序11-4、11-5,结合程序运行结果理解程序;
l 掌握GUI程序中鼠标事件处理技术。
package mouse;

import java.awt.*;
import java.awt.event.*;
import java.awt.geom.*;
import java.util.*;
import javax.swing.*;

/**
 * 一个带有鼠标操作的用于添加和删除正方形的组件。
*/
public class MouseComponent extends JComponent
{
   private static final int DEFAULT_WIDTH = 300;
   private static final int DEFAULT_HEIGHT = 200;

   private static final int SIDELENGTH = 10;
   private ArrayList<Rectangle2D> squares;
   private Rectangle2D current;
// 包含鼠标光标的正方形
   public MouseComponent()
   {
      squares = new ArrayList<>();
      current = null;

      addMouseListener(new MouseHandler());
      addMouseMotionListener(new MouseMotionHandler());
   }

   public Dimension getPreferredSize() { return new Dimension(DEFAULT_WIDTH, DEFAULT_HEIGHT); }

   public void paintComponent(Graphics g)
   {
      Graphics2D g2 = (Graphics2D) g;

      // draw all squares
      for (Rectangle2D r : squares)
         g2.draw(r);
   }

   /**
    * Finds the first square containing a point.
    * @param p a point
    * @return the first square that contains p
    */
   public Rectangle2D find(Point2D p)
   {
      for (Rectangle2D r : squares)
      {
         if (r.contains(p)) return r;
      }
      return null;
   }

   /**
    * Adds a square to the collection.
    * @param p the center of the square
    */
   public void add(Point2D p)
   {
      double x = p.getX();
      double y = p.getY();

      current = new Rectangle2D.Double(x - SIDELENGTH / 2, y - SIDELENGTH / 2, SIDELENGTH,
            SIDELENGTH);
      squares.add(current);
      repaint();
   }

   /**
    * Removes a square from the collection.
    * @param s the square to remove
    */
   public void remove(Rectangle2D s)
   {
      if (s == null) return;
      if (s == current) current = null;
      squares.remove(s);
      repaint();
   }

   private class MouseHandler extends MouseAdapter
   {
      public void mousePressed(MouseEvent event)
      {
         // add a new square if the cursor isn't inside a square
         current = find(event.getPoint());
         if (current == null) add(event.getPoint());
      }

      public void mouseClicked(MouseEvent event)
      {
         // remove the current square if double clicked
         current = find(event.getPoint());
         if (current != null && event.getClickCount() >= 2) remove(current);
      }
   }

   private class MouseMotionHandler implements MouseMotionListener
   {
      public void mouseMoved(MouseEvent event)
      {
         // set the mouse cursor to cross hairs if it is inside
         // a rectangle

         if (find(event.getPoint()) == null) setCursor(Cursor.getDefaultCursor());
         else setCursor(Cursor.getPredefinedCursor(Cursor.CROSSHAIR_CURSOR));
      }

      public void mouseDragged(MouseEvent event)
      {
         if (current != null)
         {
            int x = event.getX();
            int y = event.getY();
// 拖动当前矩形将其置于(x,y)中心
            current.setFrame(x - SIDELENGTH / 2, y - SIDELENGTH / 2, SIDELENGTH, SIDELENGTH);
            repaint();
         }
      }
   }
}
package mouse;

import javax.swing.*;

/**
 *
包含用于测试鼠标操作的面板的框架
*/
public class MouseFrame extends JFrame
{
   public MouseFrame()
   {
      add(new MouseComponent());
      pack();
   }
}
package mouse;

import java.awt.*;
import javax.swing.*;

/**
 * @version 1.34 2015-06-12
 * @author Cay Horstmann
 */
public class MouseTest
{
   public static void main(String[] args)
   {
      EventQueue.invokeLater(() -> {
         JFrame frame = new MouseFrame();
         frame.setTitle("MouseTest");
         frame.setDefaultCloseOperation(JFrame.EXIT_ON_CLOSE);
         frame.setVisible(true);
      });
   }
}
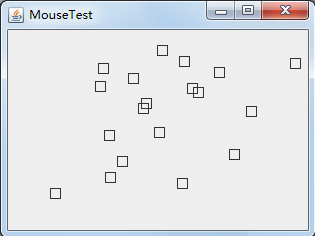
实验结果:
实验2:结对编程练习
利用班级名单文件、文本框和按钮组件,设计一个有如下界面(图1)的点名器,要求用户点击开始按钮后在文本输入框随机显示2017级网络与信息安全班同学姓名,如图2所示,点击停止按钮后,文本输入框不再变换同学姓名,此同学则是被点到的同学姓名。
package hh;
import java.util.*;
import java.awt.*;
import javax.swing.*;
import java.awt.event.*;
import java.io.File;
import java.io.FileNotFoundException;

import javax.swing.event.*;
public class NameFrame extends JFrame implements ActionListener{
    private JLabel jla;
    private JLabel jlb;
    private JButton jba;//"push" 按钮的实现
    private static boolean flag = true;//boolean变量
    public NameFrame(){
        this.setLayout(null);/
        jla = new JLabel("姓名");
        jlb = new JLabel("  ");
        jba = new JButton("开始");
        this.add(jla);//添加组件
        this.add(jlb);
        jla.setFont(new Font("Courier",Font.PLAIN,25));//设置字体
        jla.setHorizontalAlignment(JLabel.CENTER);
         jla.setVerticalAlignment(JLabel.CENTER);
         jla.setBounds(20,100,180,30);//移动组件并调整其大小
         jlb.setOpaque(true);
         jlb.setBackground(Color.cyan);//设置组件的背景色
         jlb.setFont(new Font("Courier",Font.PLAIN,25));
         jlb.setHorizontalAlignment(JLabel.CENTER);
         jlb.setVerticalAlignment(JLabel.CENTER);
         jlb.setBounds(150,100,150,30);

         this.add(jba);
         jba.setBounds(150,150,80,26);

         jba.addActionListener(this);//添加监听器按钮

         this.setTitle("点名器");
        this.setBounds(400,400,400,300);
        this.setVisible(true);
        this.setDefaultCloseOperation(DISPOSE_ON_CLOSE);
    }
    public void actionPerformed(ActionEvent e){
        int i=0;
        String names[]=new String[47];
        //捕获异常
        try {
            Scanner in=new Scanner(new File("D:\studentnamelist.txt"));
            while(in.hasNextLine())
            {
                names[i]=in.nextLine();
                i++;
            }
        } catch (FileNotFoundException e1) {
            // TODO Auto-generated catch block
            e1.printStackTrace();
        }
        if(jba.getText()=="开始"){//返回按钮文本
            jlb.setBackground(Color.PINK);
            flag = true;
            new Thread(){
                public void run(){
                    while(NameFrame.flag){
                    Random r = new Random();
                    int i= r.nextInt(47);
                    jlb.setText(names[i]);
                    }
                }
            }.start();
            jba.setText("停止");
            jba.setBackground(Color.GREEN);
        }
        else if(jba.getText()=="停止"){
            flag = false;
            jba.setText("开始");//设置按钮的文本
            jba.setBackground(Color.WHITE);
            jlb.setBackground(Color.WHITE);
        }
     }
    public static void main(String arguments []){
        new NameFrame();
    }
}

实验结果:
通过本次的实验我们对于简单的人机交互界面的制作有了一定的了解和认识,并做了一些实验,敲了相关的一些程序,对于本章的内容有了一定的了解,在后来的学习中我会更加努力,多敲代码,加强自己的编程能力,相信在今后的日子里,我会变成一名优秀的程序员。