快速入门:
# 快速初始化Npm
npm init -y

# 安装全局express脚手架: https://github.com/expressjs/generator
npm install -g express-genertator

# 安装项目express
npm install express --save-dev

# 使用脚手架快速构建一个依赖于sass(styl、less)的项目
express -c sass my-application# 安装项目依赖
cd express && npm install

# 开启项目
DEBUG-my-application ./bin/www
安装依赖的过程中,如果你是window用户,可能会出现类似 node-sass 等等这样那样的环境或依赖问题导致编译失败。
请先安装windows-build-tools. 然后重试
# github地址
https://github.com/felixrieseberg/windows-build-tools

# 安装命令(使用管理员运行powershell / cmd运行以下代码)
npm install --global --production windows-build-tools
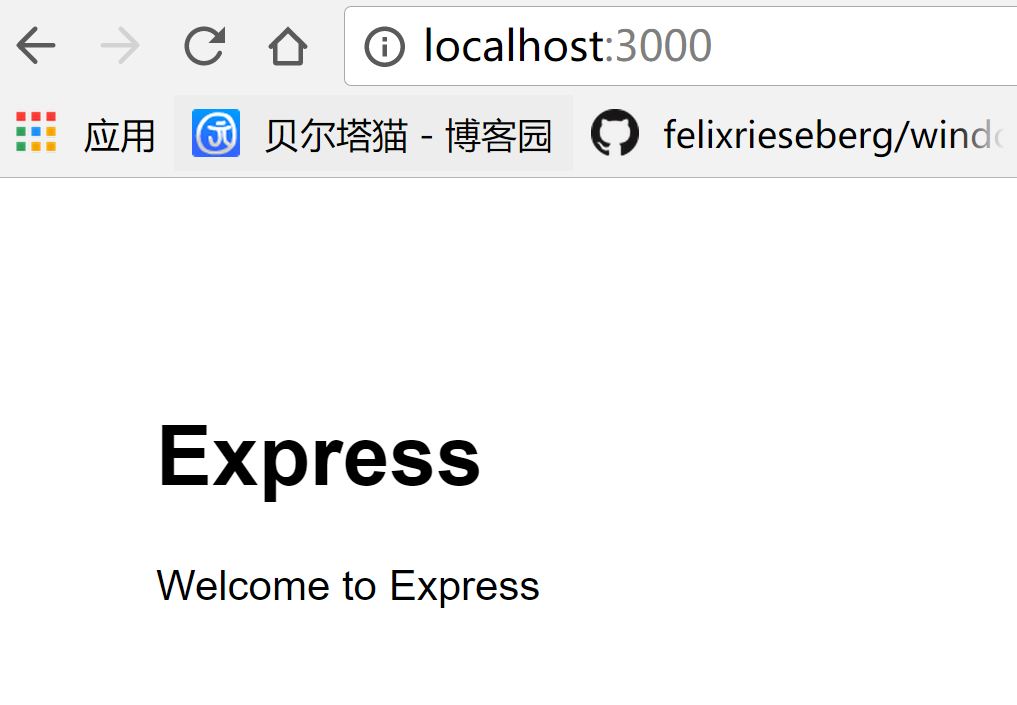
如果一切顺利,开启任意浏览器进入 http://localhost:3000 查看:
接下来,我们就从脚手架生成的代码来学习
补充: 每次修改nodejs的源码(除了jade、pug、ejs等模板引擎),都需要重新启动app.js才能生效。
我们可以使用 supervisor 来帮助我们自动重启应用。 npm install supervisor -g
你怎么通过node启动应用的,就换成使用supervisor启动即可。
# before
node app

# after
supervisor app
1、Express核心:路由
# app.js
var index = require('./routes/index');
var users = require('./routes/users');

app.use('/', index);
app.use('/users', users);
打开 http://localhost:3000/ 和 http://localhost:3000/users 可以看到对应的界面。我们也可以自己写一个中间件试试
// 试试水
app.use('/about', function (req,rep,next) {
  rep.send("fuck you about");
})
访问 http://localhost:3000/about

补充:这里有个神坑
# app.js
app.use('/reg', reg);

# routes/reg.js
router.get('/reg', function(req, res, next) {
    res.render('reg', { title: 'Express' });
});
当我们访问 http://localhost:3000 时,会发现显示404。原因是什么呢?
其实只要把reg.js中的 router.get('/reg', ...) 改为 router.get('/', ...) 即可。
因为前者索引的地址为 http://localhost:3000/reg/reg 而后者才是我们想要实现的路由。可以试试
2、Express核心:中间件
app.js中的每一行代码几乎都是中间件:app.use(<middleware>)
1、logger: 会不停的在控制台打印请求输出日志
2、bodyParser: 解析HTTP请求
3、cookieParser: 解析Cookie数据
...
3、不使用脚手架、生成器、中间件、高级模块。照样可以快速的构建express应用
- 创建文件结构和目录、文件
- NPM初始化
- 依赖声明
- app.js
- jade
- 运行node服务
# 创建文件夹和文件
mkdir views db public routes && touch app.js && cd views && touch index.jade

# 初始化npm 和 安装依赖
npm init -y && npm install express jade stylus mongoskin --save
app.js
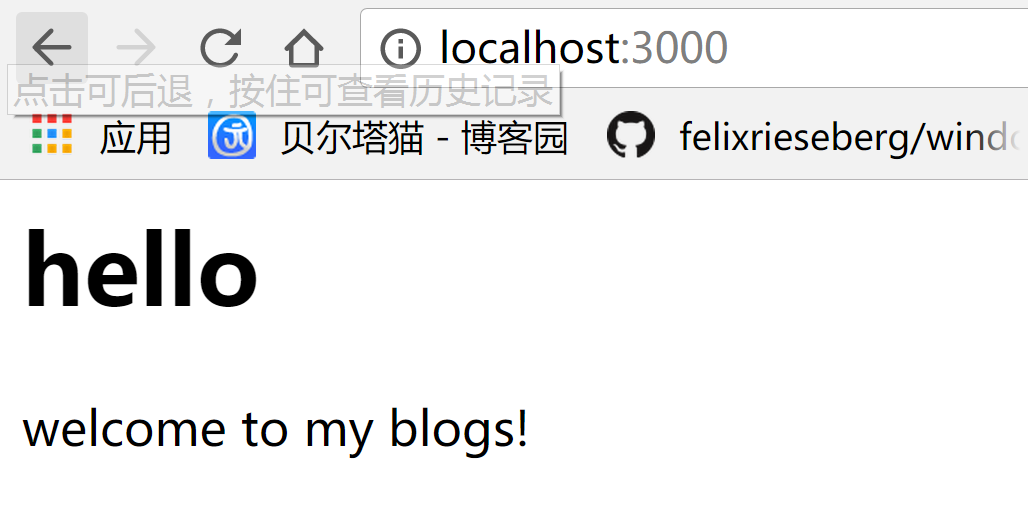
var express =require('express');
var http = require('http');
var path = require('path');

var app = express();

app.set('port', process.env.PORT || 3000);
app.set('views', path.join(__dirname, 'views'));
app.set('view engine', 'jade');

app.all('*', function (req,res) {
  res.render('index', {msg: "welcome to my blogs!"})
})

http.createServer(app).listen(app.get('port'), function () {
    console.log("express server listeng on port" + app.get('port'));
});
index.jade
h1 hello
p #{msg}
node app 运行服务
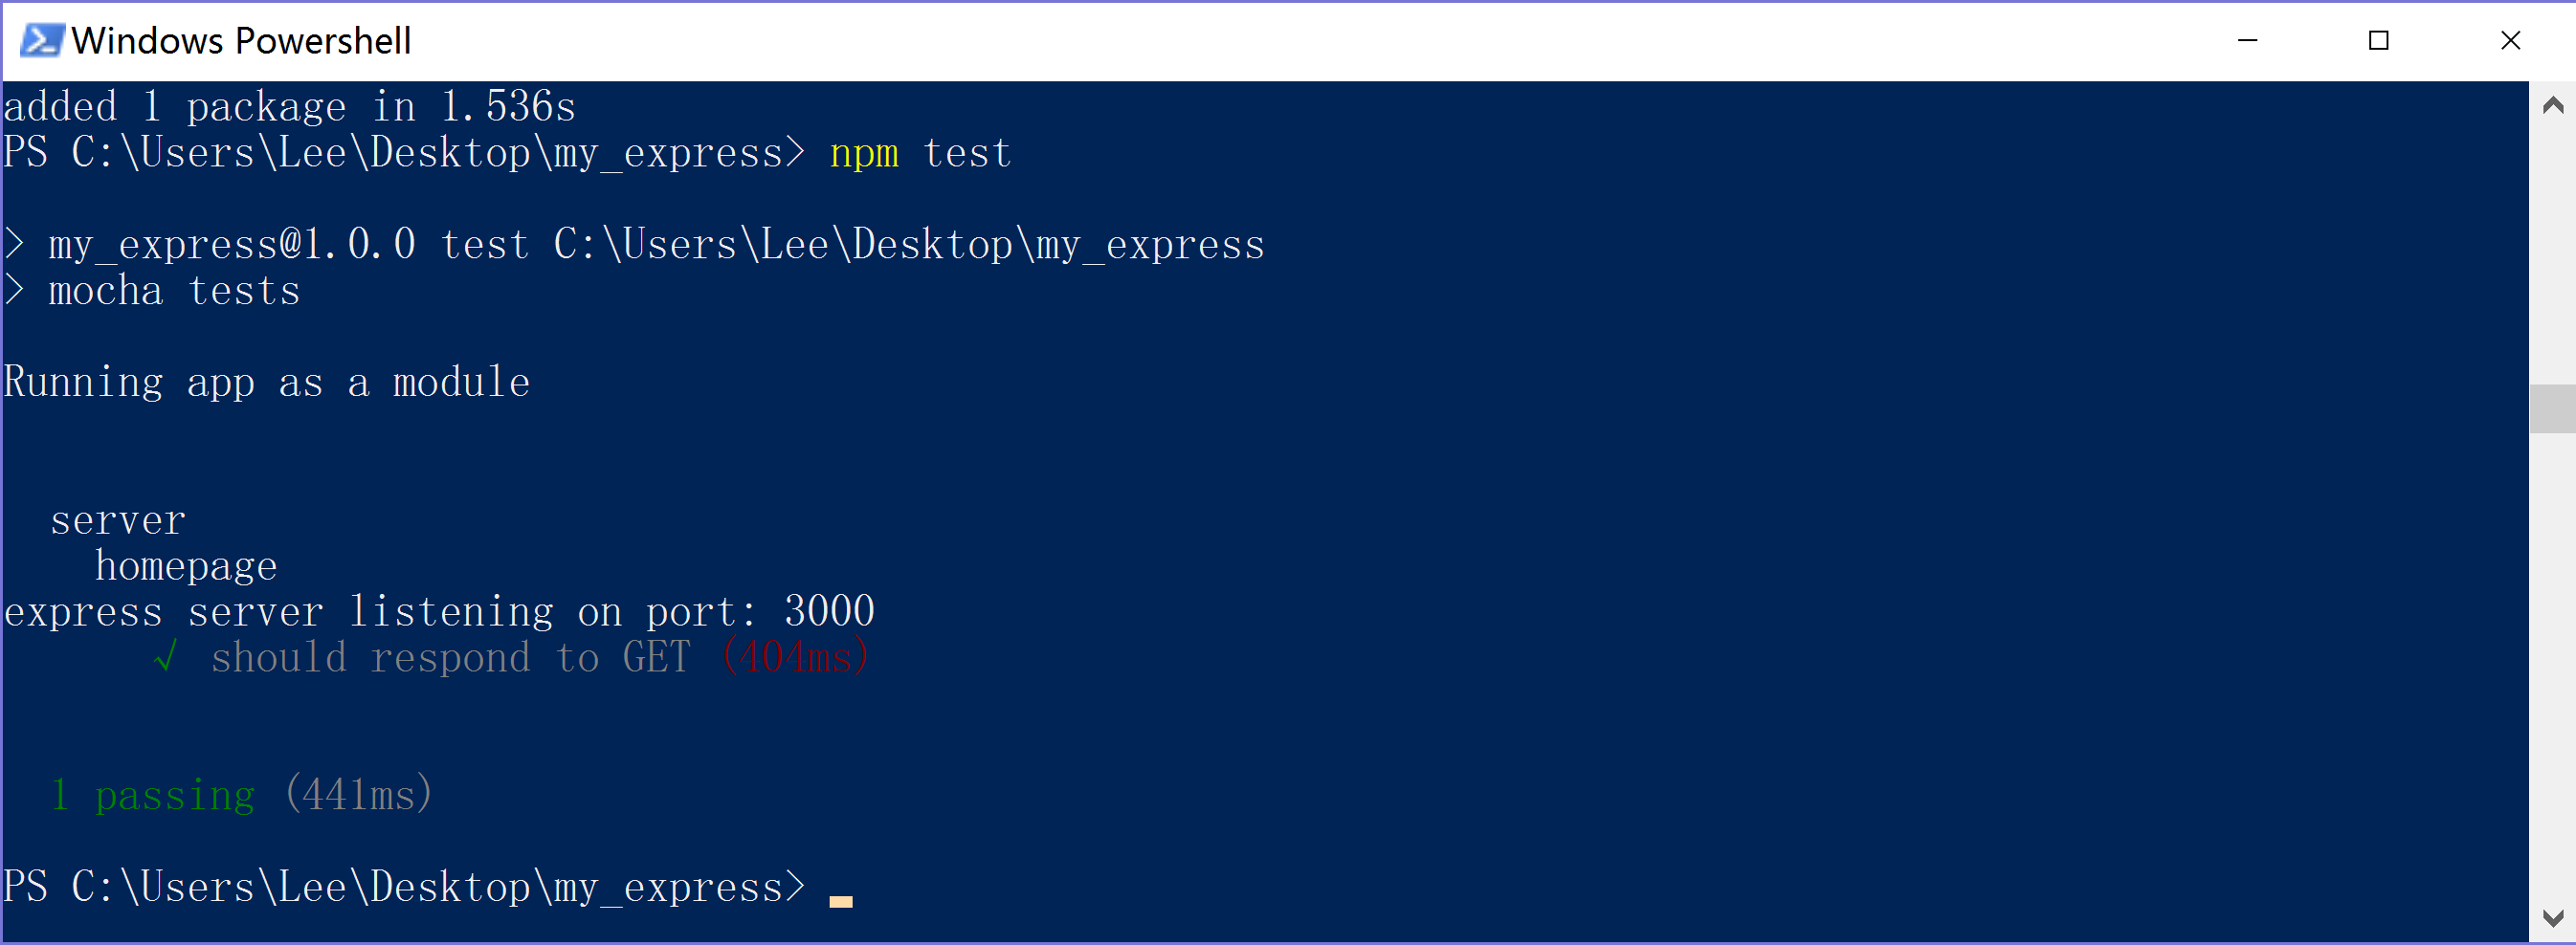
4、使用 Mocha + Expect.js 进行 BDD 测试
目标: 通过mocha + 断言库 对express的启动服务功能进行单元测试
# 创建测试目录和测试文件
mkdir tests && touch index.test.js

# 安装相关依赖
npm install expect.js mocha superagent --save

# 安装全局Mocha
npm install mocha -g

# expect.js github 和 API手册
https://github.com/Automattic/expect.js
修改 app.js 的代码以便进行单元测试
// http.createServer(app).listen(app.get('port'), function () {
//     console.log("express server listeng on port" + app.get('port'));
// });

var server = http.createServer(app);

var boot = function () {
    server.listen(app.get('port'), function () {
        console.log('express server listening on port: ' + app.get('port'))
    })
}

var shutdown = function () {
    server.close();
}

if (require.main === module) {
    boot()
} else {
    console.log("Running app as a module");
    exports.boot = boot;
    exports.shutdown = shutdown;
    exports.port = app.get('port')
}
编写测试用例:tests / index.test.js
var boot = require('../app').boot;
var shutdown = require('../app').shutdown;
var port = require('../app').port;
// http请求库
var superagent = require('superagent');
// 注意这个库的全名必须带.js
var expect = require('expect.js');
describe('server', function () {
    before(function () {
        boot();
    });

    describe('homepage', function () {
        it ('should respond to GET', function (done) {
            superagent.get('http://localhost:' + port)
                      .end(function (err, res) {
                            expect(res.status).to.equal(200);
                            done()
                      })
        })
    })

    after (function () {
        shutdown()
    })
})
运行测试用例: mocha tests/index.test.js
5、单独使用和学习jade.
http://www.cnblogs.com/CyLee/p/7229125.html
6、继续回到脚手架,通过脚手架学习
(1)req.query:处理get请求,获取get的请求参数
(2)req.params: 处理/:xxx形式的get或post请求,获取get/post的请求参数
(3)rep.bodu:处理Post请求,获取Post请求体
(4)rep.param():处理get和post请求
7、使用github + express登录
1、打开github并且登录,在右上角个人信息中选择Settings -> Developer settings -> OAuth applications -> Register a new application

回到项目中,安装 passport 和 passport-github
npm install passport-github passport --save-dev
在项目的入口app.js代码中,加入如下代码块
const passport = require('passport')
const GithubStrategy = require('passport-github').Strategy

const app = express()
app.use('/login',  require('./routes/login'))
app.use(passport.initialize()) // 初始化passport
if (app.get('env') === 'development') {
    passport.use(new GithubStrategy({
        clientID: "e50400ce682488d87b71",
        clientSecret: "13e406e42b4578ab600c93df8e059bd80a3205b8",
        callbackURL: "http://localhost:3000/login/github/callback"
    }, function (accessToken, refreshToken, profile, done) {
        done(null, profile);
    }))
}
进入/routes/login.js中,加入如下代码块.
const passport = require('passport')
router.get('/github', passport.authenticate('github', {session: false}))
router.get('/github/callback',  passport.authenticate('github', {
      session: false,
      failureRedirect: '/login',
      successFlash: '登录成功'
    }),
    function (req, res, next) {
      req.session.user = {
        name: req.user.username,
        head: "http://gravatar.com/avatar/" + req.user._json.gravatar_id + "?s=48"
      };
      res.redirect('/')
    }
)
由于我的项目直接使用了express的session功能,所以禁掉了Passport的session功能。
Passport 默认会将用户信息存储在req.user中。这里我们获取到了用户的头像("http://gravatar.com/avatar/" + req.user._json.gravatar_id + "?s=48") 和 用户名 (req.user.username)。并且加入到session中。然后跳转到首页。
就这么简单
持续更新知识点...