线程池
上下文管理
- 线程池中关于上下文管理的相关代码 点我查看更详细的上下文管理介绍
import contextlib

@contextlib.contextmanager
def worker_state(state_list, worker_thread):
    """
    用户记录线程中正在等待的线程数
    :param state_list:
    :param worker_thread:
    :return:
    """
    state_list.append(worker_thread)

    try:
        yield
    finally:
        state_list.remove(worker_thread)

free_list = []
current_thread = "aaa"
with worker_state(free_list, current_thread):
    print(123)
    print(456)
- socket_server 之上下文管理
import contextlib
import socket


@contextlib.contextmanager
def context_socket(host, port):
    sk = socket.socket()
    sk.bind((host, port))
    sk.listen(5)
    try:
        yield sk
    finally:
        sk.close()

with context_socket("127.0.0.1", 8888) as sock:
    sock.sendall(bytes("hehe", encoding="utf-8"))
redis
redis连接池
redis自定义列表
redis事务操作
redis发布订阅
- 创建发布订阅类
# release_subscription.py
import redis


class RedisHelper:

    def __init__(self, **kwargs):
        pool = redis.ConnectionPool(**kwargs)
        self.__conn = redis.Redis(connection_pool=pool)

    def release(self, msg, channel):
        """
        redis发布端
        :param msg: 发送的内容
        :param channel: # 发布的频道
        :return:
        """
        self.__conn.publish(channel, msg)
        return True

    def subscription(self, channel):
        """
        redis订阅端
        :param channel: # 订阅的频道
        :return:
        """
        pub = self.__conn.pubsub()
        pub.subscribe(channel)
        pub.parse_response()
        return pub
- 实例化发布端
# redis_release.py
# 导入发布订阅模块
import release_subscription


obj = release_subscription.RedisHelper(host="127.0.0.1")
obj.release("hehe", "fm103.9")
- 实例化订阅端
# redis_sub.py
# 导入发布订阅模块
import release_subscription


obj = release_subscription.RedisHelper(host="127.0.0.1")
data = obj.subscription("fm103.9")
print(data.parse_response())
RabbitMQ
基于RabbitMQ实现的消息队列
- 生产者
import pika

connection = pika.BlockingConnection(pika.ConnectionParameters(host="127.0.0.1"))

channel = connection.channel()

channel.queue_declare(queue='hello')   # 创建一个队列,如果存在则不产生任何效果

channel.basic_publish(exchange='',
                      routing_key='hello',
                      body='Hello World!')      # 给队列发送消息 "Hello World!"
print(" [x] Sent 'Hello World!'")
connection.close()
- 消费者
import pika

connection = pika.BlockingConnection(pika.ConnectionParameters(
    host='127.0.0.1'))
channel = connection.channel()

channel.queue_declare(queue='hello')


def callback(ch, method, properties, body):
    print(" [x] Received %r" % body)


channel.basic_consume(callback,   # 回调函数, 如果从队列中取到数据之后则执行回调函数
                      queue='hello',    # 队列名
                      no_ack=True)

print(' [*] Waiting for messages. To exit press CTRL+C')
channel.start_consuming()
消息不丢失
- 如果消费者遇到情况(its channel is closed, connection is closed, or TCP connection is lost)挂掉了,那么,通过设置 no-ack=False,RabbitMQ会重新将该任务添加到队列中
# 消费者代码
import pika

connection = pika.BlockingConnection(pika.ConnectionParameters(
        host='10.211.55.4'))
channel = connection.channel()

channel.queue_declare(queue='hello')

def callback(ch, method, properties, body):
    print(" [x] Received %r" % body)
    import time
    time.sleep(10)
    print 'ok'
    ch.basic_ack(delivery_tag = method.delivery_tag)

channel.basic_consume(callback,
                      queue='hello',
                      no_ack=False)  # 设置no_ack=False保证消息不丢失

print(' [*] Waiting for messages. To exit press CTRL+C')
channel.start_consuming()
- durable 消息不丢失
# 生产者代码
import pika

connection = pika.BlockingConnection(pika.ConnectionParameters(host='127.0.0.1'))
channel = connection.channel()

# make message persistent
channel.queue_declare(queue='hello', durable=True) # 设置durable=True

channel.basic_publish(exchange='',
                      routing_key='hello',
                      body='Hello World!',
                      properties=pika.BasicProperties(
                          delivery_mode=2, # make message persistent
                      ))
print(" [x] Sent 'Hello World!'")
connection.close()


# 消费者代码
import pika

connection = pika.BlockingConnection(pika.ConnectionParameters(host='127.0.0.1'))
channel = connection.channel()

# make message persistent
channel.queue_declare(queue='hello', durable=True)  # 设置durable=True


def callback(ch, method, properties, body):
    print(" [x] Received %r" % body)
    import time
    time.sleep(10)
    print 'ok'
    ch.basic_ack(delivery_tag = method.delivery_tag)

channel.basic_consume(callback,
                      queue='hello',
                      no_ack=False)   # 设置no_ack=False

print(' [*] Waiting for messages. To exit press CTRL+C')
channel.start_consuming()
消费者消息获取顺序
# 默认情况下,消息队列里的数据是按照顺序被消费者拿走,例如:消费者1去队列中获取 奇数 序列的任务,消费者2去队列中获取偶数序列的任务
通过设置channel.basic_qos(prefetch_count=1) 表示谁来谁取,不再按照奇偶数排列

# 消费者端代码
import pika

connection = pika.BlockingConnection(pika.ConnectionParameters(host='10.211.55.4'))
channel = connection.channel()

# make message persistent
channel.queue_declare(queue='hello')


def callback(ch, method, properties, body):
    print(" [x] Received %r" % body)
    import time
    time.sleep(10)
    print 'ok'
    ch.basic_ack(delivery_tag = method.delivery_tag)

channel.basic_qos(prefetch_count=1)  # 通过设置该参数,让消费者不按默认顺序取

channel.basic_consume(callback,
                      queue='hello',
                      no_ack=False)

print(' [*] Waiting for messages. To exit press CTRL+C')
channel.start_consuming()
发布订阅
发布订阅和简单的消息队列区别在于,发布订阅会将消息发送给所有的订阅者,而消息队列中的数据被消费一次便消失。所以,RabbitMQ实现发布和订阅时,会为每一个订阅者创建一个队列,而发布者发布消息时,会将消息放置在所有相关队列中。
通过设置exchange 和 type=fanout实现该功能
- 发布端
import pika
import sys

connection = pika.BlockingConnection(pika.ConnectionParameters(
        host='127.0.0.1'))
channel = connection.channel()

channel.exchange_declare(exchange='logs',
                         type='fanout')   # 通过设置exchange来与队列通信

message = ' '.join(sys.argv[1:]) or "info: Hello World!"
channel.basic_publish(exchange='logs',
                      routing_key='',
                      body=message)
print(" [x] Sent %r" % message)
connection.close()
- 订阅端
import pika

connection = pika.BlockingConnection(pika.ConnectionParameters(
        host='127.0.0.1'))
channel = connection.channel()

channel.exchange_declare(exchange='logs',
                         type='fanout')

# 生成一个随机的queue
result = channel.queue_declare(exclusive=True)
queue_name = result.method.queue

# 将queue与exchange绑定,发布端给exchange发消息的时候,与该exchange绑定的queue都会收到发布端发布的消息
channel.queue_bind(exchange='logs',
                   queue=queue_name)

print(' [*] Waiting for logs. To exit press CTRL+C')

def callback(ch, method, properties, body):
    print(" [x] %r" % body)

channel.basic_consume(callback,
                      queue=queue_name,
                      no_ack=True)

channel.start_consuming()
发布订阅-关键字
上面的例子发送消息时明确指定某个队列并向其中发送消息,RabbitMQ还支持根据关键字发送,即队列绑定关键字,发送者将数据根据关键字发送到消息exchange,exchange根据关键字判定应该将数据发送至指定队列。
通过设置exchange 和 type = direct实现该功能
- 发布端
import pika

connection = pika.BlockingConnection(pika.ConnectionParameters(
        host='localhost'))
channel = connection.channel()

channel.exchange_declare(exchange='direct_logs',
                         type='direct')

severity = "info"
message = 'Hello World!'
channel.basic_publish(exchange='direct_logs',
                      routing_key=severity,
                      body=message)
print(" [x] Sent %r:%r" % (severity, message))
connection.close()
- 订阅端
import pika

connection = pika.BlockingConnection(pika.ConnectionParameters(
        host='localhost'))
channel = connection.channel()

channel.exchange_declare(exchange='direct_logs',
                         type='direct')

result = channel.queue_declare(exclusive=True)
queue_name = result.method.queue

severities = ["info", "error"]

for severity in severities:
    channel.queue_bind(exchange='direct_logs',
                       queue=queue_name,
                       routing_key=severity)   # 将exchange与关键字routing_key绑定

print(' [*] Waiting for logs. To exit press CTRL+C')


def callback(ch, method, properties, body):
    print(" [x] %r:%r" % (method.routing_key, body))

channel.basic_consume(callback,
                      queue=queue_name,
                      no_ack=True)

channel.start_consuming()
发布订阅-关键字模糊匹配
通过设置type=topic,可以让队列绑定几个模糊的关键字,之后发送者将数据发送到exchange,exchange将传入”路由值“和 ”关键字“进行匹配,匹配成功,则将数据发送到指定队列
# 表示可以匹配 0 个 或 多个 单词
*  表示只能匹配 一个 单词
发送者路由值              队列中
old.boy.python          old.*  -- 不匹配
old.boy.python          old.#  -- 匹配
- 发布端
import pika
import sys

connection = pika.BlockingConnection(pika.ConnectionParameters(
        host='127.0.0.1'))
channel = connection.channel()

channel.exchange_declare(exchange='topic_logs',
                         type='topic')

routing_key = sys.argv[1] if len(sys.argv) > 1 else 'anonymous.info'
message = ' '.join(sys.argv[2:]) or 'Hello World!'
channel.basic_publish(exchange='topic_logs',
                      routing_key=routing_key,
                      body=message)
print(" [x] Sent %r:%r" % (routing_key, message))
connection.close()
- 订阅端
import pika
import sys

connection = pika.BlockingConnection(pika.ConnectionParameters(
        host='localhost'))
channel = connection.channel()

channel.exchange_declare(exchange='topic_logs',
                         type='topic')

result = channel.queue_declare(exclusive=True)
queue_name = result.method.queue

binding_keys = sys.argv[1:]
if not binding_keys:
    sys.stderr.write("Usage: %s [binding_key]...
" % sys.argv[0])
    sys.exit(1)

for binding_key in binding_keys:
    channel.queue_bind(exchange='topic_logs',
                       queue=queue_name,
                       routing_key=binding_key)

print(' [*] Waiting for logs. To exit press CTRL+C')

def callback(ch, method, properties, body):
    print(" [x] %r:%r" % (method.routing_key, body))

channel.basic_consume(callback,
                      queue=queue_name,
                      no_ack=True)

channel.start_consuming()
MySQL
PyMySQL
一、安装模块
pip install pymysql
二、使用
- 执行SQL(增删改操作)
#!/usr/bin/env python
# -*- coding:utf-8 -*-
import pymysql

# 创建连接
conn = pymysql.connect(host='127.0.0.1', port=3306, user='root', passwd='123', db='t1')
# 创建游标
cursor = conn.cursor()

# 执行SQL,并返回收影响行数
effect_row = cursor.execute("update hosts set host = '1.1.1.2'")

# sql语句中有一个占位符
# 执行SQL,并返回受影响行数
# effect_row = cursor.execute("update hosts set host = '1.1.1.2' where nid > %s", (1,))

# sql语句中有多个占位符
# 执行SQL,并返回受影响行数
# effect_row = cursor.executemany("insert into hosts(host,color_id)values(%s,%s)", [("1.1.1.11",1),("1.1.1.11",2)])


# 提交,不然无法保存新建或者修改的数据
conn.commit()

# 关闭游标
cursor.close()
# 关闭连接
conn.close()
- 插入数据的时候获取新创建数据自增ID
import pymysql

conn = pymysql.connect(host='127.0.0.1', port=3306, user='root', passwd='123', db='t1')
cursor = conn.cursor()
cursor.executemany("insert into hosts(host,color_id)values(%s,%s)", [("1.1.1.11",1),("1.1.1.11",2)])
conn.commit()
cursor.close()
conn.close()

# 获取最新自增ID
new_id = cursor.lastrowid
- 查询操作
import pymysql

conn = pymysql.connect(host='127.0.0.1', port=3306, user='root', passwd='123', db='t1')
cursor = conn.cursor()
cursor.execute("select * from hosts")

# 获取第一行数据
row_1 = cursor.fetchone()

# 获取前n行数据
# row_2 = cursor.fetchmany(3)
# 获取所有数据
# row_3 = cursor.fetchall()

conn.commit()
cursor.close()
conn.close()

# 注:在fetch数据时按照顺序进行,可以使用cursor.scroll(num,mode)来移动游标位置,如:
cursor.scroll(1,mode='relative')  # 相对当前位置移动,将游标移动到下一个位置
cursor.scroll(-3,mode='relative')  # 相对当前位置移动,将游标移动到上三个位置
cursor.scroll(2,mode='absolute') # 绝对位置移动,将游标移动到第2个位置
cursor.scroll(10,mode='absolute') # 绝对位置移动,将游标移动到第10个位置
- fetch数据类型
import pymysql

conn = pymysql.connect(host='127.0.0.1', port=3306, user='root', passwd='123', db='t1')

# 游标设置为字典类型
cursor = conn.cursor(cursor=pymysql.cursors.DictCursor)
r = cursor.execute("select * from hosts")

result = cursor.fetchone()		# 返回的是一个字典,以字段名为key,value为值

conn.commit()
cursor.close()
conn.close()
Python ORM --> SQLAchemy
SQLAlchemy是Python编程语言下的一款ORM框架,该框架建立在数据库API之上,使用关系对象映射进行数据库操作,简言之便是:将对象转换成SQL,然后使用数据API执行SQL并获取执行结果。
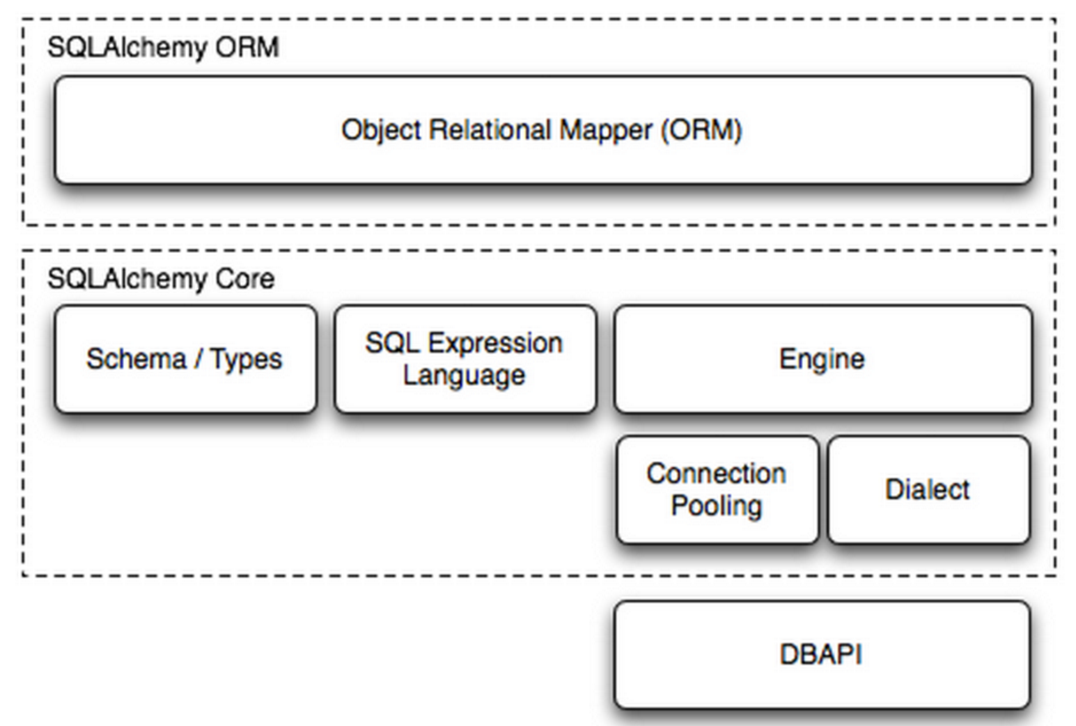
SQLAlchemy本身无法操作数据库,其必须以来pymsql等第三方插件,Dialect用于和数据API进行交流,根据配置文件的不同调用不同的数据库API,从而实现对数据库的操作,如:
MySQL-Python
    mysql+mysqldb://<user>:<password>@<host>[:<port>]/<dbname>

pymysql
    mysql+pymysql://<username>:<password>@<host>/<dbname>[?<options>]

MySQL-Connector
    mysql+mysqlconnector://<user>:<password>@<host>[:<port>]/<dbname>

cx_Oracle
    oracle+cx_oracle://user:pass@host:port/dbname[?key=value&key=value...]

更多详见:http://docs.sqlalchemy.org/en/latest/dialects/index.html
一、底层处理
使用 Engine/ConnectionPooling/Dialect 进行数据库操作,Engine使用ConnectionPooling连接数据库,然后再通过Dialect执行SQL语句
from sqlalchemy import create_engine

engine = create_engine("mysql+pymysql://tuocigaoshou:Eb^BEF38E9FBC36CA775@111.204.117.99:3306/test", max_overflow=5)

# 执行SQL 插入一条数据 (增删改)
cur = engine.execute("insert into users (name, extra) values ('aaa', 'aaa')")
print(cur.lastrowid)    # 可以获取到新插入数据行的自增id


# 执行SQL  插入多条数据
cur = engine.execute("insert into users (name, extra) values (%s, %s)", [["bbb", "bbb"], ["ccc", "ccc"],])
print(cur.lastrowid)  # 插入多条数据的时候只能获取到第一行的自增id

# 执行SQL 另一种插入方式,只能插入一条
cur = engine.execute("INSERT INTO users (name, extra) VALUES (%(name)s, %(extra)s)", name="ddd", extra="ddd")


# 执行SQL 查询
cur = engine.execute('select * from users')

# 获取第一行数据
print(cur.fetchone())
# 获取第n行数据
print(cur.fetchmany(3))
# 获取所有数据
print(cur.fetchall())
二、ORM功能使用
使用 ORM/Schema Type/SQL Expression Language/Engine/ConnectionPooling/Dialect 所有组件对数据进行操作。根据类创建对象,对象转换成SQL,执行SQL。
- 创建表
from sqlalchemy.ext.declarative import declarative_base
from sqlalchemy import Column, Integer, String, ForeignKey, UniqueConstraint, Index
from sqlalchemy.orm import sessionmaker, relationship
from sqlalchemy import create_engine

engine = create_engine("mysql+pymysql://tuocigaoshou:Eb^BEF38E9FBC36CA775@111.204.117.99:3306/test", max_overflow=5)

Base = declarative_base()

# 创建单表
class Users(Base):  # 必须继承Base类
    __tablename__ = 'users'     # 表名

    # 创建三列数据
    id = Column(Integer, primary_key=True)      # primary_key 主键,自增ID
    name = Column(String(32))
    extra = Column(String(16))

    # 联合索引
    __table_args__ = (
    UniqueConstraint('id', 'name', name='uix_id_name'),
        Index('ix_id_name', 'name', 'extra'),
    )

# 一对多
class Favor(Base):
    __tablename__ = 'favor'
    nid = Column(Integer, primary_key=True)     # primary_key 主键,自增ID
    caption = Column(String(50), default='red', unique=True)    # unique唯一约束


class Person(Base):
    __tablename__ = 'person'
    nid = Column(Integer, primary_key=True)     # primary_key 主键,自增ID
    name = Column(String(32), index=True, nullable=True)
    favor_id = Column(Integer, ForeignKey("favor.nid"))     # 外键


# 多对多
class Group(Base):
    __tablename__ = 'group'
    id = Column(Integer, primary_key=True)
    name = Column(String(64), unique=True, nullable=False)


class Server(Base):
    __tablename__ = 'server'

    id = Column(Integer, primary_key=True, autoincrement=True)
    hostname = Column(String(64), unique=True, nullable=False)
    port = Column(Integer, default=22)


class ServerToGroup(Base):      # 通过第三张表创建上两张表多对多的关系
    __tablename__ = 'servertogroup'
    nid = Column(Integer, primary_key=True, autoincrement=True)
    server_id = Column(Integer, ForeignKey('server.id'))
    group_id = Column(Integer, ForeignKey('group.id'))


# Base.metadata.create_all(engine)    # 创建表,会执行Base类的所有子类创建所有表
# Base.metadata.drop_all(engine)      # 删除表,会执行Base类的所有子类删除所有表