一、知识点
1、介绍数据选择控件UIPickerView和日期选择控件UIDatePicker控件
* UIPickerView的案例
* 点餐系统
* 城市选择
* 国旗选择
* UIDatePicker的案例
* UIToolbar的介绍和基本使用
* UIBarButtonItem的介绍和演示
* 将日期或时间数据设置到文本框上
2、项目配置文件介绍
* 应用头像
* 应用加载图片的设置
* info.plist文件介绍:
* 常用的key
* Xcode 6以前都是以“项目名称-info.plist”命名,Xcode 6以后就只有info.plist
// 现在历史版本Xcode的网址
// https://developer.apple.com/downloads/
* 通过open as source code查看info.plist中完整的key
* 通过代码去获取info.plist中的信息
* pch文件介绍
* 创建pch文件
* 配置基本信息
* 打印宏的演示
二、UIPickerView的使用
- 作用:
- 从指定的“数据源”中选择数据
- 通常以UITextField的“inputView”出现,当选中的某个文本框时,弹出的键盘中显示该控件。
- 注意:
- 使用PickerView之前需要指定数据源对象和代理对象
- 需要使用到的两个协议
- UIPickerViewDataSource 数据源协议
- UIPickerViewDelegate 代理协议
1、数据源方法
设置列:
numberOfComponentsInPickerView:(UIPickerView *)pickerView
设置行:
pickerView:(UIPickerView *)pickerView numberOfRowsInComponent:(NSInteger)component
2、delegate代理方法
设置显示内容(titleForRow)
-(NSString *)pickerView:(UIPickerView *)pickerView titleForRow:(NSInteger)row forComponent:(NSInteger)component
也可以设置显示视图(viewForRow)
-(UIView *)pickerView:(UIPickerView *)pickerView viewForRow:(NSInteger)row forComponent:(NSInteger)component reusingView:(UIView *)view
获取pickerview选择的数据方法:(didSelectRow)
-(void)pickerView:(UIPickerView *)pickerView didSelectRow:(NSInteger)row inComponent:(NSInteger)component
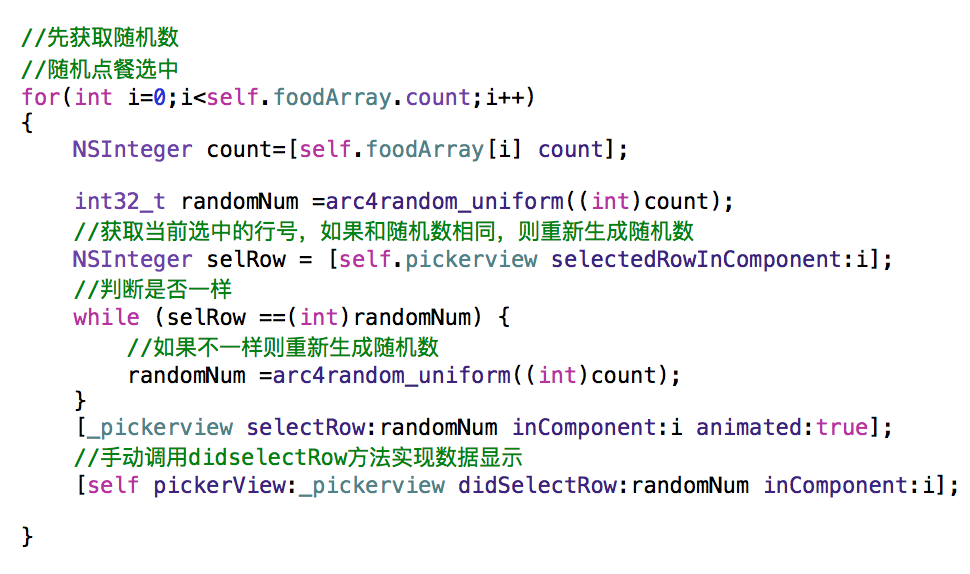
三、随机数生成(arc4random_uniform)
arc4random():c语言函数,随机生成一个无符号整数(0-2的32次)
arc4random()%(n+1) 随机生成一个0-n之间的数字
arc4random_uniform(256) 苹果推荐,随机生成一个0-n之间的数字
(随机生成颜色:
[UIColor colorWithRed :arc4random_uniform(256)/255.0 green:arc4random_uniform(256)/255.0 blue: arc4random_uniform(256)/255.0 alpha:1.0];
有个问题:随机生成的数可能和当前选择的数一致,导致pickerview没有发生改变:
解决:
1、获取当前选择项:
//获取当前选中的行号,如果和随机数相同,则重新生成随机数
NSInteger selRow = [self.pickerview selectedRowInComponent:i];
2、和随机数进行比较,如果一致,则重新生成随机数
//如果不一样则重新生成随机数
randomNum =arc4random_uniform((int)count);
3、如果不一致,则之间显示随机数
[_pickerview selectRow:randomNum inComponent:i animated:true];
四、城市选择(第0列的选择会影响第1列的数据显示)
1、重点:怎么显示行:
判断,如果是第0列的话:每行显示的就是省名称:
if(component= =0)
{
province =self.dataArray[row];
return province.name;
}
判断如果不是第0列的话:
a、获取选定的省的数组下标(在第0列的下标)
NSInteger selProIdx =[pickerView selectedRowInComponent:0];
b、获取选定省
privince =self.dataArray[selProIdx]
c、获取选定省所包含的城市数组
NSArray *citiesAttay =province.cities;
d、加载城市名称并显示
return citiesAttay[row];
2、重点:发现一个问题:就是城市这一列的数据,在没滚动前,不会自动更新,需要手动刷新
在didSelectRow中进行数据更新和显示 并使用reloadComponent选择要刷新的列
/如果滚动的是第0列,要刷新第一列城市数据
if(component==0)
{
[pickerView reloadComponent:1];
//选中第一列第0行
[pickerView selectRow:0 inComponent:1 animated:YES];
}
3、UIPickerView 的重要Bug:数组越界导致程序崩溃
/**
崩溃原因:
第1次选中的省,显示的城市数据固定
再次滚动的时候,如果没有停止,城市的数据还是原来的
但是,停止以后就要刷新城市的数据,这个时候,原来的城市数组跟当前要显示的城市数据不一致,导致数组越界崩溃
解决:
在计算显示有多少行的时候,将省模型保存起来,以后都通过保存的省来显示,获取数据显示
*/
在
numberOfRowsInComponent:解决:
//2、根据下标找到省模型
CZProvince *province =self.dataArray[selProIdx];
//保存上一次显示的行数
self.selPro =province;
return self.selPro.cities.count;
在此后对cities的调用选取中,都直接通过:
return self.selPro.cities[row];
的方法直接显示获取数据
五、国家选择(UIPickerView中显示的是自定义view的情况)
1、通过xib创建视图
2、通过flagview方法返回视图/行高
+(instancetype)flagView
{
return [[[NSBundle mainBundle] loadNibNamed:@"CZFlagView" owner:nil options:nil] lastObject];
}
//行高由谁决定就由谁去管理
+(CGFloat) rowHeight
{
return 80;
}
3、获取视图或行高(在-(UIView *)pickerView:(UIPickerView *)pickerView viewForRow:(NSInteger)row forComponent:(NSInteger)component reusingView:(UIView *)view 方法中:以及rowHeightForComponent方法中
CZFlagView *flagview =[CZFlagView flagView];
#pragma mark -怎么可变的改变行高 根据xib 在view里面再定义一个方法,直接告诉行高,并在内部实现
-(CGFloat)pickerView:(UIPickerView *)pickerView rowHeightForComponent:(NSInteger)component
{
return [CZFlagView rowHeight];
}
六、UIDatePicker日期获取
0、介绍:UIDatePicker(及实现)
闹钟。。
格式固定,数据有规律,保证日期格式的正确
通常以UITextField的inputView的形式出现(一般不会单独放一个UIDatePicker)
点击文本框不再弹出的是系统键盘,而是一个时间选择器 (顶部还有一个功能条)
使用:
1)、初始化
2)、常用的设置
mode:4:只显示time、date、time和date counter and timer 计时器类似
locale:本地化
textfield有一个inputView的属性
self.textField.inputView =[[UIDatePicker alloc]init];
inputAccessoryView 设置键盘上面的工具栏
1、获取日期
NSDate *date =[_pickerview date];
2、日期转字符串并显示日期
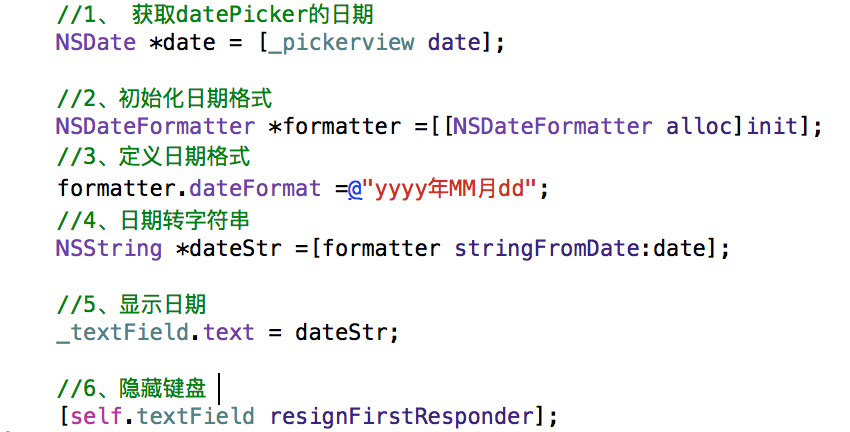
3、textField的inputView和inputAccessoryView属性的使用
#pragma mark -考虑到直接在inputView属性中,创建UIPickerView 就意味着每次点击textField都会被重新创建 解决:使用控件懒加载
//textfield 的inputView属性
self.textField.inputView =self.pickerview;
//设置键盘上部的工具条
self.textField.inputAccessoryView =self.toolbar;
4、控件懒加载
a、@property(nonatomic,strong) UIToolbar *toolbar;
注意使用strong强引用:为啥?
strong:不会被释放
那为什么平常写控件的时候,为什么用weak?
因为在storyview中拖进来,意味着将控件添加到了控制器中,相当于,控制器的view有个强指针指向这个控件,所以此时,如果控件也强指向控制器的话,不是无法释放,而是需要释放两次。
那么,为什么用代码创建的时候,也需要用weak:因为当控件创建好之后,紧接着就会被添加到控制器的view中,也相当于,控制器对这个控件有了一个强引用
b、
-(UIDatePicker *)pickerview
{
if(_pickerview ==nil)
{
//1、初始化
_pickerview =[[UIDatePicker alloc]init];
//2、本地化
_pickerview.locale =[NSLocale localeWithLocaleIdentifier:@"fr"];
//3、日期选择器的显示模式
_pickerview.datePickerMode =UIDatePickerModeDate;
}
return _pickerview;
}
c、直接调用self.pickerview可获取
5、新控件toolbar的介绍及3种创建button 的方法
方式一、常规创建(initWithTitle)
UIBarButtonItem *cancle =[[UIBarButtonItem alloc]initWithTitle:@"取消" style:UIBarButtonItemStylePlain target:self action:@selector(cancleClick)];
方式二、系统fiexibleSpacing按钮(initWithBarButtonSystemItem)
//创建fiexibleSpacing系统按钮
UIBarButtonItem *fiexibleSpacing =[[UIBarButtonItem alloc]initWithBarButtonSystemItem:UIBarButtonSystemItemFlexibleSpace target:self action:nil];
方式三、使用button形式外包itembutton的按钮(initWithCustomView)
UIButton *donebtn =[[UIButton alloc]initWithFrame:CGRectMake(200, 0, 40, 40)];
[donebtn setTitle:@"确定" forState:UIControlStateNormal];
//[donebtn setTintColor:[UIColor blackColor]];
[donebtn setTitleColor:[UIColor blackColor] forState:UIControlStateNormal];
[donebtn addTarget:self action:@selector(doneClick) forControlEvents:UIControlEventTouchUpInside];
UIBarButtonItem *done = [[UIBarButtonItem alloc]initWithCustomView:donebtn];
6、键盘消失的两种设置
键盘消失:
1、self.textField resignFirstsResponse
2、self.view endEditing :YES];(适用于多个需要设置键盘消失)
7、toolbar的一些注意点
五、点击取消或完成需要执行的操作
UIToolBar的背景设置:Bar Tint 设置background是看不到的
item的图片和文字不能同时设置
要想同时显示文字和图片,需要添加button
但是颜色与item的不一样
方式一、Assets - 图片 - Render AS
方式二、代码修改(imageWithRenderingMode:UIImageRenderingModeAlwaysOriginal)
例如:
创建带图片的button item
UIImage *img=[UIImage imageNamed:];
UIBarButtonItem *done =[UIBarButton Item alloc]initWithImage:img
会发现本来一个橙色的图片变成系统色
img imageWithRenderingMode:UIImageRenderingModeAlwaysOriginal];
七、项目文件介绍
项目文件介绍
复习:UIPickerView/UIDatePicker
1、info.plist
2、pch文件(xcode6之后消失,因为编译太慢)
0)空项目可以通过 new - target -file建立
上一个文件夹:显示的是常用的文件
1)assets.scassets - app icon:应用头像
launch screen-启动图片
2)infoplist文件
xcode6以前,名称为“项目名称-info.plist”
xml语言
Application Transport Security NSAllowsArbitraryLoads
2.1)bundle identifier:应用的唯一标示:如果两个应用,使用同一个标示的话,就会被覆盖(
应用程序升级也是通过判断如果两个bundleid一致的话,则直接覆盖原有的程序
2.2)bundle(display name)
应用名称
2.3)bundle version
应用程序的版本号(内部使用的版本号)
bundle visions string short:发布应用程序之后的版本号
2.4)mainstoryboard file base name :main
对应Main.storyboard:启动之后为什么会打开mainstoryboadr的原因
2.5)supported interface orientations
手机的home button方向
2.6)获取版本号:当更新时可显示:应用程序当前更新了哪些功能的介绍
NSDictionary *infoDict=[NSBundle mainBundle].infoDictionary;(可以获取到info.plist文件 只读,可以打印看看)
三、pch文件
1、创建:other-pct filepreFixHeader:预编译
2、作用:
a、帮我们把所有公用的宏放起来
[UIColor colorwithRed :arct4random_uniform(256)/255.0 green: arc4random_uniform(256)/255.0 blue:arc4random_uniform(256)/255.0 alpha:1.0)];
把颜色直接在定义在prefixHeader.pch文件中,定义宏: #define CZRandom
定义宏的时候 尽量将项目的前缀加上
b、配置
项目- targets -build settings - prefix header-debug(测试)/release(发布的时候)
每次发布前都要考虑prefix header文件是否正确(便捷方式:点击右边 看prefixheader.pch文件的路径 “./”指向项目文件目录 展开之后会发现,测试和发布是同一个pch文件)
c、可以控制打印
#ifdef DEBUG
#define CZLog(…)NSLog(__VA_ARGS__)
#else
//发布版本
#define CZLog(…)
#denif
把NSLog写成CZLog
如果是发布版本禁止打印
项目-TARGETS-EditSheme -Run -info -bulid configuration -release
d、保存公用的头文件
如果一个工具类的头文件在这个类以及其它类中都有可能用到 每次都要包含那个头文件的解决:避免多处导入
在pch文件中:#import ”CZTool.h”
e、c语言类型的文件
包含C语言文件,编译的时候会报错,因为c语言中没有oc之类的头文件
在pch文件中需要屏蔽掉 oc写的内容
#ifdef __OBJC__
#endif