一、设置YUM仓库
YUM的软件库源地址为:http://content.example.com/rhel7.0/x86_64/dvd,将此配置为操作系统的默认软件仓库。
方法一(修改配置文件):
vim /etc/yum.repos.d/yum.repo
[base]
name=RHCSA
baseurl=http://content.example.com/rhel7.0/x86_64/dvd
enable=1
gpgcheck=0
创建yum源需要主机配置文件必须存放在/etc/yum.repos.d下,并且以.repo结尾。
name:定义源名称
baseurl:定义源地址
enable:定义是否启用
gpgcheck:定义是否检查软件签名,如果设置为1,需要设置:gpgkey=file:///etc/pki/rpm-gpg/RPM-GPG-KEY-CentOS-7。
baseurl:支持使用本地路径、FTP、http三种资源格式:baseurl=file:/// baseurl=ftp:// baseurl=http://
本地路径位置中第三个/表示本地根目录,与上述gpgkey本地路径格式一致。
方法二(使用命令行进行添加):
yum-config-manager -add http://content.example.com/rhel7.0/x86_64/dvd
如果当前系统没有yum-config-manager命令需要安装yum-utils软件包。
二、调整逻辑卷大小
将逻辑卷
/dev/VolGroup/lv_home和其文件系统大小调整到15G,要确保文件系统中的内容保持完整。
查看当前逻辑卷大小
[root@serverX ~]# lvscan
  ACTIVE            '/dev/VolGroup/lv_swap' [<1.97 GiB] inherit
  ACTIVE            '/dev/VolGroup/lv_root' [50.00 GiB] inherit
  ACTIVE            '/dev/VolGroup/lv_home' [11.48 GiB] inherit //lv_home大小为11.48G
使用lvscan命令可以查看出当前LV/dev/VolGroup/lv_home大小为11.48G。
查看组卷大小
[root@serverX ~]# vgdisplay
  --- Volume group ---
  VG Name               VolGroup
  System ID
  Format                lvm2
  Metadata Areas        1
  Metadata Sequence No  4
  VG Access             read/write
  VG Status             resizable
  MAX LV                0
  Cur LV                3
  Open LV               3
  Max PV                0
  Cur PV                1
  Act PV                1
  VG Size               <63.51 GiB
  PE Size               4.00 MiB
  Total PE              16258
  Alloc PE / Size       16243 / <63.45 GiB
  Free  PE / Size       15 / 60.00 MiB //硬盘可供指派给逻辑卷的单位
  VG UUID               dcN4dI-xFex-69UJ-6L1d-b4b4-9BEZ-YdPD6f
查看当前硬盘可供指派给逻辑卷的最小单位已经不足以使用,所以需要对当前VG进行扩展,在此我们做一个分区用于扩展VG。
添加所需分区
parted /dev/sdb
(parted) mkpart
Partition type?  primary/extended? primary
File system type?  [ext2]? ext4
Start? 1
End? 5GiB
(parted) print
Model: ATA CentOS Linux-1 (scsi)
Disk /dev/sdb: 10.7GB
Sector size (logical/physical): 512B/4096B
Partition Table: msdos
Disk Flags:

Number  Start   End     Size    Type     File system  Flags
 1      1049kB  5369MB  5368MB  primary
将新添加的分区加入逻辑卷中
[root@serverX ~]# vgextend VolGroup /dev/sdb1 //将sdb1分区加入卷组
  Physical volume "/dev/sdb1" successfully created.
  Volume group "VolGroup" successfully extended
[root@serverX ~]# lvextend -L 15GiB /dev/VolGroup/lv_home //扩展逻辑卷至15GiB
  Size of logical volume VolGroup/lv_home changed from 11.48 GiB (2939 extents) to 15.00 GiB (3840 extents).
  Logical volume VolGroup/lv_home successfully resized.
[root@serverX ~]# resize2fs /dev/VolGroup/lv_home //更新逻辑卷
resize2fs 1.42.9 (28-Dec-2013)
Filesystem at /dev/VolGroup/lv_home is mounted on /home; on-line resizing required
old_desc_blocks = 2, new_desc_blocks = 2
The filesystem on /dev/VolGroup/lv_home is now 3932160 blocks long.

[root@serverX ~]# lvscan //重新扫描确认结果
  ACTIVE            '/dev/VolGroup/lv_swap' [<1.97 GiB] inherit
  ACTIVE            '/dev/VolGroup/lv_root' [50.00 GiB] inherit
  ACTIVE            '/dev/VolGroup/lv_home' [15.00 GiB] inherit
三、创建用户组
创建下列用户、组以及和组的成员关系:
- 一个名为adminuser的组;
- 一个名为natasha的用户,其属于adminuser,这个组是该用户的从属组;
- 一个名为harry的用户,属于adminuser,这个组是该用户的从属组;
- 一个名为sarah的用户,其在系统中没有可交互的shell,并且不是adminuser组的成员;
- natasha、harry、sarah的密码都要设置为flectrag。
[root@serverX ~]# groupadd adminuser
[root@serverX ~]# useradd -G adminuser natasha //-G指定用户所属的从属组
[root@serverX ~]# useradd -G adminuser harry
[root@serverX ~]# useradd -s /sbin/nologin sarah //-s 指定登录shell,/sbin/nologin表示不能登录系统
[root@serverX ~]# echo flectrag|passwd --stdin natasha
Changing password for user natasha.
passwd: all authentication tokens updated successfully.
[root@serverX ~]# echo flectrag|passwd --stdin harry
Changing password for user harry.
passwd: all authentication tokens updated successfully.
[root@serverX ~]# echo flectrag|passwd --stdin sarah
Changing password for user sarah.
passwd: all authentication tokens updated successfully.
四、使用访问控制列表配置文件权限
拷贝文件/etc/fstab到/var/tmp/fstab,配置文件/var/tmp/fstab的权限:
- 文件/var/tmp/fstab的拥有者是root;
- 文件/var/tmp/fstab输入root组;
- 文件/var/tmp/fstab对任何人都不可执行;
- 用户natasha能够对文件/var/tmp/fstab执行读和写操作;
- 用户harry对文件/var/tmp/fstab既不能读,也不能写;
- 所有其他用户(当前的和将来的)能够对文件/var/tmp/fstab进行读操作。
[root@serverX ~]# cp /etc/fstab /var/tmp/
[root@serverX ~]# setfacl -m u:natasha:rw /var/tmp/fstab
[root@serverX ~]# setfacl -m u:harry:- /var/tmp/fstab
五、配置一个crontab任务
为用户natasha配置一个定时任务,每天在本地时间14:23时执行以下命令:
bin/echo hiya
[root@serverX ~]#crontab -e -u natasha
23 14 * * * /bin/echo hiya
计划任务时间格式为分时日月周,后面直接加要执行的命令即可。
crontab -e -u user:为指定用户编辑计划任务
crontab -l:查看当前用户所有的计划任务
crontab -r:清除计划任务
特殊字符 代表意义 * 代表任何时刻,例如分钟为*,代表每分钟都执行 , 代表分割时段,例如小时为3,5表示3时和5时执行此计划任务 - 代表一个时间段范围,例如日配置为1-10,表示相应月的1-10号执行此计划任务 /n n表示数字,如果分钟为*/5,表示每五分钟执行一次计划任务
六、创建一个多用户使用目录
创建一个多用户共同使用的目录/home/admins,特性如下:
- /home/admins目录的组所有权是adminuser;
- adminuser组的成员对目录有读写和执行的权限。除此之外的其他所有用户没有任何权限(root除外);
- 在/home/admins目录中创建的文件,其组所有权会自动设置为属于adminuser组。
[root@serverX ~]# mkdir /home/admins
[root@serverX ~]# chown :adminuser /home/admins/ //设置目录所属组为adminuser
[root@serverX ~]# chmod 2770 /home/admins //2770特殊权限为2表示为SGID,使用者在此目录下的群组将会变成该目录的群组,770表示文件的属主属组拥有读写执行权限。
[root@serverX ~]# ll /home/
total 0
drwxrws---. 2 root     adminuser  6 Jan  3 17:28 admins
七、升级操作系统内核
新版本内核文件可以从http://rhgls.domainX.example.com/pub/updates/获取。升级操作系统内核,同事需要满足下列要求:
- 当系统重新启动之后升级的内核要作为默认的内核;
- 原来的内核要被保留,并且仍然可以正常启动。
[root@serverX ~]# uname -r
3.10.0-693.el7.x86_64
[root@serverX ~]# wget https://elrepo.org/linux/kernel/el7/x86_64/RPMS/kernel-ml-4.19.12-1.el7.elrepo.x86_64.rpm
--2019-01-03 18:08:33--  https://elrepo.org/linux/kernel/el7/x86_64/RPMS/kernel-ml-4.19.12-1.el7.elrepo.x86_64.rpm
Resolving elrepo.org (elrepo.org)... 69.195.83.87
Connecting to elrepo.org (elrepo.org)|69.195.83.87|:443... connected.
HTTP request sent, awaiting response... 200 OK
Length: 47850944 (46M) [application/x-rpm]
Saving to: ‘kernel-ml-4.19.12-1.el7.elrepo.x86_64.rpm’

100%[===================================================================================================================>] 47,850,944   603KB/s   in 79s

2019-01-03 18:09:53 (589 KB/s) - ‘kernel-ml-4.19.12-1.el7.elrepo.x86_64.rpm’ saved [47850944/47850944]
[root@serverX ~]# rpm -ivh kernel-ml-4.19.12-1.el7.elrepo.x86_64.rpm
warning: kernel-ml-4.19.12-1.el7.elrepo.x86_64.rpm: Header V4 DSA/SHA1 Signature, key ID baadae52: NOKEY
Preparing...                          ################################# [100%]
Updating / installing...
   1:kernel-ml-4.19.12-1.el7.elrepo   ################################# [100%]
[root@serverX ~]# cat /boot/grub2/grub.cfg |grep menuentry //过滤启动项,查看grub配置文件中是否存在安装后的内核启动参数。
if [ x"${feature_menuentry_id}" = xy ]; then
  menuentry_id_option="--id"
  menuentry_id_option=""
export menuentry_id_option
menuentry 'CentOS Linux (4.19.12-1.el7.elrepo.x86_64) 7 (Core)' --class centos --class gnu-linux --class gnu --class os --unrestricted $menuentry_id_option 'gnulinux-3.10.0-693.el7.x86_64-advanced-da5515d9-ffb3-4589-99c5-699b3fcb547f' {
menuentry 'CentOS Linux (3.10.0-693.el7.x86_64) 7 (Core)' --class centos --class gnu-linux --class gnu --class os --unrestricted $menuentry_id_option 'gnulinux-3.10.0-693.el7.x86_64-advanced-da5515d9-ffb3-4589-99c5-699b3fcb547f' {
menuentry 'CentOS Linux (0-rescue-529c8dcd6c464addae7654f5958443c6) 7 (Core)' --class centos --class gnu-linux --class gnu --class os --unrestricted $menuentry_id_option 'gnulinux-0-rescue-529c8dcd6c464addae7654f5958443c6-advanced-da5515d9-ffb3-4589-99c5-699b3fcb547f' {
[root@serverX ~]#grub2-set-default 'CentOS Linux (4.19.12-1.el7.elrepo.x86_64) 7 (Core)' //将默认启动内核设置为新安装内核
[root@serverX ~]#grub2-editenv list //确认是否设置成功
saved_entry=CentOS Linux (4.19.12-1.el7.elrepo.x86_64) 7 (Core)
[root@serverX ~]#reboot
[root@serverX ~]#uname -r
4.19.12-1.el7.elrepo.x86_64
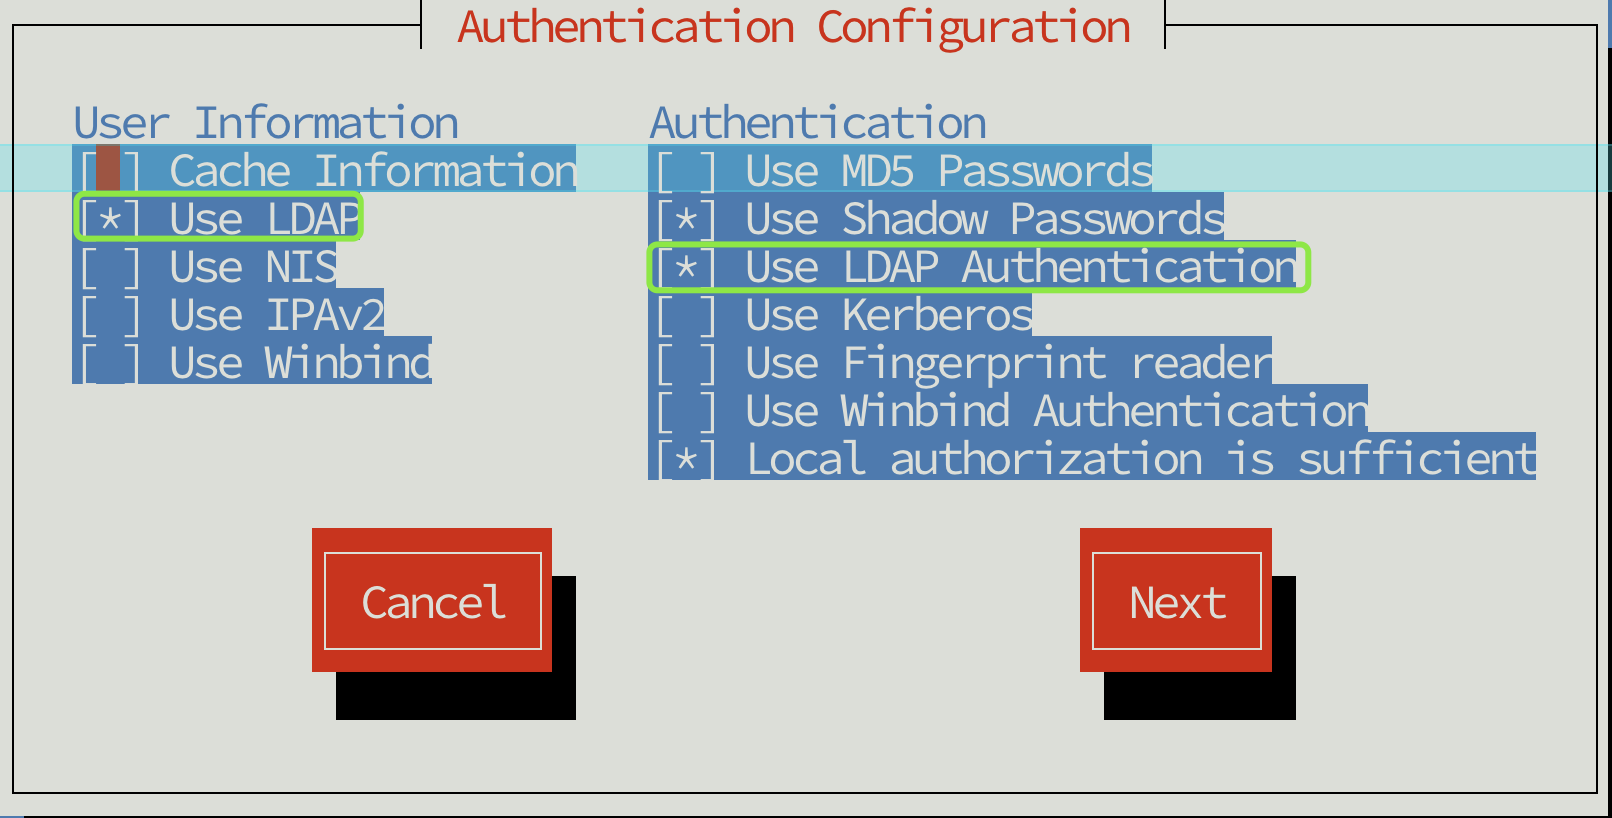
八、使用LDAP进行用户集中认证
系统host.domainX.example.com提供了一个LDAP验证服务。将系统按照以下要求绑定到这个服务上:
- 验证服务器的基本 DN 是:dc=domainX,dc=example,dc=com;
- 帐户信息和验证信息都是由 LDAP 提供的;
- 连接要使用证书进行加密,证书可以在下面的链接中下载 :ftp://host.domainX.example.com/pub/domainX.crt;
- 当正确完成配置后,用户 ldapuserX 应该能够登录到您的系统中,但是没有主目录。 当您完成 autofs 的题目之后,才能生成主目录;
- 用户 ldapuserX 的密码是 password。
[root@serverX ~]# yum -y install sssd
[root@serverX ~]# authconfig-tui

[root@serverX ~]# cd /etc/openldap/certs/
[root@serverX certs]# wget ftp://host.domainx.example.com/pub/domainX.crt
[root@serverX certs]# systemctl restart sssd
[root@serverX certs]# id ldapuserX
uid=17X(ldapuserX) gid=17X(ldapuserX) groups=17X(ldapuserX)
九、autofs配置
按照以下要求配置autofs用来自动挂载LDAP用户的家目录:
- host.domainX.example.com(172.24.10.250)通过 NFS v3 版本输出 /rhome 目录到您的系统,这个文件系统包含了用户 ldapuserX 的主目录,并且已经预先配置好;
- ldapuserX 用户的家目录是 host.domainX.example.com:/rhome/ldapuserX;
- ldapuserX 的家目录应该挂载到本地的/rhome/ldapuserX 目录下;
- 用户对其家目录是可写的;
- ldapuserX 用户的密码是 password。
[root@serverX ~]# yum -y install autofs
[root@serverX ~]# mkdir /rhome/ldapuserX -p
[root@serverX ~]# vim /etc/auto.master //指定监控点
/rhome/ldapuserX /etc/guests.rule
[root@serverX ~]# vim /etc/guests.rule
ldapuserX -rw,v3 host.domainX.example.com:/rhome/ldapuserX //通过NFS V3版本以可读写方式进行挂载
[root@serverX ~]# systemctl start autofs
[root@serverX ~]# systemctl enable autofs
Created symlink from /etc/systemd/system/multi-user.target.wants/autofs.service to /usr/lib/systemd/system/autofs.service.
[root@serverX ~]# su - ldapuserX -c 'pwd'
/rhome/ldapuserX
十、配置NTP客户端
配置操作系统,让其作为ntp1.aliyun.com的NTP客户端。
[root@serverX ~]# yum -y install chrony
[root@serverX ~]# vim /etc/chrony.conf
server ntp1.aliyun.com iburst //注释原有默认NTP地址
[root@serverX ~]# systemctl restart chronyd
[root@serverX ~]# timedatectl
      Local time: Fri 2019-01-04 14:39:02 CST
  Universal time: Fri 2019-01-04 06:39:02 UTC
        RTC time: Fri 2019-01-04 06:39:02
       Time zone: America/New_York (CST, +0800)
     NTP enabled: yes //查看NTP是否启用
NTP synchronized: no
 RTC in local TZ: no
      DST active: n/a
十一、配置一个用户账户
创建一个名为alex的用户,用户ID为3456。密码是flectrag
[root@serverX ~]# useradd -u 3456 alex
[root@serverX ~]# echo flectrag | passwd --stdin alex
Changing password for user alex.
passwd: all authentication tokens updated successfully.
十二、添加一个swap分区
在操作系统中添加一个大小为512MiB的swap分区,详细信息如下:
- 当操作系统启动时,swap分区可以自动挂载;
- 不要移除或修改当前系统中其他的swap分区。
[root@serverX ~]# fdisk /dev/sdb
Welcome to fdisk (util-linux 2.23.2).

Changes will remain in memory only, until you decide to write them.
Be careful before using the write command.

Device does not contain a recognized partition table
Building a new DOS disklabel with disk identifier 0x001379c8.

Command (m for help): n
Partition type:
   p   primary (0 primary, 0 extended, 4 free)
   e   extended
Select (default p): p
Partition number (1-4, default 1):
First sector (2048-209715199, default 2048):
Using default value 2048
Last sector, +sectors or +size{K,M,G} (2048-209715199, default 209715199): +512M
Partition 1 of type Linux and of size 512 MiB is set

Command (m for help): w
The partition table has been altered!

Calling ioctl() to re-read partition table.
Syncing disks.
[root@serverX ~]# mkswap /dev/sdb1
Setting up swapspace version 1, size = 524284 KiB
no label, UUID=05291f58-7136-436b-b5ed-28df93547bbc
[root@serverX ~]# vim /etc/fstab
/dev/sdb1 swap swap defaults 0 0
[root@serverX ~]# swapon -a
[root@serverX ~]# swapon -s //查看当前交换分区启动情况
Filename				Type		Size	Used	Priority
/dev/dm-1                              	partition	2097148	0	-2
/dev/sdb1                              	partition	524284	0	-3
十三、查找文件
找出所有用户student拥有的文件,并且把它们拷贝到/root/findfiles目录中。
mkdir /root/findfiles ; find / -user student -type f |xargs -i cp {} /root/findfiles/
十四、查找一个字符串
在文件/usr/share/dict/words 中查找到所有包含字符串 seismic 的行:
- 将找出的行按照原文的先后顺序拷贝到/root/wordlist 文件中;
- /root/wordlist 文件不要包含空行,并且其中的所有行的内容都必须是/usr/share/dict/words 文件中原始行的准确副本。
[root@serverX ~]# grep 'seismic' /usr/share/dict/words > /root/wordlist
十五、创建一个逻辑卷
根据下面的要求创建一个新的逻辑卷:
- 逻辑卷命名为 database,属于 datastore 卷组,并且逻辑卷的大小为 50 个物理扩展单元 (physical extent);
- 在 datastore 卷组中的逻辑卷,物理扩展单元 (physical extent) 大小应为 16 MiB;
- 使用 ext3 文件系统对新的逻辑卷进行格式化,此逻辑卷应该在系统启动的时候自动挂载在 /mnt/database 目录下。
[root@serverX ~]# fdisk /dev/sdb
Welcome to fdisk (util-linux 2.23.2).

Changes will remain in memory only, until you decide to write them.
Be careful before using the write command.


Command (m for help): n
Partition type:
   p   primary (1 primary, 0 extended, 3 free)
   e   extended
Select (default p): p
Partition number (2-4, default 2):
First sector (1050624-209715199, default 1050624):
Using default value 1050624
Last sector, +sectors or +size{K,M,G} (1050624-209715199, default 209715199): +1G //因为题目要求PE大小为16MiB,逻辑卷大小为50PE,所以用于做此逻辑卷的分区必须大于50x16,free PE数小于50会导致创建失败。
Partition 2 of type Linux and of size 50 MiB is set

Command (m for help): w
The partition table has been altered!

Calling ioctl() to re-read partition table.

WARNING: Re-reading the partition table failed with error 16: Device or resource busy.
The kernel still uses the old table. The new table will be used at
the next reboot or after you run partprobe(8) or kpartx(8)
Syncing disks.
[root@serverX ~]# fdisk -l /dev/sdb

Disk /dev/sdb: 107.4 GB, 107374182400 bytes, 209715200 sectors
Units = sectors of 1 * 512 = 512 bytes
Sector size (logical/physical): 512 bytes / 512 bytes
I/O size (minimum/optimal): 512 bytes / 512 bytes
Disk label type: dos
Disk identifier: 0x001379c8

   Device Boot      Start         End      Blocks   Id  System
/dev/sdb1            2048     1050623      524288   83  Linux
/dev/sdb2         1050624     1153023       51200   83  Linux
[root@serverX ~]# partprobe /dev/sdb ;sync
[root@serverX ~]# vgcreate -s 16MiB datastore /dev/sdb2
  Physical volume "/dev/sdb2" successfully created.
  Volume group "datastore" successfully created
[root@serverX ~]# lvcreate -l 50 -n database datastore
  Logical volume "database" created.
[root@serverX ~]# mkfs.ext3 /dev/datastore/database
mke2fs 1.42.9 (28-Dec-2013)
Filesystem label=
OS type: Linux
Block size=4096 (log=2)
Fragment size=4096 (log=2)
Stride=0 blocks, Stripe width=0 blocks
51296 inodes, 204800 blocks
10240 blocks (5.00%) reserved for the super user
First data block=0
Maximum filesystem blocks=209715200
7 block groups
32768 blocks per group, 32768 fragments per group
7328 inodes per group
Superblock backups stored on blocks:
	32768, 98304, 163840

Allocating group tables: done
Writing inode tables: done
Creating journal (4096 blocks): done
Writing superblocks and filesystem accounting information: done

[root@serverX ~]# mkdir /mnt/database
[root@serverX ~]# vim /etc/fstab
/dev/datastore/database /mnt/database ext3 defaults 0 0
[root@serverX ~]# mount -a
十六、创建一个归档文件
创建一个名为 /root/backup.tar.bz2 的归档文件,其中包含 /usr/local 目录中的内容,tar 归档必须使用 bzip2 进行压缩。
tar jcf /root/backup.tar.bz2 /usr/local/