这两天搞了Qt移植 因为不小心 耽误了挺多时间 但是也比较好的掌握了 现在记录一下
准备工具: tslib-1.16 qt-everywhere-opensource-src-4.8.5.tar qtcreator
下载路径:
tslib-1.16下载: https://github.com/kergoth/tslib/releases/download/1.16/tslib-1.16.tar.bz2
Qtqt-everywhere-opensource-src-4.8.5.tar下载: http://download.qt.io/archive/qt/
Qt creator下载: http://download.qt.io/archive/qtcreator/
tslib 的移植
解压 tslib.
进入 tslib 源代码目录
创建 out 目录,或者其他的目录名字用于安装的 注意: 这个文件名很重要 后面都要用到
运行 autogen.sh
./autogen.sh
写一个配置的脚本
mygen.sh
#!/bin/sh
./configure
--prefix=/xxxx
--host=arm-linux-gnueabihf
xxx为想要安装的路径
给这个配置脚本加一个权限
chmod +x mygen.sh
运行这个脚本
./mygen.sh
编译
make && make install
生成的库在 out 文件夹下面
bin etc include lib share
Qt 交叉编译
- 将 Qt 源码放入 Ubuntu 虚拟机,并解压。
  tar -xvf qt-everywhere-opensource-src-4.8.5.tar.gz
  cd qt-everywhere-opensource-src-4.8.5/
- 复制一份配置文件
cp mkspecs/qws/linux-arm-gnueabi-g++/ mkspecs/qws/linux-arm-gnueabihf-g++/ -rf
- 修改该配置文件 mkspecs/qws/linux-arm-gnueabihf-g++/qmake.conf
#
# qmake configuration for building with arm-none-linux-gnueabi-g++
#

include(../../common/linux.conf)
include(../../common/gcc-base-unix.conf)
include(../../common/g++-unix.conf)
include(../../common/qws.conf)

# modifications to g++.conf
QMAKE_CC                = arm-linux-gnueabihf-gcc
QMAKE_CXX               = arm-linux-gnueabihf-g++
QMAKE_LINK              = arm-linux-gnueabihf-g++
QMAKE_LINK_SHLIB        = arm-linux-gnueabihf-g++

# modifications to linux.conf
QMAKE_AR                = arm-linux-gnueabihf-ar cqs
QMAKE_OBJCOPY           = arm-linux-gnueabihf-objcopy
QMAKE_STRIP             = arm-linux-gnueabihf-strip


QMAKE_INCDIR            = /tslib安装的而绝对路径/include
QMAKE_LIBDIR            = /tslib安装的而绝对路径/lib

load(qt_config)
# 上面这两条是 tslib 库的位置 load(qt_config)
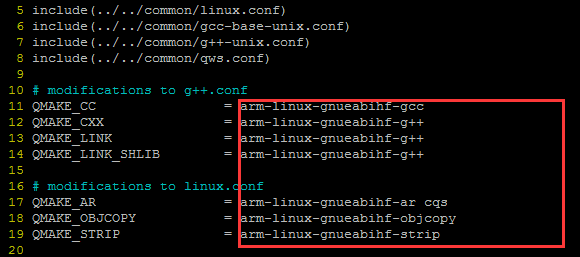
注意:一定要看清楚里面 要一样的才行 arm-linux-gnueabihf-xxxx
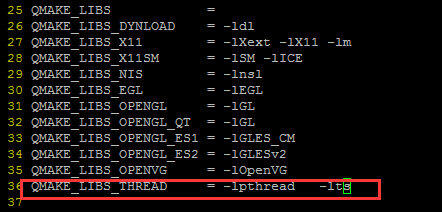
在 mkspecs/common/linux.conf 中 QMAKE_LIBS_THREAD 这一行加入 -lts QMAKE_LIBS_THREAD = -lpthread -lts
- 家目录创建一个 qtlib 目录
mkdir ~/qtlib
- 在 Qt4.8.5 源码目录创建 config.sh 配置脚本 编辑一下内容
#!/bin/sh
    ./configure
		-opensource
		-prefix  /想要安装的路径
		-confirm-license
		-release
		-shared
		-embedded arm
		-force-pkg-config
		-xplatform qws/linux-arm-gnueabihf-g++
		-depths 16,18,24,32
		-fast
		-optimized-qmake
		-pch
		-qt-sql-sqlite
		-qt-libjpeg
		-qt-zlib
		-qt-libpng
		-qt-freetype
		-little-endian -host-little-endian
		-no-qt3support
		-qt-libtiff -qt-libmng
		-make translations
		-qt-gfx-linuxfb -qt-gfx-transformed -qt-gfx-multiscreen
		-no-gfx-vnc -no-gfx-qvfb -qt-kbd-linuxinput
		-no-kbd-qvfb -armfpa
		-no-mouse-qvfb
		-no-opengl
		-no-mmx -no-sse -no-sse2
		-no-3dnow
		-no-openssl
		-webkit
		-no-qvfb
		-no-phonon
		-no-nis
		-no-opengl
		-no-cups
		-no-glib
		-no-xcursor -no-xfixes -no-xrandr -no-xrender
		-no-separate-debug-info
		-nomake examples -make tools -nomake docs
		-qt-mouse-tslib -DQT_QLOCALE_USES_FCVT
		-I/xxx安装tslib的时候创建的文件夹的绝对路径 里面有include文件夹xxxinclude
		-L/xxx安装tslib的时候创建的文件夹的绝对路径 里面有lib文件夹xxx/lib
		-no-pch
- 给它加一个执行权限,并执行
chmod +x config.sh && ./config.sh
- 执行编译并安装
  make -j4 && make install

  编译的时候最终会在atlib文件夹下生成如下文件
  ls ~/qtlib/
  bin  imports  include  lib  mkspecs  phrasebooks  plugins

到这里qt交叉编译已经安装完成
Qtcreator 安装及环境配置
- 下载完之后,将这个文件放到 Ubuntu 虚拟机里面,加一个执行权限,并运行。
chmod +x qt-creator-linux-x86_64-opensource-2.8.1.run && ./qt-creator-linux-x86_64-opensource-2.8.1.run
-
安装完毕打开 qtcreator

-
配置交叉编译器
-
进入 Tools->Options

-
配置 qmake。
- 进入 Tools->Options

- 进入 Tools->Options
-
配置 qkit
- 进入 Tools->Options

- 进入 Tools->Options
-
配置完毕,选择 Apply, OK
-
打开一个例程,进行编译,KIt Selection 的时候要选择 arm2


以上参考:https://www.cnblogs.com/chenfulin5/p/6958560.html