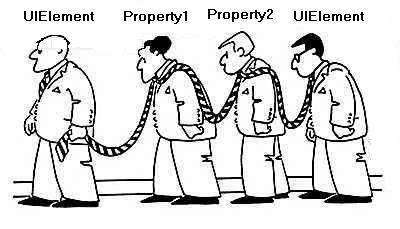
WPF 的体系结构,标记扩展,依赖属性,逻辑树/可视化树,布局,转换等。今天,我们将讨论 WPF 最重要的一部分——绑定。WPF 带来了优秀的数据绑定方式,可以让我们绑定数据对象,这样每次对象发生更改都能引发对应的改变。数据绑定最主要的目的是确保 UI 上的改变总是自动和内部的对象结构同步。在进一步讨论前,我们先看一下我们已经讨论过的问题。

数据绑定技术是在 WPF 技术之前就出现了。在 ASP.NET 中,我们通过绑定数据元素来渲染控件中适当的数据。我们通常传入一个 DataTable 并且绑定模板来获得独立的 DataRow 的数据。另外,在传统的 windows form 应用程序中,我们也可以把属性绑定到数据元素上。给对象的属性添加绑定可以确保当属性值发生改变时内部可以反应到数据。所以一句话说来,数据绑定不是什么新的东西。数据绑定是用来在应用程序中轻松展示数据的,从而可以减少开发人员为了显示数据而编写大量的代码。在这片文章中我将讨论如何在 WPF 中使用数据绑定技术并提供一个简单的示例程序。
WPF 中的绑定
WPF 推广了数据绑定的概念并引进了很多新特性,这样我们可以更广泛地使用绑定特性。绑定在应用程序和业务层之间建立了联系。如果你希望你的程序遵循严格的设计规则,数据绑定可以帮你实现。我们将在稍后详细讨论如何实现。
绑定可以分为以下几类:
数据绑定/对象绑定
数据绑定是最主要也是最重要的。WPF 引入了可以声明在 XAML 中的对象 ObjectDataProvider 和 XMLDataProvider 来增强对象绑定的能力。数据绑定可以通过多种方式实现。就像 这篇博客 中说的,我们可以通过 XAML,XAML+C# 或者单独的 C# 代码来使用数据绑定。所以 WPF 有足够的灵活性来处理任何问题。
<TextBox x:Name="txtName" /><TextBlock Text="{Binding ElementName=txtName, Path=Text.Length}" />
上面的代码中展示了最基本的绑定应用。TextBlock 的 Text 属性被绑定到了名字为 txtName 的 TextBox 上面,当你在 txtName 这个输入框中输入任何字符串的时候 TextBlock 将显示字符串的长度。因为标记扩展实际上就是一个有多个属性的类,这里我们声明了属性 ElementName 和 Path 的值。ElementName 确定属性所属的对象。Path 决定在对象中查找的路径。
你可以在 XAML 中很轻松地使用 ObjectDataProvider 来保存数据。ObjectDataProvider 可以作为资源添加到 XAML 中并且在之后使用 StaticResource 来引用。让我们看看下面的代码:
<StackPanel Orientation="Vertical"><StackPanel.Resources><ObjectDataProvider ObjectType="{x:Type m:StringData}" x:Key="objStrings" MethodName="GetStrings"/></StackPanel.Resources><ListBox Name="lstStrings" Width="200" Height="300" ItemsSource="{Binding Source={StaticResource objStrings}}" /></StackPanel>
在上面的代码中,ObjectType 将得到一个 Type ,其方法 GetStrings 将被调用。在 ListBox 中,我使用静态资源引用了该对象。现在在下面的代码中,你可以声明一个类:
public class StringData{ObservableCollection<String> lst= new ObservableCollection<String>();public StringData(){lst.Add("Abhishek");lst.Add("Abhijit");lst.Add("Kunal");lst.Add("Sheo");}public ObservableCollection<String> GetStrings(){return lst;}}
这样你就可以看到列表将被这些字符串填充。
**为什么是 ObservableCollection ? 什么又是 INotifyPropertyChanged , INotifyCollectionChanged ? **
在上面的代码中,我使用了 ObservableCollection 。这很重要。ObservableCollection 在新的列表项插入时将自动发送通知。这里即是通知 ListBox 更新列表。加入你放一个按钮用来给 ObservableCollection 插入数据,绑定将自动被通知从而更新集合。你不需要手动地在列表中插入同样的值。WPF 绑定通常需要当值修改的时候被通知。接口 INotifyPropertyChanged 和 INotifyCollectionChanged 被用来更新绑定了数据的 UI 元素。 如果创建了一个值改变时需要更新 UI 的属性,你只需要实现接口 INotifyPropertyChanged ,如果是集合(就像 ItemsSource),需要实现 INotifyCollectionChanged 。ObservableCollection 本身已经实现了 INotifyCollectionChanged ,所以他本身就支持当新的项被添加或者旧的项被移除的时候更新控件。我在另外一篇文章中已经详细讨论过了这两个: 修改对象或者集合的通知
相反地, Sacha 有一个非常好的关于抛弃 INotifyPropertyChanged 接口而使用 切面(INotifyPropertyChanged 就是通过切面来实现的) 的观点。
XML 绑定
跟对象绑定相似, XAML 也支持绑定。你可以使用 Binding 类内置的属性 XPath 很容易地绑定 XMLDataProvider 提供的数据。让我们看看下面的代码:
<TextBlock Text="{Binding XPath=@description}"/><TextBlock Text="{Binding XPath=text()}"/>
所以,如果你在节点 XYZ 中,InnerText 可以通过属性 text() 来获取到。 @ 标记用于属性。这样,使用 XPath 可以很好地处理 XAML 。如果你想阅读更多关于 XAML 绑定的内容,请查看 WPF 中的 XML 绑定
DataContext 的重要性
你可能觉得有点奇怪为什么我在讨论 WPF 绑定的时候讲到 DataContext 。DataContext 实际上是一个依赖属性。它指向原始数据,我们传递给 DataContext 的对象可以传递给所有的子控件。意思即使如果为 Grid 定义了 DataContext ,然后 Grid 中的所有元素都将得到同样的 DataContext 。
<Grid DataContext="{StaticResource dtItem}"><TextBox Text="{Binding MyProperty}" /></Grid>
上面的代码中我为 Grid 定义了一个 DataContext , Grid 中的 TextBox 可以引用 MyProperty 属性,因为 dtItem 将会自动继承给所有的子元素。当使用绑定的时候, DataContext 是你必须使用的最重要的部分。
绑定成员
大家已经了解过标记扩展了,实际上绑定也是一种标记扩展。它是一个有着多个属性的 Binding 类。让我们讨论一下绑定类中的一些成员:
- Source:Source 属性持有 DataSource 。默认地,它引用控件的 DataContext 。如果你为绑定放入了 Source 属性,他将替换原来的 DataContext 。
- ElementName:如果想要引用定义在 XAML 中的另外的元素,可以使用 ElementName 。ElementName 是作为 Source 的替代。如果绑定的 Path 没有定义,它将使用作为 Source 传递对象的 ToString 来获得数据。
- Path:Path 定义了获得字符串数据的真实属性路径。如果最后发现不是一个字符串,他将调用 ToString 来获得数据。
- Mode:它定义了数据如何传递。 OneWay 意味着对象只会在 source 更新时才更新,OneWayToSource 则相反。TwoWay 意味着数据双向传递。
- UpdateSourceTrigger:这是绑定中另外一个重要的部分。它定义了 source 合适更新。它的值可以是:
- PropertyChanged:这是默认值。当控件中发生任何更新,另外绑定的元素将反射到同样的更改。
- LostFocus:意思是在属性失去焦点的时候才会得到更新。
-
Explicit:如果使用这个值,你必须显示地设置何时更新 Source 。你可以使用绑定表达式的 UpdateSource 来更新控件:
BindingExpression bexp = mytextbox.GetBindingExpression(TextBox.TextProperty);bexp.UpdateSource();
通过这样的方式,source 将得到更新。
- Converter:转换器提供了一个当绑定对象更新时调用的对象。继承了接口 IValueConverter 可以作为转换器。可以从以下链接了解更多: 绑定中的转换器
- ConverterParameter:用来给转换器发送参数。
- FallbackValue:定义当绑定无法返回值时的替代值。默认为空白。
- StringFormat:一个表明了数据如何格式化的字符串。
- ValidatesOnDataErrors:定义后,将会验证 DataErrors 。你可以通过实现接口 IDataErrorInfo 来为数据更新定义自定义的验证代码块。可以从以下链接阅读更多:使用 IDataErrorInfo 验证应用
后台代码的绑定
跟在 XAML 中定义的相似,你也可以在后台代码中定义绑定。可以这样做:
Binding myBinding = new Binding("DataObject");myBinding.Source = myDataObject;myTextBlock.SetBinding(TextBlock.TextProperty, myBinding);
你可以通过这种方式声明绑定的属性。
命令绑定
WPF 支持命令绑定。每个像 Button 这样的普通对象都暴露了一个继承 ICommand 接口的属性 Command,当命令对象执行的该方法会被调用。
例如,你希望你的命令在窗口输入被触发的时候执行:
<Window.InputBindings><KeyBinding Command="{Binding CreateNewStudent}" Key="N" Modifiers="Ctrl" /><MouseBinding Command="{Binding CreateNewStudent}"MouseAction="LeftDoubleClick" /></Window.InputBindings>
在上面的代码中, CreateNewStudent 是暴露了一个实现 ICommand 接口的对象,当按下 Ctrl+N 或者双击左键时将会执行 Excute 方法。
注意:在 VS2008 中,InputBindings 只接收静态的 Command 对象。这里是一个 bug report,在以后发布的版本中将修复这个问题。
可以使用 CommandParameter 给实现 ICommand 接口的方法传递参数。
<Button Content="CreateNew" Command="{Binding CreateNewStudent}" />
和 InputBindings 相似,你也可以在按钮中使用命令。你需要创建一个实现接口 ICommand 的对象来执行:
public class CommandBase : ICommand{private Func<object, bool> _canExecute;private Action<object> _executeAction;private bool canExecuteCache;public CommandBase(Action<object>executeAction, Func<object, bool> canExecute){this._executeAction = executeAction;this._canExecute = canExecute;}#region ICommand Memberspublic bool CanExecute(object parameter){bool tempCanExecute = _canExecute(parameter);canExecuteCache = tempCanExecute;return canExecuteCache;}private event EventHandler _canExecuteChanged;public event EventHandler CanExecuteChanged{add { this._canExecuteChanged += value; }remove { this._canExecuteChanged -= value; }}protected virtual void OnCanExecuteChanged(){if (this._canExecuteChanged != null)this._canExecuteChanged(this, EventArgs.Empty);}public void Execute(object parameter){_executeAction(parameter);}#endregion}
我使用了 CommandBase 类来让代码不要看起来那么笨拙。真正的对象看起来是这样的:
private CommandBase createNewstudent;public CommandBase CreateNewStudent{get{this.createNewstudent = this.createNewstudent ?? new CommandBase(param => this.CreateStudent(), param => this.CanCreateStudent);return this.createNewstudent;}}private object CreateStudent(){this.CurrentStudent = new StudentItem();return this.CurrentStudent;}public bool CanCreateStudent{get { return true; }}
这样,你就会发现 createNewCommand 命令传递了 CreateStudent 这个在对象被更新时会调用的 lamda 表达式。CanCreateStudent 属性同样会被调用,它返回 true 或者 false。 WPF 将允许执行命令。

PropertyBinding 和 CommandBinding 提供了一种把展示逻辑和展示层完全分开的方法。这样就可以让整个架构中分离所有逻辑代码。微软使用 MVVM 模式创建了整个 Expression blend 这样就可以把 View 从 ViewModel 中分离出来,从而可以对呈现层进行单元测试。我们将在本系列的后面文章中讨论更多。
多重绑定
和单个绑定相似,WPF 同样引入了多重绑定( MultiBinding)的概念。在使用多重绑定时,数据将基于多个源进行绑定。你可以声明多个绑定表达式并且每一个的输出都将独立依赖。
<TextBlock DockPanel.Dock="Top" ><TextBlock.Text><MultiBinding Converter="{StaticResource mbindingconv}"><Binding ElementName="lst" Path="Items.Count" /><Binding ElementName="txtName" Path="Text" /><Binding ElementName="txtAge" Path="Text" /></MultiBinding></TextBlock.Text></TextBlock>
在这里, TextBlock 的值由三个元素决定,第一个是 ListBox 的数量,然后是 txtName 和 txtAge 。我在 IMultiValueConverter 代码块中已经使用了 Converter 来确保找到所有的独立元素并且分开获取每个值。IMultiValueConverter 和 IValueConverter 相似,可以根据值返回绑定到 Text 属性的对象。
public class MyMultiBindingConverter : IMultiValueConverter{#region IMultiValueConverter Memberspublic object Convert(object[] values, Type targetType,object parameter, System.Globalization.CultureInfo culture){string returnval = "Total no of Data {0}, NewData : ";if (values.Count() <= 0) return string.Empty;returnval = string.Format(returnval, values[0]);for (int i = 1; i < values.Count(); i++)returnval += "- " + values[i];return returnval;}public object[] ConvertBack(object value, Type[]targetTypes, object parameter, System.Globalization.CultureInfo culture){throw new NotImplementedException();}#endregion}
简单地来说,我只是连接了传入的每一个值然后返回输出。在示例程序中,我实现了最简单的绑定并且确保了值来自 Model。你可以在本文的顶部找到示例程序源代码的下载。
WPF Tutorial - Concept Binding
Introduction
Before this article, I have discussed about the architecture of WPF, Markup extensions, dependency properties, logical trees and Visual trees, layout, transformation, etc. Today, I will discuss what we call the most important part of any WPF application, the binding. WPF comes with superior DataBinding capabilities which enables the user to bind objects so that whenever the other object changes, the main object reflects its changes. The main motive of DataBinding is to ensure that the UI is always synchronized with the internal object structure automatically.
Before going further, let's jot down the things that we have already discussed.
DataBinding was present before the introduction of WPF. In ASP.NET, we bind data elements to render proper data from the control. We generally pass in a DataTable and bind the Templates to get data from individual DataRows. On the other hand, in case of traditional windows forms application, we can also bind a property with a data element. The Bindings can be added to properties of objects to ensure whenever the property changes the value, the data is internally reflected to the data. So in one word, DataBinding is nothing new to the system. The main objective of DataBinding is to show data to the application and hence reduce the amount of work the application developer needs to write to just make the application properly display data. In this article, I will discuss how you could use the Databinding in WPF application and also create a sample application to demonstrate the feature in depth.
Binding in WPF
WPF puts the concept of Binding further and introduced new features, so that we could use the Binding feature extensively. Binding establishes the connection between the application and the business layers. If you want your application to follow strict design pattern rules, DataBinding concept will help you to achieve that. We will look into greater detail with how to do that in a while.
In WPF, we can bind two Properties, one Property and one DependencyProperty, two DependencyProperties etc. WPF also supports Command Binding. Let's discuss how to implement them in detail.
Binding can be classified into few Types.
DataBinding / Object Binding
The most important and primary binding is Databinding. WPF introduces objects like ObjectDataProviderand XMLDataProvider to be declared into XAML to enhance the capability of object binding. DataBinding can be achieved by several ways. As shown by Adnan in his blog [^], we can make use of Binding capabilities by employing either XAML, XAML and C#, and C# itself. So WPF is flexible enough to handle any situation.
<TextBox x:Name="txtName" />
<TextBlock Text="{Binding ElementName=txtName, Path=Text.Length}" />
In the above situation, I have shown the most basic usage of Binding. The Text property of TextBlock is bound with the TextBox txtName so that whenever you enter something on the TextBox during runtime, the TextBlock will show the length of the string.
As a Markup Extension binding is actually a Class with properties, here we specified the value of the property ElementName and Path. The ElementName ensures the object that the property belongs to. Path determines the property path which the object needs to look into.
You can use ObjectDataProvider to handle data in your XAML easily. ObjectDataProvider can be added as Resource and later on can be referenced using StaticResource. Let's see the code below:
<StackPanel Orientation="Vertical">
    <StackPanel.Resources>
      <ObjectDataProvider ObjectType="{x:Type m:StringData}"

         x:Key="objStrings" MethodName="GetStrings"/>
    </StackPanel.Resources>
    <ListBox Name="lstStrings" Width="200" Height="300"

           ItemsSource="{Binding Source={StaticResource objStrings}}" />
Just as shown above, the ObjectType will get a Type, which is the internal class structure for which the method GetStrings will be called for. From the ListBox , I have referenced the Object using StaticResource. Now in the code, you can declare a class:
public class StringData
 {
  ObservableCollection<String> lst= new ObservableCollection<String>();

        public StringData()
        {
            lst.Add("Abhishek");
            lst.Add("Abhijit");
            lst.Add("Kunal");
            lst.Add("Sheo");
        }
        public ObservableCollection<String> GetStrings()
        {
             return lst;
        }
    }
So you can see the list has been populated with the strings.
Why ObservableCollection , the INotifyPropertyChanged, INotifyCollectionChanged?
Now as you can see, I have used ObvervableCollection. This is important. ObservableCollection sends automatic notification when a new item is inserted. Thus notifies the ListBox to update the list. So if you place a button,which inserts some data in the ObservableCollection , the Binding will automatically be notified by the collection and hence update the collection automatically. You don't need to manually insert the same in the ListBox.
WPF Binding generally needs to be notified when it is modified. The interfaces INotifyPropertyChanged and INotifyCollectionChanged are needed to update the UIElement which is bound with the data. So if you are crating a property which needed to update the UI when the value of it is modified, the minimum requirement is to implement the same from INotifyPropertyChanged, and for collection (like ItemsSource), it needs to implement INotifyCollectionChanged. ObservableCollection itself implements INotifyCollectionChanged, so it has support to update the control whenever new item is inserted to the list or any old item is removed from the string.
I have already discussed the two in detail in an article : Change Notification for Objects and Collection [^].
On the contrary, Sacha has a good point of getting rid of INotifyPropertyChanged interface using Aspect Examples (INotifyPropertyChanged via aspects).
XML Binding
Similar to Object binding, XAML also supports XML binding. You can bind the data coming from XMLDataProvider easily using built in properties like XPath in Binding class definition. Let's look into the code:
<TextBlock Text="{Binding XPath=@description}"/>
<TextBlock Text="{Binding XPath=text()}"/>
So, if you are in the node XYZ, the InnerText can be fetched using text() property. The @ sign is used for Attributes. So using XPath, you can easily handle your XML.
If you want to read more about XML binding, check: XML Binding in WPF [^].
Importance of DataContext
You might wonder why I have taken context of DataContext while I am talking about WPF Bindings. DataContext is actually a Dependency property. It points to Raw Data such that the object that we pass as DataContext will inherit to all its child controls. I mean to say if you define the DataContext for a Grid, then all the elements that are inside the Grid will get the same DataContext.
<Grid DataContext="{StaticResource dtItem}">
<TextBox Text="{Binding MyProperty}" />
</Grid>
Here as I defined DataContext for the Grid, the TextBox inside the grid can refer to the property MyPropertyas the dtItem object will be automatically inherited to all its child elements. While using Binding, DataContextis the most important part which you must use.
Binding Members
As you all know about Markup Extensions, Binding is actually a Markup Extension. It is a class Binding with few properties. Let's discuss about the Members that are there in Binding:
- Source: The source property holds the
DataSource. By default, it references theDataContextof the control. If you place Source property for the Binding, it will take that in lieu of originalDataContextelement. - ElementName: In case of
Bindingwith anotherElement,ElementNametakes the name of theElementdefined within the XAML for reference of the object.ElementNameacts as a replacement toSource. If path is not specified for the Binding, it will useToStringto get the data from the Object passed as Source. - Path:
Pathdefines the actual property path to get the String Data. If the end product is not astring, it will also invokeToStringto get the data. - Mode: It defines how the Data will be flown.
OneWaymeans object will be updated only when source is updated, on the contraryOneWayToSourceis the reverse.TwoWaydefines the data to be flown in both ways. - UpdateSourceTrigger: This is another important part of any
Binding. It defines when the source will be updated. The value ofUpdateSourceTriggercan be :- PropertyChanged: It is the default value. As a result, whenever anything is updated in the control, the other bound element will reflect the same.
- LostFocus: It means whenever the property loses its focus, the property gets updated.
- Explicit: If you choose this option, you need to explicitly set when to update the Source. You need to use
UpdateSourceofBindingExpressionto update the control.Hide Copy CodeBindingExpression bexp = mytextbox.GetBindingExpression(TextBox.TextProperty); bexp.UpdateSource();
By this, the source gets updated.
- Converter:
Convertergives you an interface to put an object which will be invoked whenever the Binding objects get updated. Any object that implementsIValueConvertercan be used in place ofConverter. You can read more about it from Converter in Binding [^]. - ConverterParameter: It is used in addition to
Converterto send parameters toConverter. - FallbackValue: Defines the value which will be placed whenever the
Bindingcannot return any value. By default, it is blank. - StringFormat: A formatting
stringthat indicates theFormatto which the data will follow. - ValidatesOnDataErrors: When specified, the
DataErrorswill be validated. You can useIDataErrorInfoto run your custom Validation block when Data object is updated. You can read more aboutIDataErrorInfofrom : Validate your application using IDataErrorInfo [^].
Binding in Code-behind
Similar to what you might do with XAML, you can also define binding in the codeBehind. To do this, you need to use:
Binding myBinding = new Binding("DataObject");
 myBinding.Source = myDataObject;
 myTextBlock.SetBinding(TextBlock.TextProperty, myBinding);
You can also specify the Binding properties in this way.
Command Binding
WPF supports CommandBinding. Each command object like Button exposes a property called Command which takes an object that implements ICommand interface and will execute the method Execute whenever object command gets fired.
Say, you want your command to be executed whenever the window Inputs gets invoked:
<Window.InputBindings>
        <KeyBinding Command="{Binding CreateNewStudent}" Key="N" Modifiers="Ctrl" />
        <MouseBinding Command="{Binding CreateNewStudent}"

		MouseAction="LeftDoubleClick" />
    </Window.InputBindings>
In the above code, the CreateNewStudent is a property that exposes the object which inherits ICommandinterface and the Execute method will be invoked whenever the Key Ctrl + N or LeftDoubleClick of the window is invoked.
Note: In VS 2008, the InputBindings only take Static Command objects. There is a bug report for this [^] , and it will be fixed in later releases.
You can use CommandParameter to pass parameters to the methods that make up the ICommand interface.
<Button Content="CreateNew" Command="{Binding CreateNewStudent}" />
Similar to InputBindings, you can use the Command with a Button. To execute, you need to create an object that implements ICommand like below:
public class CommandBase : ICommand
    {
        private Func<object, bool> _canExecute;
        private Action<object> _executeAction;
        private bool canExecuteCache;

        public CommandBase(Action<object>executeAction, Func<object, bool> canExecute)
        {
            this._executeAction = executeAction;
            this._canExecute = canExecute;
        }

        #region ICommand Members

        public bool CanExecute(object parameter)
        {
            bool tempCanExecute = _canExecute(parameter);
            canExecuteCache = tempCanExecute;
            return canExecuteCache;
        }
        private event EventHandler _canExecuteChanged;
        public event EventHandler CanExecuteChanged
        {
            add { this._canExecuteChanged += value; }
            remove { this._canExecuteChanged -= value; }
        }
        protected virtual void OnCanExecuteChanged()
        {
            if (this._canExecuteChanged != null)
                this._canExecuteChanged(this, EventArgs.Empty);
        }
        public void Execute(object parameter)
        {
            _executeAction(parameter);
        }

        #endregion
    }
I have used a CommandBase class to make the objects look less clumsy. The actual object class looks like:
private CommandBase createNewstudent;
        public CommandBase CreateNewStudent
        {
            get
            {

                this.createNewstudent = this.createNewstudent ??
           new CommandBase(param => this.CreateStudent(), param => this.CanCreateStudent);
                return this.createNewstudent;
            }
        }

        private object CreateStudent()
        {
            this.CurrentStudent = new StudentItem();
            return this.CurrentStudent;
        }

        public bool CanCreateStudent
        {
            get { return true; }
        }
Thus, you can see the createNewCommand passes CreateStudent lamda expression which is called whenever the object gets updated. The CanCreateStudent is a property that will also be called and based on true or false, WPF will allow the command to execute.
The PropertyBinding and CommandBinding give a total package to separate the presentation logic from the Presentation Layer. This gives the architecture to put all the logic separated. Microsoft created the whole Expression blend using MVVM pattern which separates the View from the ViewModel and hence gives a chance to handle Unit Testing easily even for presentation layer. We will discuss more about the topic later on the series.
MultiBinding
Similar to single Binding, WPF also introduces the concept of MultiBinding. In case of MultiBinding, the data bound depends on more than one source. You can specify more than one binding expression and on each of them the actual output is dependent on.
<TextBlock DockPanel.Dock="Top" >
   <TextBlock.Text>
      <MultiBinding Converter="{StaticResource mbindingconv}">
        <Binding ElementName="lst" Path="Items.Count" />
        <Binding ElementName="txtName" Path="Text" />
        <Binding ElementName="txtAge" Path="Text" />
      </MultiBinding>
   </TextBlock.Text>
 </TextBlock>
Here, the value for TextBlock is dependent on 3 elements, the first one is the ListBox count, then txtNameand txtAge. I have used Converter to ensure we find all the individual elements in the IMultiValueConverter block and handle each value separately. The IMultiValueConverter just similar to IValueConverter can take the value and return the object that is bound to the Text property.
public class MyMultiBindingConverter : IMultiValueConverter
    {
        #region IMultiValueConverter Members

        public object Convert(object[] values, Type targetType,
                object parameter, System.Globalization.CultureInfo culture)
        {
            string returnval = "Total no of Data {0}, NewData : ";

            if (values.Count() <= 0) return string.Empty;

            returnval = string.Format(returnval, values[0]);

            for (int i = 1; i < values.Count(); i++)
                returnval += "- " + values[i];

            return returnval;
        }

        public object[] ConvertBack(object value, Type[]
            targetTypes, object parameter, System.Globalization.CultureInfo culture)
        {
            throw new NotImplementedException();
        }

        #endregion
    }
For simplicity, I have just concat each of the values that are passed and return back the output.
In the sample application, I have produced the most simple Binding to ensure everything comes from the Model. You can find the sample application from the link at the top of this article.
Conclusion
I think you must be enjoying the series. Also feel free to write your comments. Thanks for reading.