要将 Firebase 添加到您的应用,您需要有一个 Firebase 项目以及适用于您的应用的 Firebase 配置文件。
- 如果您还没有 Firebase 项目,请在 Firebase 控制台中创建一个。如果您已经有与自己的移动应用相关联的现有 Google 项目,请点击导入 Google 项目。如果没有,请点击添加项目。
- 点击将 Firebase 添加到您的 Android 应用,然后按设置步骤操作。如果您是导入现有 Google 项目,系统可能会自动执行这些操作,您只需下载配置文件即可。
- 出现提示时,输入应用的软件包名称。请务必输入应用在使用的软件包名称;只有在将应用添加到 Firebase 项目时您才能进行此设置。
- 最后,您要下载一个
google-services.json文件。您可以随时重新下载此文件。 - 如果尚未将此文件复制到项目的模块文件夹(通常是
app/),请执行此操作。
在“根级别”的build.gradle文件添加一条规则。以包含Google服务插件:
 1 buildscript {
 2
 3     repositories {
 4         jcenter()
 5     }
 6
 7     dependencies {
 8         classpath 'com.android.tools.build:gradle:2.3.3'
 9
10         classpath 'com.google.gms:google-services:3.2.0'
11     }
12 }
13
14 allprojects {
15     repositories {
16         maven { url 'https://maven.google.com' }
17         mavenCentral()
18         jcenter()
19     }
20 }
然后在模块Gradle文件中(比如app模块下),底部添加apply plugin行,以启用 Gradle 插件:
 1 apply plugin: 'com.android.application'
 2
 3 android {
 4      // ...
 5 }
 6
 7 dependencies {
 8     // ...
 9
10     compile 'com.google.android.gms:play-services-base:11.4.0'
11     // Google Firebase cloud messaging
12     compile 'com.google.firebase:firebase-messaging:11.4.0'
13
14 }
15
16 apply plugin: 'com.google.gms.google-services'
ECFCMMSGService 继承 FirebaseMessagingService , 重写onMessageReceived方法接收通知消息弹通知栏1 http请求: 2 https://fcm.googleapis.com/fcm/send 3 4 Content-Type:application/json 5 Authorization:key= App Key 6 { 7 "notification" : { 8 "body" : "You have a new message", 9 "title" : "", 10 "icon" : "app icon" 11 }, 12 "to" : "user token" 13 }
 1 http请求:
 2 https://fcm.googleapis.com/fcm/send
 3
 4 Content-Type:application/json
 5 Authorization:key= App Key
 6 {
 7     "data" : {
 8       "request" : "1",
 9       "xxx" : "xxx"
10     },
11     "to" : "user token"
12 }
(3)Messages with both notification and data payload:
这种消息是在Notification Message的基础上加入一些数据,在用户点击通知栏的时候启动对应的activity并传入intent。
 1 public class ECFCMMSGService extends FirebaseMessagingService {
 2
 3     // 它主要用于处理接收 App 正在运行的时候,接收到的推送
 4
 5     private static final String TAG = "ECFCMMSGService";
 6
 7     @Override
 8     public void onMessageReceived(RemoteMessage remoteMessage) {
 9         super.onMessageReceived(remoteMessage);
10
11         // Check if message contains a data payload.
12         if (remoteMessage.getData().size() > 0) {
13             Log.d(TAG, "Message data payload: " + remoteMessage.getData());
14         }
15
16         // Check if message contains a notification payload.
17         if (remoteMessage.getNotification() != null) {
18             Log.d(TAG, "Message Notification Body: " + remoteMessage.getNotification().getBody());
19
20             sendNotification(remoteMessage.getNotification().getBody());
21         }
22     }
23
24     private void sendNotification(String messageBody) {
25
26         Intent intent = new Intent(this, MainActivity.class);
27         intent.putExtra("key", messageBody);
28         intent.addFlags(Intent.FLAG_ACTIVITY_CLEAR_TOP);
29
30         PendingIntent pendingIntent = PendingIntent.getActivity(this, 0 /* Request code */, intent,
31                 PendingIntent.FLAG_ONE_SHOT);
32
33         Bitmap icon2 = BitmapFactory.decodeResource(getResources(),
34                 R.mipmap.app_logo);
35
36         Uri defaultSoundUri = RingtoneManager.getDefaultUri(RingtoneManager.TYPE_NOTIFICATION);
37         NotificationCompat.Builder notificationBuilder = new NotificationCompat.Builder(this)
38                 .setSmallIcon(R.mipmap.app_logo)
39                 .setContentTitle("You have a new message.")
40                 .setContentText(messageBody)
41                 .setAutoCancel(true)
42                 .setLargeIcon(icon2)
43                 .setSound(defaultSoundUri)
44                 .setContentIntent(pendingIntent);
45
46         NotificationManager notificationManager =
47                 (NotificationManager) getSystemService(Context.NOTIFICATION_SERVICE);
48
49         notificationManager.notify(new Random().nextInt() /* ID of notification */, notificationBuilder.build());
50     }
51 }
自定义 ECFCMTokenRefreshService 集成 FirebaseInstanceIdService.
用户token的创建,转换和更新,在onTokenRefresh()方法中获取token并上传到服务器。
  1 public class ECFCMTokenRefreshService extends FirebaseInstanceIdService {
  2
  3     // 它主要用于管理 FCM 的注册令牌(下文简称 FCM_TOKEN ),以及更改等。它可以获取到用户设备唯一的一个 FCM_TOKEN ,向单个用户推送消息的时候使用
  4
  5     private static final String TAG = "FCMTokenRefreshService";
  6
  7     private ApiService mService;
  8     private float mRequestTime = 0;
  9     private int mErrorCount = 0;
 10     private int REQUEST_ERROR_MAX = 10;
 11     private TreeMap<String, Object> mParams;
 12
 13     @Override
 14     public void onCreate() {
 15         super.onCreate();
 16
 17         if (PreferencesUtils.getInstance().isFCMTokenSendServiceSuccess()) {
 18             return;
 19         }
 20
 21         String token = PreferencesUtils.getInstance().getFcmToken();
 22
 23         if (TextUtils.isEmpty(token)) {
 24             token = FirebaseInstanceId.getInstance().getToken();
 25         }
 26
 27         sendFCMTokenToServer(token);
 28     }
 29
 30     @Override
 31     public void onTokenRefresh() {
 32         super.onTokenRefresh();
 33
 34         PreferencesUtils.getInstance().saveFCMTokenSendServiceSuccess(false);
 35
 36         String token = FirebaseInstanceId.getInstance().getToken();
 37         Log.i(TAG, "onTokenRefresh: " + token);
 38         // Important, send the fcm token to the server
 39         sendFCMTokenToServer(token);
 40     }
 41
 42     // http://ebike-test.zriot.net/shop-app/push/token
 43     private void sendFCMTokenToServer(final String token) {
 44
 45         if (TextUtils.isEmpty(token)) {
 46             return;
 47         }
 48
 49         if (mService == null) {
 50             mService = RetrofitHelper.getInstance().getApiService(ApiService.class);
 51         }
 52
 53         PreferencesUtils.getInstance().saveFCMToken(token);
 54
 55         if (!AccountManager.getInstance().isUserLogin()) {
 56             return;
 57         }
 58
 59         if (mParams == null) {
 60             mParams = new TreeMap<>();
 61         }
 62
 63         if (mParams.size() == 0) {
 64             mParams.put("uid", AccountManager.getInstance().getUserId());
 65             mParams.put("token", AccountManager.getInstance().getToken());
 66             mParams.put("fcmToken", token);
 67             mParams.put("osType", "1"); // 1: android 2 : ios 70         }
 71
 72         mService.sendFCMTokenToServer(mParams)
 73                 .subscribeOn(Schedulers.io())
 74                 .unsubscribeOn(Schedulers.io())
 75                 .observeOn(AndroidSchedulers.mainThread())
 76                 .subscribeWith(new DisposableObserverCallBack<BaseResponse>() {
 77                     @Override
 78                     public void onNext(@NonNull BaseResponse response) {
 79
 80                         if (response == null) {
 81                             return;
 82                         }
 83
 84                         if (response.isRequestSuccess()) {
 85                             PreferencesUtils.getInstance().saveFCMTokenSendServiceSuccess(true);
 86                         }
 87
 88                         mErrorCount = 0;
 89                     }
 90
 91                     @Override
 92                     public void onError(Throwable e) {
 93                         super.onError(e);
 94
 95                         if (mErrorCount >= REQUEST_ERROR_MAX) {
 96                             return;
 97                         }
 98
 99                         if (!allowRequest()) {
100                             return;
101                         }
102
103                         sendFCMTokenToServer(token);
104
105                         mErrorCount += 1;
106                     }
107                 });
108     }
109
110     private boolean allowRequest() {
111
112         if (mRequestTime == 0) {
113             mRequestTime = System.currentTimeMillis();
114             return true;
115         }
116
117         if (System.currentTimeMillis() - mRequestTime < 3000) {
118
119             return false;
120         } else {
121
122             mRequestTime = System.currentTimeMillis();
123             return true;
124         }
125     }
126
127 }
在android清单文件中:注册service:
 1      <service android:name=".fcm.ECFCMMSGService"
 2             android:stopWithTask="false">
 3             <intent-filter>
 4                 <action android:name="com.google.firebase.MESSAGING_EVENT" />
 5             </intent-filter>
 6         </service>
 7
 8         <service android:name=".fcm.ECFCMTokenRefreshService"
 9             android:stopWithTask="false">
10             <intent-filter>
11                 <action android:name="com.google.firebase.INSTANCE_ID_EVENT" />
12             </intent-filter>
13         </service>
注意:
App 是否运行,决定了推送走的两条线路
App 在运行的时候,推送如果有 Notification ,一般也是我们自己去控制的,所以最终它点击后的效果,我们是可以通过 PendingIntent 做部分定制的。
但是如果是在 App 没有运行的情况下,就完全归 FCM 服务帮你完成这一系列的操作,它点击后的效果,只能将你的 App 调起,并且把你需要的参数传递到你的 SplashActivity(Action 为 android.intent.action.MAIN 的 Activity) 上。
推送服务的 icon 和 字体颜色
FCM 的推送通知,可以配置 icon 以及 App 名称的颜色。对 icon 和 字体颜色的配置,需要在 AndroidManifest.xml 中进行。
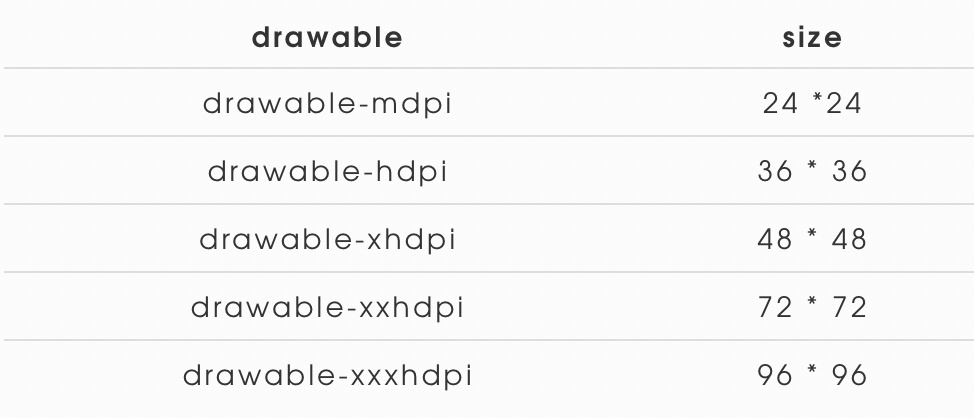
还有一点需要注意,通常我们 App 的 Icon 都做的非常的精美,但是这种 Icon 是无法直接使用在 FCM 的推送上的。需要额外的定制,以及对应的尺寸。
FCM Icon 的标准:背景透明,以白色图案填充。(实际上,展开后的效果会将icon 进行着色,所以任何颜色最终都会被着色成我们配置的颜色,不配置默认是个浅灰色)。

当然,它和图标的适配一样,不一定需要全套,只需要配置我们需要的尺寸即可。
将以下代码行添加到 application 标记内,以设置自定义默认图标和app 名称的自定义颜色:
<!-- Set custom default icon. This is used when no icon is set for incoming notification messages.
     See README(https://goo.gl/l4GJaQ) for more. -->

<meta-data
 android:name="com.google.firebase.messaging.default_notification_icon"
    android:resource="@drawable/ic_stat_ic_notification" />

<!-- Set color used with incoming notification messages. This is used when no color is set for the incoming
     notification message. See README(https://goo.gl/6BKBk7) for more. -->

<meta-data
 android:name="com.google.firebase.messaging.default_notification_color"
    android:resource="@color/colorAccent" />

AndroidManifest.xml
如果配置好这些,依然得到的是一个白色的小块,可以尝试升级一下 FCM 的版本,低版本好像是有这个 Bug ,在新版已经解决了。
问题:
- Firebase API initialization failure.
- Android app not receiving Firebase Notification when app is stopped from multi-task tray
- Push notification works incorrectly when app is on background or not running
- Push not received when app is killed
Firebase控制台测试只能发送Notification Message,测试的时候把App从最近列表划掉之后能收到,而且是在没翻墙的情况下都能收到。当然当进程被完全杀死就收不到了。
Data Message则需要通过server api调用,前台后台都能收到透传消息。
Android Push Notifications using Firebase Cloud Messaging FCM & PHP