我对native部分真的当前了解的非常少,必须从现在起抓紧时间给它一顿暴学。
本次破解的是一到CTF题,找到正确的Flag即可。
Apk下载地址:链接:https://pan.baidu.com/s/1K6wauXK73pzO4wpueCWV9A
提取码:qola
jni.h下载地址:链接:https://pan.baidu.com/s/1DSlUORCsZVcxbvfzaJTUYg
提取码:psxs
1.老规矩吧,先拖到jeb里,给它一顿反编译。由于只有一个界面,直接查看MainActivity即可。
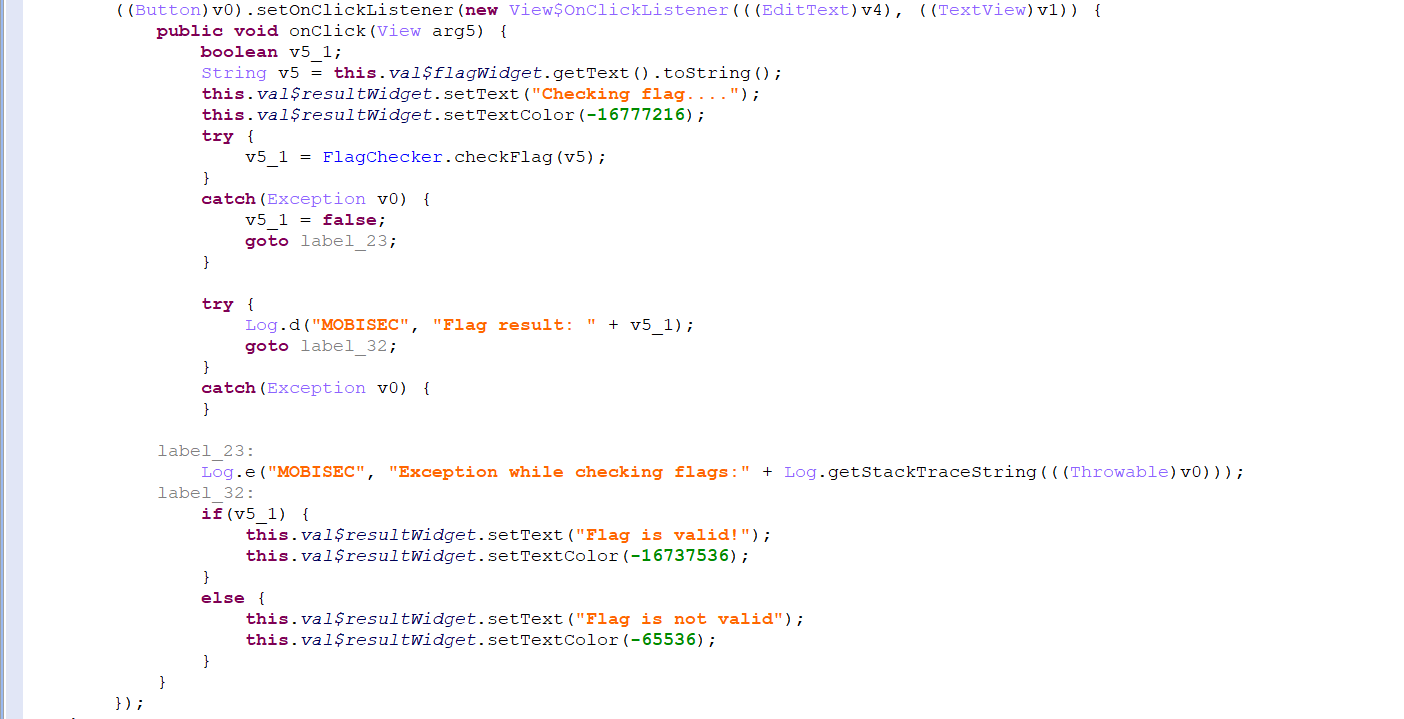
2.最终填入的String应该是放到FlagChecker.checkFlag方法中进入校验。查看checkFlag方法。
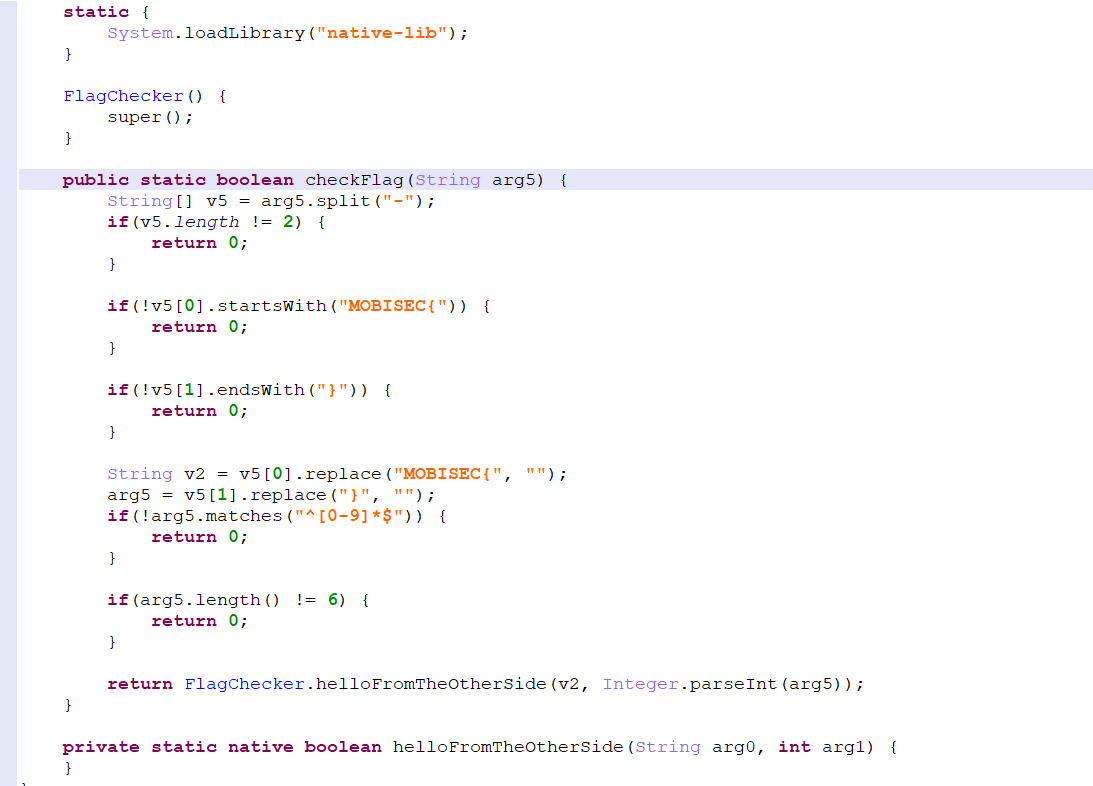
3.这段很容易懂,正确的字符串大体上应该长成这个屌样:“MOBISEC{X1-X2}" 。 其中X2部分是由数字组成,长度为6。最终将X1字符串和转成int值的X2传入到native方法中。
首先找到so,armeabiv-v7a: 第7代及以上的 ARM 处理器。2011年15月以后的生产的大部分Android设备都使用它.
arm64-v8a: 第8代、64位ARM处理器,很少设备,三星 Galaxy S6是其中之一。
armeabi: 第5代、第6代的ARM处理器,早期的手机用的比较多。
x86: 平板、模拟器用得比较多。
x86_64: 64位的平板。
到apk中对应的位置找到native-lib.so然后拖到IDA中一路确定,找到helloFromTheOtherSide方法,按F5查看伪代码。
bool __fastcall Java_com_mobisec_gonative_FlagChecker_helloFromTheOtherSide(int a1, int a2, int a3, int a4)
{
  int v4; // r6
  int v5; // r4
  int v6; // r8
  const char *v7; // r0
  char *v8; // r5
  size_t v9; // r0
  bool v10; // zf
  _BOOL4 result; // r0
  int v12; // r0
  bool v13; // zf
  int v14; // r0
  bool v15; // zf
  int v16; // r0
  bool v17; // zf
  int v18; // r4
  char dest; // [sp+6h] [bp-22h]
  char v20; // [sp+Bh] [bp-1Dh]
  int v21; // [sp+Ch] [bp-1Ch]

  v4 = a1;
  v5 = a4;
  v6 = a3;
  v7 = (const char *)(*(int (__fastcall **)(int, int, _DWORD))(*(_DWORD *)a1 + 676))(a1, a3, 0);
  v8 = (char *)v7;
  v9 = strlen(v7);
  v10 = v9 == 12;
  if ( v9 == 12 )
    v10 = v5 == 31337;
  if ( v10 )
    goto LABEL_6;
LABEL_4:
  (*(void (__fastcall **)(int, int, char *))(*(_DWORD *)v4 + 680))(v4, v6, v8);
  result = 0;
  while ( _stack_chk_guard != v21 )
  {
LABEL_6:
    v12 = (unsigned __int8)*v8;
    v13 = v12 == 110;
    if ( v12 == 110 )
      v13 = v8[11] == 111;
    if ( !v13 )
      goto LABEL_4;
    strncpy(&dest, v8 + 1, 5u);
    v20 = 0;
    if ( strncmp("ative", &dest, 5u) )
      goto LABEL_4;
    v14 = (unsigned __int8)v8[9];
    v15 = v14 == 95;
    if ( v14 == 95 )
      v15 = v8[6] == 95;
    if ( !v15 )
      goto LABEL_4;
    v16 = (unsigned __int8)v8[7];
    v17 = v16 == 105;
    if ( v16 == 105 )
      v17 = v8[8] == 115;
    if ( !v17 )
      goto LABEL_4;
    v18 = strcmp("so", v8 + 10);
    (*(void (__fastcall **)(int, int, char *))(*(_DWORD *)v4 + 680))(v4, v6, v8);
    result = v18 == 0;
  }
  return result;
}
4.这是什么鸟玩意呀,C语言里的指针这个星那个星的,看的我到是满眼的星。传进来两个参数怎么给我整成4个int了?
首先要知道,在JNI中本地方法第一个参数是JNIEnv接口指针,指向一个个函数表,函数表中的每一个入口指向一个JNI函数。
第二个参数根据本地方法是一个静态方法还是实例方法而有所不同。本地方法是一个静态方法时,第二个参数代表本地方法所在的类;本地方法是一个实例方法时,第二个参数代表本地方法所在的对象。
其次,要导入jni.h的函数库,点File->Load file->Parse C header file 找到jni.h所在位置点打开,此时显示Compilation successful 导入成功。
点击函数第一个参数int 右键Convert to struct* 在弹出的框中选择_JNIEnv点ok。
将已经显示出来一些函数,选中右键Force call type。
然后点住第一个参数a1按住n键重命名为env。
 1 bool __fastcall Java_com_mobisec_gonative_FlagChecker_helloFromTheOtherSide(_JNIEnv *env, int a2, int a3, int a4)
 2 {
 3   _JNIEnv *v4; // r6
 4   int v5; // r4
 5   void *v6; // r8
 6   const char *v7; // r0
 7   const char *v8; // r5
 8   size_t v9; // r0
 9   bool v10; // zf
10   _BOOL4 result; // r0
11   int v12; // r0
12   bool v13; // zf
13   int v14; // r0
14   bool v15; // zf
15   int v16; // r0
16   bool v17; // zf
17   int v18; // r4
18   char dest; // [sp+6h] [bp-22h]
19   char v20; // [sp+Bh] [bp-1Dh]
20   int v21; // [sp+Ch] [bp-1Ch]
21
22   v4 = env;
23   v5 = a4;
24   v6 = (void *)a3;
25   v7 = env->functions->GetStringUTFChars(&env->functions, (jstring)a3, 0);     //把一个jstring指针(指向JVM内部的Unicode字符序列)
                                                  转化成一个UTF-8格式的C字符串
26   v8 = v7;
27   v9 = strlen(v7);              //获取字符串长度
28   v10 = v9 == 12;
29   if ( v9 == 12 )
30     v10 = v5 == 31337;
31   if ( v10 )
32     goto LABEL_6;
33 LABEL_4:
34   v4->functions->ReleaseStringUTFChars(&v4->functions, v6, v8);         //从GetStringUTFChars中获取的UTF-8字符串在本地代码中使用完毕后,
                                             要使用ReleaseStringUTFChars告诉JVM这个UTF-8字符串不会被使用了,
                                             因为这个UTF-8字符串占用的内存会被回收。
35   result = 0;
36   while ( _stack_chk_guard != v21 )
37   {
38 LABEL_6:
39     v12 = *(unsigned __int8 *)v8;
40     v13 = v12 == 110;            //”n“
41     if ( v12 == 110 )
42       v13 = v8[11] == 111;       //”o“
43     if ( !v13 )
44       goto LABEL_4;
45     strncpy(&dest, v8 + 1, 5u);
46     v20 = 0;
47     if ( strncmp("ative", &dest, 5u) )
48       goto LABEL_4;
49     v14 = *((unsigned __int8 *)v8 + 9);
50     v15 = v14 == 95;            //”_"
51     if ( v14 == 95 )
52       v15 = v8[6] == 95;
53     if ( !v15 )
54       goto LABEL_4;
55     v16 = *((unsigned __int8 *)v8 + 7);
56     v17 = v16 == 105;           //“i”
57     if ( v16 == 105 )
58       v17 = v8[8] == 115;       //“s”
59     if ( !v17 )
60       goto LABEL_4;
61     v18 = strcmp("so", v8 + 10);
62     v4->functions->ReleaseStringUTFChars(&v4->functions, v6, v8);
63     result = v18 == 0;
64   }
65   return result;
66 }
5.是不是读起来好接受多了,从这段代码中就能分析出来,先判断传进来的X1长度是不是12,再看X2是不是等于31337,由此可得后半段字符串应为”031337}“。
c语言中对字符比较只能比较其ascii码,所以下面的步骤是先比较第一位和最后一位是不是“n”和“o”。是的话看第2到第6位是不是“ative”。
再看第10位和第7位是不是“_",再看第8第9位是不是”i“和”s“,最后比较最后两位是不是”so“。所以前半段应该为”MOBISEC{native_is_so”。最终结果为“MOBISEC{native_is_so-031337}”。
6.破解完后如下图所示,有一说一,这个so里的逻辑很简单,非常适合我这种刚刚起步的小老弟。今后还是要把这个逆向给它一顿臭学。 
参考资料: https://www.52pojie.cn/thread-742703-1-1.html (推荐)