官网:
https://www.rabbitmq.com/download.html
https://www.rabbitmq.com/install-rpm.html
Installing the package using Yum repositories on Package Cloud or Bintray (this option is highly recommended)
安装详细步骤
选择通过Package Cloud脚本,安装yum repo,然后直接yum安装的方式
# 两个密钥导入一下,不知道有什么用
# import the new PackageCloud key that will be used starting December 1st, 2018 (GMT)
$ rpm --import https://packagecloud.io/rabbitmq/rabbitmq-server/gpgkey
# import the old PackageCloud key that will be discontinued on December 1st, 2018 (GMT)
$ rpm --import https://packagecloud.io/gpg.key

# 安装yum源:会将相关依赖信息下载到 /etc/yum.repos.d
$ curl -s https://packagecloud.io/install/repositories/rabbitmq/erlang/script.rpm.sh | sudo bash
$ curl -s https://packagecloud.io/install/repositories/rabbitmq/rabbitmq-server/script.rpm.sh | sudo bash

# 安装erlang和rabbitmq-server(名字取的就是脚本url中的)
$ yum install -y erlang
$ yum install -y rabbitmq-server

# 启动、配置rabbitmq-server开机自启动
$ systemctl start rabbitmq-server
$ systemctl enable rabbitmq-server
$ systemctl status rabbitmq-server

# 启用rabbitmq-server的web界面
$ rabbitmq-plugins enable rabbitmq_management

# 默认只有一个guest/guest用户,且只能通过localhost访问,添加其他用户
$ rabbitmqctl add_user admin 123
# 设置管理员权限
$ rabbitmqctl set_user_tags admin administrator
概念
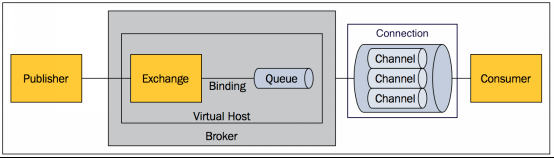
Virtual Host
可以理解为一个Rabbitmq服务,一个Rabbitmq进程中可以提供多个服务,每个服务里面都有一套独立的Exchange、Binding、Queue,各自之间不会互相影响
Exchange
交换机,接收生产者发送的消息,然后将消息路由到Queue中。主要由四种Exchange:direct、fanout、topic、headers(这个性能比较差,效果和direct差别不大,几乎不用了)
direct
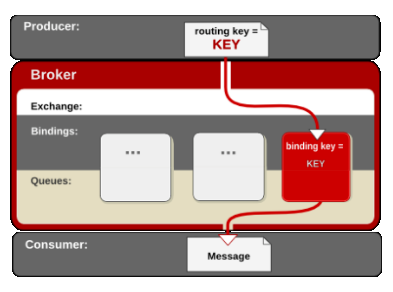
找到消息中的路由键和Binding中的binding key相同的Binding,消息发送到对应Binding的队列中。
fanout
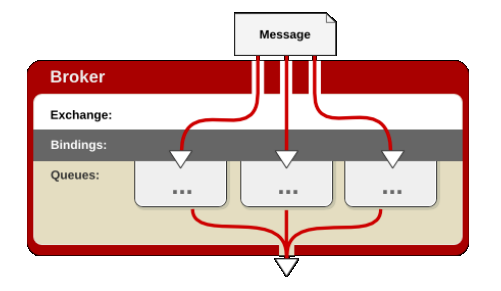
发送到fanout交换器的消息会被分发到所有绑定的队列上去,不关心路由键
topic
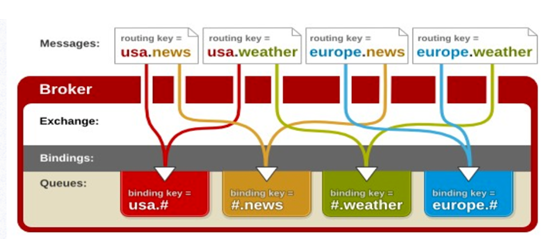
通过路由键与Binding的binding key进行模式匹配来转发,如上图所示
headers
略
Binding
绑定,Exchange和Queue之间的路由规则,基于路由键和Exchange类型
Queue
消息队列,用来保存消息,等待Consumer来消费
Channel
难道是SocketChannel???
代码示例
生产者
package test;

import com.rabbitmq.client.Channel;
import com.rabbitmq.client.Connection;
import com.rabbitmq.client.ConnectionFactory;

import java.util.UUID;

public class ProducerDemo {

	private static Connection connection;

	public static void main(String[] args) throws Exception {

		// testDirect();
		// testFanout();
		testTopic();

		connection.close();
	}

	private static Channel initChannel() throws Exception {

		ConnectionFactory factory = new ConnectionFactory();
		factory.setUsername("admin");
		factory.setPassword("123");
		factory.setHost("192.168.106.151");
		factory.setVirtualHost("/");
		factory.setPort(5672);

		connection = factory.newConnection();

		return connection.createChannel();
	}

	private static void testDirect() throws Exception {

		// 获取信道
		Channel channel = initChannel();

		// 设置交换机名称和类型,配置服务重启后数据不保留(同时会创建交换机)
		channel.exchangeDeclare("testDirectExchange", "direct", false);

		// 这一步主要用来创建队列
		channel.queueDeclare("testDirectQueue", false, false, false, null);

		// 清空一下队列
		channel.queuePurge("testDirectQueue");

		// 不需要绑定操作???我怎么不绑定不行呢
		channel.queueBind("testDirectQueue", "testDirectExchange", "testDirectQueue");

		// 发送消息到指定的交换机,未设置header头内容(可以不必指定routing key)
		for (int i = 0; i < 1000; i++) {
			channel.basicPublish("testDirectExchange", "testDirectQueue", null, UUID.randomUUID().toString().getBytes());
		}

		channel.close();
	}

	private static void testFanout() throws Exception {

		Channel channel = initChannel();

		channel.exchangeDeclare("testFanoutExchange", "fanout", false);

		channel.queueDeclare("testFanoutQueue_0", false, false, false, null);
		channel.queueDeclare("testFanoutQueue_1", false, false, false, null);
		channel.queueDeclare("testFanoutQueue_2", false, false, false, null);

		// 绑定多个Queue
		channel.queueBind("testFanoutQueue_0", "testFanoutExchange", "aaa");
		channel.queueBind("testFanoutQueue_1", "testFanoutExchange", "bbb");
		channel.queueBind("testFanoutQueue_2", "testFanoutExchange", "ccc");

		// 此种类型的交换机会将消息发送到绑定的所有队列中,不会管设置的routing key
		for (int i = 0; i < 1000; i++) {
			channel.basicPublish("testFanoutExchange", "ddd", null, UUID.randomUUID().toString().getBytes());
		}

		channel.close();
	}

	private static void testTopic() throws Exception {

		Channel channel = initChannel();

		channel.exchangeDeclare("testTopicExchange", "topic", false);

		channel.queueDeclare("testTopicQueue_0", false, false, false, null);
		channel.queueDeclare("testTopicQueue_1", false, false, false, null);

		// topic类型的exchange支持模式匹配
		channel.queueBind("testTopicQueue_0", "testTopicExchange", "#.test");
		channel.queueBind("testTopicQueue_1", "testTopicExchange", "aa.#");

		channel.basicPublish("testTopicExchange", "aa.test", null, "aa.test".getBytes());
		channel.basicPublish("testTopicExchange", "aa.bb", null, "aa.bb".getBytes());
		channel.basicPublish("testTopicExchange", "6666.test", null, "6666.test".getBytes());

		channel.close();
	}
}
消费者
package test;

import com.rabbitmq.client.*;

public class ConsumerDemo {

	public static void main(String[] args) throws Exception {

		test();
	}

	private static Channel initChannel() throws Exception {

		ConnectionFactory factory = new ConnectionFactory();
		factory.setUsername("admin");
		factory.setPassword("123");
		factory.setHost("192.168.106.151");
		factory.setVirtualHost("/");
		factory.setPort(5672);

		Connection connection = factory.newConnection();

		return connection.createChannel();
	}

	private static void test() throws Exception {

		Channel channel = initChannel();

		// 设置客户端最多接受未被ack的消息的个数
		channel.basicQos(64);

		// 消费与交换机无关,直接消费队列
		channel.basicConsume("testDirectQueue", true, "consumerTag", new DefaultConsumer(channel) {
			@Override
			public void handleDelivery(String consumerTag, Envelope envelope, AMQP.BasicProperties properties, byte[] body) {
				System.out.println("routing key: " + envelope.getRoutingKey());
				System.out.println("content type: " + properties.getContentType());
				System.out.println("message: " + new String(body));
				// 如果服务端关闭了这里就ack不到
				// channel.basicAck(envelope.getDeliveryTag(), false);
			}
		});
	}
}