zabbix介绍
三、程序构成
(1)zabbix_server:服务端守护进程
(2)zabbix_agented:agent端守护进程
(3)zabbix_proxy:代理服务器(可选,分布式才用到)
(4)zabbix_get:命令行工具,手动测试数据采集
(5)zabbix_sender:命令行工具,运行于agent端,手动向server端发送数据
(6)zabbixjavagateway:java网关

监控范畴:

实验环境准备:
| Centos7.0 192.168.200.113 | server.zabbix.com |
| Centos7.0 192.168.200.114 | agent.zabbix.com |
| Windows 192.168.200.2 | windows10client |
以下实验操作主要注意主机名
server服务端:
环境配置:
[root@localhost ~]# hostname server.zabbix.com
[root@localhost ~]# bash
[root@server ~]# vim /etc/hosts
127.0.0.1 localhost localhost.localdomain localhost4 localhost4.localdomain4
::1 localhost localhost.localdomain localhost6 localhost6.localdomain6
192.168.200.113 server.zabbix.com
192.168.200.114 agent.zabbix.com
192.168.200.2 windows10
[root@server ~]# vim /etc/hostname
server.zabbix.com
[root@server ~]# scp /etc/hosts 192.168.200.114:/etc/
[root@server ~]# systemctl stop firewalld
[root@server ~]# iptables -F
[root@server ~]# setenforce 0
agent客户端:
环境配置:
[root@client1 ~]# hostname agent.zabbix.com
[root@client1 ~]# bash
[root@agent ~]# vim /etc/sysconfig/network
HOSTNAEM=agent.zabbix.com
[root@agent ~]# systemctl stop firewalld
[root@agent ~]# iptables -F
[root@agent ~]# setenforce 0
server端:
配置阿里云yum源:
[root@server ~]# cd /etc/yum.repos.d/
[root@server yum.repos.d]# wget http://mirrors.aliyun.com/repo/Centos-7.repo
[root@server yum.repos.d]# ls
a Centos-7.repo CentOS-Media.repo epel.repo epel-testing.repo local.repo
[root@server yum.repos.d]# yum install http mariadb-server mariadb mariadb-devel php php-mbstring php-mysql php-bcmath php-gd php-xmlrpc php-ldap php-xml libevent libevent-devel net-snmp net-snmp-devel libxml2 libxml2-devel ntpdate gcc gcc-c++ make curl-devel -y
[root@server yum.repos.d]# ntpdate sla.time.edu.cn #同步清华大学时间服务器
启动LAMP相应服务
[root@server yum.repos.d]# cd
[root@server ~]# systemctl restart mariadb
[root@server ~]# systemctl enable mariadb
[root@server ~]# systemctl restart httpd
[root@server ~]# systemctl enable httpd
[root@server ~]# mysqladmin -u root password 123123 #为mysql的root用户设置登录密码
准备JAVA初始环境
[root@server ~]# java -version #查看java版本
openjdk version "1.8.0_181"
OpenJDK Runtime Environment (build 1.8.0_181-b13)
OpenJDK 64-Bit Server VM (build 25.181-b13, mixed mode)
[root@server ~]# javac -version #监控Tomcat时需要javac
bash: javac: 未找到命令...
相似命令是: 'java'
[root@server ~]# rm -rf /usr/bin/java
[root@server ~]# rz
[root@server ~]# ls
anaconda-ks.cfg epel-release-latest-7.noarch.rpm jdk-8u191-linux-x64.tar.gz 模板 图片 下载 桌面
Centos-7.repo initial-setup-ks.cfg 公共 视频 文档 音乐
[root@server ~]# tar xf jdk-8u191-linux-x64.tar.gz
[root@server ~]# mv jdk1.8.0_191/ /usr/local/java
[root@server ~]# vim /etc/profile
在末尾添加如下两条:

JAVA_HOME=/usr/local/java
PATH=$PATH:$JAVA_HOME/bin
[root@server ~]# source /etc/profile
[root@server ~]# java -version
java version "1.8.0_191"
Java(TM) SE Runtime Environment (build 1.8.0_191-b12)
Java HotSpot(TM) 64-Bit Server VM (build 25.191-b12, mixed mode)
[root@server ~]# javac -version
javac 1.8.0_191
源码安装zabbix:
[root@server ~]# rz
[root@server ~]# ls
jdk-8u191-linux-x64.tar.gz
zabbix-3.4.11.tar.gz
[root@server ~]# tar xf zabbix-3.4.11.tar.gz -C /usr/src
[root@server ~]# cd /usr/src/zabbix-3.4.11/
[root@server zabbix-3.4.11]# ./configure --prefix=/usr/local/zabbix --enable-server --enable-agent --with-mysql --enable-ipv6 --with-net-snmp --with-libcurl
--with-libxml2 --enable-java && make -j2 && make install
mariadb数据库授权
[root@server zabbix-3.4.11]# cd
[root@server ~]# mysql -u root -p123123
MariaDB [(none)]> create database zabbix character set utf8;
Query OK, 1 row affected (0.00 sec)
MariaDB [(none)]> grant all on zabbix.* to zabbix@localhost identified by 'zabbix';
Query OK, 0 rows affected (0.00 sec)
MariaDB [(none)]> grant all on zabbix.* to zabbix@'192.168.200.113' identified by 'zabbix'; #此步骤是为zabbix.server启动授权
Query OK, 0 rows affected (0.00 sec)
MariaDB [(none)]> flush privileges; #刷新授权表
Query OK, 0 rows affected (0.00 sec)
导入zabbix需要的数据库
[root@server ~]# cd /usr/src/zabbix-3.4.11/
[root@server zabbix-3.4.11]# mysql -uzabbix -pzabbix zabbix < database/mysql/schema.sql
[root@server zabbix-3.4.11]# mysql -uzabbix -pzabbix zabbix < database/mysql/images.sql
[root@server zabbix-3.4.11]# mysql -uzabbix -pzabbix zabbix < database/mysql/data.sql
登录查看
[root@server zabbix-3.4.11]# mysql -u root -p123123
MariaDB [(none)]> use zabbix;
Reading table information for completion of table and column names
You can turn off this feature to get a quicker startup with -A
Database changed
MariaDB [zabbix]> show tables;
创建zabbix的程序用户并授权防止权限报错
[root@server zabbix-3.4.11]# cd
[root@server ~]# useradd -M -s /sbin/nologin zabbix
[root@server ~]# cd /usr/local
[root@server local]# chown -R zabbix:zabbix zabbix/
[root@server local]# cd zabbix/
[root@server zabbix]# pwd
/usr/local/zabbix
[root@server zabbix]# mkdir logs/
[root@server zabbix]# chown zabbix:zabbix logs/
[root@server zabbix]# cp -p etc/zabbix_server.conf{,.bak}
[root@server zabbix]# cp -p etc/zabbix_agentd.conf{,.bak}
修改zabbix配置文件
[root@server zabbix]# cd /usr/local/zabbix/etc/
[root@server etc]# vim zabbix_server.conf
删除全部添加如下代码:

LogFile=/usr/local/zabbix/logs/zabbix_server.log                         #指定zabbix日志位置
PidFile=/tmp/zabbix_server.pid                                           #指定zabbix.pid文件位置
DBHost=192.168.200.113                                                   #指定数据库主机名
DBName=zabbix                                                            #指定数据库名为zabbix
DBUser=zabbix                                                            #指定用户为zabbix
DBPassword=zabbix                                                        #指定密码为zabbix
DBSocket=/var/lib/mysql.sock                                              #指定mariadb数据库的sock文件
Include=/usr/local/zabbix/etc/zabbix_server.conf.d/*.conf
[root@server etc]# vim zabbix_agentd.conf
删除全部添加如下代码:
PidFile=/tmp/zabbix_agentd.pid
Server=127.0.0.1,192.168.200.113
ServerActive=192.168.200.113
Hostname=server.zabbix.com
LogFile=/usr/local/zabbix/logs/zabbix_agentd.log
Include=/usr/local/zabbix/etc/zabbix_agentd.conf.d/*.conf
[root@server etc]# ln -s /usr/local/zabbix/sbin/* /usr/local/bin/
启动监控程序
[root@server etc]# zabbix_server
[root@server etc]# zabbix_agentd
配置php与apache
[root@server etc]# cd
[root@server ~]# mv /usr/src/zabbix-3.4.11/frontends/php/ /var/www/html/zabbix
[root@server ~]# chown -R apache:apache /var/www/html/zabbix/
[root@server ~]# vim /etc/php.ini
第878行       date.timezone=Asia/Shanghai                        #时区
第384行        max_execution_time=300                            #单位秒,通过post,get以及put方式接受数据时间限制
第394行        max_input_time=300                                #php程序上传文件解析数据时间的限制
第672行        post_max_size=32M                                 #post方式请求数据允许的最大大小
第405行         memory_limit=128M                                #设置程序的内存限制
第854行        extension=bcmath.so                                #加载zabbix程序需要加载的扩张模块bcmath.so手动添加
[root@server ~]# systemctl restart httpd #启动httpd服务
检测服务端口信息
[root@server ~]# netstat -anpt | grep :10050
tcp 0 0 0.0.0.0:10050 0.0.0.0:* LISTEN 35292/zabbix_agentd
tcp6 0 0 :::10050 :::* LISTEN 35292/zabbix_agentd
[root@server ~]# netstat -anpt | grep :10051
tcp 0 0 0.0.0.0:10051 0.0.0.0:* LISTEN 35318/zabbix_server
tcp6 0 0 :::10051 :::* LISTEN 35318/zabbix_server
[root@server ~]# netstat -anpt | grep :80
tcp6 0 0 :::80 :::* LISTEN 35550/httpd
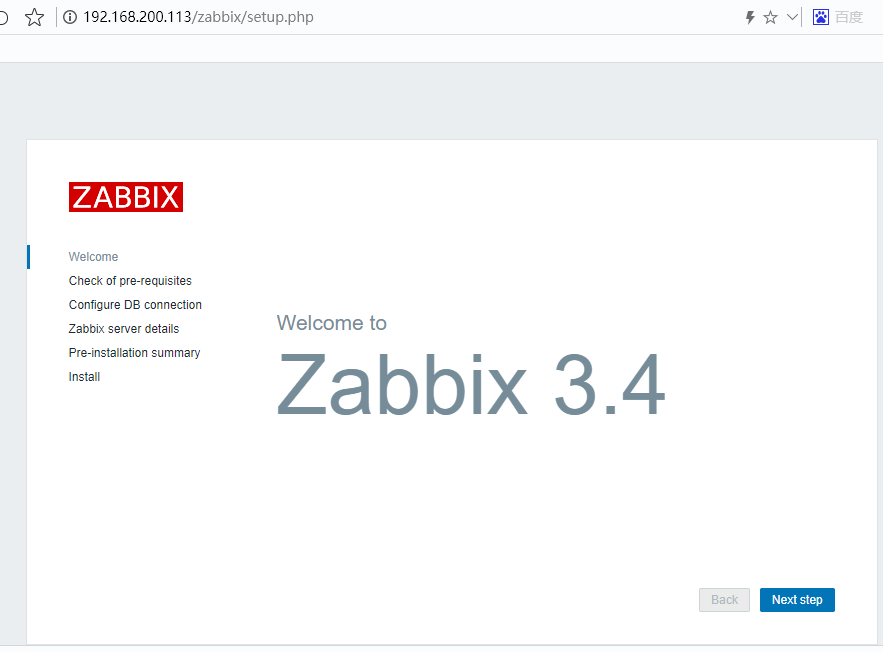
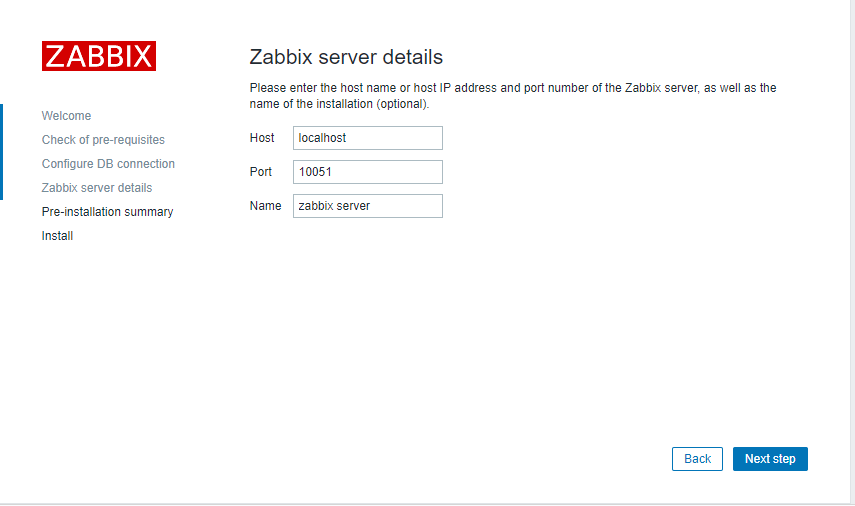
WEB安装zabbix
访问http://192.168.200.113/zabbix进入页面安装
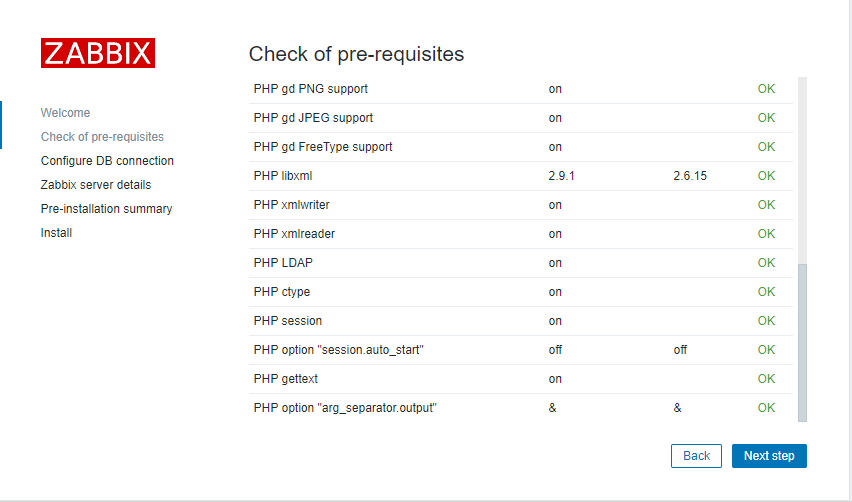
保障所有选项都是ok状态
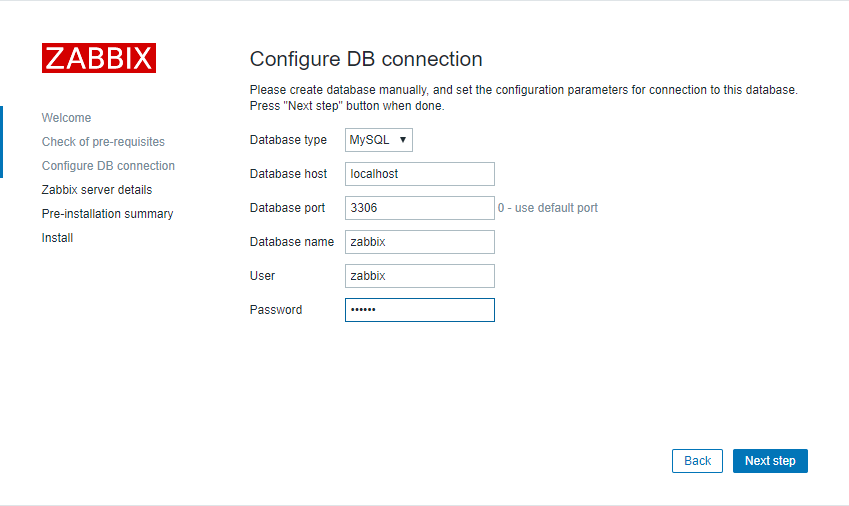
密码为zabbix
名字随便起这里起zabbix server
用户名admin 密码zabbix
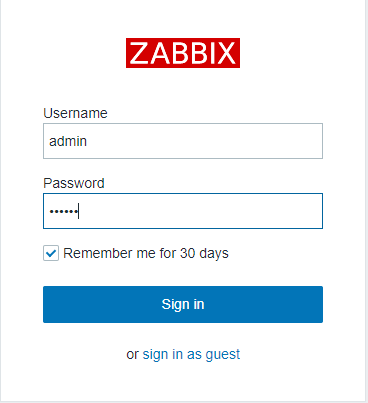
登录成功:
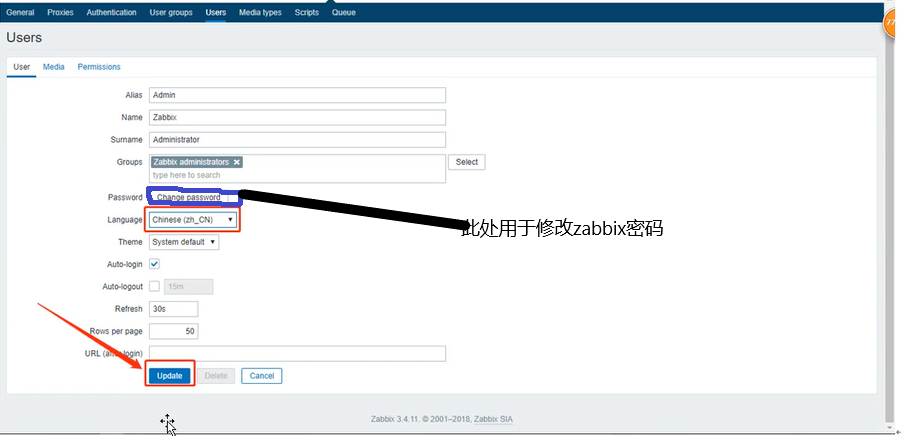
zabbix页面优化中文汉化:
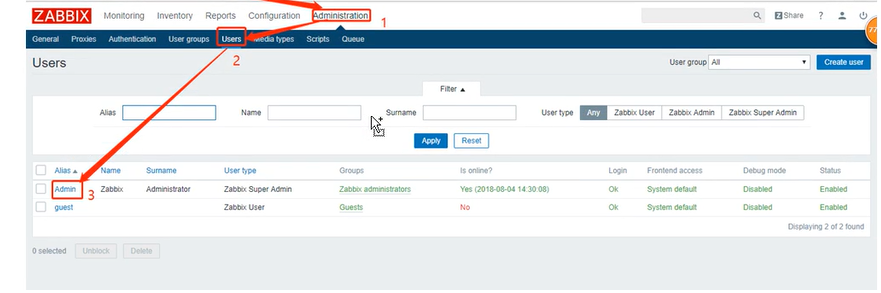
按F5刷新页面完成汉化

汉化后问题:页面出现中文乱码

解决方法:更改zabbix默认的字体为电脑自带字体
[root@server ~]# cd /var/www/html/zabbix/fonts/ #查看zabbix自带的默认字体
[root@server fonts]# ls
DejaVuSans.ttf
[root@server fonts]#
电脑自带字体路径:C:WindowsFonts,选择自己喜欢的字体复制到桌面并导入到xshell中
[root@server fonts]# ls
DejaVuSans.ttf simsun.ttc
[root@server fonts]# mv simsun.ttc DejaVuSans.ttf
按F5再次刷新页面
=================================================================================
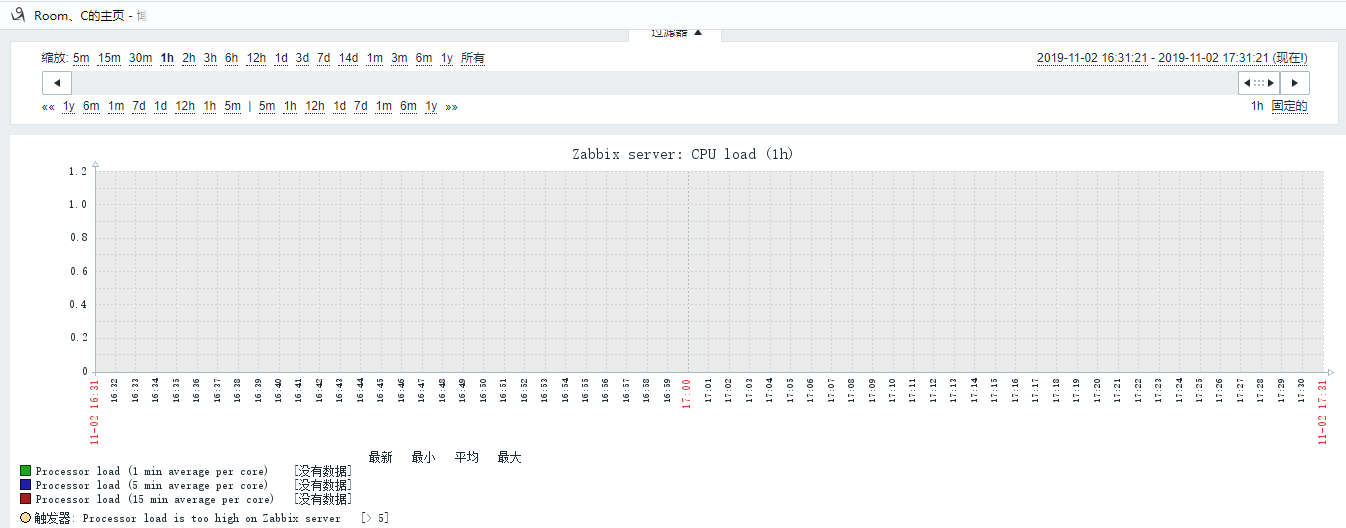
zabbix监控主机:添加自身为被监控机


监控项就是你要监控的服务或者硬件
图像是监控的服务或者硬件当前的状态
触发器就是用来当某个服务或者硬件出现了问题会自动报警,后面可以利用微信,邮箱类进行报警通知
========================================================================================================
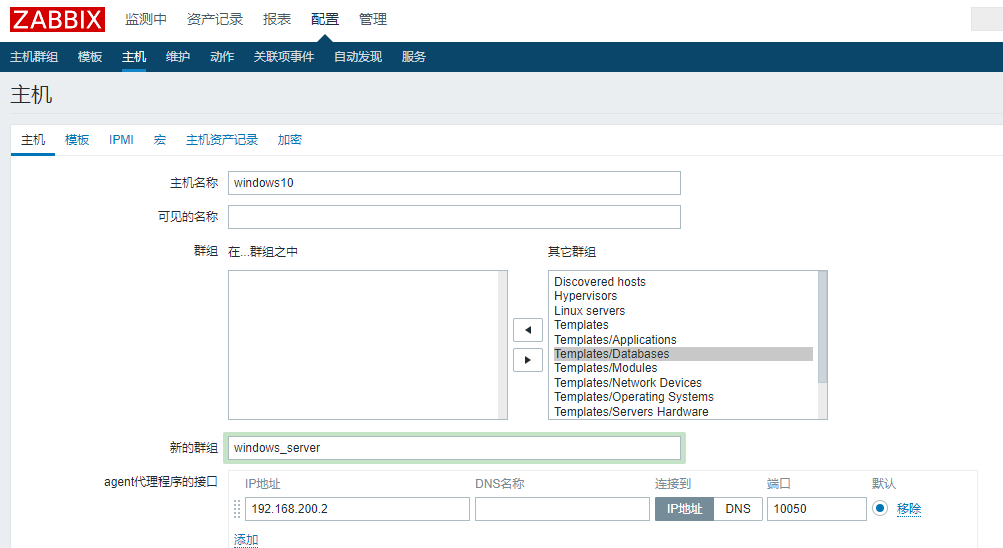
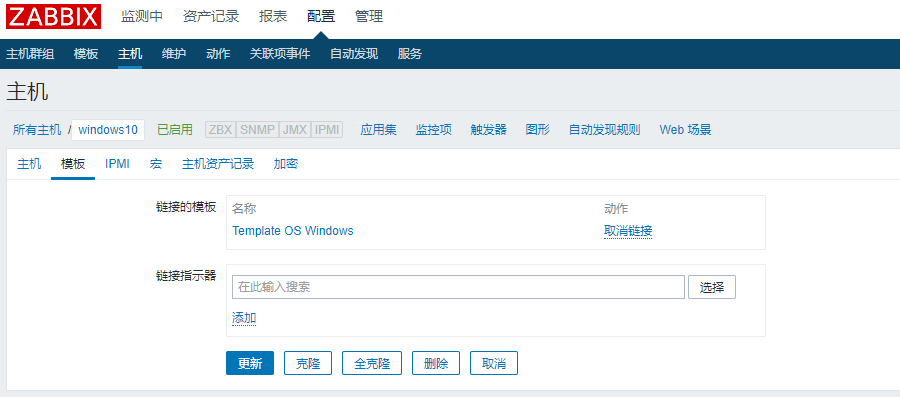
zabbix监控windows主机:
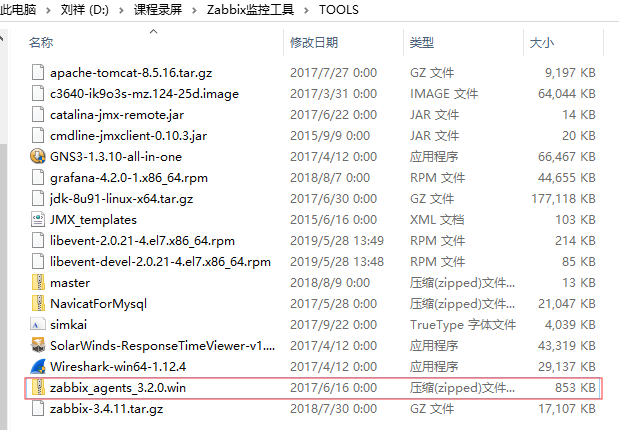
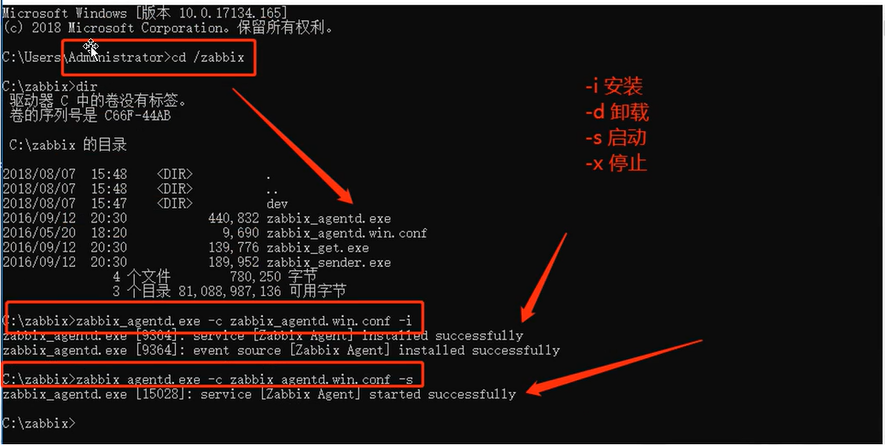
1:将这个压缩包里面的东西拷贝到C盘的根目录Zabbix下:

2:用记事本打开这个conf文件并修改如下三处内容:修改完成后保存


3:windows中启动zabbix:

zabbix中添加windows实时监控:
===============================================================================================================
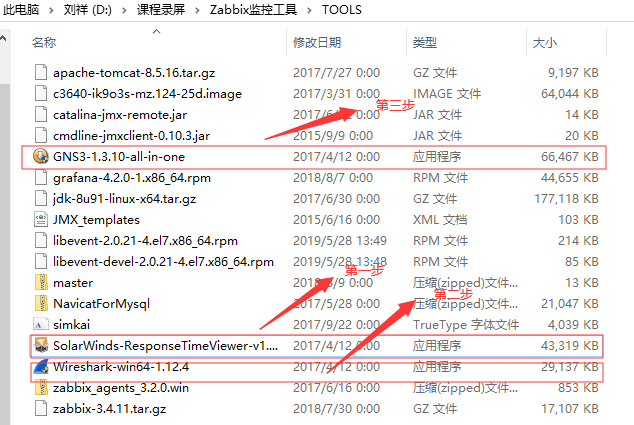
Zabbix监控硬件设备:如路由器等
GNS3是一款模拟的虚拟软件
==========================================================================================================
Zabbix监控linux主机
Linux-client操作(agent)
[root@agent ~]# hostname
agent.zabbix.com
[root@agent ~]# cat /etc/hostname
agent.zabbix.com
[root@agent ~]# cat /etc/hosts
127.0.0.1 localhost localhost.localdomain localhost4 localhost4.localdomain4
::1 localhost localhost.localdomain localhost6 localhost6.localdomain6
192.168.200.113 server.zabbix.com
192.168.200.114 agent.zabbix.com
192.168.200.2 windows10
[root@agent ~]# ping server.zabbix.com -c 4
[root@agent ~]# systemctl stop firewalld
[root@agent ~]# iptables -F
[root@agent ~]# setenforce 0
源码安装zabbix
[root@agent ~]# rz
[root@agent ~]# ls
anaconda-ks.cfg zabbix-3.4.11.tar.gz 公共 模板 视频 图片 文档 下载 音乐 桌面
[root@agent ~]# yum install gcc gcc-c++ libxml2-devel libcurl-devel pcre-devel ntpdate -y
[root@agent ~]# ntpdate sla.time.edu.cn #同步清华大学服务器时间
[root@agent ~]# tar xf zabbix-3.4.11.tar.gz -C /usr/src
[root@agent ~]# cd /usr/src/zabbix-3.4.11/
[root@agent zabbix-3.4.11]# ./configure --prefix=/usr/local/zabbix --enable-agent --with-net-snmp --with-libcurl --with-libxml2 && make -j2 && make install
--enable-agent 启用agent
[root@agent zabbix-3.4.11]# cp misc/init.d/tru64/zabbix_agentd /etc/init.d/ #复制启动脚本
[root@agent zabbix-3.4.11]# vim /etc/init.d/zabbix_agentd
24行修改路径为:DAEMON=/usr/local/zabbix/sbin/zabbix_agentd
[root@agent zabbix-3.4.11]# chmod +x /etc/init.d/zabbix_agentd
[root@agent zabbix-3.4.11]# cd
[root@agent ~]# useradd -M -s /sbin/nologin zabbix
[root@agent ~]# chown -R zabbix:zabbix /usr/local/zabbix/
[root@agent ~]# cd /usr/local/zabbix/
[root@agent zabbix]# mkdir logs/
[root@agent zabbix]# chown -R zabbix:zabbix logs/
[root@agent zabbix]# cp /usr/local/zabbix/etc/zabbix_agentd.conf{{,.bak}
修改主配置文件
[root@agent zabbix]# vim /usr/local/zabbix/etc/zabbix_agentd.conf
PidFile=/tmp/zabbix_agentd.pid
Server=192.168.200.113
ServerActive=192.168.200.113
Hostname=agent.zabbix.com
LogFile=/usr/local/zabbix/logs/zabbix_agentd.log
Include=/usr/local/zabbix/etc/zabbix_agentd.conf.d/*.conf
################################################################以上是配置路径类以下是自定义监控项
UnsafeUserParameters=1
UserParameter=mysql.version,mysql -V
UserParameter=mysql.status[*],/usr/local/zabbix/etc/chk_mysql.sh.$1
UserParameter=mysql.ping,mysqladmin -uroot -p123123 -P3306 -h192.168.200.114 ping | grep -c alive
[root@agent zabbix]# service zabbix_agentd start #启动服务
Zabbix agent started.
[root@agent zabbix]# netstat -anpt | grep 10050 #查看端口
tcp 0 0 0.0.0.0:10050 0.0.0.0:* LISTEN 18789/zabbix_agentd
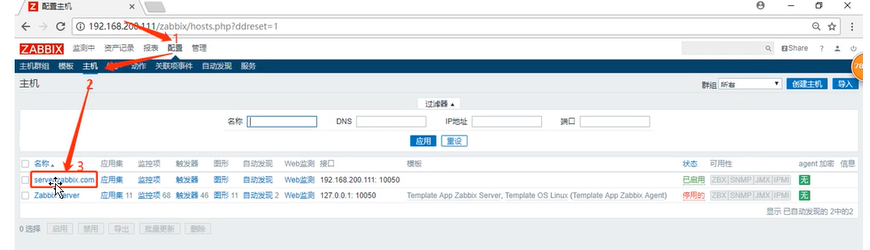
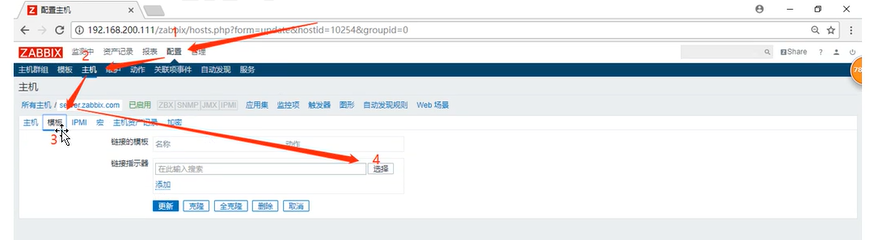
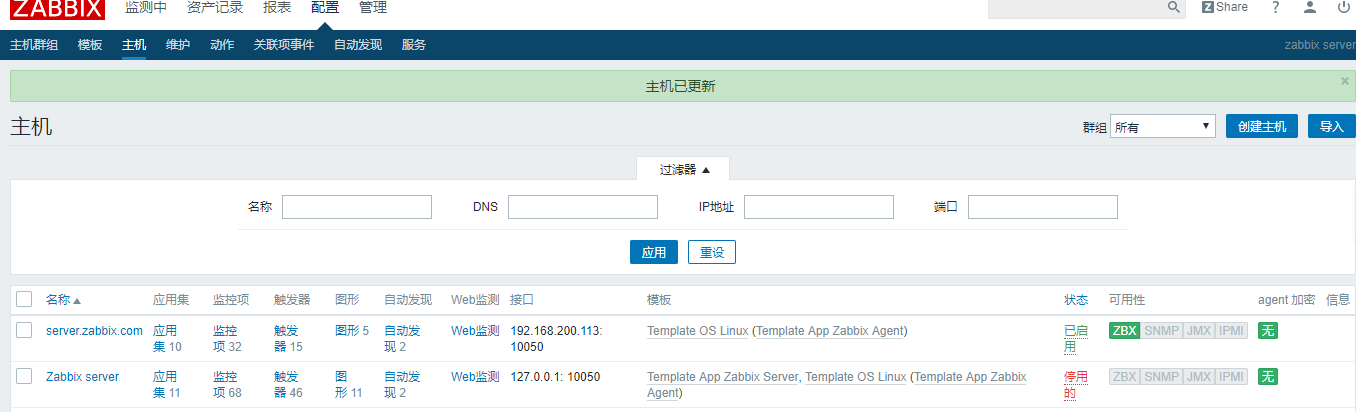
Zabbix添加linux主机:操作跟前面添加主机一样,是linux系统就linux组是windows就是windows组
![]()
==============================================================================================================
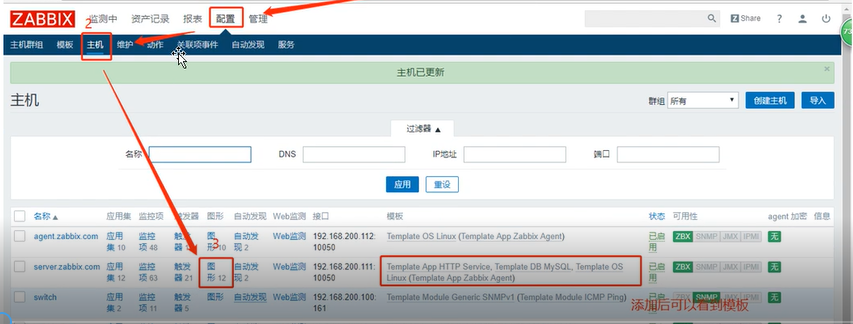
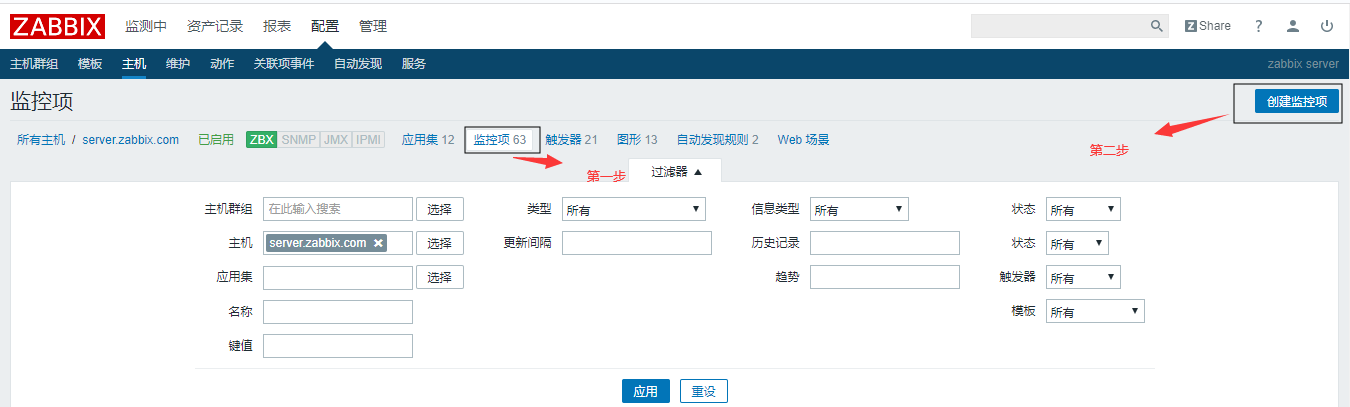
Zabbix-server监控mysql及httpd服务
zabbix监控mysql数据库,为server.zabbix.com添加服务模块
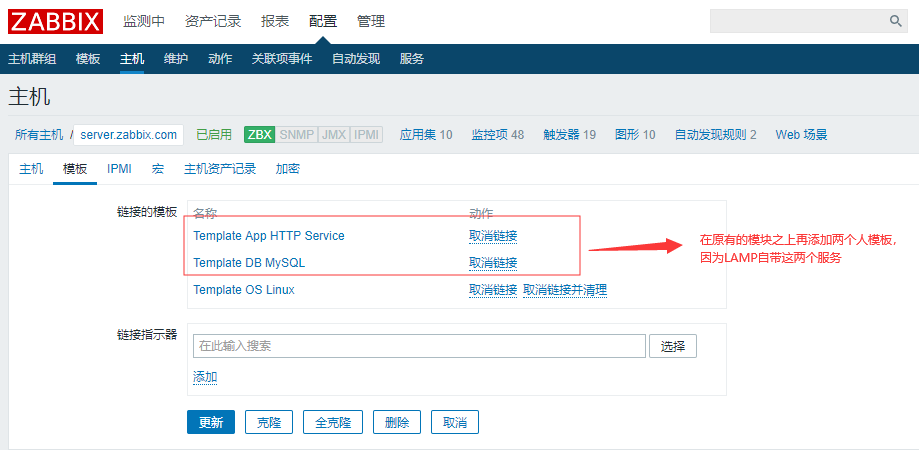
创建Mysql服务图形


server.zabbix.com服务器操作
既然要监控服务就要能够采集到数据,而采集也要有采集的方式,
[root@server ~]# cd /usr/local/zabbix/etc/
[root@server etc]# vim zabbix_agentd.conf
PidFile=/tmp/zabbix_agentd.pid
Server=127.0.0.1,192.168.200.113
ServerActive=192.168.200.113
Hostname=server.zabbix.com
LogFile=/usr/local/zabbix/logs/zabbix_agentd.log
Include=/usr/local/zabbix/etc/zabbix_agentd.conf.d/*.conf
##################################################################以下是自定义的内容

#允许所有字符的参数传递给用户定义的参数
UnsafeUserParameters=1 #自定义监控项开关,1表示开启,0表示关闭
#定义键mysql.version,以及值-----
UserParameter=mysql.version,mysql -V #红色部分可以是命令也可以是一条脚本,如差内存大小就直接编写free查内存的shell脚本
#定义键值mysql.ping,指定chk_mysql.sh的脚本使用此脚本检查Mysql的运行状态
UserParameter=mysql.status[*],/usr/local/zabbix/etc/chk_mysql.sh $1
#只用mysqladmin命令指定agent端连接用户密码ip地址,
UserParameter=mysql.ping,mysqladmin -uroot -p123123 -P3306 -h 192.168.200.113 ping | grep -c alive
编辑chk_mysql.sh的脚本
[root@server etc]# pwd
/usr/local/zabbix/etc
[root@server etc]# vim /usr/local/zabbix/etc/chk_mysql.sh
#!/bin/bash
#FileName: check_mysql.sh
# 用户名
MYSQL_USER='root'
# 密码
MYSQL_PWD='123123'
# 主机地址/IP
MYSQL_HOST='192.168.200.113'
# 端口
MYSQL_PORT='3306'
# 数据连接
MYSQL_CONN="/usr/bin/mysqladmin -u${MYSQL_USER} -p${MYSQL_PWD} -h${MYSQL_HOST} -P${MYSQL_PORT}"
# 参数是否正确
if [ $# -ne "1" ];then
echo "arg error!"
fi
# 获取数据
case $1 in
Uptime)
result=`${MYSQL_CONN} status|cut -f2 -d":"|cut -f1 -d"T"`
echo $result
;;
Com_update)
result=`${MYSQL_CONN} extended-status |grep -w "Com_update"|cut -d"|" -f3`
echo $result
;;
Slow_queries)
result=`${MYSQL_CONN} status |cut -f5 -d":"|cut -f1 -d"O"`
echo $result
;;
Com_select)
result=`${MYSQL_CONN} extended-status |grep -w "Com_select"|cut -d"|" -f3`
echo $result
;;
Com_rollback)
result=`${MYSQL_CONN} extended-status |grep -w "Com_rollback"|cut -d"|" -f3`
echo $result
;;
Questions)
result=`${MYSQL_CONN} status|cut -f4 -d":"|cut -f1 -d"S"`
echo $result
;;
Com_insert)
result=`${MYSQL_CONN} extended-status |grep -w "Com_insert"|cut -d"|" -f3`
echo $result
;;
Com_delete)
result=`${MYSQL_CONN} extended-status |grep -w "Com_delete"|cut -d"|" -f3`
echo $result
;;
Com_commit)
result=`${MYSQL_CONN} extended-status |grep -w "Com_commit"|cut -d"|" -f3`
echo $result
;;
Bytes_sent)
result=`${MYSQL_CONN} extended-status |grep -w "Bytes_sent" |cut -d"|" -f3`
echo $result
;;
Bytes_received)
result=`${MYSQL_CONN} extended-status |grep -w "Bytes_received" |cut -d"|" -f3`
echo $result
;;
Com_begin)
result=`${MYSQL_CONN} extended-status |grep -w "Com_begin"|cut -d"|" -f3`
echo $result
;;
*)
echo "Usage:$0(Uptime|Com_update|Slow_queries|Com_select|Com_rollback|Questions|Com_insert|Com_delete|Com_commit|Bytes_sent|Bytes_received|Com_begin)"
;;
esac
[root@server etc]# chmod 777 chk_mysql.sh
[root@server etc]# mysql -u root -p123123
MariaDB [(none)]> grant all on *.* to 'root'@'server.zabbix.com' identified by '123123';
Query OK, 0 rows affected (0.00 sec)
MariaDB [(none)]> flush privileges;
Query OK, 0 rows affected (0.00 sec)
MariaDB [(none)]> exit
Bye
每次先杀进程再起服务保证配置的更新
[root@server etc]# killall -9 zabbix_agentd
[root@server etc]# killall -9 zabbix_server
[root@server etc]# /usr/local/zabbix/sbin/zabbix_agentd
[root@server etc]# /usr/local/zabbix/sbin/zabbix_server
[root@server etc]# netstat -anpt | grep 10050
[root@server etc]# netstat -anpt | grep 10051
server.zabbix.com的测试
[root@server etc]# zabbix_get -s 192.168.200.113 -k mysql.ping
1 #出现数字表示抓取成功
[root@server etc]# zabbix_get -s 192.168.200.113 -k mysql.status[Com_update]
3411 #抓取update的值
查看zabbix效果

=====================================================================================================
Zabbix监控apache
[root@server etc]# vim /usr/local/zabbix/etc/chk_httpd.sh
#!/bin/bash

netstat -anpt | grep 80 &>/dev/null
if [ $? -eq '0' ];then
echo "1"
else
echo "0"
fi
[root@server etc]# chmod 777 chk_httpd.sh
[root@server etc]# ./chk_httpd.sh #运行httpd脚本查看113主机的httpd服务是否活着
1
[root@server etc]# vim zabbix_agentd.conf
PidFile=/tmp/zabbix_agentd.pid
Server=127.0.0.1,192.168.200.113
ServerActive=192.168.200.113
Hostname=server.zabbix.com
LogFile=/usr/local/zabbix/logs/zabbix_agentd.log
Include=/usr/local/zabbix/etc/zabbix_agentd.conf.d/*.conf
##################################################################以下是自定义的内容
UnsafeUserParameters=1
UserParameter=mysql.version,mysql -V
UserParameter=mysql.status[*],/usr/local/zabbix/etc/chk_mysql.sh $1
UserParameter=mysql.ping,mysqladmin -uroot -p123123 -P3306 -h 192.168.200.113 ping | grep -c alive
UserParameter=httpd.status[*],/usr/local/zabbix/etc/chk_httpd.sh $1      #将httpd的脚本放入自定义下后期有脚本都可以这样放进来
[root@server etc]# killall -9 zabbix_agentd
[root@server etc]# killall -9 zabbix_server
[root@server etc]# zabbix_agentd
[root@server etc]# zabbix_server
[root@server etc]# zabbix_get -s 192.168.200.113 -k httpd.status #获取httpd.status监控项
(Not all processes could be identified, non-owned process info
will not be shown, you would have to be root to see it all.) #红色部分是因为zabbix没法调用netstat
1
解决zabbbix没法调用netstat的解决方法
[root@server etc]# which netstat
/usr/bin/netstat
[root@server etc]# chmod u+s /usr/bin/netstat
[root@server etc]# zabbix_get -s 192.168.200.113 -k httpd.status #再次获取httpd.status监控项
1


======================================================================================-==========================
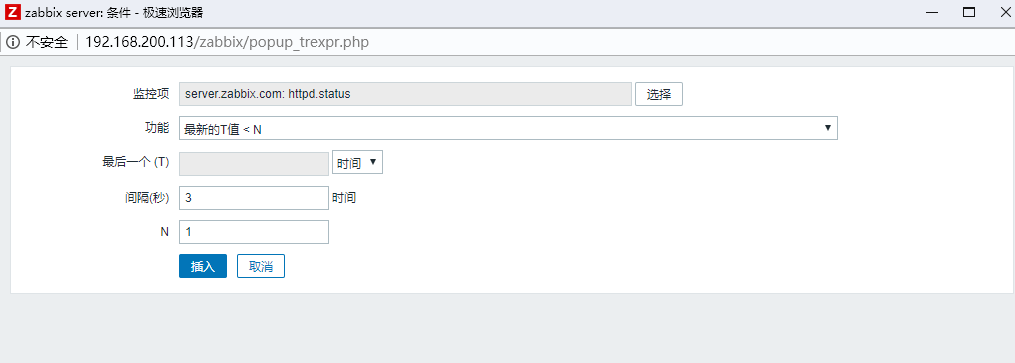
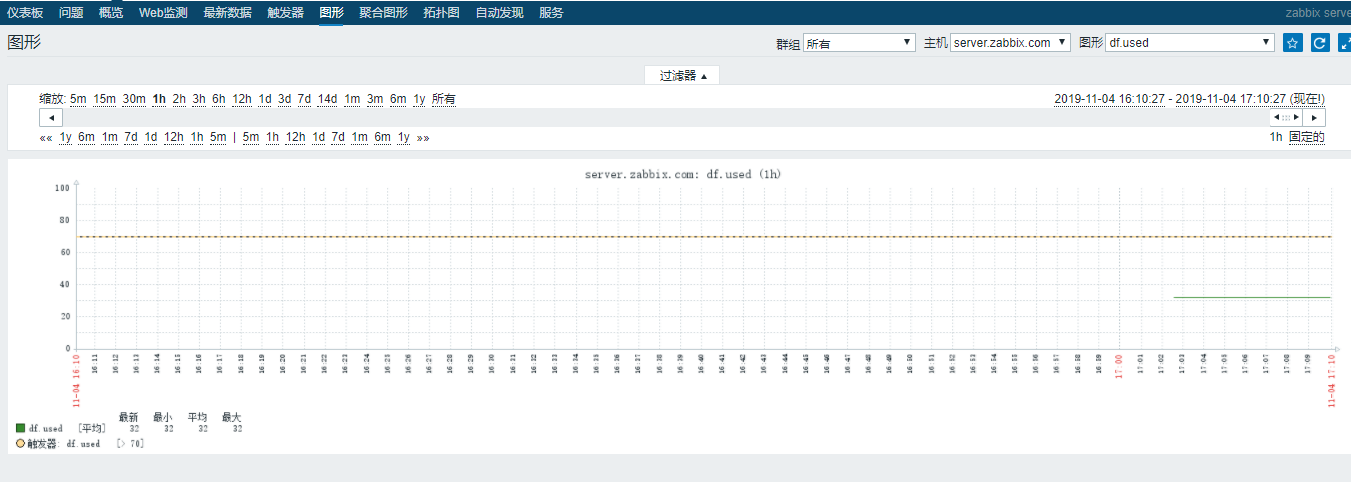
监控练习:监控根的只用率并优化图形介质
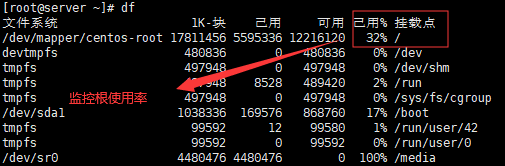
[root@server etc]# df | awk -F '[ %]+' 'NR==2{print $(NF-1)}'
32
[root@server etc]# vim zabbix_agentd.conf
......
........
UserParameter=df.used,df | awk -F '[ %]+' 'NR==2{print $(NF-1)}'
[root@server etc]# killall -9 zabbix_agentd
[root@server etc]# zabbix_agentd
[root@server etc]# zabbix_get -s 192.168.200.113 -k df.used #获取监控项的值
32


=====================================================================================================
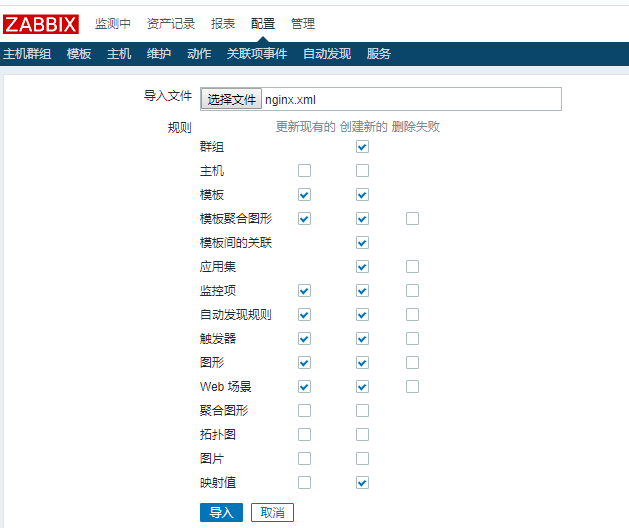
Zabbix监控Nginx
[root@agent ~]# systemctl stop firewalld
[root@agent ~]# iptables -F
[root@agent ~]# setenforce 0
[root@agent ~]# ls
anaconda-ks.cfg zabbix-3.4.11.tar.gz 公共 模板 视频 图片 文档 下载 音乐 桌面
[root@agent ~]# rz
[root@agent ~]# rpm -ivh nginx-1.15.9-1.x86_64.rpm -C /usr/src
rpm: -C: 未知的选项
[root@agent ~]# rpm -ivh nginx-1.15.9-1.x86_64.rpm
准备中... ################################# [100%]
正在升级/安装...
1:nginx-1.15.9-1 ################################# [100%]
[root@agent conf]# nginx -V
nginx version: nginx/1.15.9
built by gcc 4.8.5 20150623 (Red Hat 4.8.5-28) (GCC)
built with OpenSSL 1.0.2k-fips 26 Jan 2017
TLS SNI support enabled
configure arguments: --prefix=/usr/local/nginx --user=nginx --group=nginx --with-http_stub_status_module --with-http_ssl_module --with-http_flv_module
--with-http_gzip_static_module
[root@agent ~]# cd /usr/local/nginx/conf/
[root@agent conf]# vim nginx.conf
location /status {
        stub_status on;
        access_log off;

}
[root@agent conf]# killall -HUP nginx
[root@agent conf]# netstat -anpt | grep 80
tcp 0 0 0.0.0.0:80 0.0.0.0:* LISTEN 7915/nginx: master
[root@agent zabbix]# cat nginx_chk.sh
#!/bin/bash
###########################
#zabbix monitoring script
#
# nginx:
# - anything available via nginx stub-status module
#
##################################
# Contact:
# vincent.viallet@gmail.com
# Zabbix requested parameter
ZBX_REQ_DATA="$1"
ZBX_REQ_DATA_URL="$2"
# Nginx defaults
NGINX_STATUS_DEFAULT_URL="192.168.200.114/status" #(这里写网站的域名)
WGET_BIN="/usr/bin/wget"

#
# Error handling:
# - need to be displayable in Zabbix (avoid NOT_SUPPORTED)
# - items need to be of type "float" (allow negative + float)
#
ERROR_NO_ACCESS_FILE="-0.9900"
ERROR_NO_ACCESS="-0.9901"
ERROR_WRONG_PARAM="-0.9902"
ERROR_DATA="-0.9903" # either can not connect / bad host / bad port
# Handle host and port if non-default
if [ ! -z "$ZBX_REQ_DATA_URL" ]; then
URL="$ZBX_REQ_DATA_URL"
else
URL="$NGINX_STATUS_DEFAULT_URL"
fi
# save the nginx stats in a variable for future parsing
NGINX_STATS=$($WGET_BIN -q $URL -O - 2> /dev/null)
# error during retrieve
if [ $? -ne 0 -o -z "$NGINX_STATS" ]; then
echo $ERROR_DATA
exit 1
fi
#
# Extract data from nginx stats
#
case $ZBX_REQ_DATA in
active_connections) echo "$NGINX_STATS" | head -1 | cut -f3 -d' ';;
accepted_connections) echo "$NGINX_STATS" | grep -Ev '[a-zA-Z]' | cut -f2 -d' ';;
handled_connections) echo "$NGINX_STATS" | grep -Ev '[a-zA-Z]' | cut -f3 -d' ';;
handled_requests) echo "$NGINX_STATS" | grep -Ev '[a-zA-Z]' | cut -f4 -d' ';;
reading) echo "$NGINX_STATS" | tail -1 | cut -f2 -d' ';;
writing) echo "$NGINX_STATS" | tail -1 | cut -f4 -d' ';;
waiting) echo "$NGINX_STATS" | tail -1 | cut -f6 -d' ';;
*) echo $ERROR_WRONG_PARAM; exit 1;;
esac
exit 0
[root@agent zabbix]# chmod +x nginx_chk.sh
[root@agent etc]# cat zabbix_agentd.conf
UserParameter=nginx[*],/usr/local/zabbix/nginx_chk.sh "$1"
[root@agent etc]# /usr/local/zabbix/sbin/zabbix_agentd
[root@agent etc]# netstat -anpt | grep 10050
tcp 0 0 0.0.0.0:10050 0.0.0.0:* LISTEN 9742/zabbix_agentd
server端抓取数据
[root@server etc]# /usr/local/zabbix/bin/zabbix_get -s 192.168.200.114 -p 10050 -k "nginx[reading]"
0
Web Zabbix端添加主机
启用前自动发现的规则及动作


=======================================================================================================
Zabbix监控FTP服务
[root@agent ~]# yum install vsftpd -y
[root@agent ~]# systemctl start vsftpd
[root@agent ~]# systemctl enable vsftpd


======================================================================================================
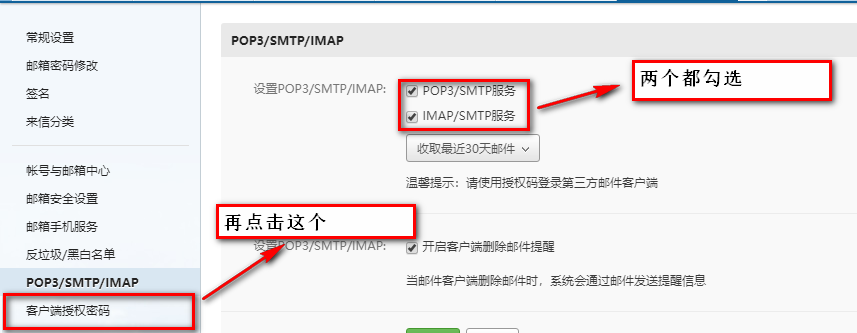
邮件报警:登录www.163.com网易邮箱


服务端server操作:
[root@server ~]# yum install mailx dos2unix -y
[root@server ~]# mailx -V
12.5 7/5/10
[root@server ~]# cp /etc/mail.rc /etc/mail.rc.bak
[root@server ~]# vim /etc/mail.rc
在末尾添加如下命令
set from=l18370248736@163.com smtp=smtp.163.com #从哪儿发的,smtp是服务器
set smtp-auth-user=l18370248736@163.com smtp-auth-password="lcx123123" #授权的用户名 ,授权的授权码是lcx123123
set smtp-auth=login #登录
发送测试内容:
[root@server ~]# echo "test mail 111" | mail -s "tm" l18370248736@163.com #前面是内容,后面是邮箱地址

编辑zabbix_server.conf引用脚本
[root@server ~]# vim /usr/local/zabbix/etc/zabbix_server.conf
LogFile=/usr/local/zabbix/logs/zabbix_server.log
PidFile=/tmp/zabbix_server.pid
DBHost=192.168.200.113
DBName=zabbix
DBUser=zabbix
DBPassword=zabbix
DBSocket=/var/lib/mysql.sock
Include=/usr/local/zabbix/etc/zabbix_server.conf.d/*.conf
AlertScriptsPath=/usr/local/zabbix/share/zabbix/alertscripts                 #这条是邮箱报警加的,意思是电脑自动从这个路径寻找脚本
[root@server ~]# cd /usr/local/zabbix/share/zabbix/alertscripts/
[root@server alertscripts]# vim mail.sh
#!/bin/bash

#export.UTF-8

bt=$2

sjr=$1

FILE=/tmp/mailtmp.txt

echo "$3" >$FILE              #$3是邮件内容,将内容重定向到/tmp/mailtmp.txt中

/usr/bin/dos2unix -k $FILE            #使用/usr/bin/dos2unix将邮件进行转换,因为邮件可能有中文

/bin/mail -s "$bt" "$sjr" <$FILE           #$bt是标题,$sjr是收件人,最后重定向输入内容
[root@server alertscripts]# chmod 777 mail.sh
[root@server alertscripts]# chown zabbix:zabbix mail.sh
[root@server alertscripts]# touch /tmp/mailtmp.txt
[root@server alertscripts]# chmod 777 /tmp/mailtmp.txt
[root@server alertscripts]# chown zabbix:zabbix /tmp/mailtmp.txt
脚本测试:
[root@server alertscripts]# ./mail.sh l18370248736@163.com "test mail2" "test mail from server.zabbix.com test2"
dos2unix: converting file /tmp/mailtmp.txt to Unix format ...

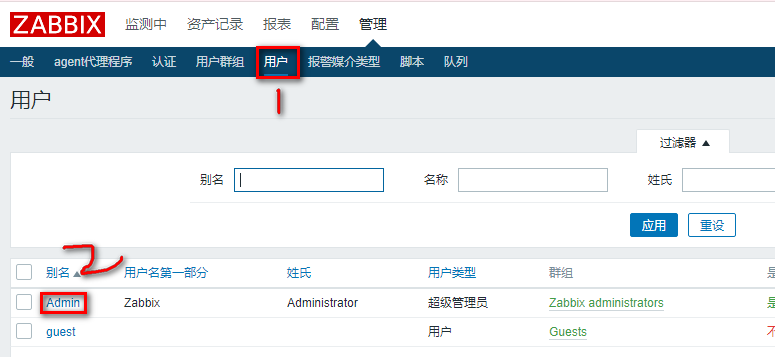
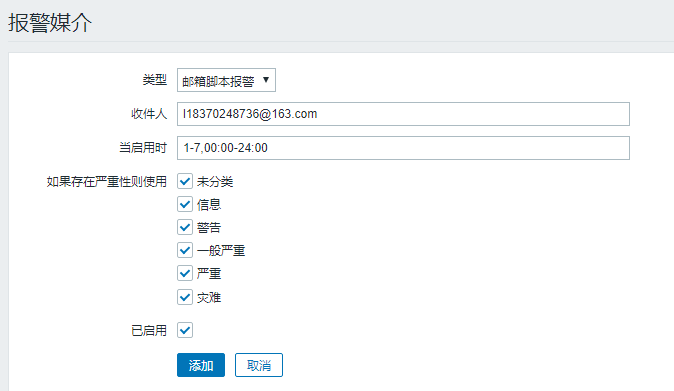
zabbix监控邮箱报警思路:
监控--创建报警媒介类型--更新用户的报警媒介类型--创建动作(根据触发器触发)--验证


操作、恢复操作、确认操作中的信息内容为:
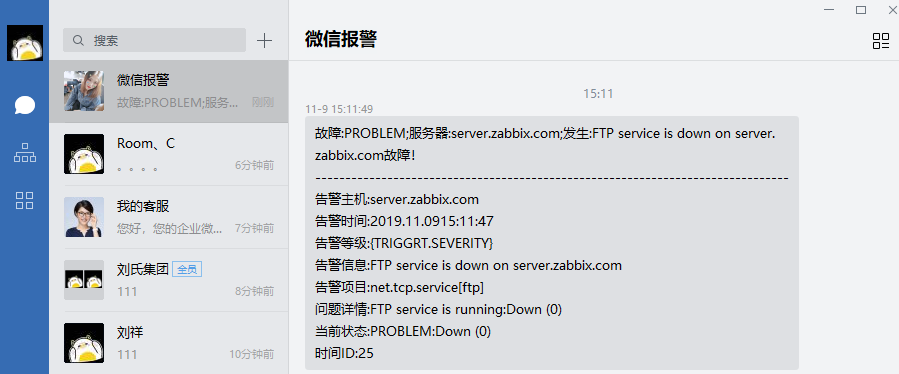
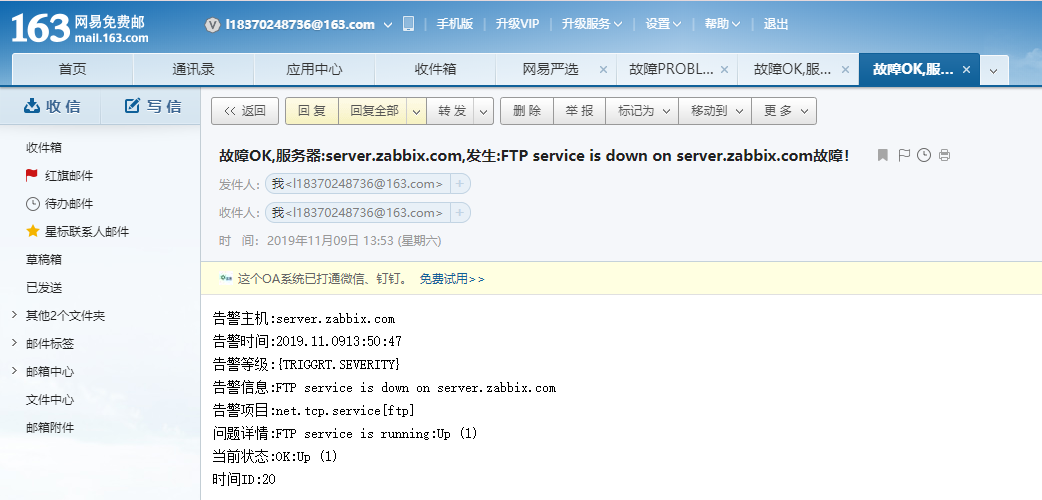
故障:{TRIGGER.STATUS};服务器:{HOSTNAME1};发生:{TRIGGER.NAME}故障!


告警主机:{HOSTNAME1}
告警时间:{EVENT.DATE}{EVENT.TIME}
告警等级:{TRIGGRT.SEVERITY}
告警信息:{TRIGGER.NAME}
告警项目:{TRIGGER.KEY1}
问题详情:{ITEM.NAME}:{ITEM.VALUE}
当前状态:{TRIGGER.STATUS}:{ITEM.VALUE1}
时间ID:{EVENT.ID}


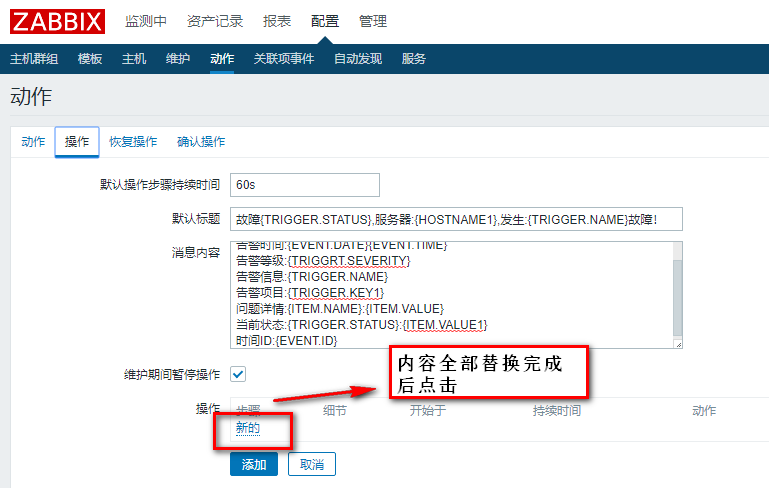

后面的恢复操作、和确认操作与上面操作一致都执行这四个步骤,最后回到动作添加
模拟邮件报警:关闭FTP服务
[root@server ~]# systemctl stop vsftpd.service
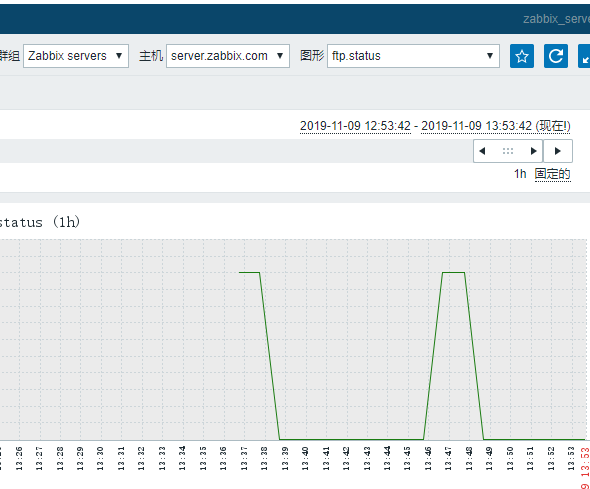

FTP故障修复:
[root@server ~]# systemctl start vsftpd.service
========================================================================================
Zabbix企业微信报警:企业微信域名地址:https://qy.weixin.qq.com/


并且下载电脑端企业微信:
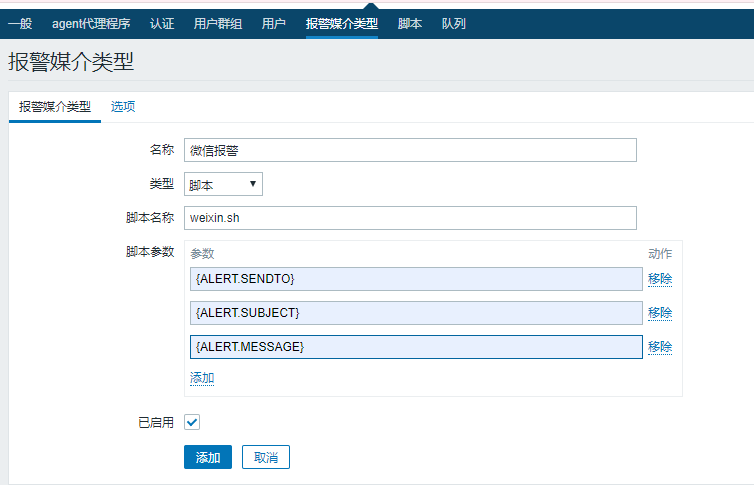
Server服务端配置:编写微信报警配置脚本
[root@server ~]# cd /usr/local/zabbix/share/zabbix/alertscripts/
[root@server alertscripts]# ls
mail.sh
[root@server alertscripts]# vim weixin.sh
#!/bin/bash
corpid='ww243019ef0f34fd80' #企业ID号
corpsecret='FHpT2sxv93s6Ukraf3sPHY_7q0Of4eetPXvoP3N9CcE' #企业secret号
agentid='1000002'
user="$1"
title="$2"
content="$3"
token=$(curl -s https://qyapi.weixin.qq.com/cgi-bin/gettoken?corpid=$corpid&corpsecret=$corpsecret |sed -nr 's#.*token":"(.*)","e.*#1#p')
post=$(curl -s https://qyapi.weixin.qq.com/cgi-bin/message/send?access_token=$token -d "{
"touser": "$user",
"msgtype": "text",
"agentid": $agentid,
"text": {
"content": "$title
-------------------------------------------------------------------------------
$content"
},
"safe":"0"

}")
if [ $post = '{"errcode":0,"errmsg":"ok","invaliduser":""}' ]
then
echo "提交成功!"
else
[root@server alertscripts]# chmod +x weixin.sh
[root@server alertscripts]# chown -R zabbix:zabbix weixin.sh
[root@server alertscripts]# killall -9 zabbix_server
[root@server alertscripts]# /usr/local/zabbix/sbin/zabbix_server
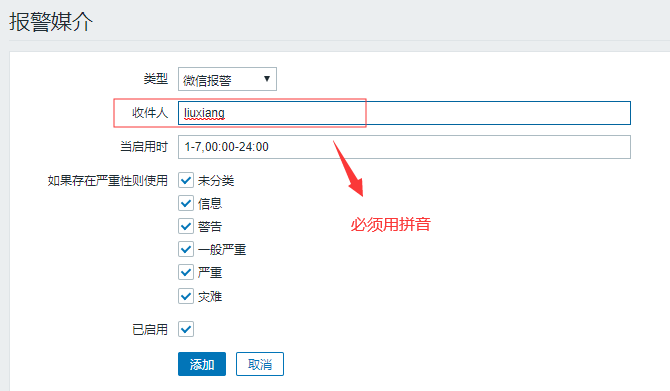

后面的操作,恢复操作,确认操作与上面的邮件报警动作一致,添加完成后,如下所示

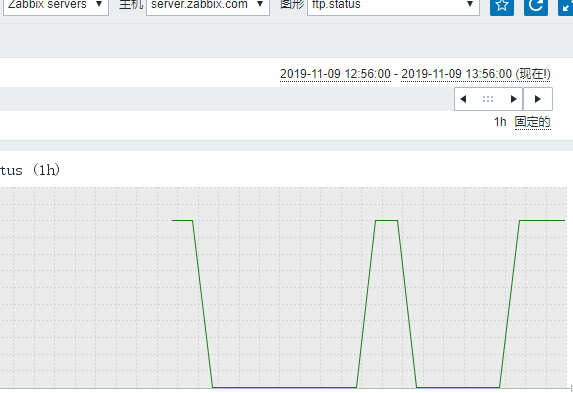
模拟微信报警故障:关闭FTP服务
[root@server ~]# systemctl stop vsftpd.service