playbooks配置文件:

[root@ansible ~]# vim /etc/ansible/hosts

[test01]
192.168.200.114

[test02]
192.168.200.115
[root@ansible ~]# vim /etc/ansible/test.yaml


---
- hosts: test01                          #要操作的主机
  remote_user: root                      #登入的用户
  tasks:                                 #tasks表示任务
    - name: adduser                      #任务名
      user: name=user2 state=present      #创建一个用户
      tags:                              #设置一个标签
        - testaaa
    - name: addgroup
      group: name=root system=yes
      tags:
        - testbbb
- hosts: test02
  remote_user: root
  tasks:
    - name: xxx
      copy: src=/etc/passwd dest=/home
      tags:
        - testccc
...
用法:
playbook文件定义的任务需要通过nasible-playbook命令调用并执行,ansible-playbook命令用法如下:
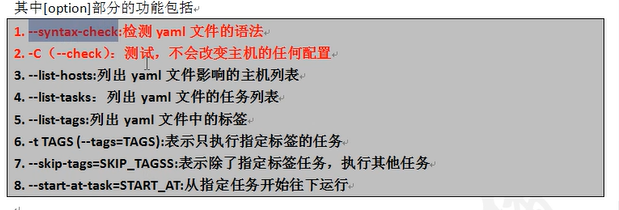
用法:ansible-playbook[option]/PATH/TO/PLAYBOOK.yaml
实验案例:
1:语法检查:
[root@ansible ~]# ansible-playbook --syntax-check /etc/ansible/test.yml

playbook: /etc/ansible/test.yml
2:预测试:
[root@ansible ~]# ansible-playbook -C /etc/ansible/test.yml

PLAY [test01] ***************************************************************************************************************************

TASK [Gathering Facts] ******************************************************************************************************************
ok: [192.168.200.114]

TASK [adduser] **************************************************************************************************************************
changed: [192.168.200.114]

TASK [addgroup] *************************************************************************************************************************
ok: [192.168.200.114]

PLAY [test02] ***************************************************************************************************************************

TASK [Gathering Facts] ******************************************************************************************************************
ok: [192.168.200.115]

TASK [xxx] ******************************************************************************************************************************
changed: [192.168.200.115]

PLAY RECAP ******************************************************************************************************************************
192.168.200.114            : ok=3    changed=1    unreachable=0    failed=0
192.168.200.115            : ok=2    changed=1    unreachable=0    failed=0
3:列出主机:
[root@ansible ~]# ansible-playbook --list-hosts /etc/ansible/test.yml

playbook: /etc/ansible/test.yml

  play #1 (test01): test01    TAGS: []
    pattern: [u'test01']
    hosts (1):
      192.168.200.114

  play #2 (test02): test02    TAGS: []
    pattern: [u'test02']
    hosts (1):
      192.168.200.115
4:列出任务:
[root@ansible ~]# ansible-playbook --list-tasks /etc/ansible/test.yml

playbook: /etc/ansible/test.yml

  play #1 (test01): test01    TAGS: []
    tasks:
      adduser    TAGS: [testaaa]
      addgroup    TAGS: [testbbb]

  play #2 (test02): test02    TAGS: []
    tasks:
      xxx    TAGS: [testccc]
5:列出标签:
[root@ansible ~]# ansible-playbook --list-tags /etc/ansible/test.yml

playbook: /etc/ansible/test.yml

  play #1 (test01): test01    TAGS: []
      TASK TAGS: [testaaa, testbbb]

  play #2 (test02): test02    TAGS: []
      TASK TAGS: [testccc]
6:执行任务:
[root@ansible ~]# ansible-playbook /etc/ansible/test.yml

PLAY [test01] ***************************************************************************************************************************

TASK [Gathering Facts] ******************************************************************************************************************
ok: [192.168.200.114]

TASK [adduser] **************************************************************************************************************************
ok: [192.168.200.114]

TASK [addgroup] *************************************************************************************************************************
ok: [192.168.200.114]

PLAY [test02] ***************************************************************************************************************************

TASK [Gathering Facts] ******************************************************************************************************************
ok: [192.168.200.115]

TASK [xxx] ******************************************************************************************************************************
ok: [192.168.200.115]

PLAY RECAP ******************************************************************************************************************************
192.168.200.114            : ok=3    changed=0    unreachable=0    failed=0
192.168.200.115            : ok=2    changed=0    unreachable=0    failed=0
7:测试查看:
[root@ansible ~]# ansible test01 -m shell -a "tail -l /etc/passwd"
192.168.200.114 | SUCCESS | rc=0 >>
user2:x:1001:1001::/home/user2:/bin/bash
[root@ansible ~]# ansible test02 -m command -a "ls -l /home"
192.168.200.115 | SUCCESS | rc=0 >>
总用量 4
drwx------. 3 crushlinx crushlinx 78 10月 28 09:53 crushlinx
-rw-r--r--. 1 root root 2304 10月 28 16:57 passwd
drwx------. 3 room room 78 4月 11 2018 room
8:执行输出:
我们在用playbook进行ansible模块操作的时候,并没有命令的执行结果输出,默认被隐藏了,可以通过refister模块追加命令输出的结果
[root@ansible ~]# vim /etc/ansible/test.yaml

---
- hosts: test01
  remote_user: root
  tasks:
    - name: adduser
      user: name=user2 state=present
      register: print_result
      tags:
        - testaaa
    - debug: var=print_result
    - name: addgroup
      group: name=root system=yes
      tags:
        - testbbb

    - debug: var=print_result
- hosts: test02
  remote_user: root
  tasks:
    - name: xxx
      copy: src=/etc/passwd dest=/home
      tags:
        - testccc
...
[root@ansible ~]# ansible-playbook /etc/ansible/test.yaml

PLAY [test01] ***************************************************************************************************************************

TASK [Gathering Facts] ******************************************************************************************************************
ok: [192.168.200.114]

TASK [adduser] **************************************************************************************************************************
ok: [192.168.200.114]

TASK [debug] ****************************************************************************************************************************
ok: [192.168.200.114] => {
    "print_result": {
        "append": false,
        "changed": false,
        "comment": "",
        "failed": false,
        "group": 1001,
        "home": "/home/user2",
        "move_home": false,
        "name": "user2",
        "shell": "/bin/bash",
        "state": "present",
        "uid": 1001
    }
}

TASK [addgroup] *************************************************************************************************************************
ok: [192.168.200.114]

TASK [debug] ****************************************************************************************************************************
ok: [192.168.200.114] => {
    "print_result": {
        "append": false,
        "changed": false,
        "comment": "",
        "failed": false,
        "group": 1001,
        "home": "/home/user2",
        "move_home": false,
        "name": "user2",
        "shell": "/bin/bash",
        "state": "present",
        "uid": 1001
    }
}

PLAY [test02] ***************************************************************************************************************************

TASK [Gathering Facts] ******************************************************************************************************************
ok: [192.168.200.115]

TASK [xxx] ******************************************************************************************************************************
ok: [192.168.200.115]

PLAY RECAP ******************************************************************************************************************************
192.168.200.114            : ok=5    changed=0    unreachable=0    failed=0
192.168.200.115            : ok=2    changed=0    unreachable=0    failed=0
client机安装httpd
[root@client2 ~]# yum install httpd httpd-server -y
[root@client2 httpd]# service httpd start
[root@client1 ~]# yum install httpd httpd-server -y
[root@client1 httpd]# service httpd start
2:触发器:

hanglers触发器的使用示例如下:
[root@ansible ~]# ansible test01 -m shell -a 'netstat -anpt | grep :80'
192.168.200.114 | SUCCESS | rc=0 >>
tcp        0      0 0.0.0.0:80              0.0.0.0:*               LISTEN      104590/nginx: maste
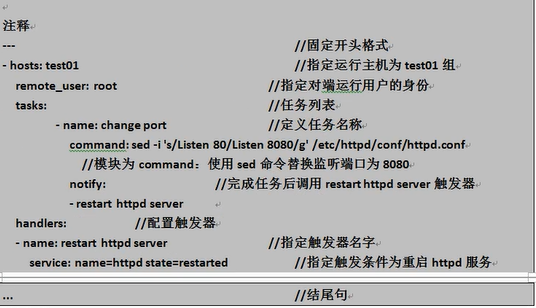
[root@ansible ~]# vim /etc/ansible/httpd.yaml


---
- hosts: crushlinux
  remote_user: root
  tasks:
    - name: change port
      command: sed -i 's/Listen 80/Listen 8080/g' /etc/httpd/conf/httpd.conf
      notify:
        - restart httpd server
  handlers:
    - name: restart httpd server
      service: name=httpd state=restarted
...
测试语法:
[root@ansible ~]# ansible-playbook -C /etc/ansible/httpd.yaml

PLAY [crushlinux] ***********************************************************************************************************************

TASK [Gathering Facts] ******************************************************************************************************************
ok: [192.168.200.115]
ok: [192.168.200.114]

TASK [change port] **********************************************************************************************************************
skipping: [192.168.200.115]
skipping: [192.168.200.114]

PLAY RECAP ******************************************************************************************************************************
192.168.200.114            : ok=1    changed=0    unreachable=0    failed=0
192.168.200.115            : ok=1    changed=0    unreachable=0    failed=0
查看配置文件内容并执行:
[root@ansible ~]# ansible "test01" -m shell -a 'grep ^Listen /etc/httpd/conf/httpd.conf'
192.168.200.114 | SUCCESS | rc=0 >>
Listen 80
[root@ansible ~]# ansible-playbook /etc/ansible/httpd.yaml
PLAY [crushlinux] ***********************************************************************************************************************
TASK [Gathering Facts] ******************************************************************************************************************
ok: [192.168.200.115]
ok: [192.168.200.114]
TASK [change port] **********************************************************************************************************************
[WARNING]: Consider using template or lineinfile module rather than running sed
可以忽略或使用模板lineinfile模块而不是运行sed
changed: [192.168.200.115]
changed: [192.168.200.114]
RUNNING HANDLER [restart httpd server] **************************************************************************************************
changed: [192.168.200.115]
changed: [192.168.200.114]
PLAY RECAP ******************************************************************************************************************************
192.168.200.114 : ok=3 changed=2 unreachable=0 failed=0
192.168.200.115 : ok=3 changed=2 unreachable=0 failed=0
查看结果:
[root@ansible ~]# ansible test01 -m shell -a 'netstat -anpt | grep httpd'
192.168.200.114 | SUCCESS | rc=0 >>
tcp6 0 0 :::8080 :::* LISTEN 9209/httpd
[root@ansible ~]# ansible crushlinux -m shell -a 'netstat -anpt | grep httpd'
192.168.200.114 | SUCCESS | rc=0 >>
tcp6 0 0 :::8080 :::* LISTEN 9209/httpd
192.168.200.115 | SUCCESS | rc=0 >>
tcp6 0 0 :::8080 :::* LISTEN 12029/httpd
基于Ansible playbook配置zabbix agent端:zabbix是一种监控器,用于监控client端
[root@ansible ~]# vim zabbix-agent.sh


#!/bin/bash
NH=$(hostname)
if [ ! -f /etc/yum.repos.d/zabbix.repo ]
then
    rpm -Uvh
http://repo.zabbix.com/zabbix/3.2/rhel/7/x86_64/zabbix-release-3.2-1.el7.noarch.rpm
fi
rpm -q zabbix-agent &>/dev/null
[ $? -ne 0 ] && yum -y -q install zabbix-agent
cp /etc/zabbix/zabbix_agentd.conf{,-$(date +%F%T)}
sed -i 's/Server=127.0.0.1/Server=192.168.200.113/g' /etc/zabbix/zabbix_agentd.conf
sed -i 's/ServerActive=127.0.0.1/ServerActive=192.168.200.113/g'
/etc/zabbix//zabbix_agentd.conf
sed -i 's/Hostname=Zabbix server/Hostname=$HN/g' /etc/zabbix/zabbix_agentd.conf
systemctl | restart zabbix-agent
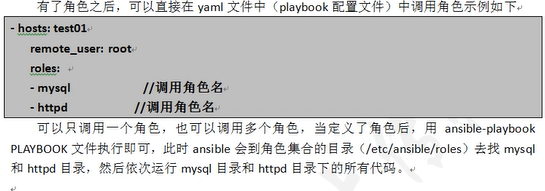
3:角色

实验案例:
通过一个实验配置数据库角色,要求被管理端主机自动安装Mariadb,安装后上传提前装备好的配置文件到远端主机,重启服务,然后新建testdb数据库,并允许test用户对其拥有所有权限:
1:被管理端配置yum源:
[root@client2 ~]# cd /etc/yum.repos.d/
[root@client2 yum.repos.d]# ls
a  epel.repo  epel-testing.repo  local.repo
[root@client1 ~]# cd /etc/yum.repos.d/
[root@client2 yum.repos.d]# ls
a  epel.repo  epel-testing.repo  local.repo
2:配置数据库角色:
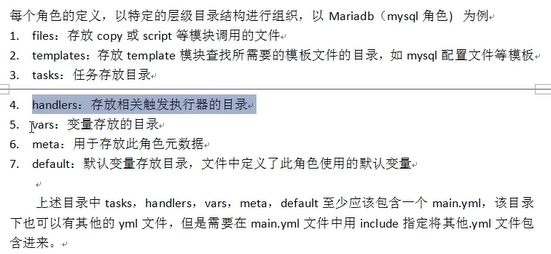
[root@ansible ~]# mkdir -pv /etc/ansible/roles/mariadb/{file,tasks,handlers}
mkdir: 已创建目录 "/etc/ansible/roles/mariadb"
mkdir: 已创建目录 "/etc/ansible/roles/mariadb/file"
mkdir: 已创建目录 "/etc/ansible/roles/mariadb/tasks"
mkdir: 已创建目录 "/etc/ansible/roles/mariadb/handlers"


[root@ansible ~]# cd /etc/ansible/
[root@ansible ansible]# vim /etc/ansible/mariadb.yaml


---
- hosts: crushlinux
  remote_user: root
  roles:
    - mariadb
...
[root@ansible ansible]# cd /etc/ansible/roles/mariadb/
[root@ansible mariadb]# ls
file handlers tasks
[root@ansible mariadb]# cd tasks/
[root@ansible tasks]# vim main.yaml
---
- name: install mariadb #指定任务名称安装mariadb数据库
yum: name=mariadb-server state=present #执行yum模块安装mariadb
- name: move config file #指定任务名称移除原有配置文件
shell: "[ -e /etc/my.cnf ] && mv /etc/my.cnf /etc/my.cnf.bak" #进行判断,如果有就移除
- name: provide a new config file #创建一个新的配置文件
copy: src=my.cnf dest=/etc/my.cnf #src源会自动到file文件中查找my.cnf配置文件
- name: reload mariadb #指定任务名称重启mariadb
shell: systemctl restart mariadb #hsell添加模块重启mariadb
- name: create database testdb #指定要求添加mysql语句
shell: mysql -u root -e "create database testdb;grant all privileges on testdb.* to 'test@'192.168.200.%' identified by 'test123';flush privileges;"
notify: #通知触发器
- restart mariadb #重启mariadb
...
[root@ansible handlers]# vim main.yml
---
- name: restart mariadb #引用上面的触发器
server: name=mariadb state=restarted #触发后重启mariadb服务
...
[root@ansible handlers]# cd ../file/
[root@ansible file]# cp /etc/my.cnf /etc/ansible/roles/mariadb/file/
[root@ansible file]# ls
my.cnf #准备my.cnf文件
[root@ansible file]# cd /etc/ansible/
[root@ansible ansible]# tree
.
├── ansible.cfg
├── hosts
├── hosts.bak
├── httpd.yaml
├── mariadb.yaml
├── roles
│ └── mariadb
│ ├── file
│ │ └── my.cnf
│ ├── handlers
│ │ └── main.yaml
│ └── tasks
│ └── main.yaml
└── test.yaml
预执行:
[root@ansible mariadb]# ansible-playbook -C /etc/ansible/mariadb.yaml