Ajax
简介
- AJAX = Asynchronous JavaScript and XML(异步的 JavaScript 和 XML)。
- AJAX 是一种在无需重新加载整个网页的情况下,能够更新部分网页的技术。
- Ajax 不是一种新的编程语言,而是一种用于创建更好更快以及交互性更强的Web应用程序的技术。
- 在 2005 年,Google 通过其 Google Suggest 使 AJAX 变得流行起来。Google Suggest能够自动帮你完成搜索单词。
- Google Suggest 使用 AJAX 创造出动态性极强的 web 界面:当您在谷歌的搜索框输入关键字时,JavaScript 会把这些字符发送到服务器,然后服务器会返回一个搜索建议的列表。
- 就和国内百度的搜索框一样!
- 传统的网页(即不用ajax技术的网页),想要更新内容或者提交一个表单,都需要重新加载整个网页。
- 使用ajax技术的网页,通过在后台服务器进行少量的数据交换,就可以实现异步局部更新。
- 使用Ajax,用户可以创建接近本地桌面应用的直接、高可用、更丰富、更动态的Web用户界面。
伪造Ajax
我们可以使用前端的一个标签来伪造一个ajax的样子。iframe标签
1、新建一个module :springmvc-06-ajax , 导入web支持!
2、编写一个 ajax-frame.html 使用 iframe 测试,感受下效果
<!DOCTYPE html>
<html lang="en">
<head>
    <meta charset="UTF-8">
    <title>Ajax初体验</title>
</head>
<body>
<script type="text/javascript">
    window.onload = function(){
        var myDate = new Date();
        document.getElementById('currentTime').innerText = myDate.getTime();
    };

    function LoadPage(){
        var targetUrl =  document.getElementById('url').value;
        console.log(targetUrl);
        document.getElementById("iframePosition").src = targetUrl;
    }

</script>

<div>
    <p>请输入要加载的地址:<span id="currentTime"></span></p>
    <p>
        <input id="url" type="text" value="https://www.bilibili.com/"/>
        <input type="button" value="提交" onclick="LoadPage()">
    </p>
</div>

<div>
    <h3>加载页面位置:</h3>
    <iframe id="iframePosition" style=" 100%;height: 500px;"></iframe>
</div>
</body>
</html>
3、使用IDEA开浏览器测试一下!
利用AJAX可以做:
- 注册时,输入用户名自动检测用户是否已经存在。
- 登陆时,提示用户名密码错误
- 删除数据行时,将行ID发送到后台,后台在数据库中删除,数据库删除成功后,在页面DOM中将数据行也删除。
jQuery.ajax.
Ajax的核心是XMLHttpRequest对象(XHR)。XHR为向服务器发送请求和解析服务器响应提供了接口。能够以异步方式从服务器获取新数据。
jQuery 提供多个与 AJAX 有关的方法。
通过 jQuery AJAX 方法,您能够使用 HTTP Get 和 HTTP Post 从远程服务器上请求文本、HTML、XML 或 JSON – 同时您能够把这些外部数据直接载入网页的被选元素中。
jQuery 不是生产者,而是大自然搬运工。
jQuery Ajax本质就是 XMLHttpRequest,对他进行了封装,方便调用!
jQuery.ajax(...)
      部分参数:
            url:请求地址
            type:请求方式,GET、POST(1.9.0之后用method)
        headers:请求头
            data:要发送的数据
    contentType:即将发送信息至服务器的内容编码类型(默认: "application/x-www-form-urlencoded; charset=UTF-8")
          async:是否异步
        timeout:设置请求超时时间(毫秒)
      beforeSend:发送请求前执行的函数(全局)
        complete:完成之后执行的回调函数(全局)
        success:成功之后执行的回调函数(全局)
          error:失败之后执行的回调函数(全局)
        accepts:通过请求头发送给服务器,告诉服务器当前客户端可接受的数据类型
        dataType:将服务器端返回的数据转换成指定类型
          "xml": 将服务器端返回的内容转换成xml格式
          "text": 将服务器端返回的内容转换成普通文本格式
          "html": 将服务器端返回的内容转换成普通文本格式,在插入DOM中时,如果包含JavaScript标签,则会尝试去执行。
        "script": 尝试将返回值当作JavaScript去执行,然后再将服务器端返回的内容转换成普通文本格式
          "json": 将服务器端返回的内容转换成相应的JavaScript对象
        "jsonp": JSONP 格式使用 JSONP 形式调用函数时,如 "myurl?callback=?" jQuery 将自动替换 ? 为正确的函数名,以执行回调函数
先来个简单的测试,使用最原始的HttpServletResponse处理 , 最简单 , 最通用
1、配置web.xml 和 springmvc的配置文件【记得静态资源过滤和注解驱动配置上】
<?xml version="1.0" encoding="UTF-8"?>
<beans xmlns="http://www.springframework.org/schema/beans"
       xmlns:xsi="http://www.w3.org/2001/XMLSchema-instance"
       xmlns:context="http://www.springframework.org/schema/context"
       xmlns:mvc="http://www.springframework.org/schema/mvc"
       xsi:schemaLocation="http://www.springframework.org/schema/beans
       http://www.springframework.org/schema/beans/spring-beans.xsd
       http://www.springframework.org/schema/context
       https://www.springframework.org/schema/context/spring-context.xsd
       http://www.springframework.org/schema/mvc
       https://www.springframework.org/schema/mvc/spring-mvc.xsd">

    <!-- 自动扫描指定的包,下面所有注解类交给IOC容器管理 -->
    <context:component-scan base-package="com.kuang.controller"/>
    <!--静态资源过滤-->
    <mvc:default-servlet-handler />
    <mvc:annotation-driven />

    <!-- 视图解析器 -->
    <bean class="org.springframework.web.servlet.view.InternalResourceViewResolver"
          id="internalResourceViewResolver">
        <!-- 前缀 -->
        <property name="prefix" value="/WEB-INF/jsp/" />
        <!-- 后缀 -->
        <property name="suffix" value=".jsp" />
    </bean>

</beans>
2、编写一个AjaxController
@Controller
public class AjaxController {
    @RequestMapping("/a1")
    public void ajax1(String name , HttpServletResponse response) throws IOException {
        System.out.println("a1:parm-->" + name);
        if ("admin".equals(name)){
            response.getWriter().print("true");
        }else{
            response.getWriter().print("false");
        }
    }
}
3、导入jquery , 可以使用在线的CDN , 也可以下载导入
<script src="https://code.jquery.com/jquery-3.3.1.min.js"></script>
<script src="${pageContext.request.contextPath}/statics/js/jquery-3.3.1.min.js"></script>
4、编写index.jsp测试
<%@ page contentType="text/html;charset=UTF-8" language="java" %>
<html>
  <head>
    <title>$Title$</title>
    <script src="${pageContext.request.contextPath}/static/jquery-3.3.1.min.js"></script>

    <script>

      function a1(){
        $.post({
          url:"${pageContext.request.contextPath}/a1",
          data:{'name':$("#username").val()},
          success:function (data) {
            alert(data);
          }
        });
      }

    </script>
  </head>
  <body>

  <%--onblur:失去焦点触发事件--%>
  用户名:<input type="text" id="username" onblur="a1()"/>

  </body>
</html>
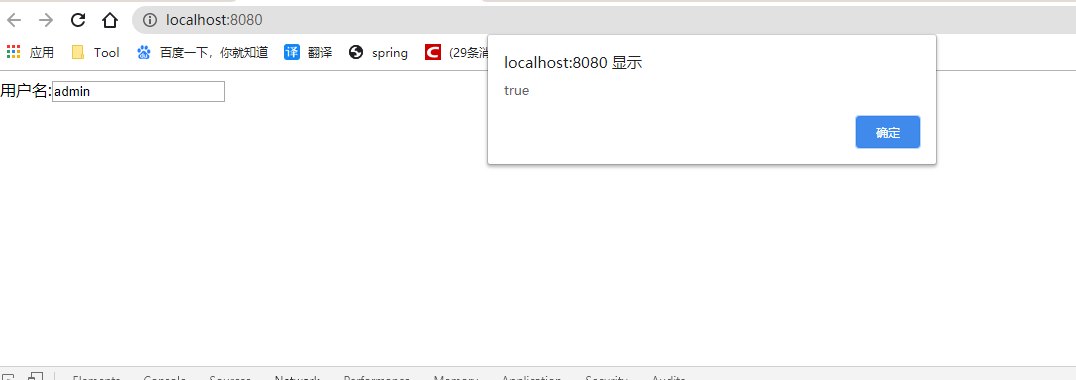
5、启动tomcat测试!打开浏览器的控制台,当我们鼠标离开输入框的时候,可以看到发出了一个ajax的请求!是后台返回给我们的结果!测试成功!
Springmvc实现
实体类user
public class User {
    private String name;
    private int age;
    private String sex;

/*
get,set,toString
*/
}
我们来获取一个集合对象,展示到前端页面[记得导入json依赖不然会500]
 <!-- https://mvnrepository.com/artifact/com.fasterxml.jackson.core/jackson-core -->
        <dependency>
            <groupId>com.fasterxml.jackson.core</groupId>
            <artifactId>jackson-databind</artifactId>
            <version>2.9.8</version>
        </dependency>
@RestController
public class AjaxController {

 @RequestMapping("/a2")
    public List<User> ajax2(){
        List<User> list = new ArrayList<User>();
        list.add(new User("张三",16,"男"));
        list.add(new User("李四",17,"男"));
        list.add(new User("王五",18,"男"));
        return list; //由于@RestController注解,将list转成json格式返回
    }
}
前端页面
<%@ page contentType="text/html;charset=UTF-8" language="java" %>
<html>
<head>
  <title>Title</title>
</head>
<body>
<input type="button" id="btn" value="获取数据"/>
<table width="80%" align="center">
  <tr>
    <td>姓名</td>
    <td>年龄</td>
    <td>性别</td>
  </tr>
  <tbody id="content">
  </tbody>
</table>

<script src="${pageContext.request.contextPath}/static/jquery-3.3.1.min.js"></script>
<script>

  $(function () {
    $("#btn").click(function () {
      $.post("${pageContext.request.contextPath}/a2",function (data) {
        console.log(data)
        var html="";
        for (var i = 0; i <data.length ; i++) {
          html+= "<tr>" +
                  "<td>" + data[i].name + "</td>" +
                  "<td>" + data[i].age + "</td>" +
                  "<td>" + data[i].sex + "</td>" +
                  "</tr>"
        }
        $("#content").html(html);
      });
    })
  })
</script>
</body>
</html>
成功实现了数据回显!可以体会一下Ajax的好处!

注册提示效果
我们再测试一个小Demo,思考一下我们平时注册时候,输入框后面的实时提示怎么做到的;如何优化
我们写一个Controller
@RestController
public class AjaxController {
@RequestMapping("/a3")
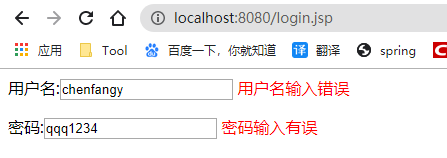
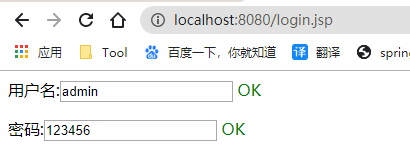
public String ajax3(String name,String pwd){
String msg = "";
//模拟数据库中存在数据
if (name!=null){
if ("admin".equals(name)){
msg = "OK";
}else {
msg = "用户名输入错误";
}
}
if (pwd!=null){
if ("123456".equals(pwd)){
msg = "OK";
}else {
msg = "密码输入有误";
}
}
return msg; //由于@RestController注解,将msg转成json格式返回
}
}
前端页面 login.jsp
<%@ page contentType="text/html;charset=UTF-8" language="java" %>
<html>
<head>
    <title>ajax</title>
    <script src="${pageContext.request.contextPath}/static/jquery-3.3.1.min.js"></script>
    <script>

        function a1(){
            $.post({
                url:"${pageContext.request.contextPath}/a3",
                data:{'name':$("#name").val()},
                success:function (data) {
                    if (data.toString()=='OK'){
                        $("#userInfo").css("color","green");
                    }else {
                        $("#userInfo").css("color","red");
                    }
                    $("#userInfo").html(data);
                }
            });
        }
        function a2(){
            $.post({
                url:"${pageContext.request.contextPath}/a3",
                data:{'pwd':$("#pwd").val()},
                success:function (data) {
                    if (data.toString()=='OK'){
                        $("#pwdInfo").css("color","green");
                    }else {
                        $("#pwdInfo").css("color","red");
                    }
                    $("#pwdInfo").html(data);
                }
            });
        }

    </script>
</head>
<body>
<p>
    用户名:<input type="text" id="name" onblur="a1()"/>
    <span id="userInfo"></span>
</p>
<p>
    密码:<input type="text" id="pwd" onblur="a2()"/>
    <span id="pwdInfo"></span>
</p>
</body>
</html>
【记得处理json乱码问题】
测试一下效果,动态请求响应,局部刷新,就是如此!
获取baidu接口Demo
<!DOCTYPE HTML>
<html>
<head>
   <meta http-equiv="Content-Type" content="text/html; charset=utf-8">
   <title>JSONP百度搜索</title>
   <style>
       #q{
            500px;
           height: 30px;
           border:1px solid #ddd;
           line-height: 30px;
           display: block;
           margin: 0 auto;
           padding: 0 10px;
           font-size: 14px;
      }
       #ul{
            520px;
           list-style: none;
           margin: 0 auto;
           padding: 0;
           border:1px solid #ddd;
           margin-top: -1px;
           display: none;
      }
       #ul li{
           line-height: 30px;
           padding: 0 10px;
      }
       #ul li:hover{
           background-color: #f60;
           color: #fff;
      }
   </style>
   <script>

       // 2.步骤二
       // 定义demo函数 (分析接口、数据)
       function demo(data){
           var Ul = document.getElementById('ul');
           var html = '';
           // 如果搜索数据存在 把内容添加进去
           if (data.s.length) {
               // 隐藏掉的ul显示出来
               Ul.style.display = 'block';
               // 搜索到的数据循环追加到li里
               for(var i = 0;i<data.s.length;i++){
                   html += '<li>'+data.s[i]+'</li>';
              }
               // 循环的li写入ul
               Ul.innerHTML = html;
          }
      }

       // 1.步骤一
       window.onload = function(){
           // 获取输入框和ul
           var Q = document.getElementById('q');
           var Ul = document.getElementById('ul');

           // 事件鼠标抬起时候
           Q.onkeyup = function(){
               // 如果输入框不等于空
               if (this.value != '') {
                   // ☆☆☆☆☆☆☆☆☆☆☆☆☆☆☆☆☆☆JSONPz重点☆☆☆☆☆☆☆☆☆☆☆☆☆☆☆☆☆☆☆☆
                   // 创建标签
                   var script = document.createElement('script');
                   //给定要跨域的地址 赋值给src
                   //这里是要请求的跨域的地址 我写的是百度搜索的跨域地址
                   script.src = 'https://sp0.baidu.com/5a1Fazu8AA54nxGko9WTAnF6hhy/su?wd='+this.value+'&cb=demo';
                   // 将组合好的带src的script标签追加到body里
                   document.body.appendChild(script);
              }
          }
      }
   </script>
</head>

<body>
<input type="text" id="q" />
<ul id="ul">

</ul>
</body>
</html>
拦截器
概述
SpringMVC的处理器拦截器类似于Servlet开发中的过滤器Filter,用于对处理器进行预处理和后处理。
开发者可以自己定义一些拦截器来实现特定的功能。
过滤器与拦截器的区别:拦截器是AOP思想的具体应用。
过滤器
- servlet规范中的一部分,任何java web工程都可以使用
- 在url-pattern中配置了/*之后,可以对所有要访问的资源进行拦截
拦截器 - 拦截器是SpringMVC框架自己的,只有使用了SpringMVC框架的工程才能使用
- 拦截器只会拦截访问的控制器方法, 如果访问的是jsp/html/css/image/js是不会进行拦截的
自定义拦截器
那如何实现拦截器呢?
想要自定义拦截器,必须实现 HandlerInterceptor 接口。
1、新建一个Moudule , springmvc-07-Interceptor , 添加web支持
2、配置web.xml 和 springmvc-servlet.xml 文件
3、编写一个拦截器
package com.kuang.interceptor;

import org.springframework.web.servlet.HandlerInterceptor;
import org.springframework.web.servlet.ModelAndView;

import javax.servlet.http.HttpServletRequest;
import javax.servlet.http.HttpServletResponse;

public class MyInterceptor implements HandlerInterceptor {

    //在请求处理的方法之前执行
    //如果返回true执行下一个拦截器
    //如果返回false就不执行下一个拦截器
    public boolean preHandle(HttpServletRequest httpServletRequest, HttpServletResponse httpServletResponse, Object o) throws Exception {
        System.out.println("------------处理前------------");
        return true;
    }

    //在请求处理方法执行之后执行
    public void postHandle(HttpServletRequest httpServletRequest, HttpServletResponse httpServletResponse, Object o, ModelAndView modelAndView) throws Exception {
        System.out.println("------------处理后------------");
    }

    //在dispatcherServlet处理后执行,做清理工作.
    public void afterCompletion(HttpServletRequest httpServletRequest, HttpServletResponse httpServletResponse, Object o, Exception e) throws Exception {
        System.out.println("------------清理------------");
    }
}
4、在springmvc的配置文件中配置拦截器
<!--关于拦截器的配置-->
<mvc:interceptors>
   <mvc:interceptor>
       <!--/** 包括路径及其子路径-->
       <!--/admin/* 拦截的是/admin/add等等这种 , /admin/add/user不会被拦截-->
       <!--/admin/** 拦截的是/admin/下的所有-->
       <mvc:mapping path="/**"/>
       <!--bean配置的就是拦截器-->
       <bean class="com.kuang.interceptor.MyInterceptor"/>
   </mvc:interceptor>
</mvc:interceptors>
5、编写一个Controller,接收请求
package com.kuang.controller;

import org.springframework.stereotype.Controller;
import org.springframework.web.bind.annotation.RequestMapping;
import org.springframework.web.bind.annotation.ResponseBody;

//测试拦截器的控制器
@Controller
public class InterceptorController {

   @RequestMapping("/interceptor")
   @ResponseBody
   public String testFunction() {
       System.out.println("控制器中的方法执行了");
       return "hello";
  }
}
6、前端 index.jsp
<a href="${pageContext.request.contextPath}/interceptor">拦截器测试</a>
7、启动tomcat 测试一下!

验证用户是否登录 (认证用户)
实现思路
1、有一个登陆页面,需要写一个controller访问页面。
2、登陆页面有一提交表单的动作。需要在controller中处理。判断用户名密码是否正确。如果正确,向session中写入用户信息。返回登陆成功。
3、拦截用户请求,判断用户是否登陆。如果用户已经登陆。放行, 如果用户未登陆,跳转到登陆页面
测试:
1、编写一个登陆页面 login.jsp
<%@ page contentType="text/html;charset=UTF-8" language="java" %>
<html>
<head>
   <title>Title</title>
</head>

<h1>登录页面</h1>
<hr>

<body>
<form action="${pageContext.request.contextPath}/user/login">
  用户名:<input type="text" name="username"> <br>
  密码:<input type="password" name="pwd"> <br>
   <input type="submit" value="提交">
</form>
</body>
</html>
2、编写一个Controller处理请求
package com.kuang.controller;

import org.springframework.stereotype.Controller;
import org.springframework.web.bind.annotation.RequestMapping;

import javax.servlet.http.HttpSession;

@Controller
@RequestMapping("/user")
public class UserController {

   //跳转到登陆页面
   @RequestMapping("/jumplogin")
   public String jumpLogin() throws Exception {
       return "login";
  }

   //跳转到成功页面
   @RequestMapping("/jumpSuccess")
   public String jumpSuccess() throws Exception {
       return "success";
  }

   //登陆提交
   @RequestMapping("/login")
   public String login(HttpSession session, String username, String pwd) throws Exception {
       // 向session记录用户身份信息
       System.out.println("接收前端==="+username);
       session.setAttribute("user", username);
       return "success";
  }

   //退出登陆
   @RequestMapping("logout")
   public String logout(HttpSession session) throws Exception {
       // session 过期
       session.invalidate();
       return "login";
  }
}
3、编写一个登陆成功的页面 success.jsp
<%@ page contentType="text/html;charset=UTF-8" language="java" %>
<html>
<head>
   <title>Title</title>
</head>
<body>

<h1>登录成功页面</h1>
<hr>

${user}
<a href="${pageContext.request.contextPath}/user/logout">注销</a>
</body>
</html>
4、在 index 页面上测试跳转!启动Tomcat 测试,未登录也可以进入主页!
<%@ page contentType="text/html;charset=UTF-8" language="java" %>
<html>
 <head>
   <title>$Title$</title>
 </head>
 <body>
 <h1>首页</h1>
 <hr>
<%--登录--%>
 <a href="${pageContext.request.contextPath}/user/jumplogin">登录</a>
 <a href="${pageContext.request.contextPath}/user/jumpSuccess">成功页面</a>
 </body>
</html>
5、编写用户登录拦截器
package com.kuang.interceptor;

import org.springframework.web.servlet.HandlerInterceptor;
import org.springframework.web.servlet.ModelAndView;

import javax.servlet.ServletException;
import javax.servlet.http.HttpServletRequest;
import javax.servlet.http.HttpServletResponse;
import javax.servlet.http.HttpSession;
import java.io.IOException;

public class LoginInterceptor implements HandlerInterceptor {

   public boolean preHandle(HttpServletRequest request, HttpServletResponse response, Object handler) throws ServletException, IOException {
       // 如果是登陆页面则放行
       System.out.println("uri: " + request.getRequestURI());
       if (request.getRequestURI().contains("login")) {
           return true;
      }

       HttpSession session = request.getSession();
       // 如果用户已登陆也放行
       if(session.getAttribute("user") != null) {
           return true;
      }

       // 用户没有登陆跳转到登陆页面
       request.getRequestDispatcher("/WEB-INF/jsp/login.jsp").forward(request, response);
       return false;
  }

   public void postHandle(HttpServletRequest httpServletRequest, HttpServletResponse httpServletResponse, Object o, ModelAndView modelAndView) throws Exception {
  }

   public void afterCompletion(HttpServletRequest httpServletRequest, HttpServletResponse httpServletResponse, Object o, Exception e) throws Exception {
  }
}
6、在Springmvc的配置文件中注册拦截器
<!--关于拦截器的配置-->
<mvc:interceptors>
   <mvc:interceptor>
       <mvc:mapping path="/**"/>
       <bean id="loginInterceptor" class="com.kuang.interceptor.LoginInterceptor"/>
   </mvc:interceptor>
</mvc:interceptors>
7、再次重启Tomcat测试!
OK,测试登录拦截功能无误.
文件上传和下载
文件上传是项目开发中最常见的功能之一 ,springMVC 可以很好的支持文件上传,但是
SpringMVC上下文中默认没有装配MultipartResolver,因此默认情况下其不能处理文件上传工作。
如果想使用Spring的文件上传功能,则需要在上下文中配置MultipartResolver。
前端表单要求:为了能上传文件,必须将表单的method设置为POST,并将enctype设置为multipart/form-data。
只有在这样的情况下,浏览器才会把用户选择的文件以二进制数据发送给服务器;
对表单中的 enctype 属性做个详细的说明:
- application/x-www=form-urlencoded:默认方式,只处理表单域中的 value 属性值,
采用这种编码方式的表单会将表单域中的值处理成 URL 编码方式。 - multipart/form-data:这种编码方式会以二进制流的方式来处理表单数据,
这种编码方式会把文件域指定文件的内容也封装到请求参数中,不会对字符编码。 - text/plain:除了把空格转换为 "+" 号外,其他字符都不做编码处理,
这种方式适用直接通过表单发送邮件。
<form action="" enctype="multipart/form-data" method="post">
   <input type="file" name="file"/>
   <input type="submit">
</form>
一旦设置了enctype为multipart/form-data,浏览器即会采用二进制流的方式来处理表单数据,
而对于文件上传的处理则涉及在服务器端解析原始的HTTP响应。
在2003年,Apache Software Foundation发布了开源的Commons FileUpload组件,其很快成为Servlet/JSP程序员上传文件的最佳选择。
- Servlet3.0规范已经提供方法来处理文件上传,但这种上传需要在Servlet中完成。
- 而Spring MVC则提供了更简单的封装。
- Spring MVC为文件上传提供了直接的支持,这种支持是用即插即用的MultipartResolver实现的。
- Spring MVC使用Apache Commons FileUpload技术实现了一个MultipartResolver实现类:
- CommonsMultipartResolver。因此,SpringMVC的文件上传还需要依赖Apache Commons FileUpload的组件。
文件上传
1、导入文件上传的jar包,commons-fileupload , Maven会自动帮我们导入他的依赖包 commons-io包;
<!--文件上传-->
<dependency>
   <groupId>commons-fileupload</groupId>
   <artifactId>commons-fileupload</artifactId>
   <version>1.3.3</version>
</dependency>
<!--servlet-api导入高版本的-->
<dependency>
   <groupId>javax.servlet</groupId>
   <artifactId>javax.servlet-api</artifactId>
   <version>4.0.1</version>
</dependency>
2、配置bean:multipartResolver
【注意!!!这个bena的id必须为:multipartResolver , 否则上传文件会报400的错误!在这里栽过坑,教训!】
<!--文件上传配置-->
<bean id="multipartResolver"  class="org.springframework.web.multipart.commons.CommonsMultipartResolver">
   <!-- 请求的编码格式,必须和jSP的pageEncoding属性一致,以便正确读取表单的内容,默认为ISO-8859-1 -->
   <property name="defaultEncoding" value="utf-8"/>
   <!-- 上传文件大小上限,单位为字节(10485760=10M) -->
   <property name="maxUploadSize" value="10485760"/>
   <property name="maxInMemorySize" value="40960"/>
</bean>
CommonsMultipartFile 的 常用方法:
- String getOriginalFilename():获取上传文件的原名
- InputStream getInputStream():获取文件流
- void transferTo(File dest):将上传文件保存到一个目录文件中
测试:
3、编写前端页面
<form action="/upload" enctype="multipart/form-data" method="post">
 <input type="file" name="file"/>
 <input type="submit" value="upload">
</form>
4、controller
package com.kuang.controller;

import org.springframework.stereotype.Controller;
import org.springframework.web.bind.annotation.RequestMapping;
import org.springframework.web.bind.annotation.RequestParam;
import org.springframework.web.multipart.commons.CommonsMultipartFile;

import javax.servlet.http.HttpServletRequest;
import java.io.*;

@Controller
public class FileController {
   //@RequestParam("file") 将name=file控件得到的文件封装成CommonsMultipartFile 对象
   //批量上传CommonsMultipartFile则为数组即可
   @RequestMapping("/upload")
   public String fileUpload(@RequestParam("file") CommonsMultipartFile file , HttpServletRequest request) throws IOException {

       //获取文件名 : file.getOriginalFilename();
       String uploadFileName = file.getOriginalFilename();

       //如果文件名为空,直接回到首页!
       if ("".equals(uploadFileName)){
           return "redirect:/index.jsp";
      }
       System.out.println("上传文件名 : "+uploadFileName);

       //上传路径保存设置
       String path = request.getServletContext().getRealPath("/upload");
       //如果路径不存在,创建一个
       File realPath = new File(path);
       if (!realPath.exists()){
           realPath.mkdir();
      }
       System.out.println("上传文件保存地址:"+realPath);

       InputStream is = file.getInputStream(); //文件输入流
       OutputStream os = new FileOutputStream(new File(realPath,uploadFileName)); //文件输出流

       //读取写出
       int len=0;
       byte[] buffer = new byte[1024];
       while ((len=is.read(buffer))!=-1){
           os.write(buffer,0,len);
           os.flush();
      }
       os.close();
       is.close();
       return "redirect:/index.jsp";
  }
}
5、测试上传文件
采用file.Transto 来保存上传的文件
1、编写Controller
/*
* 采用file.Transto 来保存上传的文件
*/
@RequestMapping("/upload2")
public String  fileUpload2(@RequestParam("file") CommonsMultipartFile file, HttpServletRequest request) throws IOException {

   //上传路径保存设置
   String path = request.getServletContext().getRealPath("/upload");
   File realPath = new File(path);
   if (!realPath.exists()){
       realPath.mkdir();
  }
   //上传文件地址
   System.out.println("上传文件保存地址:"+realPath);

   //通过CommonsMultipartFile的方法直接写文件(注意这个时候)
   file.transferTo(new File(realPath +"/"+ file.getOriginalFilename()));

   return "redirect:/index.jsp";
}
2、前端表单提交地址修改
3、访问提交测试
文件下载
文件下载步骤:
1、设置 response 响应头
2、读取文件 -- InputStream
3、写出文件 -- OutputStream
4、执行操作
5、关闭流 (先开后关)
代码实现:
@RequestMapping(value="/download")
public String downloads(HttpServletResponse response ,HttpServletRequest request) throws Exception{
   //要下载的图片地址
   String  path = request.getServletContext().getRealPath("/upload");
   String  fileName = "基础语法.jpg";

   //1、设置response 响应头
   response.reset(); //设置页面不缓存,清空buffer
   response.setCharacterEncoding("UTF-8"); //字符编码
   response.setContentType("multipart/form-data"); //二进制传输数据
   //设置响应头
   response.setHeader("Content-Disposition",
           "attachment;fileName="+URLEncoder.encode(fileName, "UTF-8"));

   File file = new File(path,fileName);
   //2、 读取文件--输入流
   InputStream input=new FileInputStream(file);
   //3、 写出文件--输出流
   OutputStream out = response.getOutputStream();

   byte[] buff =new byte[1024];
   int index=0;
   //4、执行 写出操作
   while((index= input.read(buff))!= -1){
       out.write(buff, 0, index);
       out.flush();
  }
   out.close();
   input.close();
   return null;
}
前端的话
<a href="/download">点我下载</a>
测试,文件下载OK。