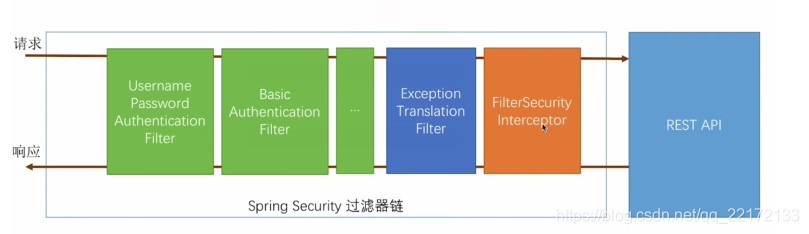
其核心就是一组过滤器链,项目启动后将会自动配置。最核心的就是 Basic Authentication Filter 用来认证用户的身份,一个在spring security中一种过滤器处理一种认证方式。
Spring Security 是 Spring 家族中的一个安全管理框架,实际上,在 Spring Boot 出现之前,Spring Security 就已经发展了多年了,但是使用的并不多,安全管理这个领域,一直是 Shiro 的天下。
相对于 Shiro,在 SSM/SSH 中整合 Spring Security 都是比较麻烦的操作,所以,Spring Security 虽然功能比 Shiro 强大,但是使用反而没有 Shiro 多(Shiro 虽然功能没有 Spring Security 多,但是对于大部分项目而言,Shiro 也够用了)。
自从有了 Spring Boot 之后,Spring Boot 对于 Spring Security 提供了 自动化配置方案,可以零配置使用 Spring Security。
因此,一般来说,常见的安全管理技术栈的组合是这样的:
- SSM + Shiro
- Spring Boot/Spring Cloud + Spring Security
注意,这只是一个推荐的组合而已,如果单纯从技术上来说,无论怎么组合,都是可以运行的。
我们来看下具体使用。
1.项目创建
在 Spring Boot 中使用 Spring Security 非常容易,引入依赖即可:

pom.xml 中的 Spring Security 依赖:
<dependency>
    <groupId>org.springframework.boot</groupId>
    <artifactId>spring-boot-starter-security</artifactId>
</dependency>
只要加入依赖,项目的所有接口都会被自动保护起来。
2.初次体验
我们创建一个 HelloController:
@RestController
public class HelloController {
    @GetMapping("/hello")
    public String hello() {
        return "hello";
    }
}
访问 /hello ,需要登录之后才能访问。

当用户从浏览器发送请求访问 /hello 接口时,服务端会返回 302 响应码,让客户端重定向到 /login 页面,用户在 /login页面登录,登陆成功之后,就会自动跳转到 /hello 接口。
另外,也可以使用 POSTMAN 来发送请求,使用 POSTMAN 发送请求时,可以将用户信息放在请求头中(这样可以避免重定向到登录页面):

通过以上两种不同的登录方式,可以看出,Spring Security 支持两种不同的认证方式:
- 可以通过 form 表单来认证
- 可以通过 HttpBasic 来认证
3.用户名配置
默认情况下,登录的用户名是 user ,密码则是项目启动时随机生成的字符串,可以从启动的控制台日志中看到默认密码:

这个随机生成的密码,每次启动时都会变。对登录的用户名/密码进行配置,有三种不同的方式:
- 在 application.properties 中进行配置
- 通过 Java 代码配置在内存中
- 通过 Java 从数据库中加载
前两种比较简单,第三种代码量略大,本文就先来看看前两种,第三种后面再单独写文章介绍,也可以参考我的微人事项目。
3.1 配置文件配置用户名/密码
可以直接在 application.properties 文件中配置用户的基本信息:
spring.security.user.name=javaboy
spring.security.user.password=123
配置完成后,重启项目,就可以使用这里配置的用户名/密码登录了。
3.2 Java 配置用户名/密码
也可以在 Java 代码中配置用户名密码,首先需要我们创建一个 Spring Security 的配置类,集成自 WebSecurityConfigurerAdapter 类,如下:
@Configuration
public class SecurityConfig extends WebSecurityConfigurerAdapter {
    @Override
    protected void configure(AuthenticationManagerBuilder auth) throws Exception {
        //下面这两行配置表示在内存中配置了两个用户
        auth.inMemoryAuthentication()
                .withUser("javaboy").roles("admin").password("$2a$10$OR3VSksVAmCzc.7WeaRPR.t0wyCsIj24k0Bne8iKWV1o.V9wsP8Xe")
                .and()
                .withUser("lisi").roles("user").password("$2a$10$p1H8iWa8I4.CA.7Z8bwLjes91ZpY.rYREGHQEInNtAp4NzL6PLKxi");
    }
    @Bean
    PasswordEncoder passwordEncoder() {
        return new BCryptPasswordEncoder();
    }
}
这里我们在 configure 方法中配置了两个用户,用户的密码都是加密之后的字符串(明文是 123),从 Spring5 开始,强制要求密码要加密,如果非不想加密,可以使用一个过期的 PasswordEncoder 的实例 NoOpPasswordEncoder,但是不建议这么做,毕竟不安全。
Spring Security 中提供了 BCryptPasswordEncoder 密码编码工具,可以非常方便的实现密码的加密加盐,相同明文加密出来的结果总是不同,这样就不需要用户去额外保存盐的字段了,这一点比 Shiro 要方便很多。
4.登录配置
对于登录接口,登录成功后的响应,登录失败后的响应,我们都可以在 WebSecurityConfigurerAdapter 的实现类中进行配置。例如下面这样:
@Configuration
public class SecurityConfig extends WebSecurityConfigurerAdapter {
    @Autowired
    VerifyCodeFilter verifyCodeFilter;
    @Override
    protected void configure(HttpSecurity http) throws Exception {
        http.addFilterBefore(verifyCodeFilter, UsernamePasswordAuthenticationFilter.class);
        http
        .authorizeRequests()//开启登录配置
        .antMatchers("/hello").hasRole("admin")//表示访问 /hello 这个接口,需要具备 admin 这个角色
        .anyRequest().authenticated()//表示剩余的其他接口,登录之后就能访问
        .and()
        .formLogin()
        //定义登录页面,未登录时,访问一个需要登录之后才能访问的接口,会自动跳转到该页面
        .loginPage("/login_p")
        //登录处理接口
        .loginProcessingUrl("/doLogin")
        //定义登录时,用户名的 key,默认为 username
        .usernameParameter("uname")
        //定义登录时,用户密码的 key,默认为 password
        .passwordParameter("passwd")
        //登录成功的处理器
        .successHandler(new AuthenticationSuccessHandler() {
            @Override
            public void onAuthenticationSuccess(HttpServletRequest req, HttpServletResponse resp, Authentication authentication) throws IOException, ServletException {
                    resp.setContentType("application/json;charset=utf-8");
                    PrintWriter out = resp.getWriter();
                    out.write("success");
                    out.flush();
                }
            })
            .failureHandler(new AuthenticationFailureHandler() {
                @Override
                public void onAuthenticationFailure(HttpServletRequest req, HttpServletResponse resp, AuthenticationException exception) throws IOException, ServletException {
                    resp.setContentType("application/json;charset=utf-8");
                    PrintWriter out = resp.getWriter();
                    out.write("fail");
                    out.flush();
                }
            })
            .permitAll()//和表单登录相关的接口统统都直接通过
            .and()
            .logout()
            .logoutUrl("/logout")
            .logoutSuccessHandler(new LogoutSuccessHandler() {
                @Override
                public void onLogoutSuccess(HttpServletRequest req, HttpServletResponse resp, Authentication authentication) throws IOException, ServletException {
                    resp.setContentType("application/json;charset=utf-8");
                    PrintWriter out = resp.getWriter();
                    out.write("logout success");
                    out.flush();
                }
            })
            .permitAll()
            .and()
            .httpBasic()
            .and()
            .csrf().disable();
    }
}
我们可以在 successHandler 方法中,配置登录成功的回调,如果是前后端分离开发的话,登录成功后返回 JSON 即可,同理,failureHandler 方法中配置登录失败的回调,logoutSuccessHandler 中则配置注销成功的回调。
(
小知识点总结:
1、注解 @EnableWebSecurity
在 Spring boot 应用中使用 Spring Security,用到了 @EnableWebSecurity注解,官方说明为,该注解和 @Configuration 注解一起使用, 注解 WebSecurityConfigurer 类型的类,或者利用@EnableWebSecurity 注解继承 WebSecurityConfigurerAdapter的类,这样就构成了 Spring Security 的配置。
2、抽象类 WebSecurityConfigurerAdapter
一般情况,会选择继承 WebSecurityConfigurerAdapter 类,其官方说明为:WebSecurityConfigurerAdapter 提供了一种便利的方式去创建 WebSecurityConfigurer的实例,只需要重写 WebSecurityConfigurerAdapter 的方法,即可配置拦截什么URL、设置什么权限等安全控制。
3、方法 configure(AuthenticationManagerBuilder auth) 和 configure(HttpSecurity http)
————————————————
WebSecurityConfigurerAdapter 的两个方法:
* 通过 {@link #authenticationManager()} 方法的默认实现尝试获取一个 {@link AuthenticationManager}.
* 如果被复写, 应该使用{@link AuthenticationManagerBuilder} 来指定 {@link AuthenticationManager}.
*
* 例如, 可以使用以下配置在内存中进行注册公开内存的身份验证{@link UserDetailsService}:
*
* // 在内存中添加 user 和 admin 用户
* @Override
* protected void configure(AuthenticationManagerBuilder auth) {
* auth
* .inMemoryAuthentication().withUser("user").password("password").roles("USER").and()
* .withUser("admin").password("password").roles("USER", "ADMIN");
* }
/**
* 复写这个方法来配置 {@link HttpSecurity}.
* 通常,子类不能通过调用 super 来调用此方法,因为它可能会覆盖其配置。 默认配置为:
*
* http.authorizeRequests().anyRequest().authenticated().and().formLogin().and().httpBasic();
*
*/
protected void configure(HttpSecurity http) throws Exception {
logger.debug("Using default configure(HttpSecurity). If subclassed this will potentially override subclass configure(HttpSecurity).");
http
.authorizeRequests()
.anyRequest().authenticated()
.and()
.formLogin().and()
.httpBasic();
}
AuthenticationManagerBuilder 用于创建一个 AuthenticationManager,让我能够轻松的实现内存验证、LADP验证、基于JDBC的验证、添加UserDetailsService、添加AuthenticationProvider。 (UsernamePasswordAuthenticationFilter(AbstractAuthenticationProcessingFilter的子类))
final 类 HttpSecurity 通过以下方法可配置拦截什么URL、设置什么权限等安全控制。(ProviderManager(AuthenticationManager的实现类))
HttpSecurity 常用方法及说明:
方法 说明
openidLogin() 用于基于 OpenId 的验证
headers() 将安全标头添加到响应
cors() 配置跨域资源共享( CORS )
sessionManagement() 允许配置会话管理
portMapper() 允许配置一个PortMapper(HttpSecurity#(getSharedObject(class))),其他提供SecurityConfigurer的对象使用 PortMapper 从 HTTP 重定向到 HTTPS 或者从 HTTPS 重定向到 HTTP。默认情况下,Spring Security使用一个PortMapperImpl映射 HTTP 端口8080到 HTTPS 端口8443,HTTP 端口80到 HTTPS 端口443
jee() 配置基于容器的预认证。 在这种情况下,认证由Servlet容器管理
x509() 配置基于x509的认证
rememberMe 允许配置“记住我”的验证
authorizeRequests() 允许基于使用HttpServletRequest限制访问
requestCache() 允许配置请求缓存
exceptionHandling() 允许配置错误处理
securityContext() 在HttpServletRequests之间的SecurityContextHolder上设置SecurityContext的管理。 当使用WebSecurityConfigurerAdapter时,这将自动应用
servletApi() 将HttpServletRequest方法与在其上找到的值集成到SecurityContext中。 当使用WebSecurityConfigurerAdapter时,这将自动应用
csrf() 添加 CSRF 支持,使用WebSecurityConfigurerAdapter时,默认启用
logout() 添加退出登录支持。当使用WebSecurityConfigurerAdapter时,这将自动应用。默认情况是,访问URL”/ logout”,使HTTP Session无效来清除用户,清除已配置的任何#rememberMe()身份验证,清除SecurityContextHolder,然后重定向到”/login?success”
anonymous() 允许配置匿名用户的表示方法。 当与WebSecurityConfigurerAdapter结合使用时,这将自动应用。 默认情况下,匿名用户将使用org.springframework.security.authentication.AnonymousAuthenticationToken表示,并包含角色 “ROLE_ANONYMOUS”
formLogin() 指定支持基于表单的身份验证。如果未指定FormLoginConfigurer#loginPage(String),则将生成默认登录页面
oauth2Login() 根据外部OAuth 2.0或OpenID Connect 1.0提供程序配置身份验证
requiresChannel() 配置通道安全。为了使该配置有用,必须提供至少一个到所需信道的映射
httpBasic() 配置 Http Basic 验证
addFilterAt() 在指定的Filter类的位置添加过滤器
————————————————
原理效验流程图
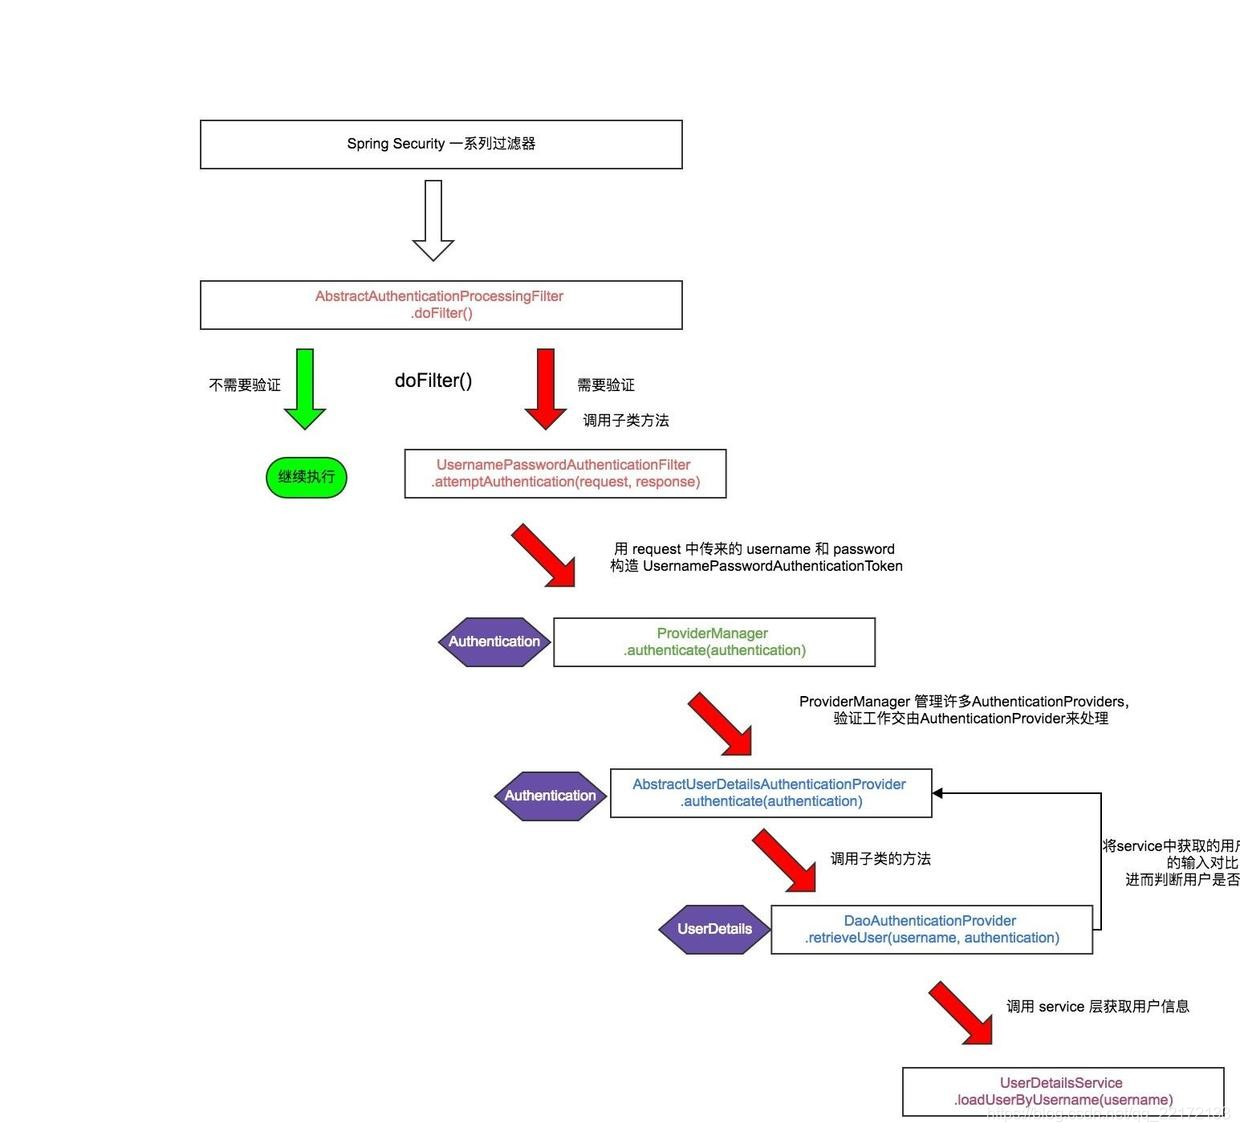
转自:https://blog.csdn.net/qq_22172133/article/details/86503223
)
5.忽略拦截
如果某一个请求地址不需要拦截的话,有两种方式实现:
- 设置该地址匿名访问
- 直接过滤掉该地址,即该地址不走 Spring Security 过滤器链
推荐使用第二种方案,配置如下:
@Configuration
public class SecurityConfig extends WebSecurityConfigurerAdapter {
    @Override
    public void configure(WebSecurity web) throws Exception {
        web.ignoring().antMatchers("/vercode");
    }
}
Spring Security 另外一个强大之处就是它可以结合 OAuth2 ,玩出更多的花样出来,这些我们在后面的文章中再和大家细细介绍。