原文地址:https://github.com/PaulNieuwelaar/alertjs/wiki/Documentation#alertshow
For version 3.0 documentation, click here.
Installation & Usage
- Download and install the unmanaged solution (recommended), or download the source files from other downloads, and create the required web resources manually using your own publisher prefix and naming style (not recommended as there are hardcoded references in the files).
- Make sure to publish all customizations if installing the unmanaged solution, or creating the web resources manually.
- Create a new JavaScript web resource or use an existing web resource to create your custom functions which will call the alert.js functions.
- Add a reference to the alert.js web resource on your form or view (the other required files are loaded automatically).
- For forms, this is simply added through the form properties.
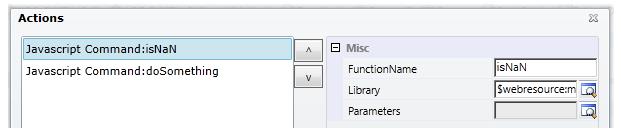
- For views, add a "JavaScript Function Action" to the "Command Actions" for your button command, calling the alert.js web resource, where the function is "isNaN" (without quotes). Using the Ribbon Workbench to edit the command is recommended.
- Add a reference to your custom JavaScript web resource where you're making the calls to alert.js. This should be added after the reference to alert.js.
- Call your custom function from your JavaScript library, e.g. from the command bar button, or from the form onload event.
Supported Functions
- Alert.show
- Alert.hide
- Alert.showLoading
- Alert.showWebResource
- Alert.showDialogProcess
- Alert.showIFrame
- Alert.getIFrameWindow
- Alert.getCrmWindow
- Alert.htmlEncode
Alert.show
Use this method to show a light-box message. This can be called from a form, view, or anywhere that supports JavaScript. As of version 2.0, the unsupported CRM light-box is no longer being used. Instead a custom dialog is displayed, 100% contained within the solution, meaning the lightbox displays seamlessly on any browser.
Alert.show(title, message, buttons, icon, width, height, baseUrl, preventCancel, padding)
Parameters
title
- Type: String. The main (large) text to display inside the message.
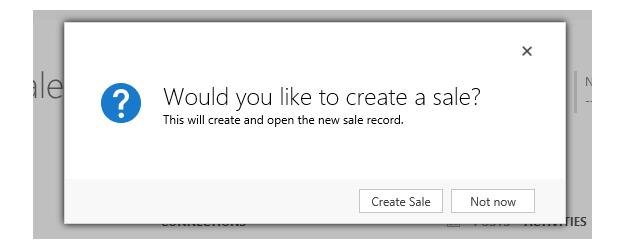
"Would you like to create a sale?"
message
- Type: String. The sub-heading (smaller) text to display below the title. Not required. This value accepts HTML, so if you want to display more complex messages, you can pass in custom HTML. You can also display plugin traces or error messages here, or even create more complex HTML objects like iframes etc. Note: use the Alert.htmlEncode() function to display things like XML.
"This will create and open the new sale record."
buttons
- Type: Array of Alert.Button objects. The buttons to display inside the message. If this is set to null, a default "OK" button is displayed, which simply closes the message. If this is set to an empty array, no buttons will be displayed, meaning the alert can only be dismissed using the 'X' or the Alert.hide() function.
[
    new Alert.Button("Create Sale", createSaleFunction, true),
    new Alert.Button("Not now")
]
- Each Alert.Button object should be created using the following properties:
new Alert.Button(label, callback, setFocus, preventClose)- label (String): The text to display on the button.
- callback (function): A custom function to call when the button is clicked. This function accepts no input parameters, and can be declared inline as a dynamic function. A callback is not required, as the button can still close the alert by default (unless you specify otherwise).
- setFocus (bool): Specify whether this button should have focus set to it by default, i.e. to allow pressing 'enter' to fire the button command. If there is only one button, focus is automatically set to the button, unless you explicitly set this to false.
- preventClose (bool): Specify whether this button should not close the alert after executing the callback function. By default, if this value is not specified, the alert will be automatically closed after clicking the button. Set this to true if you want to keep the alert open, for example if your button does something like the 'download log' for CRM errors, where you want to keep the error open.
icon
- Type: String. The icon to display beside the message. Not required.
- ERROR: Message will display an error icon.
- WARNING: Message will display a warning icon.
- INFO: Message will display an info icon.
- SUCCESS: Message will display a green tick (success) icon.
- QUESTION: Message will display a question mark icon.
- LOADING: Message will display a CRM loading spinner icon.
"QUESTION"
width
- Type: Number. The width of the dialog in pixels. If not specified, this will default to 500px.
500
height
- Type: Number. The height of the dialog in pixels. If not specified, this will default to 250px. If the specified height is greater than 250, the message and icon will align to the top of the alert, which is useful for displaying larger messages or trace logs etc. Otherwise, if the height is 250 or less, the message and icon will align in the middle of the alert, which is best used for simple 1-2 line messages. In either case, if the message content exceeds the height of the alert, a scroll bar will be added allowing the user to read the whole message, and copy the content if needed.
250
baseUrl
- Type: String. The CRM server base URL. Not required on forms or views. If not specified, it will default to
Xrm.Page.context.getClientUrl(). Must be specified where Xrm.Page is not available, e.g. from web resources.
"http://server/org"
preventCancel
- Type: bool. Specify whether the 'X' to close the alert should be hidden, preventing the user from closing the alert without using one of the specified buttons. By default the 'X' will be displayed, so to hide the 'X', set this to true.
true
padding
- Type: Number. Specify custom padding around the popup (in pixels). If not specified, or set to null, this will default to 20px.
30
Alert.hide
Use this method to manually hide the alert from code. This is useful if you have a background process running which once completed, will automatically close the alert. This function accepts no input parameters, and has no return type. This will simply hide any alert being displayed at the time.
Alert.hide()
Alert.showLoading
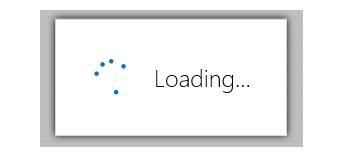
Use this method to display a small loading spinner with the text "Loading...". This is just a simple wrapper for the Alert.show method with a few standardised defaults, making it easier to reuse when needing to display a loading message.
Alert.showLoading(url)
Parameters
url
- Type: String. The CRM server base URL. Not required on forms or views. If not specified, it will default to
Xrm.Page.context.getClientUrl(). Must be specified where Xrm.Page is not available, e.g. from web resources.
"http://server/org"
Alert.showWebResource
Use this method to display an HTML web resource inside a light-box. The URL of the web resource is generated and then passed into the Alert.showIFrame function, which creates an iframe to the web resource. You can also optionally add custom titles, buttons, and padding, just like the standard Alert.show function.
Alert.showWebResource(webResourceName, width, height, title, buttons, baseUrl, preventCancel, padding)
To access the web resource document, i.e. to get the values from inputs on the web resource, you can make a call to Alert.getIFrameWindow from the button callback of this alert, or from any other JavaScript. This allows you to access any elements inside the web resource being displayed.
To access CRM components from inside the web resource document, i.e. to execute some other form logic on click of a button inside your web resource, you can make a call to Alert.getCrmWindow from anywhere inside the web resource. This allows you to call other functions, or access form fields directly from within the web resource.

Parameters
webResourceName
- Type: String. The schema name of the HTML web resource to display inside the alert. Additional query string parameters can be added to the webResourceName to pass values to the web resource (must be added to the Data query string).
"new_/html/tester.html?Data=" + encodeURIComponent("someVar1=1&someVar2=2")
width
- Type: Number. The width of the dialog in pixels. If not specified, this will default to 800px.
1600
height
- Type: Number. The height of the dialog in pixels. If not specified, this will default to 600px.
900
title
- Type: String. An optional title to display at the top of the web resource. If not specified, the web resource will expand to the top of the alert.
"Change Account Name"
buttons
- Type: Array of Alert.Button objects. The buttons to display at the bottom of the web resource. If this is set to null, no buttons will be displayed (i.e. if the buttons are managed inside the web resource). See the Alert.show documentation above for how to structure the buttons. To access values from the web resource, make a call to Alert.getIFrameWindow from the button callback.
[new Alert.Button("OK", doSomething)]
baseUrl
- Type: String. The CRM server base URL. Not required on forms or views. If not specified, it will default to
Xrm.Page.context.getClientUrl(). Must be specified where Xrm.Page is not available, e.g. from web resources.
"http://server/org"
preventCancel
- Type: bool. Specify whether the 'X' to close the alert should be hidden, preventing the user from closing the alert without using one of the specified buttons. By default the 'X' will be displayed, so to hide the 'X', set this to true.
true
padding
- Type: Number. Specify custom padding around the popup (in pixels). If not specified, or set to null, this will default to 0px.
30
Alert.showDialogProcess
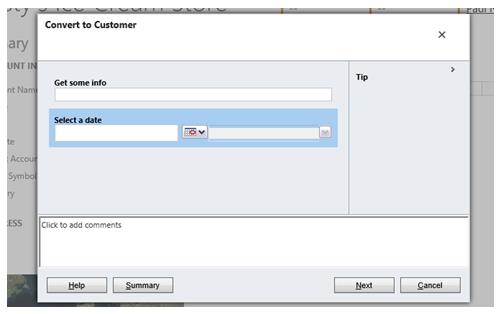
Use this method to display a CRM dialog process inside a light-box. The URL of the dialog process is generated and then passed into the Alert.showIFrame function, which creates an iframe to the dialog process. You can also optionally specify a callback function which will execute when the dialog is completed or cancelled, allowing you to refresh the form for example.
Alert.showDialogProcess(dialogId, entityName, recordId, callback, width, height, baseUrl)
Parameters
dialogId
- Type: String. The Guid of the dialog to display. You can find this by opening the process, and getting the 'id' query string parameter from the URL.
"ac03c16e-40b2-41c4-9831-4f651b77f393"
entityName
- Type: String. The schema name of the entity the dialog is being run for.
"account"
recordId
- Type: String. The Guid of the record to run the dialog against. To run the dialog against the current record (i.e. from a form), you can use
Xrm.Page.data.entity.getId().
Xrm.Page.data.entity.getId()
callback
- Type: function. A function to call when the dialog is closed. This should include any code you wish to execute after the user is finished with the dialog, e.g. to refresh the form. Note that this function will fire whether the user completed the dialog, or closed it without completing it. The callback function accepts no parameters, and can be declared inline as a dynamic function.
function () {
    Xrm.Page.data.refresh();
}
width
- Type: Number. The width of the dialog in pixels. If not specified, this will default to 800px.
1600
height
- Type: Number. The height of the dialog in pixels. If not specified, this will default to 600px.
900
baseUrl
- Type: String. The CRM server base URL. Not required on forms or views. If not specified, it will default to
Xrm.Page.context.getClientUrl(). Must be specified where Xrm.Page is not available, e.g. from web resources.
"http://server/org"
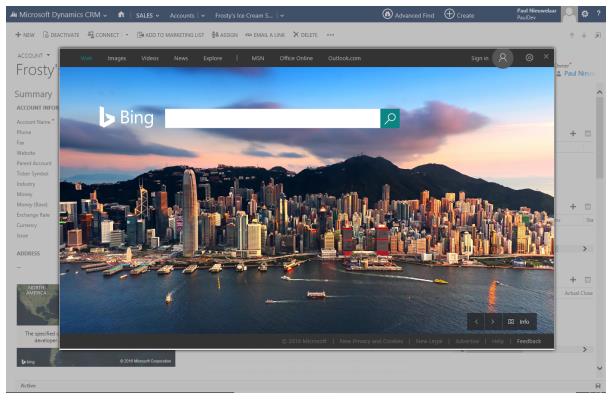
Alert.showIFrame
Use this method to display a URL inside a light-box, via an iFrame. You can also optionally add custom titles, buttons, and padding, just like the standard Alert.show function.
Alert.showIFrame(iframeUrl, width, height, title, buttons, baseUrl, preventCancel, padding)
To access the iframe document, i.e. to get the values from inputs on the web page, you can make a call to Alert.getIFrameWindow from the button callback of this alert, or from any other JavaScript. This allows you to access any elements inside the web page being displayed. Note that cross-domain scripting is not allowed, so the web page being displayed in the iframe must be on the same domain as CRM for you to access its document via this method.
To access CRM components from inside the iframe document, i.e. to execute some other form logic on click of a button inside your web page, you can make a call to Alert.getCrmWindow from anywhere inside the web page. This allows you to call other functions, or access form fields directly from within the iframe document. Note that cross-domain scripting is not allowed, so the web page being displayed in the iframe must be on the same domain as CRM for you to call into CRM from its document.
Parameters
iframeUrl
- Type: String. The URL of the webpage to display inside the light-box. This webpage must allow being displayed inside an iframe. E.g.
"http://bing.com"works but"http://google.com"does not.
"http://bing.com"
width
- Type: Number. The width of the dialog in pixels. If not specified, this will default to 800px.
1600
height
- Type: Number. The height of the dialog in pixels. If not specified, this will default to 600px.
900
title
- Type: String. An optional title to display at the top of the iframe. If not specified, the iframe will expand to the top of the alert.
"Change Account Name"
buttons Type: Array of Alert.Button objects. The buttons to display at the bottom of the iframe. If this is set to null, no buttons will be displayed (i.e. if the buttons are managed inside the iframe). See the Alert.show documentation above for how to structure the buttons. To access values from the iframe, make a call to Alert.getIFrameWindow from the button callback.
[new Alert.Button("OK", doSomething)]
baseUrl
- Type: String. The CRM server base URL. Not required on forms or views. If not specified, it will default to
Xrm.Page.context.getClientUrl(). Must be specified where Xrm.Page is not available, e.g. from web resources.
"http://server/org"
preventCancel
- Type: bool. Specify whether the 'X' to close the alert should be hidden, preventing the user from closing the alert without using one of the specified buttons. By default the 'X' will be displayed, so to hide the 'X', set this to true.
true
padding
- Type: Number. Specify custom padding around the popup (in pixels). If not specified, or set to null, this will default to 0px.
30
Alert.getIFrameWindow
Use this method to get the context of an iFrame being displayed in the light-box. For example, if you're capturing input via a web resource, you can use this function to access the inputs on the web resource from inside a custom function. This allows you to use custom buttons to access the iFrame data.
Alert.getIFrameWindow()
Return type
- Type: window object. The window representing the current iFrame being displayed in the light-box. If no iFrames are available, this will return null.
var iFrameWindow = Alert.getIFrameWindow();

var value = iFrameWindow.document.getElementById("somefield").value;
Alert.getCrmWindow
This method gives you context of the CRM form (or client API wrapper if turbo forms are enabled). This allows you to access CRM functions, and your own custom JavaScript libraries from inside iFrame alerts. From inside a web resource, for example, you can call parent.Alert.getCrmWindow().doSomething();, where "doSomething()" represents a custom function loaded onto the parent form.
Alert.getCrmWindow()
Return type
- Type: window object. The window representing the CRM form, or client API wrapper if turbo forms are enabled. This window contains all of your custom web resource libraries loaded onto the form.
var crmWindow = parent.Alert.getCrmWindow();

crmWindow.Xrm.Page.getAttribute("name").setValue("something")
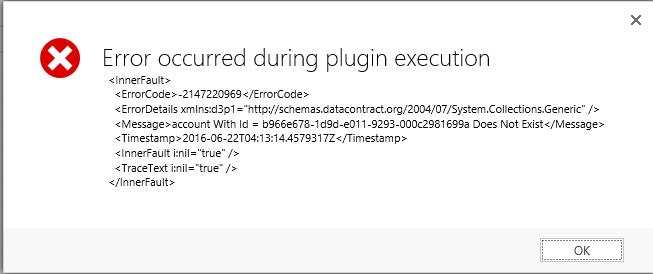
Alert.htmlEncode
Use this method to encode a custom message which contains HTML characters, to allow it to be displayed inside the alert message. For example, if displaying formatted XML with indented spacing and XML tags, calling this method will format the text into an HTML friendly message that displays nicely inside the alert. The returned value should then be passed to the 'message' of the Alert.show method.
NOTE: If you want to actually use HTML tags, like <b>bold</b>, you should not use this method.
Alert.htmlEncode(text)
Parameters
text
- Type: String. The text to encode, e.g. a trace log.
"  <InnerFault>
" +
"    <ErrorCode>-2147220969</ErrorCode>
" +
"    <ErrorDetails xmlns:d3p1="http://schemas.datacontract.org/2004/07/System.Collections.Generic" />
" +
"    <Message>account With Id = b966e678-1d9d-e011-9293-000c2981699a Does Not Exist</Message>
" +
"    <Timestamp>2016-06-22T04:13:14.4579317Z</Timestamp>
" +
"    <InnerFault i:nil="true" />
" +
"    <TraceText i:nil="true" />
" +
"  </InnerFault>"
Return type
- Type: String. The text passed into the method, with all HTML tags encoded, including line breaks and spacing.
" <InnerFault><br /> <ErrorCode>-2147220969</ErrorCode><br /> <ErrorDetails xmlns:d3p1="http://schemas.datacontract.org/2004/07/System.Collections.Generic" /><br /> <Message>account With Id = b966e678-1d9d-e011-9293-000c2981699a Does Not Exist</Message><br /> <Timestamp>2016-06-22T04:13:14.4579317Z</Timestamp><br /> <InnerFault i:nil="true" /><br /> <TraceText i:nil="true" /><br /> </InnerFault>"
