- 创建Spring的主要目的是用来替代更加重量级的企业级Java技术,尤其是EJB(Enterprise JavaBean 企业级JavaBean)。相对于EJB来说,Spring提供了更加轻量级和简单的编程模型。它增强了简单老式Java对象(Plain Old Java Object, POJO)的功能,使其具备了之前只有EJB和其他企业级Java规范才具有的功能。
- Spring是为了解决企业级应用开发的复杂性而创建的。为了降低Java开发的复杂性,Spring采取了以下4种关键策略:
- 基于POJO的轻量级和最小侵入性编程
- 通过依赖注入和面向接口实现松耦合
- 基于切面和惯例进行声明式编程
- 通过切面和模板减少样版式代码
- 任何一个应用都会由两个或者更多的类组成,这些类相互之间进行协作来完成特定的业务逻辑。按照传统的做法,每个对象负责管理与自己相互协作的对象(即它所依赖的对象)的引用,这将导致高度耦合和难以测试的代码。
- 依赖注入DI带来的最大收益--松耦合,如果一个对象只通过接口(而不是具体实现或初始化过程)来表明依赖关系,那么这种依赖就能够在对象本身毫不知情的情况下,用不同的具体实现进行替换。
- Spring通过应用上下文(Application Context)装载bean的定义并把它们组装起来,Spring应用上下文全权负责对象的创建和组装。
- DI能够让相互协作的软件组件保持松散耦合,而面向切面编程(AOP)允许你把遍布应用各处的功能分离出来形成可重用的组件。
- 在基于Spring的应用中,应用对象生存于Spring容器中。Spring容器负责创建对象,装配它们,配置它们并管理它们的整个生命周期。
- Spring自带了多个容器实现,可以归为两种不同的类型:
- bean工厂(由org.springframework.beans.factory.BeanFactory接口定义)是最简单的容器,提供基本的DI支持。
- 应用上下文(由org.springframework.context.ApplicationContext接口定义)基于BeanFactory构建,并提供应用框架级别的服务。应用上下文比bean工厂更受欢迎。
Spring常用的应用上下文:
- AnnotationConfigApplicationContext:从一个或多个基于Java的配置类中加载Spring应用上下文
- AnnotationConfigWebApplicationContext:从一个或多个基于Java的配置类中加载SpringWeb应用上下文
- ClassPathXMLApplicationContext:从类路径下的一个或多个XML配置文件中加载上下文定义,把应用上下文的定义文件作为类资源
- FileSystemXMLApplicationContext:从文件系统下的一个或多个XML配置文件中加载上下文定义
- XMLWebApplicationContext:从Web应用下的一个或多个XML配置文件中加载上下文定义
- bean的生命周期:

- Spring Bean的生命周期:
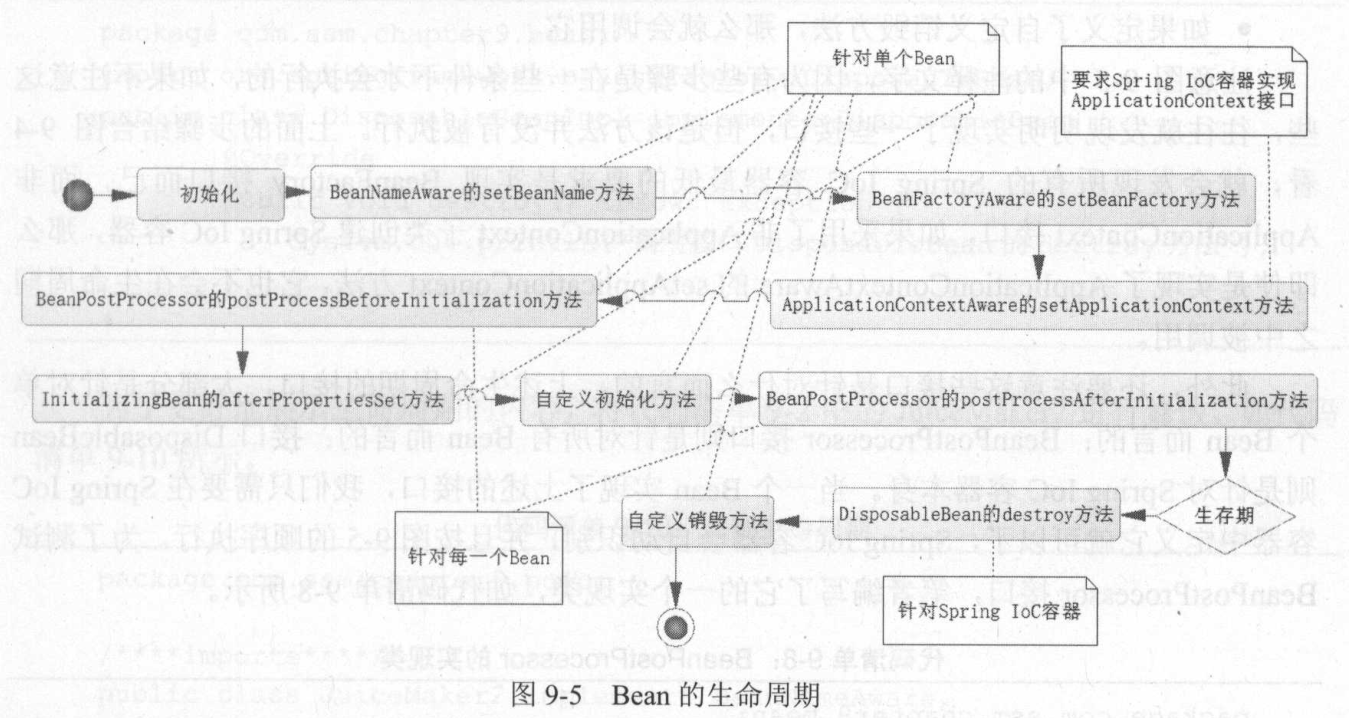
- Spring对Bean进行实例化
- Spirng将值和Bean的引用注入到Bean对应的属性中
- 如果Bean实现了BeanNameAware接口的setBeanName方法,那么就会调用这个方法。
- 如果Bean实现了BeanFactoryAware接口的setBeanFactory方法,那么就会调用这个方法。
- 如果Bean实现了ApplicationContextAware接口的setApplicationContext方法,且Spring IoC容器也必须是一个ApplicationContext接口的实现类,那么才会调用这个方法。
- 如果Bean实现了BeanPostProcessor接口的postProcessBeforeInitialization方法,那么就会调用这个方法
- 如果Bean实现了InitializingBean接口的afterPropertiesSet方法,那么就会调用这个方法
- 如果Bean自定义了初始化方法,即使用init-method声明了自定义的初始化方法,那么就会调用这个方法
- 如果Bean实现了BeanPostProcessor接口的postProcessAfterInitialization方法,那么就会调用这个方法。
- 至此,Bean就完成了初始化,Bean就生存在Spring IoC容器中,使用者就可以从中获取Bean的服务。当服务器正常关闭,或者遇到其他关闭Spring IoC容器的时间,就会完成Bean的销毁。
- 如果Bean实现了接口DisposableBean接口的destory方法,那么就会调用这个方法。
- 如果Bean自定义了销毁方法,即使用destroy-method声明了自定义的销毁方法,那么就会调用这个方法。
注意:BeanPostProcessor接口是针对所有Bean而言的,而其他接口则是针对单个Bean而言的。
使用示例对Spring Bean的声明周期进行演示:
- Source类POJO
 Source类
package com.ssm.chapter9.pojo;

public class Source {
    private String fruit;    // 类型
    private String sugar;    // 糖分描述
    private String size;    // 大小杯
    public String getFruit() {
        return fruit;
    }
    public void setFruit(String fruit) {
        this.fruit = fruit;
    }
    public String getSugar() {
        return sugar;
    }
    public void setSugar(String sugar) {
        this.sugar = sugar;
    }
    public String getSize() {
        return size;
    }
    public void setSize(String size) {
        this.size = size;
    }

}
- JuiceMaker2类,实现了BeanNameAware, BeanFactoryAware, ApplicationContextAware, InitializingBean接口,和自定义的初始化方法init()和销毁方法destory(),以及业务方法makeJuice()
JuiceMaker2类
package com.ssm.chapter9.pojo;

import org.springframework.beans.BeansException;
import org.springframework.beans.factory.BeanFactory;
import org.springframework.beans.factory.BeanFactoryAware;
import org.springframework.beans.factory.BeanNameAware;
import org.springframework.beans.factory.InitializingBean;
import org.springframework.context.ApplicationContext;
import org.springframework.context.ApplicationContextAware;

public class JuiceMaker2 implements BeanNameAware, BeanFactoryAware, ApplicationContextAware, InitializingBean {
    private String beverageShop = null;
    private Source source = null;

    public String getBeverageShop() {
        return beverageShop;
    }

    public void setBeverageShop(String beverageShop) {
        this.beverageShop = beverageShop;
    }

    public Source getSource() {
        return source;
    }

    public void setSource(Source source) {
        this.source = source;
    }

    public String makeJuice() {
        String juice = "这是一杯由" + beverageShop + "饮品店,提供的" + source.getSize() + source.getSugar() + source.getFruit();
        return juice;
    }

    public void init() {
        System.out.println("【" + this.getClass().getSimpleName() + "】执行自定义初始化方法");
    }

    public void destroy() {
        System.out.println("【" + this.getClass().getSimpleName() + "】执行自定义销毁方法");
    }

    @Override
    public void setBeanName(String arg0) {
        System.out.println("【" + this.getClass().getSimpleName() + "】调用BeanNameAware接口的setBeanName方法");

    }

    @Override
    public void setBeanFactory(BeanFactory arg0) throws BeansException {
        System.out.println("【" + this.getClass().getSimpleName() + "】调用BeanFactoryAware接口的setBeanFactory方法");
    }

    @Override
    public void setApplicationContext(ApplicationContext arg0) throws BeansException {
        System.out.println(
                "【" + this.getClass().getSimpleName() + "】调用ApplicationContextAware接口的setApplicationContext方法");
    }

    @Override
    public void afterPropertiesSet() throws Exception {
        System.out.println("【" + this.getClass().getSimpleName() + "】调用InitializingBean接口的afterPropertiesSet方法");
    }
}
- 实现了BeanPostProcessor接口的BeanPostProcessorImpl Bean
BeanPostProcessorImpl
package com.ssm.chapter9.bean;

import org.springframework.beans.BeansException;
import org.springframework.beans.factory.config.BeanPostProcessor;

public class BeanPostProcessorImpl implements BeanPostProcessor {

    @Override
    public Object postProcessBeforeInitialization(Object bean, String beanName) throws BeansException {
        System.out.println("【" + bean.getClass().getSimpleName() + "】对象" + beanName + "开始实例化");
        return bean;
    }

    @Override
    public Object postProcessAfterInitialization(Object bean, String beanName) throws BeansException {
        System.out.println("【" + bean.getClass().getSimpleName() + "】对象" + beanName + "实例化完成");
        return bean;
    }

}
- 实现了DisposableBean接口的DisposableBeanImpl Bean
DisposableBeanImpl
package com.ssm.chapter9.bean;

import org.springframework.beans.factory.DisposableBean;

public class DisposableBeanImpl implements DisposableBean {

    @Override
    public void destroy() throws Exception {
        System.out.println("调用接口DisposableBean的destroy方法");
    }

}
- Spring配置文件spring-cfg.xml
Spring XML配置文件
<?xml version='1.0' encoding='UTF-8' ?>
<beans xmlns="http://www.springframework.org/schema/beans"
    xmlns:xsi="http://www.w3.org/2001/XMLSchema-instance"
    xsi:schemaLocation="http://www.springframework.org/schema/beans
    http://www.springframework.org/schema/beans/spring-beans-4.0.xsd">

    <!--BeanPostProcessor定义 -->
    <bean id="beanPostProcessor" class="com.ssm.chapter9.bean.BeanPostProcessorImpl" />

    <!--DisposableBean定义 -->
    <bean id="disposableBean" class="com.ssm.chapter9.bean.DisposableBeanImpl" />

    <bean id="source" class="com.ssm.chapter9.pojo.Source">
        <property name="fruit" value="橙汁" />
        <property name="sugar" value="少糖" />
        <property name="size" value="大杯" />
    </bean>

    <bean id="juiceMaker2" class="com.ssm.chapter9.pojo.JuiceMaker2"
        destroy-method="destroy" init-method="init">
        <property name="beverageShop" value="贡茶" />
        <property name="source" ref="source" />
    </bean>

</beans>
- 测试方法
测试主方法
package com.ssm.chapter9.main;

import org.springframework.context.support.ClassPathXmlApplicationContext;

import com.ssm.chapter9.pojo.JuiceMaker2;

public class Chapter9Main {
    public static void main(String[] args) {
        testIoC();
    }

    public static void testIoC() {
        ClassPathXmlApplicationContext ctx =
                new ClassPathXmlApplicationContext("spring-cfg.xml");
        JuiceMaker2 juiceMaker2 = (JuiceMaker2) ctx.getBean("juiceMaker2");
        System.out.println(juiceMaker2.makeJuice());
        ctx.close();
    }
}
- 测试结果
测试结果
十月 09, 2018 8:44:28 上午 org.springframework.context.support.ClassPathXmlApplicationContext prepareRefresh
信息: Refreshing org.springframework.context.support.ClassPathXmlApplicationContext@5e8c92f4: startup date [Tue Oct 09 08:44:28 GMT+08:00 2018]; root of context hierarchy
十月 09, 2018 8:44:28 上午 org.springframework.beans.factory.xml.XmlBeanDefinitionReader loadBeanDefinitions
信息: Loading XML bean definitions from class path resource [spring-cfg.xml]
【DisposableBeanImpl】对象disposableBean开始实例化
【DisposableBeanImpl】对象disposableBean实例化完成
【Source】对象source开始实例化
【Source】对象source实例化完成
【JuiceMaker2】调用BeanNameAware接口的setBeanName方法
【JuiceMaker2】调用BeanFactoryAware接口的setBeanFactory方法
【JuiceMaker2】调用ApplicationContextAware接口的setApplicationContext方法
【JuiceMaker2】对象juiceMaker2开始实例化
【JuiceMaker2】调用InitializingBean接口的afterPropertiesSet方法
【JuiceMaker2】执行自定义初始化方法
【JuiceMaker2】对象juiceMaker2实例化完成
这是一杯由贡茶饮品店,提供的大杯少糖橙汁
十月 09, 2018 8:44:28 上午 org.springframework.context.support.ClassPathXmlApplicationContext doClose
信息: Closing org.springframework.context.support.ClassPathXmlApplicationContext@5e8c92f4: startup date [Tue Oct 09 08:44:28 GMT+08:00 2018]; root of context hierarchy
【JuiceMaker2】执行自定义销毁方法
调用接口DisposableBean的destroy方法

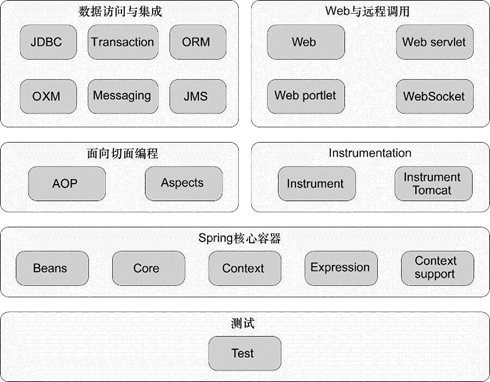
- Spring框架由6个定义良好的模块分类组成: