在微服务概念兴起的今天,很多公司转型使用微服务作为架构。在技术选型上Spring Cloud 是非常好的选择,它提供了一站式的分布式系统解决方案,而Spring Cloud中的每个组件都是基于Spring Boot构建的,Spring Boot提供J2EE一站式解决方案,具有以下优点:
- 快速创建独立运行的Spring项目以及与主流框架集成
- 使用嵌入式的Servlet容器,应用无需打成WAR包
- starters自动依赖与版本控制
- 大量的自动配置,简化开发,也可修改默认值
- 无需配置XML,无代码生成,开箱即用
- 准生产环境的运行时应用监控
- 与云计算的天然集成
一、Spring Boot的核心组件模块
| 模块 | java文件数 |
|---|---|
| spring-boot | 551 |
| spring-boot-actuator | 423 |
| spring-boot-autoconfigure | 783 |
| spring-boot-devtools | 169 |
| spring-boot-cli | 180 |
| spring-boot-tools | 355 |
从上面的java文件数量大致可以看出,SpringBoot技术框架的核心组成部分:
spring-boot-autoconfigure
spring-boot
spring-boot-tools
我们把SpringBoot源码导入IntelliJ IDEA,查看artifact的全部依赖关系。
IDEA有个Maven Projects窗口,一般在右侧能够找到,如果没有可以从菜单栏打开:View>Tool Windows>Maven Projects;
选择要分析的maven module(idea的module相当于eclipse的project),右击show dependencies,会出来该module的全部依赖关系图,非常清晰细致。
例如,spring-boot-starter-freemarker的依赖图分析如下:

在spring-boot-build 的pom中,我们可以看到:
<modules>
    <module>spring-boot-dependencies</module>
    <module>spring-boot-parent</module>
    <module>spring-boot-tools</module>
    <module>spring-boot</module>
    <module>spring-boot-test</module>
    <module>spring-boot-autoconfigure</module>
    <module>spring-boot-test-autoconfigure</module>
    <module>spring-boot-actuator</module>
    <module>spring-boot-devtools</module>
    <module>spring-boot-docs</module>
    <module>spring-boot-starters</module>
    <module>spring-boot-actuator-docs</module>
    <module>spring-boot-cli</module>
</modules>
其中,在spring-boot-dependencies中,SpringBoot项目维护了一份庞大依赖。这些依赖的版本都是经过实践,测试通过,不会发生依赖冲突的。就这样一个事情,就大大减少了Spring开发过程中,出现jar包冲突的概率。spring-boot-parent依赖spring-boot-dependencies。
下面我们简要介绍一下SpringBoot子modules。
- spring-boot:SpringBoot核心工程。
- spring-boot-starters:是SpringBoot的启动服务工程。
- spring-boot-autoconfigure:是SpringBoot实现自动配置的核心工程。
- spring-boot-actuator:提供SpringBoot应用的外围支撑性功能。
比如:
- Endpoints,SpringBoot应用状态监控管理
- HealthIndicator,SpringBoot应用健康指示表
- 提供metrics支持
- 提供远程shell支持
- spring-boot-tools:提供了SpringBoot开发者的常用工具集。诸如,spring-boot-gradle-plugin,spring-boot-maven-plugin就是这个工程里面的。
- spring-boot-cli:是Spring Boot命令行交互工具,可用于使用Spring进行快速原型搭建。你可以用它直接运行Groovy脚本。如果你不喜欢Maven或Gradle,Spring提供了CLI(Command Line Interface)来开发运行Spring应用程序。你可以使用它来运行Groovy脚本,甚至编写自定义命令。
二、Spring Boot Starters
Spring boot中的starter概念是非常重要的机制,能够抛弃以前繁杂的配置,统一集成进starter,应用者只需要引入starter jar包,spring boot就能自动扫描到要加载的信息。
starter让我们摆脱了各种依赖库的处理,需要配置各种信息的困扰。Spring Boot会自动通过classpath路径下的类发现需要的Bean,并织入bean。
例如,如果你想使用Spring和用JPA访问数据库,你只要依赖 spring-boot-starter-data-jpa 即可。
目前,github上spring-boot项目的最新的starter列表spring-boot/spring-boot-starters如下:
spring-boot-starter
spring-boot-starter-activemq
spring-boot-starter-actuator
spring-boot-starter-amqp
spring-boot-starter-aop
spring-boot-starter-artemis
spring-boot-starter-batch
spring-boot-starter-cache
spring-boot-starter-cloud-connectors
spring-boot-starter-data-cassandra
spring-boot-starter-data-couchbase
spring-boot-starter-data-elasticsearch
spring-boot-starter-data-jpa
spring-boot-starter-data-ldap
spring-boot-starter-data-mongodb
spring-boot-starter-data-mongodb-reactive
spring-boot-starter-data-neo4j
spring-boot-starter-data-redis
spring-boot-starter-data-rest
spring-boot-starter-data-solr
spring-boot-starter-freemarker
spring-boot-starter-groovy-templates
spring-boot-starter-hateoas
spring-boot-starter-integration
spring-boot-starter-jdbc
spring-boot-starter-jersey
spring-boot-starter-jetty
spring-boot-starter-jooq
spring-boot-starter-jta-atomikos
spring-boot-starter-jta-bitronix
spring-boot-starter-jta-narayana
spring-boot-starter-log4j2
spring-boot-starter-logging
spring-boot-starter-mail
spring-boot-starter-mobile
spring-boot-starter-mustache
spring-boot-starter-parent
spring-boot-starter-reactor-netty
spring-boot-starter-security
spring-boot-starter-social-facebook
spring-boot-starter-social-linkedin
spring-boot-starter-social-twitter
spring-boot-starter-test
spring-boot-starter-thymeleaf
spring-boot-starter-tomcat
spring-boot-starter-undertow
spring-boot-starter-validation
spring-boot-starter-web
spring-boot-starter-web-services
spring-boot-starter-webflux
spring-boot-starter-websocket
这是Spring Boot的核心启动器,包含了自动配置、日志和YAML。它的项目依赖图如下:


可以看出,这些starter只是配置,真正做自动化配置的代码的是在spring-boot-autoconfigure里面。同时spring-boot-autoconfigure依赖spring-boot工程,这个spring-boot工程是SpringBoot的核心。
SpringBoot会基于你的classpath中的jar包,试图猜测和配置您可能需要的bean。
例如,如果你的classpath中有tomcat-embedded.jar,你可能会想要一个TomcatEmbeddedServletContainerFactory Bean (SpringBoot通过获取EmbeddedServletContainerFactory来启动对应的web服务器。常用的两个实现类是TomcatEmbeddedServletContainerFactory和JettyEmbeddedServletContainerFactory)。
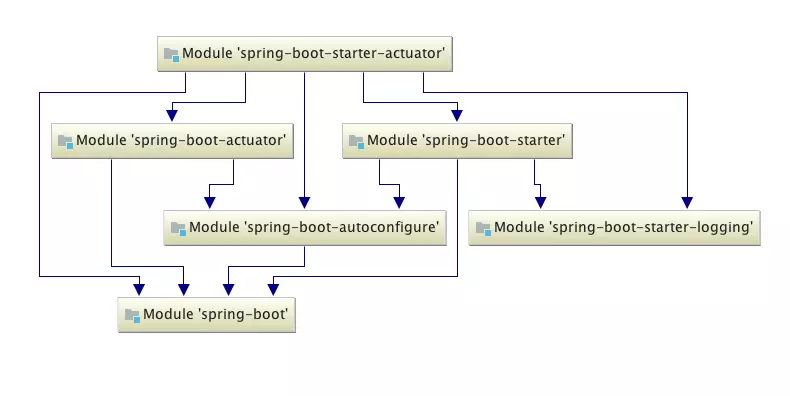
其他的所有基于Spring Boot的starter都依赖这个spring-boot-starter。比如说spring-boot-starter-actuator的依赖树,如下图:
三、SpringBoot 自动配置原理
SpringBoot 自动配置主要通过 @EnableAutoConfiguration, @Conditional, @EnableConfigurationProperties 或者 @ConfigurationProperties 等几个注解来进行自动配置完成的。
@EnableAutoConfiguration 开启自动配置,主要作用就是调用 Spring-Core 包里的 loadFactoryNames(),将 autoconfig 包里的已经写好的自动配置加载进来。
@Conditional 条件注解,通过判断类路径下有没有相应配置的 jar 包来确定是否加载和自动配置这个类。
@EnableConfigurationProperties的作用就是,给自动配置提供具体的配置参数,只需要写在application.properties 中,就可以通过映射写入配置类的 POJO 属性中。
1、SpringBoot启动主程序类
@SpringBootApplication
public class DemoApplication {
    public static void main(String[] args) {
        SpringApplication.run(DemoApplication.class, args);
    }
}
每次我们直接直接启动这个启动类,SpringBoot就启动成功了,并且帮我们配置了好多自动配置类。其中最重要是 @SpringBootApplication 这个注解,我们点进去看一下。
2、@SpringBootApplication注解
@Target(ElementType.TYPE)
@Retention(RetentionPolicy.RUNTIME)
@Documented
@Inherited
@SpringBootConfiguration
@EnableAutoConfiguration
@ComponentScan(excludeFilters = {
        @Filter(type = FilterType.CUSTOM, classes = TypeExcludeFilter.class),
        @Filter(type = FilterType.CUSTOM, classes = AutoConfigurationExcludeFilter.class) })
public @interface SpringBootApplication {
@SpringBootApplication声明时,引用了三个重要的注解:
- @SpringBootConfiguration : SpringBoot的配置类,标注在某个类上,表示这是一个Spring Boot的配置类
- @EnableAutoConfiguration: 开启自动配置类,SpringBoot的精华所在。
- @ComponentScan包扫描
以前我们需要配置的东西,Spring Boot帮我们自动配置;@EnableAutoConfiguration告诉SpringBoot开启自动配置功能;这样自动配置才能生效;
-
@EnableAutoConfiguration注解
@Target(ElementType.TYPE)
@Retention(RetentionPolicy.RUNTIME)
@Documented
@Inherited
@AutoConfigurationPackage
@Import(AutoConfigurationImportSelector.class)
public @interface EnableAutoConfiguration {}
@EnableAutoConfiguration声明时,引用了两个重要的注解:
- @AutoConfigurationPackage:自动配置包
- @Import: 导入自动配置的组件
-
@AutoConfigurationPackage注解
     static class Registrar implements ImportBeanDefinitionRegistrar, DeterminableImports {
        @Override
        public void registerBeanDefinitions(AnnotationMetadata metadata,BeanDefinitionRegistry registry) {
            register(registry, new PackageImport(metadata).getPackageName());
        }
它其实是注册了一个Bean的定义。
new PackageImport(metadata).getPackageName(),它其实返回了当前主程序类的同级以及子级的包组件。

以上图为例,DemoApplication是和demo包同级,但是demo2这个类是DemoApplication的父级,和example包同级
也就是说,DemoApplication启动加载的Bean中,并不会加载demo2,这也就是为什么,我们要把DemoApplication放在项目的最高级中。
- @Import(AutoConfigurationImportSelector.class)注解
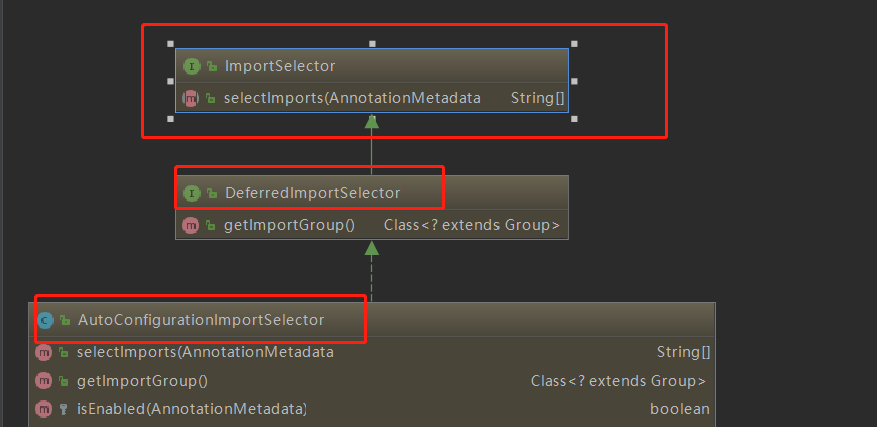
可以从图中看出AutoConfigurationImportSelector 继承了 DeferredImportSelector继承了ImportSelector,ImportSelector有一个方法为:selectImports。
  @Override
    public String[] selectImports(AnnotationMetadata annotationMetadata) {
        if (!isEnabled(annotationMetadata)) {
            return NO_IMPORTS;
        }
        AutoConfigurationMetadata autoConfigurationMetadata = AutoConfigurationMetadataLoader.loadMetadata(this.beanClassLoader);
        AnnotationAttributes attributes = getAttributes(annotationMetadata);
        List<String> configurations = getCandidateConfigurations(annotationMetadata,attributes);
        configurations = removeDuplicates(configurations);
        Set<String> exclusions = getExclusions(annotationMetadata, attributes);
        checkExcludedClasses(configurations, exclusions);
        configurations.removeAll(exclusions);
        configurations = filter(configurations, autoConfigurationMetadata);
        fireAutoConfigurationImportEvents(configurations, exclusions);
        return StringUtils.toStringArray(configurations);
    }
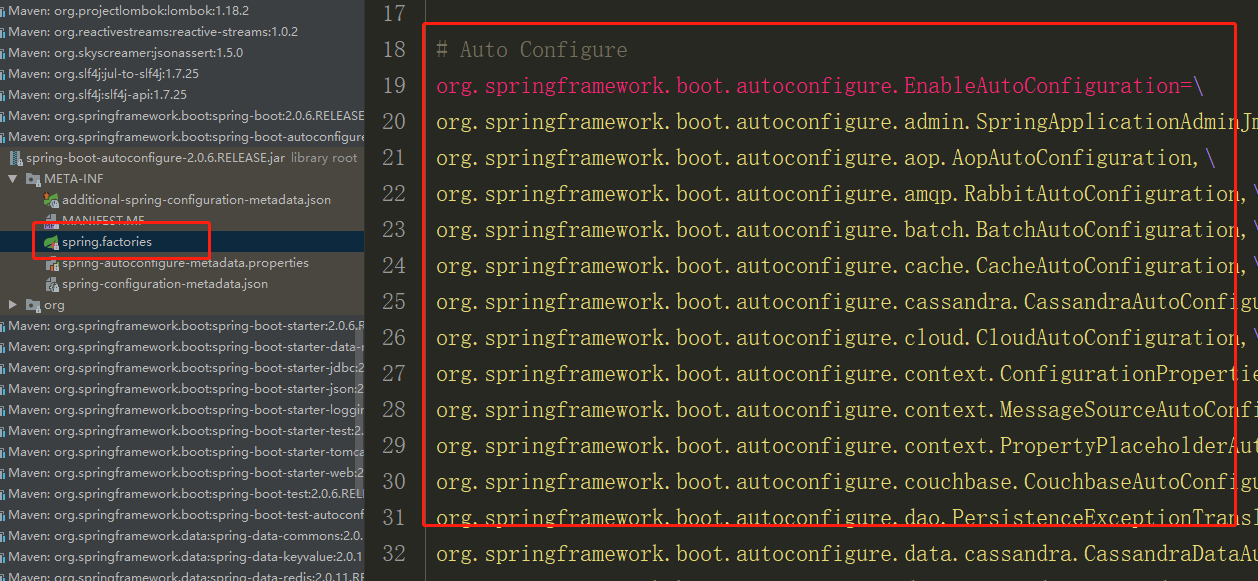
可以看到第九行,它其实是去加载public static final String FACTORIES_RESOURCE_LOCATION = "META-INF/spring.factories";外部文件。这个外部文件,有很多自动配置的
类。如下:
3、如何自定义自己的Bean
我们以RedisTemplate为例:
@Configuration
@ConditionalOnClass(RedisOperations.class)
@EnableConfigurationProperties(RedisProperties.class)
@Import({ LettuceConnectionConfiguration.class, JedisConnectionConfiguration.class })
public class RedisAutoConfiguration {
    @Bean
    @ConditionalOnMissingBean(name = "redisTemplate")
    public RedisTemplate<Object, Object> redisTemplate(RedisConnectionFactory redisConnectionFactory) throws UnknownHostException {
        RedisTemplate<Object, Object> template = new RedisTemplate<>();
        template.setConnectionFactory(redisConnectionFactory);
        return template;
    }

    @Bean
    @ConditionalOnMissingBean
    public StringRedisTemplate stringRedisTemplate(RedisConnectionFactory redisConnectionFactory) throws UnknownHostException {
        StringRedisTemplate template = new StringRedisTemplate();
        template.setConnectionFactory(redisConnectionFactory);
        return template;
    }
}
我们每次在Spring中使用Redis,都会使用到RedisTemplate这个工具类,但是他默认给我们返回的这个工具类,可能不是很符合我们的要求。比如:我们想要开启事务,或者想要改变它默认的序列化。
- 这时候该如何去做呢?
根据前面的分析,只要我们在容器中放入一个RedisTemplate Bean即可。
 1     @Bean("redisTemplate")
 2     public RedisTemplate<Object, Object> myRedisTemplate(RedisConnectionFactory redisConnectionFactory) {
 3         RedisTemplate<Object, Object> template = new RedisTemplate<>();
 4         template.setConnectionFactory(redisConnectionFactory);
 5         // 修改序列化为Jackson
 6         template.setDefaultSerializer(new GenericJackson2JsonRedisSerializer());
 7         // 开启事务
 8         template.setEnableTransactionSupport(true);
 9         return template;
10     }
我们自己定义我们的RedisTemplate模板,修改序列化,开启事务等操作。
我们将我们自己的Bean加入到IoC容器中以后,他就会默认的覆盖掉原来的RedisTemplate,达到定制的效果。
我们在以Kafka为例:
假设我们想要消费的对象不是字符串,而是一个对象呢?比如Person对象,或者其他Object类呢?
- 我们首先去查找KafkaAutoConfiguration(xxxAutoConfiguration),看看是否有关于Serializer属性的配置
- 假设没有我们就去KafkaProperties文件查找是否有Serializer的配置
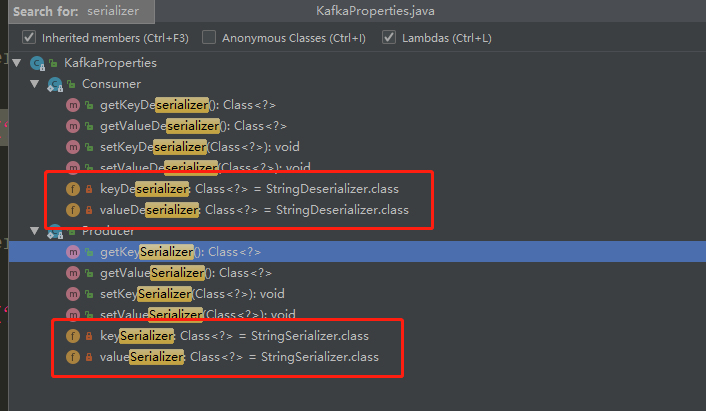
然后直接在application.properties修改默认序列化就好,连Bean都不需要自己重写。
类似这种,可以使用Spring提供的Json序列化,也可以自动使用第三方框架提供的序列化,比如Avro, Protobuff等
spring.kafka.producer.key-serializer=org.springframework.kafka.support.serializer.JsonSerializer
spring.kafka.producer.value-serializer=org.springframework.kafka.support.serializer.JsonSerializer
spring.kafka.consumer.key-deserializer=com.example.common.MyJson
spring.kafka.consumer.value-deserializer=com.example.common.MyJson
-
HttpEncodingAutoConfiguration
在这么多xxxxAutoConfiguration中,我们以HttpEncodingAutoConfiguration(Http自动编码)为例
 1 @Configuration
 2 //表示这是一个配置类,以前编写的配置文件一样,也可以给容器中添加组件
 3
 4 @EnableConfigurationProperties(HttpEncodingProperties.class)
 5 //启动指定类的ConfigurationProperties功能;将配置文件中对应的值和HttpEncodingProperties绑定起来;并把HttpEncodingProperties加入到ioc容器中
 6
 7 @ConditionalOnWebApplication
 8 //Spring底层@Conditional注解(Spring注解版),根据不同的条件,如果满足指定的条件,整个配置类里面的配置就会生效;这里是判断当前应用是否是web应用,如果是,当前配置类生效
 9
10 @ConditionalOnClass(CharacterEncodingFilter.class)
11 //判断当前项目有没有这个类CharacterEncodingFilter;SpringMVC中进行乱码解决的过滤器;
12
13 @ConditionalOnProperty(prefix = "spring.http.encoding", value = "enabled", matchIfMissing = true)
14 //判断配置文件中是否存在某个配置 spring.http.encoding.enabled;如果不存在,判断也是成立的
15 //即使我们配置文件中不配置pring.http.encoding.enabled=true,也是默认生效的;
16
17 public class HttpEncodingAutoConfiguration {
18
19     //他已经和SpringBoot的配置文件映射了
20     private final HttpEncodingProperties properties;
21
22     //只有一个有参构造器的情况下,参数的值就会从容器中拿
23     public HttpEncodingAutoConfiguration(HttpEncodingProperties properties) {
24         this.properties = properties;
25     }
26
27     @Bean
28     //给容器中添加一个组件,这个组件的某些值需要从properties中获取
29     @ConditionalOnMissingBean(CharacterEncodingFilter.class)
30     //判断容器没有这个组件
31     public CharacterEncodingFilter characterEncodingFilter() {
32         CharacterEncodingFilter filter = new OrderedCharacterEncodingFilter();
33         filter.setEncoding(this.properties.getCharset().name());
34         filter.setForceRequestEncoding(this.properties.shouldForce(Type.REQUEST));
35         filter.setForceResponseEncoding(this.properties.shouldForce(Type.RESPONSE));
36         return filter;
37     }
38     }
39     .......
40 }
通过上面的类的注解可以看到,通过使用@EnableConfigurationProperties,可以把配置文件中的属性与HttpEncodingProperties类绑定起来并且加入到IOC容器中,进入HttpEncodingProperties类,可以看到他是通过@ConfigurationProperties 注解把配置文件中的spring.http.encoding值与该类的属性绑定起来的。
@ConfigurationProperties(prefix = "spring.http.encoding")
public class HttpEncodingProperties
同时我们可以注意到上面的类中使用了@ConditionalOnClass与@ConditionalOnWebApplication注解,这两个都是@Conditional的派生注解,作用是必须是@Conditional指定的条件成立,才给容器中添加组件,配置里的内容才会生效
-
Conditional注解
下面我们以@ConditionalOnClass为例,来分析一下他的源代码。
@Conditional(OnClassCondition.class)
public @interface ConditionalOnClass {
进入OnClassCondition类,查看他的类继承信息,可以看到他继承SpringBootCondition类,SpringBootCondition又实现了Condition接口
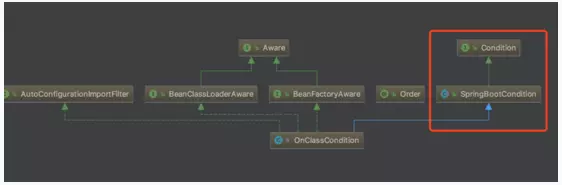
OnClassCondition又override了SpringBootCondition的getMatchOutcome方法,该方法会返回条件匹配结果。
getMatchOutcome方法源代码如下:
public ConditionOutcome getMatchOutcome(ConditionContext context,
         .....
List<String> missing = getMatches(onClasses, MatchType.MISSING, classLoader);
       ......
List<String> present = getMatches(onMissingClasses, MatchType.PRESENT, classLoader);
    }
可以看到getMatchOutcome中主要调用了getMatches方法
进入getMatches方法
private List<String> getMatches(Collection<String> candidates, MatchType matchType,
            ClassLoader classLoader) {
        List<String> matches = new ArrayList<String>(candidates.size());
        for (String candidate : candidates) {
            if (matchType.matches(candidate, classLoader)) {
                matches.add(candidate);
            }
        }
        return matches;
    }
getMatches又调用了MatchType的matches方法。
 private enum MatchType {

        PRESENT {

            @Override
            public boolean matches(String className, ClassLoader classLoader) {
                return isPresent(className, classLoader);
            }

        },

        MISSING {

            @Override
            public boolean matches(String className, ClassLoader classLoader) {
                return !isPresent(className, classLoader);
            }

        };

        private static boolean isPresent(String className, ClassLoader classLoader) {
            if (classLoader == null) {
                classLoader = ClassUtils.getDefaultClassLoader();
            }
            try {
                forName(className, classLoader);
                return true;
            }
            catch (Throwable ex) {
                return false;
            }
        }

        private static Class<?> forName(String className, ClassLoader classLoader)
                throws ClassNotFoundException {
            if (classLoader != null) {
                return classLoader.loadClass(className);
            }
            return Class.forName(className);
        }

        public abstract boolean matches(String className, ClassLoader classLoader);

    }
进入MatchType类中,可以看到他有两个枚举类,进一步看枚举类中的matches的源代码可以发现最终是利用loadClass以及forName 方法,判断类路径下有没有这个指定的类。
下面列举出的是Spring Boot对@Conditional的扩展注解。

用好SpringBoot只要把握这几点:
- SpringBoot启动会加载大量的自动配置类
- 所要做的就是我们需要的功能SpringBoot有没有帮我们写好的自动配置类:
- 如果有就再来看这个自动配置类中到底配置了哪些组件,Springboot自动配置类里边只要我们要用的组件有,我们就不需要再来配置了,但是如果说没有我们所需要的组件,那么我们就需要自己来写一个配置类来把我们相应的组件配置起来。
- 给容器中自动配置类添加组件的时候,会从properties类中获取某些属性,而这些属性我们就可以在配置文件指定这些属性