Flask自带的helloworld:
 1 app = Flask(__name__)
 2
 3 @app.route('/hello')  #hello/字符串参数路径
 4 #将url和函数hello_world的对应关系添加到路由中
 5 def hello_world():
 6     return render_template('hello.html) #返回hello页面,并传参
 7
 8
 9 if __name__ == '__main__':
10 #监听用户请求
11 #如果有用户请求,则执行app的__call__方法
12     app.run()
django请求的入口:
请求进来,执行class WSGIHandler的__call__方法
flask请求的入口:
先实例化对象,再将url对应的视图函数添加到路由当中,然后请求进来执行__call__
flask的配置文件写法
写法一:
在主代码文件中写
app.debug = True
app.config['debug'] = True
方法二:
将配置写到settings.py文件中:
app.config['debug'] = True
并在主文件中写
1 app.config.from_pyfile("settings.py")
注意上面写的是字符串,
源码执行逻辑:
root_path就是跟目录
拿到filename 也就是settings.py,然后打开读取所有的内容。
然后对其进行编译(exec),然后在执行,并放到__dict__中。
方法三:
主文件写
app.config.from_object("settings.DevelopmentConfig") #python类或类的路径
源码会先分割再通过importlib模块转换并通过反射找到这个类。
配置文件写:
 1 class Config(object):
 2     DEBUG = False
 3     TESTING = False
 4     DATABASE_URI = 'sqlite://:memory'
 5
 6 class ProductionConfig(Config):
 7     DATABASE_URI = 'mysql://user@localhost/foo'
 8
 9 class DevelopmentConfig(Config):
10     DEBUG = True
11     '''
12     继承父类,并重写父类'''
13
14 class TestingConfig(Config):
15     TESTING = True
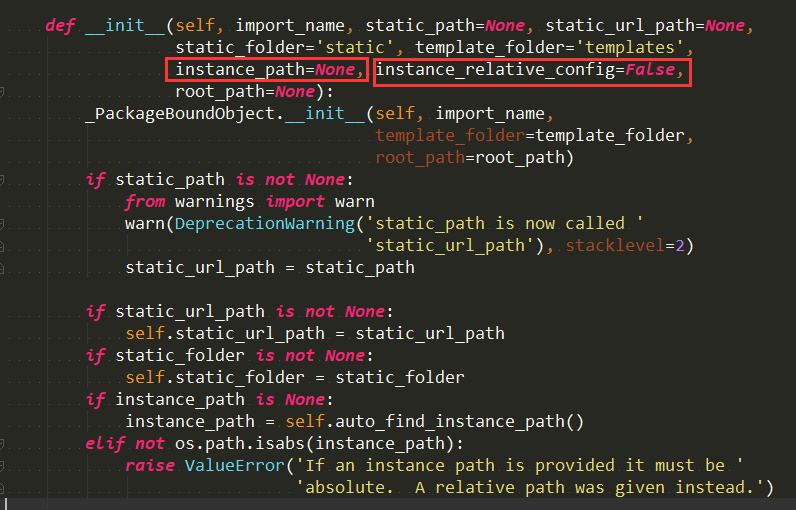
settings配置文件默认放到根目录。
如果instance_relative_config 为True,则需要放到instance_path目录,具体可以看源码:
#######################################################################
Flask框架的初步demo代码:
该demo实现通过账户tom密码123登陆,并存session,如果不登录无法访问index页面。
该页面通过url_for反向生成url并跳转回login.
登陆成功渲染字典USERS,前端通过三种方式取值。并通过a标签的herf给url传参,后端detail获取参数。
渲染单独信息。
主代码文件:
 1 from flask import Flask,request,render_template,redirect,session,url_for
 2 from flask import render_template
 3
 4 app = Flask(__name__) #实例化flask对象
 5 app.debug = True   #能够随时更改自动重启,不加的话每次更改代码需要手动重启
 6 app.config['SECRET_KEY'] = '123456'   #secret_key,用于给session加密
 7
 8 # @app.route('/hello/') #hello这个路由
 9 # @app.route('/hello/<name>')  #hello/字符串参数路径
10 # def hello_world(name=None):
11 #     return render_template('hello.html',name=name) #返回hello页面,并传参
12
13 USERS = {
14     1:{'name':'jerry','age':15,'text':'jerry is a cat'},
15     2:{'name':'tom','age':14,'text':'tom is a mouse'},
16     3:{'name':'doffy','age':16,'text':'doffy is a dog'},
17     4:{'name':'micheal','age':13,'text':'micheal is a frog'}
18 }
19
20 @app.route('/detail/<int:nid>',methods=['GET'])  #methods 注明该函数可以通过的methods方法。
21 def detail(nid):
22     info = USERS.get(nid)  #<int:nid> 通过url给函数传值
23     return render_template('detail.html',info=info)
24
25 @app.route('/index',methods=['GET'])
26 def index():
27     userinfo = session.get('userinfo')
28     if not userinfo:   #通过session判断登录状态
29         no = url_for('t1')
30         '''
31         url_for相当于django的reverse通过Url的别名反向生成url用的。
32         注意login函数的endpoint
33         '''
34         return redirect(no)
35     return render_template('index.html',user_dict = USERS)
36
37 @app.route('/login',methods=['GET','POST'],endpoint='t1') #endpoint是url的别名,相当于django中Url的name
38 def login():
39     if request.method == "GET":
40         # res = request.query_string
41         # print(res)  获取通过GET请求url传过来的参数
42         return render_template('login.html')
43     else:
44         user = request.form.get('user')
45         pwd = request.form.get('pwd')
46         if user == 'tom' and pwd == '123':
47             session['userinfo'] = user   #设置session
48             return render_template('hello.html')
49         return render_template('login.html', error='用户名或密码错误')
50
51 if __name__ == '__main__':
52     app.run()
templates目录:
login.html:
 1 <!DOCTYPE html>
 2 <html lang="en">
 3 <head>
 4     <meta charset="UTF-8">
 5     <meta http-equiv="x-ua-compatible" content="IE=edge">
 6     <meta name="viewport" content="width=device-width, initial-scale=1">
 7     <title>Title</title>
 8 </head>
 9 <body>
10 <hi>用户登录</hi>
11 <form method="post">
12     <input type="text" name="user">
13     <input type="text" name="pwd">
14     <input type="submit" value="登录">{{error}}
15 </form>
16
17 </body>
18 </html>
index.html:


 1 <!DOCTYPE html>
 2 <html lang="en">
 3 <head>
 4     <meta charset="UTF-8">
 5     <meta http-equiv="x-ua-compatible" content="IE=edge">
 6     <meta name="viewport" content="width=device-width, initial-scale=1">
 7     <title>Title</title>
 8 </head>
 9 <body>
10 <h1>STAFF INFO</h1>
11 {% for k,v in user_dict.items() %}
12     <table>
13     <tr>
14         <td>number</td>
15         <td>name</td>
16         <td>age</td>
17         <td>options</td>
18     </tr>
19 <tr>
20     <td>{{ k }}</td>
21     <td>{{ v.name }} {{ v['name'] }}{{ v.get('name') }}</td>
22         {#    三种数据的取法都可以使用#}
23     <td>{{ v.age }}</td>
24     <td><a href="/detail/{{ k }}">info</a></td>
25 </tr>
26     </table>
27 {% endfor %}
28 </body>
29 </html>
hello.html:
 1 <!DOCTYPE html>
 2 <html lang="en">
 3 <head>
 4     <meta charset="UTF-8">
 5     <meta http-equiv="x-ua-compatible" content="IE=edge">
 6     <meta name="viewport" content="width=device-width, initial-scale=1">
 7     <title>hello from flask</title>
 8 </head>
 9 <body>
10 {% if name %}
11 <h1>Hello {{ name }}</h1>
12 {#  可以通过后端传值显示name  #}
13 {% else %}
14 <h1>Hello,World!</h1>
15 {% endif %}
16 </body>
17 </html>
detail.html:
 1 <!DOCTYPE html>
 2 <html lang="en">
 3 <head>
 4     <meta charset="UTF-8">
 5     <meta http-equiv="x-ua-compatible" content="IE=edge">
 6     <meta name="viewport" content="width=device-width, initial-scale=1">
 7     <title>Title</title>
 8 </head>
 9 <body>
10 <h1>information {{ info.name }}</h1>
11 <div>
12     {{ info.text }}
13 </div>
14 </body>
15 </html>