1.Curl 命令
# 建立索引
[root@dbtest01 ~]# curl -XPUT 'http://10.0.0.121:9200/test'

# 插入数据
[root@dbtest01 ~]# curl -XPUT 'localhost:9200/student/user/1?pretty' -H 'Content-Type: application/json' -d '{"name": "wqh","gender":"male","age":"18","about":"I will carry you","interests":["cs","it"]}'
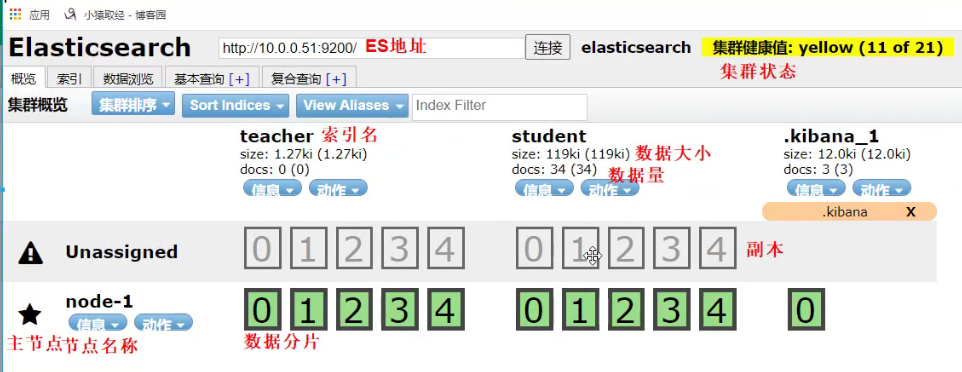
2.ES-Head 插件
谷歌浏览器安装 ES-Head 插件
3.Kibana
1.安装kibana
# 上传代码包
[root@dbtest01 ~]# rz kibana-6.6.0-x86_64.rpm

# 安装
[root@dbtest01 ~]# rpm -ivh kibana-6.6.0-x86_64.rpm
2.配置kibana
[root@dbtest01 ~]# vim /etc/kibana/kibana.yml

[root@dbtest01 ~]# grep "^[a-Z]" /etc/kibana/kibana.yml
# 进程的端口
server.port: 5601
# 监听地址
server.host: "10.0.0.121"
# 指定 ES 地址
elasticsearch.hosts: ["http://127.0.0.1:9200"]
# Kibana 也会创建索引
kibana.index: ".kibana"
3.启动kibana
# 启动 Kibana
[root@dbtest01 ~]# systemctl start kibana.service

# 验证
[root@dbtest01 ~]# netstat -lntp
tcp        0      0 10.0.0.121:5601          0.0.0.0:*               LISTEN      88636/node
4.浏览器访问页面
# 访问 http://10.0.0.121:5601 , Kibana 启动速度较慢