说明:记录下学习IOS的一些琐碎,有些在现在看起来很简单幼稚,不过权当学习足迹吧!
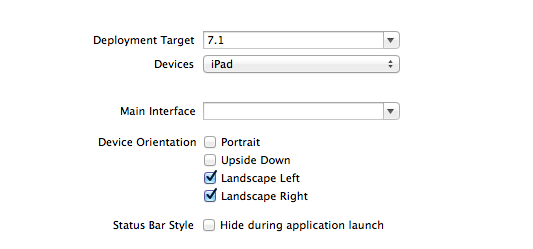
1.选定ipad支持的方向,如强制横屏等,需要在General——》Deployment Info ——》Device Orientation选择,含义如下:
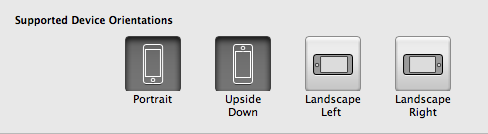
所以要想强制横屏的话,可以点选
2.UIView中如何添加xib文件?
如新建一个UIView为DocDetailView,那么建的那个xib文件在custom class中class应写成跟UIView名字一样的,这里要写成DocDetailView,而不是默认的UIView。
在.m文件中可以这样加载
 1 -(id)initWithFrame:(CGRect) frame{
 2     self = [super initWithFrame:frame];
 3     if(self){
 4         [self makeDocDetail];
 5     }
 6 }
 7
 8 -(void) makeDocDetail{
 9     NSArray *views = [[NSBundle mainBundle] loadNibNamed:@"DocDetailView" owner:self options:nil];
10     DocDetailView *docDetail = [views objectAtIndex:0];
11     //最好用下边的,这两个等价
12     DocDetailView *docDetail = [views lastObject];
13     [self addSubView:docDetail];
14 }
3.当发生错误
StoryboardApp[8593:207] Failed to instantiate the default view controller for UIMainStoryboardFile 'MainStoryboard' - perhaps the designated entry point is not set?
原因在于storyboard中的没有一个viewcontroller设置initial scene,需要选择一个view controller作为storyboard的第一个界面。

4.做注释时,一般用“/** 注释内容 */”,这是为了生成文档时方便。(前边两个*,后边一个*);
5.字符串合并。可以看以下代码
1 NSString *str1 = @"Hello ";
2 NSString *str2 = @"World";
3 NSString *str = [str1 stringByAppendingString:str2];
6.九宫格的坐标算法,使用for循环处理多个uiview的位置、大小等,最终要实现的效果如下。
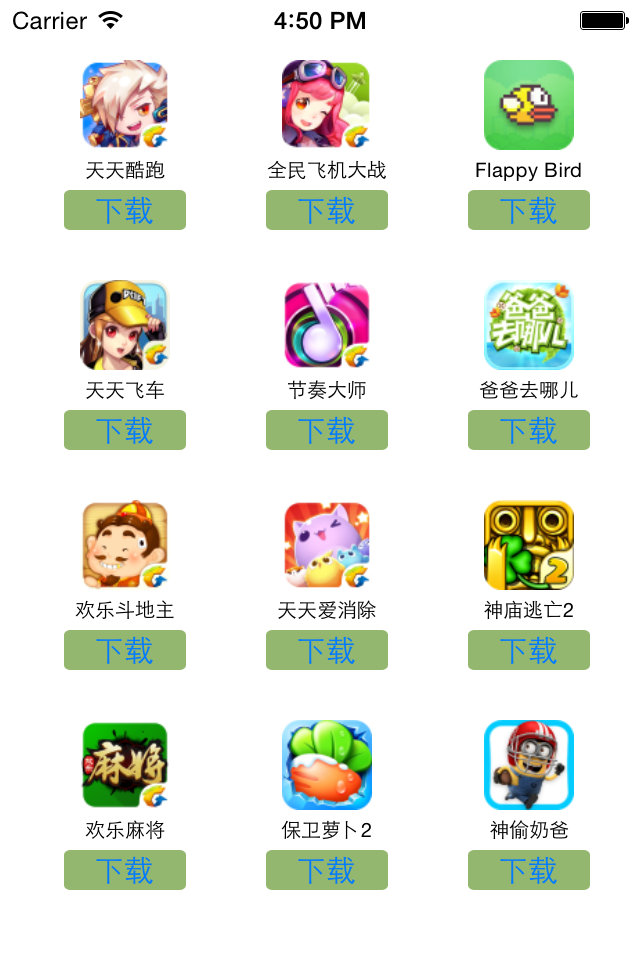
这是在1个UIView上贴12个小的UIView,每个小UIView上再添加1个UIImageView,UILabel,UIButton.
在处理这12个小UIView的位置时的算法如下:

把第一行和第一列分别作为0行,0列。那么每个小UIView的X坐标跟列想关,Y坐标跟行相关,因此只要知道了行号和列号(即该view位于哪行哪列),就能得出其坐标。
 1 int appCount = self.allApps.count;//先获取app的总数,独立出来,方便封装
 2 //allApps为数组,数据为字典
 3 int appShowRow = 3; //定义每行要展示的app数,即使appCount改变,也无需改代码。
 4
 5 //定义每个小view的大小
 6 int appViewW = 85;
 7 int appViewH = 90;
 8
 9 //定义每个小view之间间隙的大小
10 int MARGINE_Y = 20;
11 int MARGINE_X = (self.frame.size.width - appShowRow * appViewW)/(appShowRow + 1);
12
13 for (int i=0; i<appCount; i++) {
14         UIView *appView = [[UIView alloc]init];
15
16         //行号决定Y值,列号决定X值
17         int rowIndex = i / appShowRow; //行号,注意符号
18         int colIndex = i % appShowRow; //列号,取余
19
20         int appViewX = 20 + (appViewW + MARGINE_X) * colIndex;
21         int appViewY = 30 + (appViewH + MARGINE_Y) * rowIndex;
22
23         [appView setFrame:CGRectMake(appViewX, appViewY, appViewW, appViewH)];
24
25         //往view添加图片,此时imageView的父view是小的view,而不是最大的view
26         NSDictionary *appInfo = self.allApps[i];
27
28         //有了model后,可以这么写
29         //AppModel *appModel = self.allApps[i];
30         //然后相应的appImg和appText就可以改为
31         //appImg.image = [UIImage imageNamed:appModel.img];
32         //appText.text = appModel.label;
33            //appModel的img和label属性要在模型的.h中定义,不能在.m中定义
34
35         //添加图片,此时图片的位置就是相对于appView,而不是SquaredView
36         UIImageView *appImg = [[UIImageView alloc]init];
37         int appImgW = 45;
38         int appImgH = 45;
39         int appImgX = (appViewW - appImgW) * 0.5;//小view的宽度- imgView的宽度,再除以2
40         int appImgY = 0;
41
42         appImg.frame = CGRectMake(appImgX, appImgY, appImgW, appImgH);
43         appImg.image = [UIImage imageNamed:appInfo[@"icon"]];
44         [appView addSubview:appImg];
45
46         //添加UILabel和UIButton的省略
47
48
49         [self addSubview:appView]
50 }
7.对于一些属性初始化时需要注意,方法名要和属性名一致,在其它方法中调用时只能写成self.xxx,不能写成_xxx,否则调用不到。
_xxx最好只写在相应的get方法内,防止死循环。
 1 @property(nonatomic,strong) NSArray *allApps;
 2 //在其它方法调用时,只能写成self.allApps,不能写成_allApps.如
 3 -(void)drawScrollView{
 4     for(int i=0;i<self.allApps.count,i++){
 5         //其他代码
 6     }
 7 }
 8
 9 //重写allApps的get方法,方法名要和属性名一致
10 -(NSArray *)allApps{
11     if(_allApps==nil){
12     //if(!_allApps){  //等价
13         //读取plist文件
14         NSString *appPath = [[NSBundle mainBundle] pathForResource:@"app" ofType:@"plist"];
15         _allApps = [[NSArray alloc]initWithContentsOfFile:appPath];
16     }
17     return _allApps;
18 }
8.字典(NSDictionary)转模型(model)
为什么要转?因为字典容易出错。因为设置数据和读取数据都用“字符串”型key,当输错NSString类型数据时,编译器既不会智能提示,也不会报错。
模型都继承自NSObject.如
dict[@"name"] = @"tom";
NSString *name = dict[@"name"];
需要转换为模型,需要实现两个方法。
-(instancetype)initWithDict:(NSDictionary *) dict;
+(instancetype)xxxWithDict:(NSDictionary *) dict;
第二种写法之所以这么写,是因为系统的命名规范。系统中有类似的
NSString stringWithString:(NSString *);
NSDictionary dictionaryWithDictionary:(NSDictionary *);
下面举一个关于模型的例子。模型几乎为固定写法。
.h文件
1 @interface AllApp:NSObject
2 @property (nonatomic, copy) NSString *name;//app名称
3 @property (nonatomic, copy) NSString *icon;//app图标
4
5 //一般写两种方法,调用哪一种也可以
6 -(instancetype)initWithDict:(NSDictionary *)dict;//属于构造方法
7 +(instancetype)appWithDict:(NSDictionary *)dict; //不是构造方法,工厂方法
8
9 @end
.m文件中
 1 @implementation AllApp
 2 //构造方法有固定格式,首先必须初始化
 3 -(instancetype)initWithDict:(NSDictionary *)dict{
 4     if(self = [super init]){
 5         self.name = dict[@"name"];
 6         self.icon = dict[@"icon"];
 7     }
 8     return self;
 9 }
10
11 +(instancetype)appWithDict:(NSDictionary *)dict{
12     return [[self alloc]initWithDict:dict];
13 }
14
15 @end
然后第7条的初始化方法中可以改为:
 1 -(NSArray *)allApps{
 2     if(_allApps==nil){
 3     //if(!_allApps){ //与上等价
 4         NSString *appPath = [[NSBundle mainBundle] pathForResource:@"app" ofType:@"plist"];
 5         NSArray *dictArray = [NSArray arrayWithContentOfFile:appPath];
 6
 7         //将dictArray的所有字典转换成模型对象,放到新的数组中
 8         NSMutableArray *appArray = [NSMutableArray array];
 9         for(NSDictionaty *dict in dictArray){
10             AllApp *app = [AllApp appWithDict:dict];
11             //也可以写成这样
12             //AllApp *app = [[AllApp alloc]initWithDict:dict]];
13             [appArray addObject:app];
14         }
15         _allApps = appArray;
16     }
17     return _allApps;
18 }
9.做慢慢消失的提示文字,并且是圆角的,可以用UIlable来做。
 1 UILabel *warnLabel = [[UILabel alloc]initWithFrame:CGRcctMake(100,400,40,20)];
 2 warnLabel.text = @"这是弹出的提示";
 3 warnLabel.textAlignment = NSTextAlignmentCenter; //文字居中
 4 warnLabel.backgroundColor = [UIColor darkGrayColor];
 5 warnLabel.alpha = 1.0;
 6 warnLabel.font = [UIFont systemFontOfSize:10.0];
 7 warnLabel.textColor = [UIColor whiteColor];
 8
 9 //UILabel设置为圆角,网上说的大部分不全面,clipsToBounds属性设置为YES才会有效果。也不需要引入QuartzCore
10 warnLabel.layer.cornerRadius = 10;
11 warnLabel.clipsToBounds = YES;
12
13 [self addSubview:warnLabel];
14
15 //关于动画设置有2种方法,第一种首尾动画苹果已不推荐
16 [UIView beginAnimations:nil context:nil];
17 [UIView setAnimationCurve:UIViewAnimationCurveEaseIn];
18 [UIView setAnimationDuration:3.0];
19 [UIView setAnimationDelegate:self];
20 warnLabel.alpha = 0.0;
21 [UIView commitAnimations];
22
23 //第二种block动画
24 [UIView animateWithDuration:3.0
25                      animations:^{
26                          //要执行的动画
27                          warnLabel.alpha = 0.0;
28                      } completion:^(BOOL finished) {
29                          //动画完成后要执行的
30                          [warnLabel removeFromSuperview];
31                      }];
从上可以看出,block动画对执行完毕后的动作也做了说明,功能较多。
10.要想让UIScrollView滚动,有3个属性可以设置,contentSize,contentInset,contentOffset。主要设置contentSize就可以了。如在scrollView中
1 //表示在view的宽和高时分别可移动多长,下面表示在宽不能移动,高可以向下滚动170
2 self.contentSize = CGSizeMake(self.frame.size.width, self.frame.size.height + 170);
3
4 //contentInset表示增加可滚动的区域,顶端增加64,底部增加44
5 self.contentInset = UIEdgeInsetsMake(64, 0, 44, 0);
6
7 //contentOffset设置一开始的滚动位置,下面表示视图向下移动60单位
8 self.contentOffset = CGPointMake(0, -60);