关注微信公众号:CodingTechWork,一起学习进步。
引言
Linux中了解用户和用户组概念后,我们就需要对文件目录进行赋权操作,以便于文件访问权限的管控,这就涉及到文件的属性,那用户和用户组,以及读写执行权限对于文件来说具有数据安全性的影响。
文件属性
ls介绍
常用命令有:ls -al [file],其中:ls是list的意思,显示文件的文件名及相关属性。-al表示列出所有的文件详细的权限和属性(也包含了隐藏文件,即文件名第一个自复位"."的文件)
ls示例
[root@linux-01 ~/test01]#  ls -al t1.txt
-rw-r----- 1 root root 33 2月   8 11:07 t1.txt
[root@linux-01 ~/test01]#  ls -al
总用量 20
drwxr-x---   4 root root 4096 2月   8 11:07 .
dr-xr-x---. 11 root root 4096 2月   8 11:07 ..
drwxr-x---   2 root root 4096 2月   8 11:04 t01
drwxr-x---   2 root root 4096 2月   8 11:04 t02
-rw-r-----   1 root root   33 2月   8 11:07 t1.txt
rwx
读(r)、写(w)、执行(x)这三种权限一点也不陌生了。对于文件和目录有着不一样的意义。
文件rwx
r:read,读权限,可读取文件的实际目录,如读取这个文件的内容。w:write,写权限,可以新增或编辑该文件的内容,但不具备删除该文件的权限。x:execute,执行权限,表示该文件具有可以被系统执行的权限。
目录rwx
r:read,读权限,表示具有读取目录结构列表的权限,如查询该目录下的文件名数据,使用ls命令等。w:write,写权限,表示具有更改该目录结构列表的权限,如新建新的文件和子目录、删除已经存在的文件和目录、对已存在的文件或目录进行重命名、转移该目录中的文件和子目录位置等。x:execute,执行权限,表示用户能够进入该目录成为工作目录,如cd命令。
文件属性
属性说明
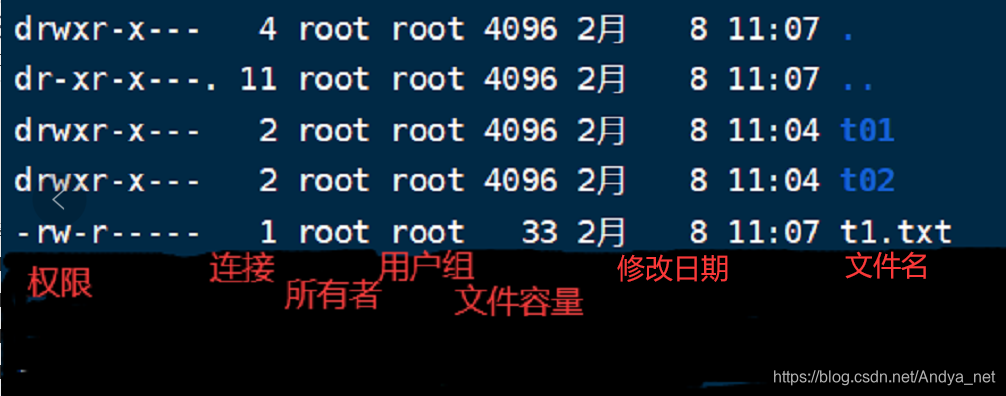
- 第1列:表示文件是目录、文件、或链接文件等。后面是3个为一组,即为文件权限,其中
r表示read可读,w表示write可写,x表示execute可执行,且位置固定rwx,若无对应权限则为-。第1组为文件所有者权限,第2组为同用户组的权限,第3组为其他非本用户组的权限。 - 第2列:
示例1详解
drwxr-x--- 2 root root 4096 2月 8 11:04 t01
d:表示目录;rwxr-x---:表示目录所有者权限为(rwx)可读、可写、可执行,同用户组的权限为(r-x)可读、不可写、可执行,其他非本用户组的权限为(---)无。2:表示有2个目录名连接到此节点(i-node),每个目录都会将它的权限与属性记录到文件系统的i-node中,不过我们使用的目录树却是使用文件名来记录,所以每个目录名就会连接到一个i-node,这个属性就是记录有多少不同的目录名连接到相同的一个i-node中。root:表示这个目录的所有者账号是root。root:表示这个目录的所属用户组是root。4096:表示这个目录的容量大小是4096B,默认单位为B。2月 8 11:04:表示这个目录的创建文件日期或者最近的修改日期是2月8日11点4分。t01:表示该目录名为t01。
示例2详解
-rw-r----- 1 root root 33 2月 8 11:07 t1.txt
-:表示为文件。rw-r-----:表示文件所有者权限为(rw-)可读、可写、不可执行,同用户组的权限为(r--)可读、不可写、不可执行,其他非本用户组的权限为(---)无。1:表示有1个文件连接到此节点(i-node)。root:一个i-node中。root:表示这个文件的所有者账号是root。root:表示这个文件的所属用户组是root。33:表示这个文件的容量大小是33B。2月 8 11:07:表示这个目录的创建文件日期或者最近的修改日期是2月8日11点7分。t1.txt:表示该文件名为t1.txt。
改变属性
chgrp改变所属用户组
被改变的组名必须在/etc/group文件内存在。若不在,使用该命令时,会报错。
[root@linux-01 ~/test01]#  ls -al t1.txt
-rw-r----- 1 root root 33 2月   8 11:07 t1.txt
[root@linux-01 ~/test01]#  chgrp u3 t1.txt
[root@linux-01 ~/test01]#  ls -al t1.txt
-rw-r----- 1 root u3 33 2月   8 11:07 t1.txt
[root@linux-01 ~/test01]#  chgrp u4 t1.txt
chgrp: 无效的组:"u4"
[root@linux-01 ~/test01]#  ls -al t1.txt
-rw-r----- 1 root u3 33 2月   8 11:07 t1.txt
其中,用户组可以改成u3,但是不可以改成u4。我们查看/etc/group中是否包含这些组。
[root@linux-01 ~/test01]#  grep 'u3' /etc/group
u3:x:992:
[root@linux-01 ~/test01]#  grep 'u4' /etc/group
[root@linux-01 ~/test01]#
chown改变文件所有者
被改变的用户名必须在/etc/passwd文件内存在。若不在,使用该命令时,会报错。
[root@linux-01 ~/test01]#  ls -al t1.txt
-rw-r----- 1 root u3 33 2月   8 11:07 t1.txt
[root@linux-01 ~/test01]#  chown u3 t1.txt
[root@linux-01 ~/test01]#  ls -al t1.txt
-rw-r----- 1 u3 u3 33 2月   8 11:07 t1.txt
[root@linux-01 ~/test01]#  chown u4 t1.txt
chown: 无效的用户: "u4"
[root@linux-01 ~/test01]#  ls -al t1.txt
-rw-r----- 1 u3 u3 33 2月   8 11:07 t1.txt
其中,所属用户可以改成u3,但是不可以改成u4。我们查看/etc/passwd中是否包含这些组。
[root@linux-01 ~/test01]#  grep 'u3' /etc/passwd
u3:x:996:992::/home/u3:/bin/bash
[root@linux-01 ~/test01]#  grep 'u4' /etc/passwd
[root@linux-01 ~/test01]#
当然,我们也可以使用chown对用户和用户组同时赋权。
[root@linux-01 ~/test01]#  ls -al t1.txt
-rw-r----- 1 u3 u3 33 2月   8 11:07 t1.txt
[root@linux-01 ~/test01]#  chown u1:u1 t1.txt
[root@linux-01 ~/test01]#  ls -al t1.txt
-rw-r----- 1 u1 u1 33 2月   8 11:07 t1.txt
递归赋权
若遇到递归目录需要赋权,我们可以通过chown [-R] 账号名称 目录的方式进行赋权。
[root@linux-01 ~/test01]#  chown u2:u2 *
[root@linux-01 ~/test01]#  ls -al
总用量 20
drwxr-x---   4 root root 4096 2月   8 11:07 .
dr-xr-x---. 11 root root 4096 2月   9 00:01 ..
drwxr-x---   2 u2   u2   4096 2月   8 11:04 t01
drwxr-x---   2 u2   u2   4096 2月   8 11:04 t02
-rw-r-----   1 u2   u2     33 2月   8 11:07 t1.txt
[root@linux-01 ~/test01]#  cd t01
[root@linux-01 ~/test01/t01]#  mkdir t0101
[root@linux-01 ~/test01/t01]#  cd ..
[root@linux-01 ~/test01]#  chown u2:u2 *
[root@linux-01 ~/test01]#  ll
总用量 12
drwxr-x--- 3 u2 u2 4096 2月   9 15:18 t01
drwxr-x--- 2 u2 u2 4096 2月   8 11:04 t02
-rw-r----- 1 u2 u2   33 2月   8 11:07 t1.txt
[root@linux-01 ~/test01]#  cd t01
[root@linux-01 ~/test01/t01]#  ll
总用量 4
drwxr-x--- 2 root root 4096 2月   9 15:18 t0101
[root@linux-01 ~/test01/t01]#  cd ..
[root@linux-01 ~/test01]#  chown -R u2:u2 *
[root@linux-01 ~/test01]#  cd t01/
chmod改变文件权限
可以通过使用chmod命令对文件权限作出变更,有两种使用形式,一种是使用数字,另一种使用符号。
chmod数字方式
计算方式
上述总结中,我们了解到文件的基本权限有9个,分别是owner,group,others三种身份带上各自的read、write、execute权限,如[-rwxrwxrwx],3个一组,每一组我们都可以使用数字来对应。
| 权限 | 说明 | 数字 |
|---|---|---|
| r | read读权限 | 4 |
| w | write写权限 | 2 |
| x | execute执行权限 | 1 |
每种身份(owner,group,others)对应的(read、write、execute)权限都需要累加。如[-rw-r--r--],该文件的权限数字是644,计算方式如下:
owner=rw-=4+2+0=6;group=r--=4+0+0=4;others=r--=4+0+0=4;
使用语法
语法:
chmod [-R] xyz 文件或目录
参数:
-R:进行递归更改,连同子目录下的所有文件都会更改权限。xyz:表示数字类型的权限属性,即rwx对应的属性数值相加。
示例
[root@linux-01 ~/t1]#  ls -al test1.txt
-rw-r----- 1 root root 0 3月   7 11:13 test1.txt
[root@linux-01 ~/t1]#  chmod 644 test1.txt
[root@linux-01 ~/t1]#  ls -al test1.txt
-rw-r--r-- 1 root root 0 3月   7 11:13 test1.txt
原权限为[-rw-r-----],将其改为本用户可读写,其他都只是可读,那就改为[-rw-r--r--]即数字为644。
chmod符号方式
每种身份owner,group,others,其实还对应缩写u、g、o。另外,a代表all,就是所有身份。
| 命令 | 身份 | 操作 | 权限 | 对象 |
|---|---|---|---|---|
| chmod | u g o a |
+(加入) -(除法) =(设置) |
r w x |
文件或目录 |
使用语法
语法:
chmod u=rw,g=r,o=x 文件目录chmod u+rw,g-x,o+r 文件目录chmod a-x 文件目录
示例
[root@linux-01 ~/t1]#  ls -al test1.txt
-rw-r--r-- 1 root root 0 3月   7 11:13 test1.txt
[root@linux-01 ~/t1]#  chmod u+x,o+w test1.txt
[root@linux-01 ~/t1]#  ls -al test1.txt
-rwxr--rw- 1 root root 0 3月   7 11:13 test1.txt
[root@linux-01 ~/t1]#  chmod a+x test1.txt
[root@linux-01 ~/t1]#  ls -al test1.txt
-rwxr-xrwx 1 root root 0 3月   7 11:13 test1.txt
[root@linux-01 ~/t1]#  chmod a-wx test1.txt
[root@linux-01 ~/t1]#  ls -al test1.txt
-r--r--r-- 1 root root 0 3月   7 11:13 test1.txt
[root@linux-01 ~/t1]#  chmod o+wx test1.txt
[root@linux-01 ~/t1]#  ls -al test1.txt
-r--r--rwx 1 root root 0 3月   7 11:13 test1.txt
chmod参数详解
[root@linux-01]#  chmod --help
用法:chmod [选项]... 模式[,模式]... 文件...
 或:chmod [选项]... 八进制模式 文件...
 或:chmod [选项]... --reference=参考文件 文件...
Change the mode of each FILE to MODE.
With --reference, change the mode of each FILE to that of RFILE.

  -c, --changes          like verbose but report only when a change is made
  -f, --silent, --quiet  suppress most error messages
  -v, --verbose          output a diagnostic for every file processed
      --no-preserve-root  do not treat '/' specially (the default)
      --preserve-root    fail to operate recursively on '/'
      --reference=RFILE  use RFILE's mode instead of MODE values
  -R, --recursive        change files and directories recursively
      --help            显示此帮助信息并退出
      --version         显示版本信息并退出
总结
了解学习Linux系统文件的三种身份(所有者、用户组与其他人)至关重要,学习这三种身份对应的三个权限(读、写、执行)是我们对于变更权限的基础。再加以使用chgrp、chown和chmod命令去实操,发现玩转文件属性和权限不再那么难了。