1.apache三种工作模式
1)prefork工作模式
一个进程处理一个用户请求
稳定但是不适合高并发的生产环境
2)worker工作模式
一个进程生成多个线程
合适高并发环境但是需要考虑到线程的安全问题
3)event工作模式
支持keepalived长连接
但是不支持httpds
2.apache基本信息
主配置文件:/etc/httpd/conf/http.conf
默认监听的端口:80
https:443
listen:80
directoryindex:index.html
documentroot:/var/www/html指定网站根目录
user:apache
servername:域名
3.服务器返回状态码
200:ok请求成功
304:表示一个缓存的资源是否发生过更改
403:forbden表示客户端没有权限访问该资源
404:notfound表示客户端请求的资源不存在
500:服务器内部错误
502:代理服务器从上游服务器获取到的是伪响应
4.LAMP通信流程
linux+apache+mysql/mariadb+php
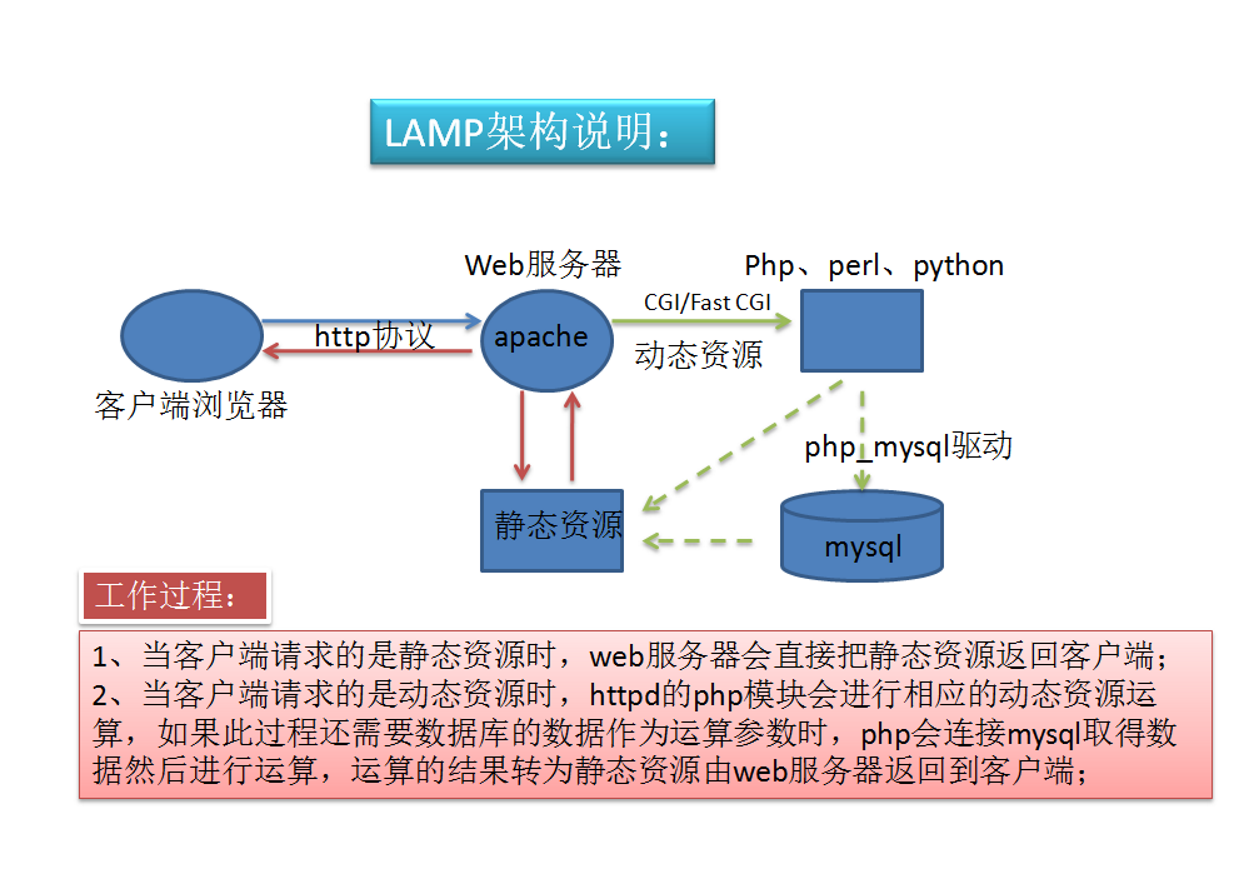
1)用户发送http请求到达httpd服务器
2)httpd解析url获取需要的资源的路径,通过内核空间读取硬盘资源,如是静态资源,则构建响应报文,发回给用户
3)如果是动态资源,将资源地址发给php解析器,解析php程序文件,解析完毕将内容发回给httpd,httpd构建响应报文,发回给用户
4)如果涉及到数据库操作,则利用php -mysql驱动,获取数据库数据,返回给PHP解析器。
5.编译安装apache
第一步:编译安装apr
1)上传相关的安装包:rz
2)解压:tar xf
3)编译:./configure - -prefix=/usr/local/apr
4)解决依赖关系:yum install gcc –y
5)继续编译:./configure - -prefix=/usr/local/apr
6)安装:make&&make install
第二步:编译安装apr -util
1)进行编译:./configure - -with -apr=/usr/local/apr - -prefix=/usr/local/apr -util#需要指定apr位置
2)安装:make&&make install
第三步:编译安装httpd
1)编译:
./configure - -prefix=/usr/local/httpd2.4
- -with -apr=/usr/local/apr
- -with -apr-util=/usr/local/apr-util
- - enable -cache
- - enable -deflate
- - enable -ssl
- - enable -rewrite
- -with -mpm=event
2)解决依赖:yum install pcre pcre-devel openssl openssl-devel –y
3)安装:make&&make install
第四步:在任何路径下执行apachectl:
[root@ken bin]#cat/etc/profile.d/httpd.sh
exportPATH=/usr/local/httpd2.4/bin:$PATH
[root@ken bin]#export/etc/profile.d/httpd.sh
-bash:export:`/etc/profile.d/httpd.sh’:notavalididentifier
[root@ken bin]#source/etc/profile.d/httpd.sh
6.基于端口和域名创建虚拟主机
基于端口:vim /etc/httpd/conf/httpd.conf
listen81
<virtualhost*:81>
directoryindex index.html
documentroot /var/www/ken1
</virtualhost>
基于域名:
<virtualhost192.168.64.4>
directoryindex index.html
documentroot /var/www/ken1
servername www.ken.com
</virtualhost>
创建网站根目录:mkdir/var/www/ken1
7.LAMP架构
linux+apache+mysql/mariadb+php
1)部署LAMP架构:yum install httpd php php -mysql mariadb-server -y
2)启动Apache与数据库:
systemctl restart httpdmariadb
3)上传WordPress安装包并解压
4)配置数据库文件
[root@ken html]#cp wp-config-sample.php wp-config.php
[root@ken html]#vim wp-config.php
/**WordPress数据库的名称*/
define(‘DB_NAME’,‘litong’);
/**MySQL数据库用户名*/
define(‘DB_USER’,‘litong’);
/**MySQL数据库密码*/
define(‘DB_PASSWORD’,‘123’);
5)配置数据库
create database ken;
grant all on*.*to ken@’localhost’ identified by ‘123’;