1. Overview
Python + MySQL + Django, 有些数据托管在 MySQL 的数据库,然后我们希望进行可视化,通过 web 的方式对数据库的信息去进行展示/检索/维护/..
这个项目中,我们的数据托管在 MySQL 的数据库中,然后在 Django 中配置数据库信息,连接到数据库,在前端用 Django-table2 进行渲染;
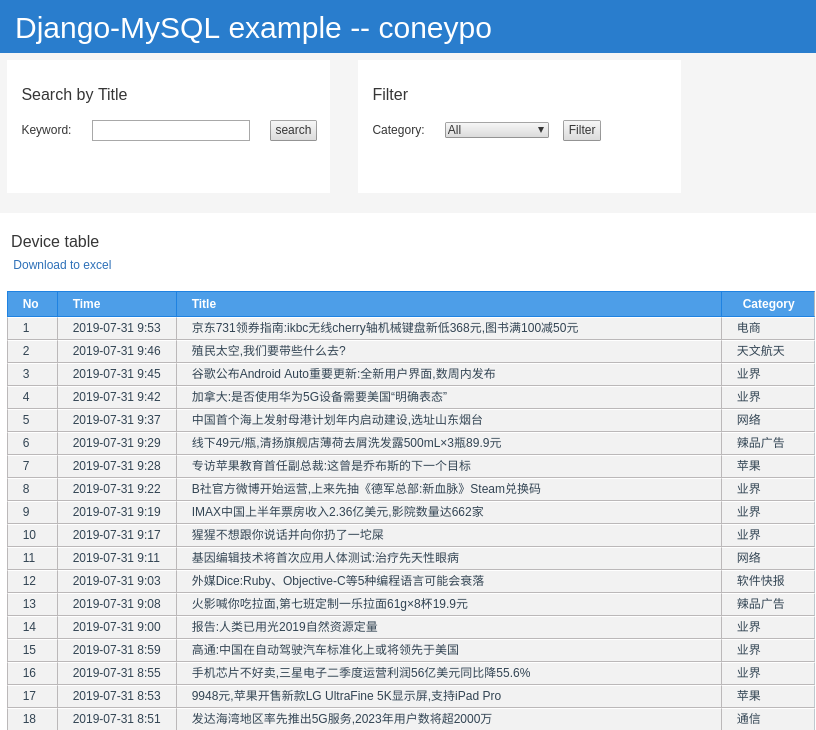
最终我们可以在 web 端看到如下所示效果,可以进行展示所有的数据,然后进行检索和过滤;
我这边爬了一些新闻下来,放到数据库里面,然后在前端 web 显示后端 MySQL 数据库中的新闻 (Time + Title + Category);
支持 search 和 filter 功能,支持下载界面内容到 CSV 功能;
2. 流程
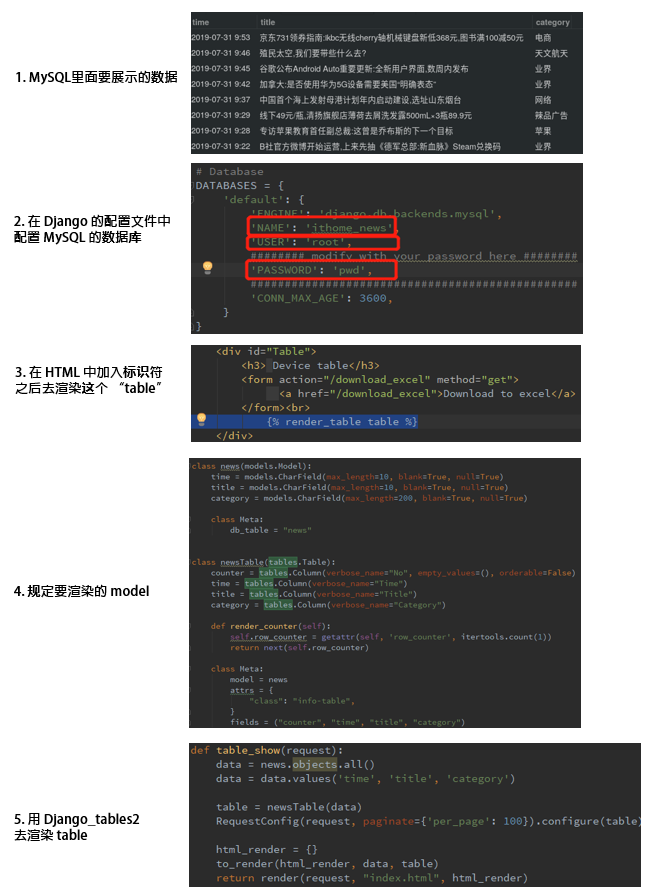
想要在 Django 中访问 MySQL 数据库的数据,首先要在 Django 的 setting.py 里面规定好数据库的 'Name' / 'USER' / 'PASSWORD';
需要对于对象 news 或者别的实体,创建 model, 下图中的 step4;
利用 Django-tables2 进行渲染,具体 Django-tables2 的使用可以参考 https://django-tables2.readthedocs.io/en/latest/pages/tutorial.html ;
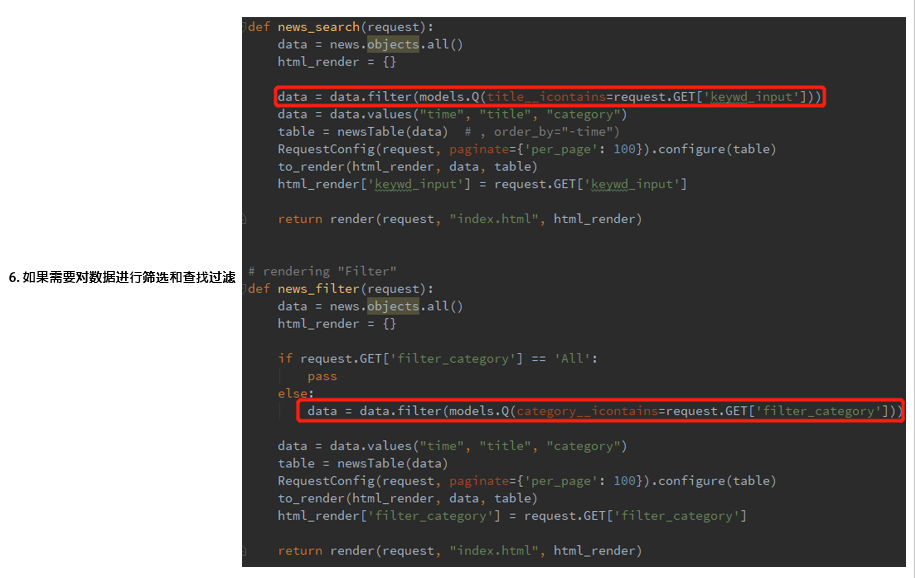
过滤/搜索/排序 都可以在后端,变成对 query 的操作,如 step6 ;
3. 源码
代码托管在 github, 在 Ubuntu host:
git clone https://github.com/coneypo/Django_MySQL_Table
前端代码 index.html
{% load render_table from django_tables2 %} {% load querystring from django_tables2 %} {% load bootstrap3 %} <!doctype html> <html> <head> <a href="board/"><title>Django table example</title></a> <link rel="stylesheet" href="/static/css/pos.css"/> <link rel="stylesheet" href="/static/css/bootstrap.min.css"/> <link rel="stylesheet" href="/static/css/table_1.css"/> <style> body {background-color: whitesmoke;} </style> <script type="text/javascript" src="/static/js/jquery-1.11.0.js"></script> </head> <body> <div id="Top" style="background:#38c"> <a href="/table_example" id="acrn_title"> Django-MySQL example -- coneypo</a> </div> <div id="Center"> <div id="Center_Searcher"> <form action="/news_search" method="get"> <table class="center_table"> <tr><td colspan="5"><h3>Search by Title</h3></td></tr> <tr> <td>Keyword:</td> <td align="center"> <input name="keywd_input" value="{{ keywd_input }}"></td> <td align="center"> <input type="submit" value="search"></td> </tr> </table> </form> </div> <div id="Center_Filter"> <form action="/news_filter" method="get"> <table class="center_table"> <tr><td colspan="5"><h3>Filter</h3></td></tr> <tr> <td>Category:</td> <td> <select name="filter_category"> {% for i in category_list %} <option value="{{i}}" {% if i == filter_category %} selected{% endif %}>{{i}}</option> {% endfor %} </select></td> <td><input type="submit" value="Filter"></td> </tr> </table> </form> </div> </div> <div id="Table"> <h3> Device table</h3> <form action="/download_excel" method="get"> <a href="/download_excel">Download to excel</a> </form><br> {% render_table table %} </div> </div> </body> </html>
后端 Django 视图代码 views.py
  1 from django.shortcuts import render
  2 from django.db import models
  3 from django.http import HttpResponse
  4 import django_tables2 as tables
  5 import MySQLdb
  6 import datetime
  7 import pytz
  8 from django_tables2.config import RequestConfig
  9 import itertools
 10 from django.db import connection
 11 from djqscsv import render_to_csv_response
 12
 13 ##### Modify with your database here #####
 14 db = MySQLdb.connect("localhost", "root", "intel@123", "ithome_news", charset='utf8')
 15 cursor = db.cursor()
 16
 17 category_list = ['All', 'iPhone应用推荐', 'iPhone新闻', 'Win10快讯', 'Win10设备', '业界', '人工智能', '人物', '天文航天', '奇趣电子', '安卓应用推荐',
 18                  '安卓手机', '安卓新闻', '影像器材', '新能源汽车', '智能家居', '智能家电', '活动互动', '游戏快报', '电商', '电子竞技', '电脑硬件', '科技前沿', '科普常识',
 19                  '笔记本', '网络', '苹果', '车联网', '软件快报', '辣品广告', '通信']
 20
 21
 22 class news(models.Model):
 23     time = models.CharField(max_length=10, blank=True, null=True)
 24     title = models.CharField(max_length=10, blank=True, null=True)
 25     category = models.CharField(max_length=200, blank=True, null=True)
 26
 27     class Meta:
 28         db_table = "news"
 29
 30
 31 class newsTable(tables.Table):
 32     counter = tables.Column(verbose_name="No", empty_values=(), orderable=False)
 33     time = tables.Column(verbose_name="Time")
 34     title = tables.Column(verbose_name="Title")
 35     category = tables.Column(verbose_name="Category")
 36
 37     def render_counter(self):
 38         self.row_counter = getattr(self, 'row_counter', itertools.count(1))
 39         return next(self.row_counter)
 40
 41     class Meta:
 42         model = news
 43         attrs = {
 44             "class": "info-table",
 45         }
 46         fields = ("counter", "time", "title", "category")
 47
 48
 49 def to_render(html_render, data, table):
 50     html_render['table'] = table
 51     html_render['category_list'] = category_list
 52
 53
 54 def table_show(request):
 55     data = news.objects.all()
 56     data = data.values('time', 'title', 'category')
 57
 58     table = newsTable(data)
 59     RequestConfig(request, paginate={'per_page': 100}).configure(table)
 60
 61     html_render = {}
 62     to_render(html_render, data, table)
 63     return render(request, "index.html", html_render)
 64
 65
 66 # rendering "Search by Title"
 67 def news_search(request):
 68     data = news.objects.all()
 69     html_render = {}
 70
 71     data = data.filter(models.Q(title__icontains=request.GET['keywd_input']))
 72     data = data.values("time", "title", "category")
 73     table = newsTable(data)  # , order_by="-time")
 74     RequestConfig(request, paginate={'per_page': 100}).configure(table)
 75     to_render(html_render, data, table)
 76     html_render['keywd_input'] = request.GET['keywd_input']
 77
 78     return render(request, "index.html", html_render)
 79
 80
 81 # rendering "Filter"
 82 def news_filter(request):
 83     data = news.objects.all()
 84     html_render = {}
 85
 86     if request.GET['filter_category'] == 'All':
 87         pass
 88     else:
 89         data = data.filter(models.Q(category__icontains=request.GET['filter_category']))
 90
 91     data = data.values("time", "title", "category")
 92     table = newsTable(data)
 93     RequestConfig(request, paginate={'per_page': 100}).configure(table)
 94     to_render(html_render, data, table)
 95     html_render['filter_category'] = request.GET['filter_category']
 96
 97     return render(request, "index.html", html_render)
 98
 99
100 def download_excel(requst):
101     data = news.objects.all()
102     print(type(data))
103     data = data.values("time", "title", "category")
104     print(type(data))
105     return render_to_csv_response(data, filename="table_download.csv")
具体来看这块,我加了注释:
# 声明 django.db 的 model
class news(models.Model):
    time = models.CharField(max_length=10, blank=True, null=True)
    title = models.CharField(max_length=10, blank=True, null=True)
    category = models.CharField(max_length=200, blank=True, null=True)

    class Meta:
        # 声明 MySQL 中 table 的名字,要不然可能会找不到
        db_table = "news"


# 声明 django-tables2 的 table
class newsTable(tables.Table):
    # verbose_name=显示名称
    counter = tables.Column(verbose_name="No", empty_values=(), orderable=False)
    time = tables.Column(verbose_name="Time")
    title = tables.Column(verbose_name="Title")
    category = tables.Column(verbose_name="Category")

    # 用来渲染第一列的计数器
    def render_counter(self):
        self.row_counter = getattr(self, 'row_counter', itertools.count(1))
        return next(self.row_counter)

    class Meta:
        model = news
        attrs = {
            # 声明 table 要调用的 CSS 样式
            "class": "info-table",
        }
        fields = ("counter", "time", "title", "category")
用 djqscsv 来实现导出到 CSV:
from djqscsv import render_to_csv_response

def download_excel(requst):
    data = news.objects.all()
    print(type(data))
    data = data.values("time", "title", "category")
    print(type(data))
    return render_to_csv_response(data, filename="table_download.csv")
urls.py 中绑定好链接:
urlpatterns = [
    path('table_example', views.table_show),
    url(r'^news_search$', views.news_search),
    url(r'^news_filter$', views.news_filter),
    url(r'^download_excel', views.download_excel),
]
4. 配置
在 run Django server 之前,需要进行一些配置:
4.1 在本地 MySQL 数据库中添加 ithome_news 这个 database;
mysql> create database ithome_news;
mysql> use ithome_news;
mysql> source /home/con/code/python/Django_MySQL_Table/ithome_news.sql
4.2 修改 Django 中 setting.py 中的 database 的配置,与你本地的数据库 NAME / USER / PASSWORD 一致:
# Database
DATABASES = {
   'default': {
   'ENGINE': 'django.db.backends.mysql',
   'NAME': 'ithome_news',
   'USER': 'root',
   ######## modify with your password here ########
   'PASSWORD': 'pwd',
   ################################################
   'CONN_MAX_AGE': 3600,
   }
   }
4.3 启动 MySQL 服务器
python3 manage.py runserver 8000
打开本地网站 http://127.0.0.1:8000/table_example
或者
python3 manage.py runserver 0.0.0.0:port

# 比如
python3 manage.py runserver 0.0.0.0:8777
打开本地网站 http://[本机IP]:[port]/table_example, 同一路由下也可以访问到该网站;
所以可以用来搭建 lab 内设备管理系统 / 人员登记 / KPI 展示 前端 web 网页;
# 请尊重他人劳动成果,转载或者使用源码请注明出处:http://www.cnblogs.com/AdaminXie
# 如果对您有帮助,欢迎在 GitHub 上 Star 支持下: https://github.com/coneypo/Django_MySQL_Table
# 如有问题请留言或者联系邮箱 coneypo@foxmail.com,商业合作勿扰