准备工作:
Linux链接网络
IP设置:192.168.16.33
关闭防火墙
iptables –F 关闭
systemctl stop firewalld 关闭
systemctl disable firewalld 开机永久关闭
关闭selinux策略
vim etc/sysconfig/seliunx 设置为disabled
# This file controls the state of SELinux on the system.
# SELINUX= can take one of these three values:
# enforcing - SELinux security policy is enforced.
# permissive - SELinux prints warnings instead of enforcing.
# disabled - No SELinux policy is loaded.
SELINUX=disabled
# SELINUXTYPE= can take one of three two values:
# targeted - Targeted processes are protected,
# minimum - Modification of targeted policy. Only selected processes are protected.
# mls - Multi Level Security protection.
SELINUXTYPE=targeted
环境要求
为用户建立一个自己的网盘,保持读写权限 名samba1 密码1234
为用户建立一个共享网盘,保持读权限 暂定路径为/test/下
安装samba
直接进行yum下载
yum install –y samba
对samba进行配置
为用户建立一个自己的网盘,保持读写权限
建立一个系统用户
[root@bogon /]# useradd samba1
设置用户密码
[root@bogon /]# smbpasswd -a samba1
New SMB password:
Retype new SMB password:
Added user samba1. #提示成功
为用户建立一个共享网盘,保持读权限
[root@bogon /]# vim /etc/samba/smb.conf
向下到最底端
查看跟public有关的项目
[public]
comment = Public Stuff
path = /test/ 共享目录在linux下那个目录共享
public = yes
writable = no 可写入权限改成no。默认yes
printable = no
write list = +staff
给/test文件目录的其他用户设置成可读写执行
chmod -f o+rwx /test
目的是让系统层面通过。
关闭linxu用户的登陆权限
[root@bogon /]# usermod -s /sbin/nologin samba1
是用户仅提供网盘而不能登陆linux
启动samba
systemctl start samba
测试
windows下输入\192.168.16.33samba1
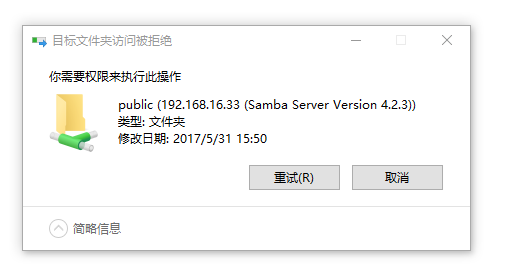
windows下输入\192.168.16.33public

测试共享目录是否只有读权限
用一个文件进行写入(写入失败说明测试只有读权限成功)