昨天正式开始 Android 编程学习与实践,由于 Android 模拟器在 WinXP 下一直未安装成功(见帖子: http://www.cnblogs.com/91program/p/5190888.html),所在将闲置很久的 Android 手机: 联想 A750 找到用于调试。
A750 是 Android 版本是: 2.3.6,在手机 上打开 USB 调试功能后,就可以通过 USB 线与 PC 连接进行调试了。
调试的主要功能是 Socket 通讯,手机做为服务器端。先用 PC 做为客户端。后期的客户端是车机,车机的系统可能是 WinCE 或 Android。
开始之前,先了解了一下 Android 编程的基本知识(后附个人学习记录的知识点),然后学习了如下链接:http://www.cnblogs.com/lknlfy/archive/2012/03/04/2379628.html 关于 Socket 编程的知识。
其中 一个关键的知识点是线程与主进程之间的消息传递机制,主要是线程中的消息传递到主进程。例如:
mHandler.sendMessage(msg);
手机端代码如下(XML就不提供了,很简单,大家看图就知识的):
/*
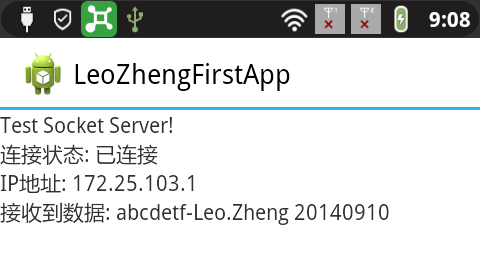
* 通过 WIFI 网络进行 Socket 通讯成功, 手机的 IP: 172.25.103.4(随个人网络环境变化)
* 测试使用 360 随身 WIFI, PC 机的 IP: 172.25.103.1
* */
  1 package com.jia.leozhengfirstapp;
  2
  3
  4 import java.io.IOException;
  5 import java.io.InputStream;
  6 import java.io.UnsupportedEncodingException;
  7 import java.net.ServerSocket;
  8 import java.net.Socket;
  9
 10
 11 import android.support.v7.app.ActionBarActivity;
 12 import android.annotation.SuppressLint;
 13 import android.os.Bundle;
 14 import android.os.Handler;
 15 import android.os.Message;
 16 import android.util.Log;
 17 import android.view.Menu;
 18 import android.view.MenuItem;
 19 import android.widget.TextView;
 20 import android.widget.Toast;
 21
 22
 23
 24
 25 public class MainActivity extends ActionBarActivity {
 26
 27
 28     private Socket clientSocket = null;
 29     private ServerSocket mServerSocket = null;
 30
 31
 32     private Handler mHandler = null;
 33
 34
 35     private AcceptThread mAcceptThread = null;
 36     private ReceiveThread mReceiveThread = null;
 37     private boolean stop = true;
 38
 39     private TextView ipText;
 40     private TextView rcvText;
 41     private TextView ConnectStatusText;
 42
 43     @SuppressLint("HandlerLeak")
 44     @Override
 45     protected void onCreate(Bundle savedInstanceState) {
 46         super.onCreate(savedInstanceState);
 47         setContentView(R.layout.activity_main);
 48
 49         ipText = (TextView)findViewById(R.id.textView1);
 50         rcvText = (TextView)findViewById(R.id.textView3);
 51         ConnectStatusText = (TextView)findViewById(R.id.textView4);
 52
 53         ConnectStatusText.setText("连接状态: 未连接");
 54
 55         // 消息处理
 56         mHandler = new Handler()
 57         {
 58             @Override
 59             public void handleMessage(Message msg)
 60             {
 61                 switch(msg.what)
 62                 {
 63                     case 0:
 64                     {
 65                         String strAddress = (msg.obj).toString();
 66                         ipText.setText("IP地址: " + strAddress);
 67                         Log.v("Leo: IP: ", strAddress);
 68                         ConnectStatusText.setText("连接状态: 已连接");
 69                         // 显示客户端IP
 70                         // ipTextView.setText((msg.obj).toString());
 71                         // 使能发送按钮
 72                         // sendButton.setEnabled(true);
 73                         break;
 74                     }
 75                     case 1:
 76                     {
 77                         String strRcv = (msg.obj).toString();
 78                         rcvText.setText("接收到数据: " + strRcv);
 79                         Log.v("Leo: Rcv: ", strRcv);
 80                         // 显示接收到的数据
 81                         // mTextView.setText((msg.obj).toString());
 82                         break;
 83                     }
 84                 }
 85
 86             }
 87         };
 88
 89         mAcceptThread = new AcceptThread();
 90         // 开启监听线程
 91         mAcceptThread.start();
 92     }
 93
 94
 95
 96
 97     @Override
 98     public boolean onCreateOptionsMenu(Menu menu) {
 99         // Inflate the menu; this adds items to the action bar if it is present.
100         getMenuInflater().inflate(R.menu.main, menu);
101         return true;
102     }
103
104
105     @Override
106     public boolean onOptionsItemSelected(MenuItem item) {
107         // Handle action bar item clicks here. The action bar will
108         // automatically handle clicks on the Home/Up button, so long
109         // as you specify a parent activity in AndroidManifest.xml.
110         int id = item.getItemId();
111         if (id == R.id.action_settings) {
112             return true;
113         }
114         return super.onOptionsItemSelected(item);
115     }
116
117     // 显示Toast函数
118     private void displayToast(String s)
119     {
120         Toast.makeText(this, s, Toast.LENGTH_SHORT).show();
121     }
122
123     private class AcceptThread extends Thread
124     {
125         @Override
126         public void run()
127         {
128             try {
129                 // 实例化ServerSocket对象并设置端口号为 12589
130                 mServerSocket = new ServerSocket(12589);
131             } catch (IOException e) {
132                 // TODO Auto-generated catch block
133                 e.printStackTrace();
134             }
135
136             try {
137                 // 等待客户端的连接(阻塞)
138                 clientSocket = mServerSocket.accept();
139             } catch (IOException e) {
140                 // TODO Auto-generated catch block
141                 e.printStackTrace();
142             }
143
144             mReceiveThread = new ReceiveThread(clientSocket);
145             stop = false;
146             // 开启接收线程
147             mReceiveThread.start();
148
149             Message msg = new Message();
150             msg.what = 0;
151             // 获取客户端IP
152             msg.obj = clientSocket.getInetAddress().getHostAddress();
153             // 发送消息
154             mHandler.sendMessage(msg);
155         }
156     }
157
158
159
160
161     private class ReceiveThread extends Thread
162     {
163         private InputStream mInputStream = null;
164         private byte[] buf;
165         private String str = null;
166
167         ReceiveThread(Socket s)
168         {
169             try {
170                 // 获得输入流
171                 this.mInputStream = s.getInputStream();
172             } catch (IOException e) {
173                 // TODO Auto-generated catch block
174                 e.printStackTrace();
175             }
176         }
177
178         @Override
179         public void run()
180         {
181             while(!stop)
182             {
183                 this.buf = new byte[512];
184
185                 // 读取输入的数据(阻塞读)
186                 try {
187                     this.mInputStream.read(buf);
188                 } catch (IOException e1) {
189                     // TODO Auto-generated catch block
190                     e1.printStackTrace();
191                 }
192
193                 // 字符编码转换
194                 try {
195                     this.str = new String(this.buf, "GB2312").trim();
196                 } catch (UnsupportedEncodingException e) {
197                     // TODO Auto-generated catch block
198                     e.printStackTrace();
199                 }
200
201                 Message msg = new Message();
202                 msg.what = 1;
203                 msg.obj = this.str;
204                 // 发送消息
205                 mHandler.sendMessage(msg);
206             }
207         }
208     }
209 }
1) 先通过 WIFI 进行 Socket 通讯
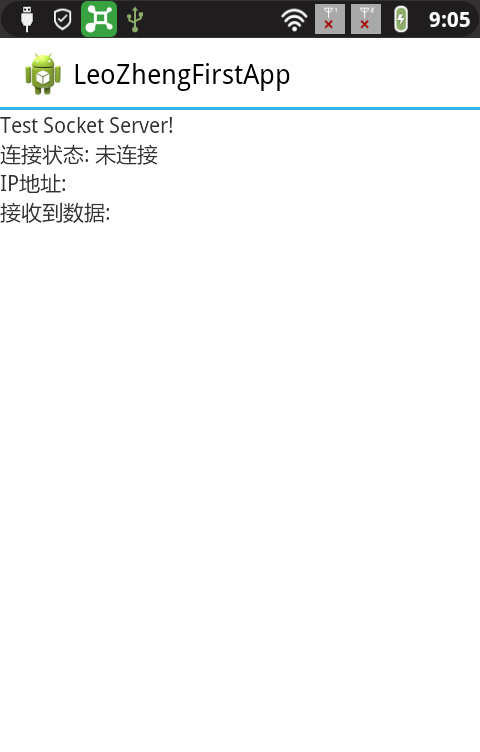
运行后,在手机上显示的未连接界面如下图:
在 PC 上运行类似于 SocketTool.exe 的工具,SocketTool.exe 的显示界面如下:

Socket 连接后,手机上显示的界面如下图:
2) 通过 USB 实现 PC 与手机的通讯
在 PC 上实现一个 Java 小应用,应用的主要代码如下:
 1 try
 2 {
 3     Runtime.getRuntime().exec("adb forward tcp:12581 tcp:12589");
 4 }
 5 catch (IOException e)
 6 {
 7     e.printStackTrace();
 8 }
 9
10
11 Socket socket = null;
12 try
13 {
14     InetAddress serverAddr = null;
15     OutputStream outStream = null;
16     byte[] msgBuffer = null;
17
18     serverAddr = InetAddress.getByName("127.0.0.1");
19     System.out.println("TCP 1" + "C: Connecting...");
20
21
22     socket = new Socket(serverAddr, 12581); // 12581 是 PC 的端口,已重定向到 Device 的 12589 端口
23
24     String message = "PC ADB,send message";
25     msgBuffer = message.getBytes("GB2312");
26
27     outStream = socket.getOutputStream();
28     outStream.write(msgBuffer);
29     Thread.sleep(10000);
30 }
31 catch (UnknownHostException e1)
32 {
33     System.out.println("TCP 2" + "ERROR: " + e1.toString());
34 }
35 catch (IOException e2)
36 {
37     System.out.println("TCP 3" + "ERROR: " + e2.toString());
38 } catch (InterruptedException e3)
39 {
40     // Thread.sleep(1000); 增加的异常处理
41     e3.printStackTrace();
42 }
43 finally
44 {
45     try
46     {
47         if (socket != null)
48         {
49             socket.close();     // 关闭时会导致接收到的数据被清空,所以延时 10 秒显示
50         }
51     }
52     catch (IOException e)
53     {
54         System.out.println("TCP 4" + "ERROR: " + e.toString());
55     }
56 }
运行后,在手机上显示的界面如下图:
