谷歌为了一统Android的UI设计推出了Material控件来实现更好的UI界面
ToorBar主要用于修改标题栏
在AndroidMainFest.xml中, android:label="MyToolBar"用于指定文字,android:theme="@style/AppTheme"指定了一个主题
<application
        android:allowBackup="true"
        android:icon="@mipmap/ic_launcher"
        android:label="MyToolBar"
        android:supportsRtl="true"
        android:theme="@style/AppTheme" >
        <activity android:name=".MainActivity" >
            <intent-filter>
                <action android:name="android.intent.action.MAIN" />

                <category android:name="android.intent.category.LAUNCHER" />
            </intent-filter>
        </activity>
    </application>
res/values/styles.xml中
<resources>

    <!-- Base application theme. -->
    <style name="AppTheme" parent="Theme.AppCompat.Light.NoActionBar"><!--当前为浅色主题,深色主题为Theme.AppCompat.NoActionBar-->
        <!-- Customize your theme here. -->
        <item name="colorPrimary">@color/colorPrimary</item>
        <item name="colorPrimaryDark">@color/colorPrimaryDark</item>
        <item name="colorAccent">@color/colorAccent</item>
    </style>

</resources>
使用ToolBar代替ActionBar
main.xml中
 <FrameLayout xmlns:android="http://schemas.android.com/apk/res/android"
        xmlns:app="http://schemas.android.com/apk/res-auto"
        android:layout_width="match_parent"
        android:layout_height="match_parent"
    >
        <android.support.v7.widget.Toolbar
            android:id="@+id/toolBar"
            android:layout_width="match_parent"
            android:layout_height="?attr/actionBarSize"
            android:background="?attr/colorPrimary"
            android:theme="@style/ThemeOverlay.AppCompat.Dark.ActionBar"
            app:popupTheme="@style/ThemeOverlay.AppCompat.Light"
            /><!--theme使ToolBar单独显示深色主题popupTheme使菜单不显示深色主题-->
    </FrameLayout>
MainActivity中
 protected void onCreate(Bundle savedInstanceState) {
        super.onCreate(savedInstanceState);
        setContentView(R.layout.activity_main);
        Toolbar toolbar=(Toolbar)findViewById(R.id.toolBar);
        setSupportActionBar(toolbar);//传入ToolBar实例
}
此时ActionBar已经换成ToolBar了,然后加以改动实现标题栏的效果
在res下新建menu,然后新建Menu resource file命名为toolbar.xml
<?xml version="1.0" encoding="utf-8"?>
<menu xmlns:android="http://schemas.android.com/apk/res/android"
    xmlns:app="http://schemas.android.com/apk/res-auto">
    <item
        android:id="@+id/item1"
        android:icon="@drawable/a"
        android:title="title1"
        app:showAsAction="always"
    /><!--永远显示在ToolBar中若空间不够则不显示 -->
    <item
        android:id="@+id/item2"
        android:icon="@drawable/b"
        android:title="title2"
        app:showAsAction="ifRoom"
        /><!--空间不足则显示在菜单中 -->
    <item
        android:id="@+id/item"
        android:icon="@drawable/e"
        android:title=""
        app:showAsAction="always"
        >
        <menu>
        <item
            android:id="@+id/item3"
            android:icon="@drawable/c"
            android:title="title3"
            app:showAsAction="never"
            /><!--空间不足则显示在菜单中 -->
        </menu><!--Android已经不支持在菜单中显示图标了,但在二级菜单中可以显示 -->


    </item><!--永远显示在菜单中 -->
</menu>
修改MainActivity
public class MainActivity extends AppCompatActivity {

    @Override
    protected void onCreate(Bundle savedInstanceState) {
        super.onCreate(savedInstanceState);
        setContentView(R.layout.activity_main);
        Toolbar toolbar=(Toolbar)findViewById(R.id.toolBar);
        setSupportActionBar(toolbar);


    }
    public boolean onCreateOptionsMenu(Menu menu){
        getMenuInflater().inflate(R.menu.toolbar,menu);//加载菜单文件
        return true;

    }

    @Override
    public boolean onOptionsItemSelected(MenuItem item) {//处理菜单点击事件
        switch (item.getItemId())
        {
            case R.id.item1:
                Toast.makeText(this,"你点击了第一个按钮",Toast.LENGTH_SHORT).show();
                break;
            case R.id.item2:
                Toast.makeText(this,"你点击了第二个按钮",Toast.LENGTH_SHORT).show();
                break;
            case R.id.item3:
                Toast.makeText(this,"你点击了第三个按钮",Toast.LENGTH_SHORT).show();
                break;
        }
        return true;
    }
}
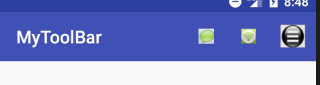
实现效果如图