1 表单绑定
可以利用v-model在表单控件元素上创建双向的数据绑定,v-model会根据控件类型自动选取正确的方法来更新元素。
2 文本框
文本框的绑定例子如下:
<div id="app">
	<p>input</p>
	<input v-model="message">
	<p>{{message}}</p>

	<p>textarea</p>
	<textarea v-model="message2"></textarea>
</div>
new Vue({
	el:'#app',
	data:{
		message:'',
		message2:''
	}
})
3 按钮
3.1 单选
data中的值为<input>的value,如:
<div id="app">
    <input type="radio" value="Value1" v-model="picked">
    <input type="radio" value="Value2" v-model="picked">
    <span>选中的值为:{{picked}}</span>
</div>
new Vue({
    el: '#app',
    data: {
        picked:'Value1'
    }
})
3.2 多选
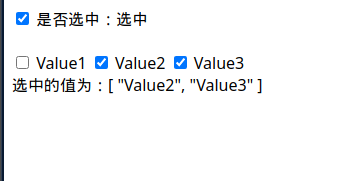
单个多选绑定的数据是一个布尔值,多个多选绑定的是一个数组:
<div id="app">
    <input type="checkbox" v-model="checked">
    <span>是否选中:{{checked ? "选中" : "不选中"}}</span>
	<br>

    <input type="checkbox" value="Value1" id="box1" v-model="checked2">
    <label for="box1">Value1</label>
    <input type="checkbox" value="Value2" id="box2" v-model="checked2">
    <label for="box2">Value2</label>
    <input type="checkbox" value="Value3" id="box3" v-model="checked2">
    <label for="box3">Value3</label>
    <br>
    <span>选中的值为:{{checked2}}</span>
</div>
new Vue({
    el: '#app',
    data: {
        checked:'Value1',
        checked2:[]
    }
})
4 列表
<div id="app">
    <select name="fruit" v-model="selected">
        <option value="">请选择一个</option>
        <option value="苹果">苹果</option>
        <option value="香蕉">香蕉</option>
    </select>

    <div>
        选择的水果是:{{selected}}
    </div>
</div>
new Vue({
    el: '#app',
    data: {
        selected:''
    }
})
5 修饰符
.lazy:默认情况下,v-model在input事件中同步输入框的值与数据,但可以添加一个修饰符.lazy,从而转变为在change事件中同步数据,比如<input v-model.lazy="meesage">.number:自动将用户的输入值转化为Number类型,如果原值的转换结果是NaN会返回原值,比如<input v-model.number="age" type="number">.trim:自动过滤用户输入的首尾空格,比如<input v-model.trim="message">
修饰符可以混合使用,例子:
<div id="app">
    <input type="text" v-model.lazy="test">
    <br>
    <p>{{test}}</p>

    <input type="text" v-model.number.lazy="test2">
    <br>
    <p>{{test2}}</p>

    <input type="text" v-model.trim="test3">
    <br>
    <p>{{test3}}</p>
</div>
6 组件
组件可以扩展HTML元素,封装可重用的代码,组件系统可以用独立可复用的小组件来构建大型应用,几乎任意类型的应用界面都可以抽象为一个组件树。
注册一个全局组件语法如下:
Vue.component(tagName,options)
其中tagName为组件名,options为配置选项。注册后,按如下方式调用组件:
<tagName></tagName>
7 全局组件
全局组件就是所有实例都能使用的组件,例如:
<div id="app">
    <test-title></test-title>
</div>
Vue.component('test-title',{
    template:'<h1>Test Title</h1>'
})
new Vue({el:'#app'})
注意标签名不能大写,比如写成:
<div id="app">
    <testTitle></testTitle>
</div>
Vue.component('testTitle',{
    template:'<h1>Test Title</h1>'
})
页面不会显示标题。
8 局部组件
局部组件就是在本实例内使用的组件,比如:
<div id="app">
    <test-title></test-title>
</div>
new Vue({
    el: '#app',
    components: {
        'test-title': {
            template:'<h1>Test Title</h1>'
        }
    }
})
也可以把模板的内容分离出来成为一个变量:
var myTemplate = {
    template:'<h1>Test Title</h1>'
}
new Vue({
    el: '#app',
    components: {
        'test-title': myTemplate
    }
})
9 prop
prop是子组件来接受父组件传递过来的数据的一个自定义属性,父组件的数据需要通过props把数据传递给子组件,子组件需要显示地使用props选项声明prop:
<div id="app">
    <test-title title="Test Title"></test-title>
</div>
Vue.component('test-title',{
    props:['title'],
    template:'<h1>{{title}}</h1>'
    //template:'<h1>{{this.title}}</h1>'
})
new Vue({el: '#app'})
9.1 动态prop
类似于v-bind绑定HTML特性到一个表达式,也可以利用v-bind动态绑定props值到父组件的数据中,每当父组件的数据变化时,该变化会传递给子组件:
<div id="app">
    <input v-model="message">
    <br>
    <test-title v-bind:title="message"></test-title>
</div>
 Vue.component('test-title',{
    props:['title'],
    template:'<h1>{{title}}</h1>'
})
new Vue({
    el: '#app',
    data: {
        message:''
    }
})
首先当输入框内容发生变化时,更新父组件的message,再传递给子组件的title,最后更新<test-title>的内容。
下面是一个绑定无序列表的例子:
<div id="app">
    <ol>
        <test-item v-for="i in items" v-bind:val="i"></test-item>
    </ol>
</div>
Vue.component('test-item',{
    props:['val'],
    template:'<h1>{{val.text}}</h1>'
})
var vm = new Vue({
    el: '#app',
    data: {
        items:[
            {text:'111'},
            {text:'222'}
        ]
    }
})
注意prop是单向绑定的,当父组件属性变化时传导到子组件,但是不会反过来。
9.2 子组件回传
父组件使用props传递数据给子组件,如果子组件把数据传递回去需要使用自定义事件,可以在v-on绑定自定义事件,每个Vue实例都实现了事件接口,也就是:
- 使用
$on(eventName)监听事件 - 使用
$emit(eventName)触发事件
另外父组件可以在使用子组件的地方直接用v-on来监听子组件触发的事件,例子:
<div id="app">
    <p>总计:{{total}}</p>
    <test v-on:increment="incrementTotal"></test>
    <br><br>
    <test v-on:increment="incrementTotal"></test>
</div>
Vue.component('test',{
    template:'<button v-on:click="incrementHandler">点击增加,目前为{{counter}}</p>',
    data:function(){
        return {
            counter:0
        }
    },
    methods:{
        incrementHandler:function(){
            this.counter += 1
            this.$emit('increment')
        }
    }
})
new Vue({
    el: '#app',
    data: {
        total:0
    },
    methods:{
        incrementTotal:function(){
            this.total += 1
        }
    }
})
效果:
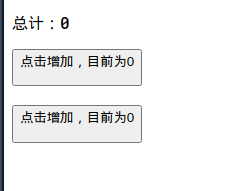
当点击任意一个按钮增加时,更新子组件内的counter,同时使用this.$emit向父组件传值,这里没有参数,如果有参数的话在后面加上即可:this.$emit("func",parm)。
父组件中引用子组件的地方需要添加v-on:func,其中v-on:func中的func需要与this.$emit("func")中的func同名,接着在v-on:func="func2"中修改func2为父组件的函数即可。简写方式为:
@func="func2"
在某个组件的根元素上监听一个原生事件可以使用.native修饰v-on,比如:
<test-title v-on:click.native="func"></test-title>
9.3 关于子组件的data
上面的例子中data不是一个对象而是一个函数,如果data直接返回一个已有对象会影响其他实例,比如修改上面的data为:
var counter = {
    counter:0
}
//...
data:function(){
    return counter
}
效果如下:
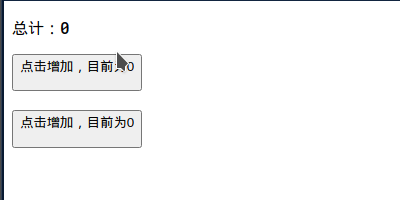
也就是子组件共享了数据,而修改为:
data:function(){
    return {
        counter:0
    }
}
效果如下:
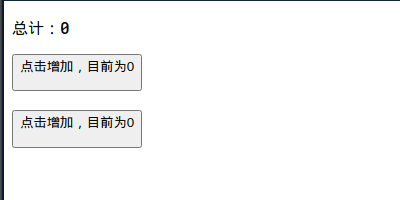
这是因为返回给每个实例一份独立的拷贝。