一、bean的名字
使用id属性 推荐使用
<bean id="stu1" class="spring02.entity.Student">
    <property name="id" value="1001" />
</bean>
使用name
<bean name="stu1" class="spring02.entity.Student">
    <property name="id" value="1001" />
</bean>
alias 给bean取别名
<alias name="stu1" alias="zhangsan" />
注意:配置一个Student的bean Student: 两个名字, id/name
id与name: id: 不能使用特殊符号, 字母+数字 推荐
name:使用特殊符号
如果一个bean没有配置id,name这个bean的名字: 以class作为name
如果一个类配置多个bean, 没有使用id,name, 名字: 以class#序号
同一个bean可以同时存在id和name
<bean id="dog" name="dog1,dog2,dog3" class="org.suke.Dog" />
<alias name="dog" alias="dog4"/>
这样dog对象就被被标识为 dog,dog1,dog2,dog3,dog4这4个标识名
二、依赖注入三种方式
1、属性setter方法注入
在<bean>标签使用<property>子标签给属性注入
要求:这个属性必须提供set方法
语法:
property标签的属性:        name:属性名       value/ref : 给属性赋值,
value: String+基本数据类型     Ref: 类类型, 是bean的id
applicationContext.xml 代码:
<bean id="stu1" class="spring02.entity.Student" name="stu">
    <!-- 调用的set方法名: set+name: setId() setId1() -->
    <property name="id" value="1001" />
    <property name="name" value="张三" />
    <property name="sex" value="男" />
    <property name="age" value="21" />
    <!-- 对象: ref -->
    <property name="address" ref="address1" />
</bean>

<!-- Address的bean -->
<bean id="address1" class="spring02.entity.Address">
    <property name="city" value="深圳" />
    <property name="cod" value="421101" />
</bean>
student实体类:
public class Student {
    private Integer id;
    private String name;
    private String sex;
    private Integer age;
    /*对象属性*/
    private Address address;
2、构造器参数注入
在<bean>标签使用<constructor-arg>子标签给属性注入
要求:这个属性必须提供对应的有参构造方法(其中必须再次创建一个无参构造方法)
语法:
constructor-arg:标签的属性:        name:属性名       value/ref : 给属性赋值,
value: String+基本数据类型     Ref: 类类型, 是bean的id
index: 参数的位置: 从0开始
type: 参数类型, 一个构造方法,有相同的数据类型的参数, 只使用type没办法确定,
(如果实体类中只有一个此类型可以使用,或者联合name一起使用)
构造方法有几个属性定义几个:constructor-arg
<!-- 通过构造方法给属性赋值 调用 一个参数的构造方法 -->
    <bean id="stu3" class="spring02.entity.Student">
        <constructor-arg name="name" value="王五" />
    </bean>

<!--实体类中的构造方法-->
public Student(String name) {
  this.name = name;
}
给一个全部参数的构造方法注入值:
<bean id="stu4" class="spring02.entity.Student">
    <constructor-arg name="name" value="赵六" />
    <constructor-arg index="0" value="1001" />
    <constructor-arg type="java.lang.String" name="sex"  value="男" />
    <constructor-arg name="age" value="22" />
    <constructor-arg name="address" ref="address1" />
</bean>
3、接口方式的注入(只在spring内部使用)
Spring 内部提供很多符合接口注入API (ApplicationContextAware )
三、spEL表达式
Spring 3.0之后,增强spring配置,提供 Spring Expression Language 语言 (spEL )
语法 #{表达式}
spring表达式 与 el 表达式的区别
#{} 获取属性, 也可以调用方法
El表达式: ${} 获取属性,不能调用对象的方法
  #{beanId.属性名}
<bean id="stu5" class="spring02.entity.Student">
    <property name="name" value="#{stu4.name.substring(1)}" />
</bean>
四、 p名称空间的使用
Spring2.5 版本之后,为了简化属性setter依赖注入,提供虚拟名称空间 p
第一步:需要映入xml配置
xmlns:p="http://www.springframework.org/schema/p"
第二步: 在bean标签中, 使用p:属性名
<!-- 使用p命名空间给属性赋值 ,本质还是使用set方法给属性赋值 p:id="1005" 等同于: <property name="id"  value="1005" /> -->
<bean id="stu6" class="spring02.entity.Student" p:id="1005"   p:name="李琦" p:address-ref="address1"></bean>
五、Bean的作用域(Scope)
Spring默认管理Bean是单例模式: 在bean使用scope属性,修改的bean的模式
<!-- 集合属性的注入
 scope="prototype": 这个bean是多例, 每次从Spring容器获取这个bean, 重新创建一个-->
<bean id="stu7" class="spring02.entity.Student" scope="prototype">
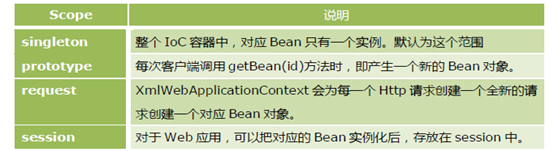
注意: Spring管理Struts2 Action对象,需要配置 prototype !
六:集合类型属性注入
主要用于 参数配置,(通过set方法)
- 数组或者List ----- <list>或者 <array>注入
- Set ---- <set> 注入
- Map --- <map> <entry> 注入
- Properties --- <props> <prop> 注入
1、数组或者List
<!-- java对象,创建set/get方法-->
//数组类型属性
private String[] arr;
//List集合
private List<Integer> list = new ArrayList<>();
<!-- applicationContext.xml -->
<bean id="stu7" class="spring02.entity.Student">
    <property name="arr">
        <!-- <array> array或者list都可以
            <value>aaa</value>
            <value>bbb</value>
            </array> -->
        <list>
            <value>aaa</value>
            <value>bbb</value>
        </list>
    </property>
<!-- List属性 -->
    <property name="list">
        <list>
            <value>1</value>
            <value>2</value>
        </list>
    </property>
</bean>
2、Set集合
<!-- java对象,创建set/get方法-->
private Set<Integer> set = new HashSet<>();
<!-- applicationContext.xml-->
<!-- Set  :去重-->
<property name="set">
    <set>
        <value>1</value>
        <value>1</value>
        <value>2</value>
    </set>
</property>
3、Map集合
<!-- java对象,创建set/get方法-->
private Map<String,String> map = new HashMap<>();
<!-- applicationContext.xml-->
<!-- Map  :key 唯一 -->
<property name="map">
    <map>
        <entry key="k1" value="v1"/>
        <entry key="k2" value="v2"/>
        <entry key="k3" value="v3"/>
        <entry key="k1" value="v3"/>
    </map>
</property>
4、Properties
<!-- java对象,创建set/get方法-->
private Properties props = new Properties();
<!-- applicationContext.xml-->
<!-- Properties : key,Value都是String -->
<property name="props">
    <props>
        <prop key="p1">v1</prop>
        <prop key="p2">v2</prop>
        <prop key="p3">v3</prop>
    </props>
</property>