微服务以单个接口为颗粒度,一个接口可能就是一个项目,如果每个项目都包含一个配置文件,一个系统可能有几十或上百个小项目组成,那配置文件也会有好多,对后续修改维护也是比较麻烦,就和前面的服务注册一样,服务注册与发现是将服务从分散到中心化,而今天的配置中心是将配置文件从分散到中心化,这样便于后续维护。本篇主要以git为例学习使用Spring Cloud Config配置中心。
一、配置中心介绍
在我们了解spring cloud config之前,我可以想想一个配置中心提供的核心功能应该有什么
- 提供服务端和客户端支持
- 集中管理各环境的配置文件
- 配置文件修改之后,可以快速的生效
- 可以进行版本管理
- 支持大的并发查询
- 支持各种语言
Spring Cloud Config可以完美的支持以上所有的需求。
Spring Cloud Config项目是一个解决分布式系统的配置管理方案。它包含了Client和Server两个部分,server提供配置文件的存储、以接口的形式将配置文件的内容提供出去,client通过接口获取数据、并依据此数据初始化自己的应用。Spring cloud使用git或svn存放配置文件,默认情况下使用git,我们先以git为例做一套示例。
二、Server 端
1.准备配置文件
为了演示spring cloud config的使用,这里在github()上创建了config-repo(https://github.com/ywcui/config-repo)仓库.然后在该仓库下创建了3个配置文件neo-config-dev.properties、neo-config-pro.properties、neo-config-test.properties,每个配置文件都设置了属性neo.hello,value分别对应i am dev,i am pro,i am test。
2.创建Spring Cloud Config Server
创建Spring Boot项目并引入Spring Cloud Config Server,具体pom.xml如下:


<?xml version="1.0" encoding="UTF-8"?>
<project xmlns="http://maven.apache.org/POM/4.0.0" xmlns:xsi="http://www.w3.org/2001/XMLSchema-instance"
    xsi:schemaLocation="http://maven.apache.org/POM/4.0.0 http://maven.apache.org/xsd/maven-4.0.0.xsd">
    <modelVersion>4.0.0</modelVersion>
    <parent>
        <groupId>org.springframework.boot</groupId>
        <artifactId>spring-boot-starter-parent</artifactId>
        <version>2.1.6.RELEASE</version>
        <relativePath/> <!-- lookup parent from repository -->
    </parent>
    <groupId>com.example</groupId>
    <artifactId>SpringCloudConfigServer</artifactId>
    <version>0.0.1-SNAPSHOT</version>
    <packaging>war</packaging>
    <name>SpringCloudConfigServer</name>
    <description>Demo project for Spring Boot</description>

    <properties>
        <java.version>1.8</java.version>
        <spring-cloud.version>Greenwich.SR2</spring-cloud.version>
    </properties>

    <dependencies>
        <dependency>
            <groupId>org.springframework.boot</groupId>
            <artifactId>spring-boot-starter-web</artifactId>
        </dependency>
        <dependency>
            <groupId>org.springframework.cloud</groupId>
            <artifactId>spring-cloud-config-server</artifactId>
        </dependency>

        <dependency>
            <groupId>org.springframework.boot</groupId>
            <artifactId>spring-boot-starter-tomcat</artifactId>
            <scope>provided</scope>
        </dependency>
        <dependency>
            <groupId>org.springframework.boot</groupId>
            <artifactId>spring-boot-starter-test</artifactId>
            <scope>test</scope>
        </dependency>
    </dependencies>

    <dependencyManagement>
        <dependencies>
            <dependency>
                <groupId>org.springframework.cloud</groupId>
                <artifactId>spring-cloud-dependencies</artifactId>
                <version>${spring-cloud.version}</version>
                <type>pom</type>
                <scope>import</scope>
            </dependency>
        </dependencies>
    </dependencyManagement>

    <build>
        <plugins>
            <plugin>
                <groupId>org.springframework.boot</groupId>
                <artifactId>spring-boot-maven-plugin</artifactId>
            </plugin>
        </plugins>
    </build>

</project>
3.设置配置文件
在配置文件中做如下配置:
server.port=8001
spring.application.name=spring-cloud-config-server
spring.cloud.config.server.git.uri=https://github.com/ywcui/config-repo
spring.cloud.config.server.git.search-paths=
spring.cloud.config.server.git.username=用户名
spring.cloud.config.server.git.password=密码
Spring Cloud Config也提供本地存储配置的方式。我们只需要设置属性spring.profiles.active=native,Config Server会默认从应用的src/main/resource目录下检索配置文件。也可以通过spring.cloud.config.server.native.searchLocations=file:E:/properties/属性来指定配置文件的位置。虽然Spring Cloud Config提供了这样的功能,但是为了支持更好的管理内容和版本控制的功能,还是推荐使用git的方式。
4.启动类设置
只需在启动类中添加@EnableConfigServer即可。
5.测试
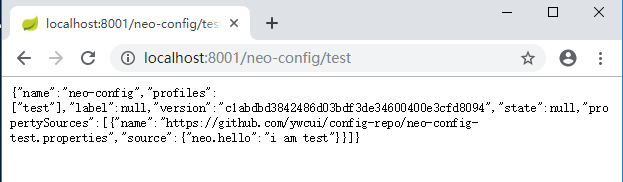
首先我们先要测试server端是否可以读取到github上面的配置信息,直接访问:http://localhost:8001/neo-config/test
返回信息如下:
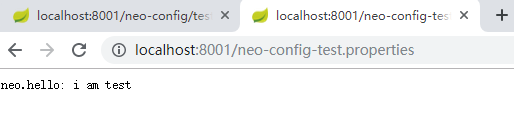
如果直接查看配置文件中的配置信息可访问:http://localhost:8001/neo-config-test.properties,返回:neo.hello: i am test
仓库中的配置文件会被转换成web接口,访问可以参照以下的规则:
- /{application}/{profile}[/{label}]
- /{application}-{profile}.yml
- /{label}/{application}-{profile}.yml
- /{application}-{profile}.properties
- /{label}/{application}-{profile}.properties
三、Client端
1.创建创建Spring Cloud Config Client
创建Spring Boot项目并引入Spring Cloud Config Client,具体pom.xml如下:
<?xml version="1.0" encoding="UTF-8"?>
<project xmlns="http://maven.apache.org/POM/4.0.0" xmlns:xsi="http://www.w3.org/2001/XMLSchema-instance"
    xsi:schemaLocation="http://maven.apache.org/POM/4.0.0 http://maven.apache.org/xsd/maven-4.0.0.xsd">
    <modelVersion>4.0.0</modelVersion>
    <parent>
        <groupId>org.springframework.boot</groupId>
        <artifactId>spring-boot-starter-parent</artifactId>
        <version>2.1.6.RELEASE</version>
        <relativePath/> <!-- lookup parent from repository -->
    </parent>
    <groupId>com.example</groupId>
    <artifactId>SpringCloudConfigClient</artifactId>
    <version>0.0.1-SNAPSHOT</version>
    <packaging>war</packaging>
    <name>SpringCloudConfigClient</name>
    <description>Demo project for Spring Boot</description>

    <properties>
        <java.version>1.8</java.version>
        <spring-cloud.version>Greenwich.SR2</spring-cloud.version>
    </properties>

    <dependencies>
        <dependency>
            <groupId>org.springframework.boot</groupId>
            <artifactId>spring-boot-starter-web</artifactId>
        </dependency>
        <dependency>
            <groupId>org.springframework.cloud</groupId>
            <artifactId>spring-cloud-starter-config</artifactId>
        </dependency>

        <dependency>
            <groupId>org.springframework.boot</groupId>
            <artifactId>spring-boot-starter-tomcat</artifactId>
            <scope>provided</scope>
        </dependency>
        <dependency>
            <groupId>org.springframework.boot</groupId>
            <artifactId>spring-boot-starter-test</artifactId>
            <scope>test</scope>
        </dependency>
    </dependencies>

    <dependencyManagement>
        <dependencies>
            <dependency>
                <groupId>org.springframework.cloud</groupId>
                <artifactId>spring-cloud-dependencies</artifactId>
                <version>${spring-cloud.version}</version>
                <type>pom</type>
                <scope>import</scope>
            </dependency>
        </dependencies>
    </dependencyManagement>

    <build>
        <plugins>
            <plugin>
                <groupId>org.springframework.boot</groupId>
                <artifactId>spring-boot-maven-plugin</artifactId>
            </plugin>
        </plugins>
    </build>

</project>
2.设置配置文件
准备application.properties、bootstrap.properties两个配置文件
application.properties:
spring.application.name=spring-cloud-config-client
server.port=8002
bootstrap.properties:
spring.cloud.config.name=neo-config
spring.cloud.config.profile=test
spring.cloud.config.uri=http://localhost:8001/
spring.cloud.config.label=master
spring.application.name:对应{application}部分
spring.cloud.config.profile:对应{profile}部分
spring.cloud.config.label:对应git的分支。如果配置中心使用的是本地存储,则该参数无用
spring.cloud.config.uri:配置中心的具体地址
spring.cloud.config.discovery.service-id:指定配置中心的service-id,便于扩展为高可用配置集群。
上面这些与spring-cloud相关的属性必须配置在bootstrap.properties中,config部分内容才能被正确加载。因为config的相关配置会先于application.properties,而bootstrap.properties的加载也是先于application.properties。
3.创建HelloController
在HelloController中使用@Value注入属性neo.hello。
package com.example.demo;

import org.springframework.beans.factory.annotation.Value;
import org.springframework.web.bind.annotation.RequestMapping;
import org.springframework.web.bind.annotation.RestController;

@RestController
public class HelloController {
    @Value("${neo.hello}")
    private String hello;

    @RequestMapping("/hello")
    public String from() {
        return this.hello;
    }
}
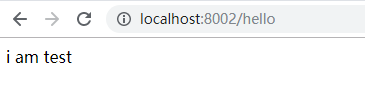
4.测试
在浏览器中输入http://localhost:8002/hello,则显示下图所示。
参考:http://www.ityouknow.com/springcloud/2017/05/22/springcloud-config-git.html